
In the era of smartphones, headphones have become an essential accessory for many individuals. Whether you’re listening to your favorite music, watching videos, or engaging in phone calls, having optimal audio quality is crucial for an immersive experience. With the release of iOS 14, Apple has introduced a new feature that allows users to check the headphone audio level in real time.
This feature is particularly useful as it helps you keep track of the volume levels and protect your hearing. In this article, we will explore the steps to check the headphone audio level in real time on iOS 14 devices. Whether you are using wired headphones or wireless AirPods, understanding how to monitor and control your audio levels can have a significant impact on your overall listening experience. Let’s dive into the details and ensure you enjoy your music and audio content at the perfect volume level.
Inside This Article
- Accessing the Control Center
- Adding the Sound Check Option
- Enabling the Headphone Audio Level
- Checking the Headphone Audio Level in Real Time
- Conclusion
- FAQs
Accessing the Control Center
Accessing the Control Center on your iOS device is the first step in checking the headphone audio level in real time. The Control Center is a convenient feature that allows you to quickly access various settings and controls with just a swipe.
To access the Control Center, simply swipe down from the top-right corner of the screen (on iPhone X and later models) or swipe up from the bottom of the screen (on older iPhone models or iPad). This will bring up the Control Center interface, which contains a range of options and shortcuts.
Once you’ve accessed the Control Center, you’ll need to make sure that the Sound Check option is added to your list of available controls. This will allow you to enable the headphone audio level feature and start monitoring the audio output from your headphones.
Let’s move on to the next step and learn how to add the Sound Check option to your Control Center.
Adding the Sound Check Option
One of the convenient features of iOS 14 is the ability to add the Sound Check option to your device. This option allows you to automatically adjust the audio levels of your headphones to ensure a consistent and comfortable listening experience.
To add the Sound Check option to your iOS device, follow these simple steps:
- Open the Settings app on your iPhone or iPad running iOS 14.
- Scroll down and tap on “Music” to access the music settings.
- Under the Playback section, you will find the “Sound Check” option. Tap on it to enable it.
Once you have enabled the Sound Check option, your device will automatically analyze the audio levels of your music and adjust them accordingly. This ensures that the volume of your headphones remains at a consistent level, regardless of the track or album you are listening to.
With the Sound Check option enabled, you can now enjoy your favorite music without having to constantly adjust the volume. Whether you’re listening to a quiet ballad or a bass-heavy track, the audio levels will be optimized for a comfortable listening experience.
Adding the Sound Check option to your iOS device is a simple and effective way to ensure that your headphone audio levels are always at the optimal level. By enabling this feature, you can enjoy your favorite music without any unwanted volume fluctuations.
Enabling the Headphone Audio Level
In iOS 14, Apple has introduced a new feature that allows you to enable the headphone audio level for real-time monitoring. This feature is especially useful for those who are concerned about their hearing health and want to ensure they are not listening to music or other audio content at a volume that could damage their ears.
To enable the headphone audio level feature, follow these steps:
- Open the Settings app on your iOS device.
- Scroll down and tap on “Sound & Haptics” or “Sounds & Haptics,” depending on your device.
- In the “Audio/Visual” section, you will find an option called “Headphone Safety.”
- Tap on “Headphone Safety” to access the settings for the headphone audio level.
Once you are in the headphone audio level settings, you have the option to customize the audio level notifications and set the maximum headphone volume.
By default, iOS sets the maximum volume level to limit the potential for hearing damage. However, you can adjust this level based on your personal preference. You can also choose to receive notifications if you exceed the recommended audio level for a specified duration.
If you want to make changes to the maximum headphone volume, simply drag the slider to your preferred level. Keep in mind that making the volume too high can still pose a risk to your hearing health, so it is recommended to set it at a moderate level.
Additionally, you can enable the “Reduce Loud Sounds” option, which helps to automatically adjust and balance the audio output to prevent sudden loud noises from causing discomfort or harm.
Once you have set your preferences, you can exit the settings and start using your headphones. The headphone audio level feature will continuously monitor the volume level and provide alerts or notifications as per your settings if it detects that the volume is too high.
Enabling the headphone audio level feature in iOS 14 is a simple yet effective way to protect your hearing and ensure you are listening to audio content at a safe volume.
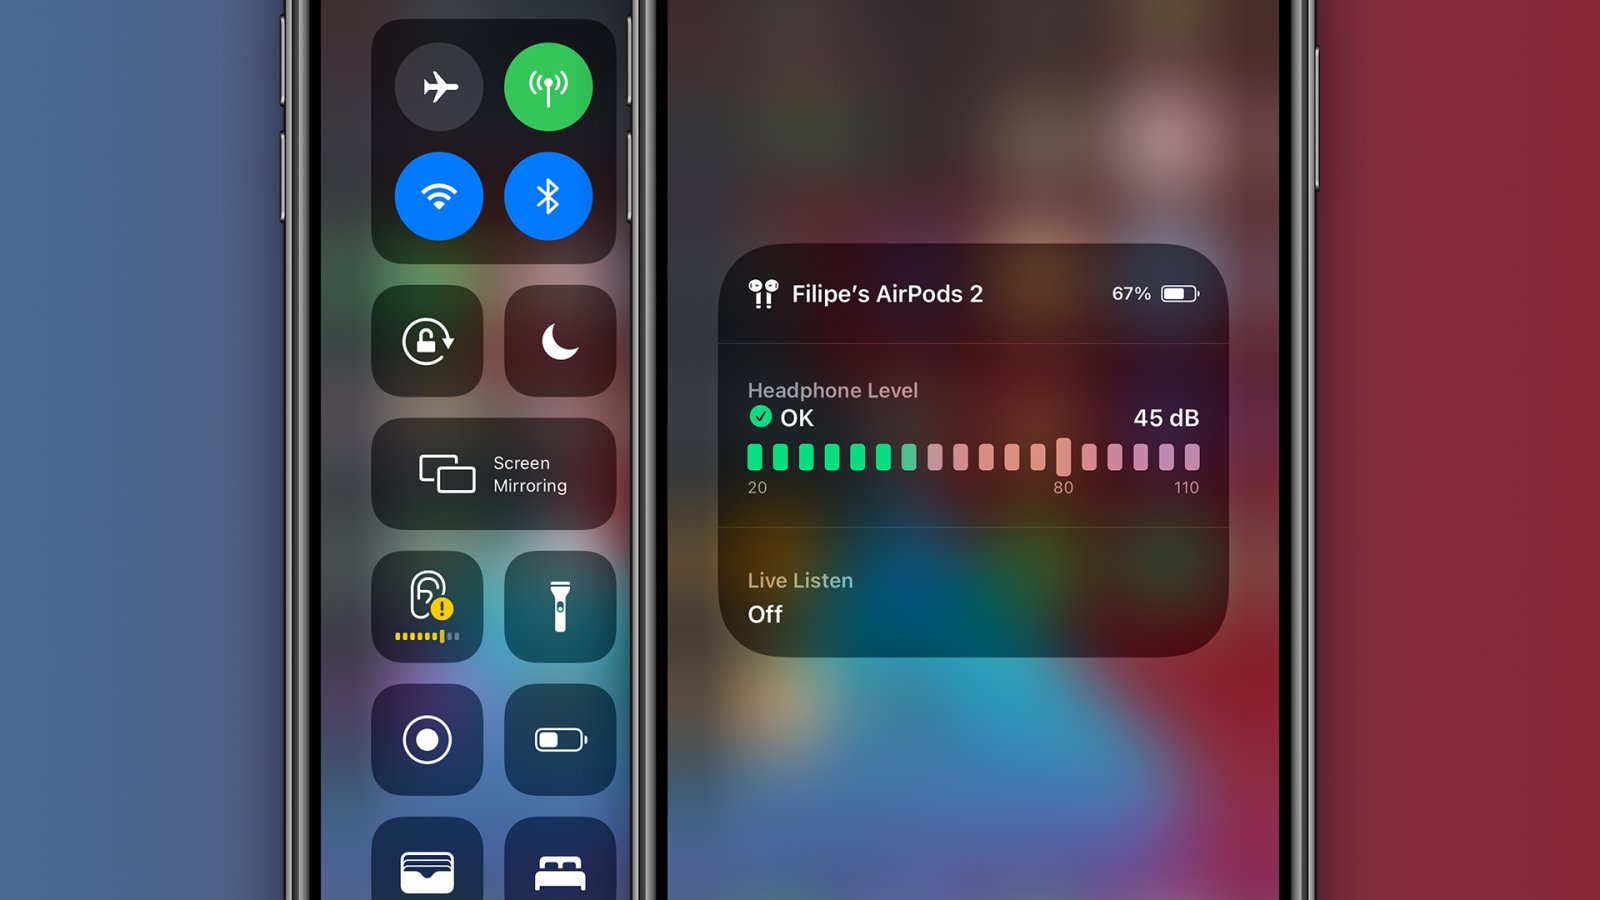
Checking the Headphone Audio Level in Real Time
With iOS 14, Apple has introduced a feature that allows users to check the headphone audio level in real time. This feature is especially useful for those who want to protect their hearing and ensure that they are not listening to audio at dangerously high volumes. In this section, we will walk you through the steps to check the headphone audio level in real time on your iOS device.
To check the headphone audio level in real time, follow these simple steps:
1. Connect your headphones to your iOS device.
2. Open the Control Center by swiping down from the top-right corner of the screen on iPhone X and later models, or by swiping up from the bottom of the screen on iPhone 8 and earlier models.
3. Look for the volume bar in the Control Center. You will notice that there is a new headphone icon next to the volume slider.
4. Tap on the headphone icon to expand the audio level controls.
5. You will now see a visual representation of the headphone audio level in real time. The volume slider will be accompanied by a yellow indicator that moves up and down based on the current audio level.
6. Use this visual indicator to monitor and adjust the audio level to a safe and comfortable level. If the indicator consistently reaches the high end of the scale, it’s a sign that you may be listening to audio at excessive volumes and should consider lowering the volume.
7. Once you have adjusted the audio level to your desired setting, you can tap anywhere outside the Control Center to close it and return to your normal usage.
By checking the headphone audio level in real time, you can ensure that you are listening to audio at a safe level and protect your hearing from potential damage. This feature is a valuable addition to iOS 14 and can greatly contribute to maintaining your auditory health.
Now that you know how to check the headphone audio level in real time on iOS 14, you can enjoy your favorite music, podcasts, and other audio content without worrying about potential harm to your ears.
In conclusion, being able to check headphone audio level in real time is a valuable feature for iOS users, particularly in the context of iOS 14. This functionality allows users to ensure they are protecting their hearing by monitoring the volume level of their headphones. With the advances in technology, iOS devices have introduced this feature to promote safe listening practices and prevent potential hearing damage.
By providing real-time feedback on audio levels, iOS 14 empowers users to make informed decisions regarding their listening experience. Whether it’s adjusting the volume during a workout, watching a movie, or enjoying music, users can now have greater control over their audio settings. This contributes to a more personalized and comfortable listening experience while prioritizing the well-being of their hearing health.
Overall, the ability to check headphone audio levels in real time demonstrates Apple’s commitment to user safety and satisfaction. With this feature, iOS 14 users can enjoy their favorite audio content while keeping their hearing protected, making it an essential addition to the iOS ecosystem.
FAQs
1. How can I check the headphone audio level in real time on iOS 14?
To check the headphone audio level in real time on iOS 14, follow these steps:
- Connect your headphones to your iOS 14 device.
- Play any audio or video on your device to activate the sound.
- Swipe down from the top right corner of the screen (or swipe up on older iPhone models) to open the Control Center.
- Look for the volume slider.
- Tap on the small icon located next to the volume slider.
- A new window will open, displaying the audio level in real time.
2. Can I adjust the headphone audio level directly from the Control Center?
Unfortunately, adjusting the headphone audio level directly from the Control Center is not possible on iOS 14. However, you can still access the audio level information by following the steps mentioned in the previous question.
3. Is there a specific app available to check headphone audio levels?
No, there is no specific app available on iOS 14 to check headphone audio levels. The real-time audio level monitoring feature can be accessed directly from the Control Center.
4. Why is it important to check headphone audio levels?
Checking headphone audio levels is important for several reasons. It helps protect your hearing by ensuring that the volume is not excessively high, which can lead to long-term damage. Additionally, it allows you to adjust the audio level based on your preference and the specific audio content you are consuming.
5. Can I adjust the headphone audio level manually?
Yes, you can manually adjust the headphone audio level on your iOS 14 device. Simply use the volume buttons on the side of your device or go to Settings > Sounds & Haptics and adjust the volume slider to your desired level.