
Are you planning to transfer all your data and settings from your old iPhone to a new one? If so, you might be wondering how long this process will take. The time it takes to transfer an iPhone to another iPhone can vary depending on a few factors. This includes the amount of data you have on your old device, the speed of your internet connection, and the method you choose to transfer your data. In this article, we will explore different methods of transferring data from one iPhone to another and give you an idea of the time it may take. Whether you’re upgrading to a new iPhone or simply want to transfer your data to another device, read on to find out more about how long it may take and which method works best for you.
Inside This Article
- Setting up the Transfer Process
- Transferring Data using Quick Start
- Transferring Data using iCloud
- Transferring Data using iTunes
- Troubleshooting and Common Issues
- Tips for Faster Data Transfer
- Conclusion
- FAQs
Setting up the Transfer Process
When you get a new iPhone and want to transfer all your data from your old iPhone to the new one, the first step is to set up the transfer process. This will ensure that your apps, photos, contacts, and other important data are seamlessly transferred to your new device. Here are the steps to follow:
1. Back Up Your Old iPhone: Before you start the transfer process, it’s crucial to back up all your data on your old iPhone. You can do this by connecting your iPhone to your computer and using iTunes to create a backup or by enabling iCloud Backup in your iPhone’s settings. This backup will serve as a safety net in case anything goes wrong during the transfer.
2. Make Sure Both iPhones are Updated: To ensure a smooth transfer, make sure that both your old iPhone and your new iPhone are running the latest version of iOS. You can check for updates by going to Settings > General > Software Update on both devices.
3. Connect Both iPhones to Wi-Fi: To transfer data between your iPhones, they both need to be connected to the same Wi-Fi network. Make sure that both devices have a stable internet connection before proceeding with the transfer.
4. Keep Both iPhones Close to Each Other: For the transfer process to work effectively, keep both iPhones close to each other during the entire process. This will ensure a strong and stable connection between the devices.
5. Choose the Transfer Method: There are different methods you can use to transfer data from your old iPhone to your new iPhone. The most common methods include using Quick Start, iCloud, or iTunes. Choose the method that suits your needs and preferences.
By following these steps and setting up the transfer process properly, you’ll be well on your way to transferring your data from your old iPhone to your new one seamlessly.
Transferring Data using Quick Start
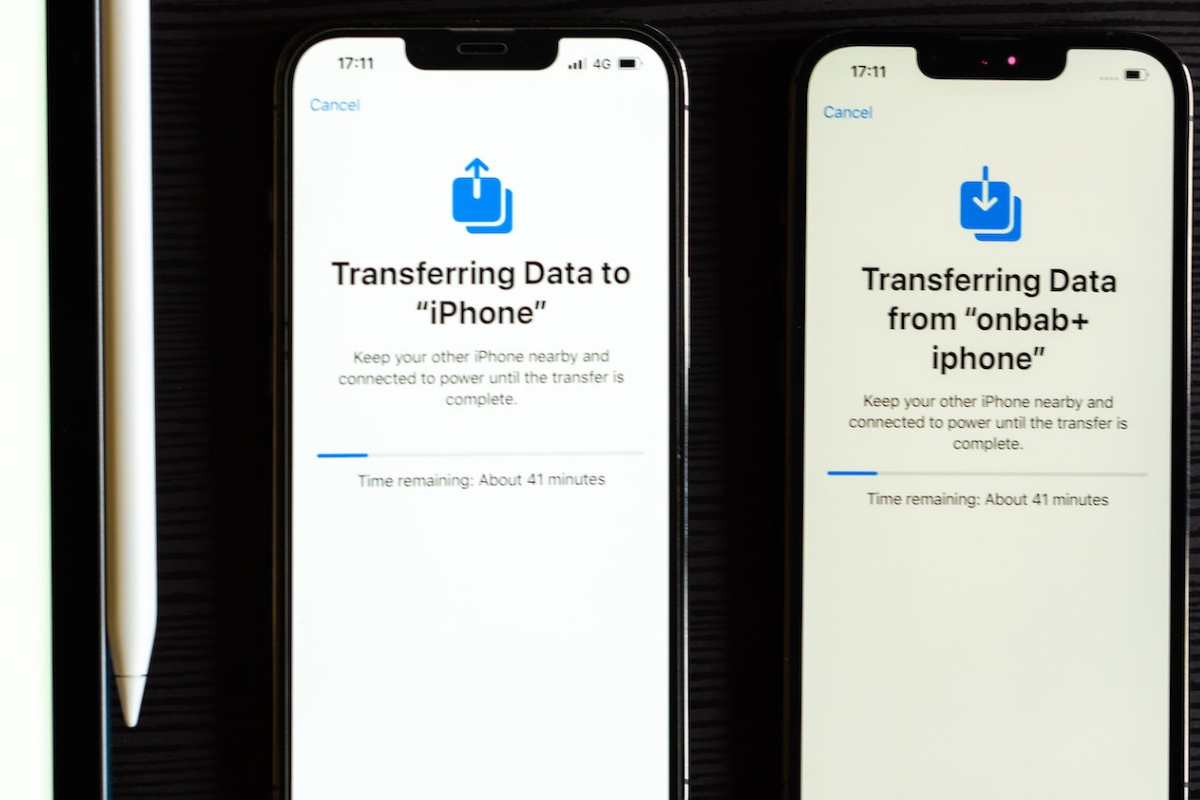
When setting up your new iPhone, one of the fastest and easiest ways to transfer data from your old iPhone is to use the Quick Start feature. Quick Start utilizes a combination of Wi-Fi and Bluetooth to establish a secure connection between the two devices, allowing for a seamless data transfer process. Here’s how to do it:
1. Place both the old and new iPhones near each other. Make sure they are both connected to Wi-Fi and have Bluetooth enabled.
2. On your new iPhone, you’ll see a “Set Up New iPhone” prompt. Tap on “Continue” and then select “Transfer from iPhone” when prompted.
3. A dynamic animation will appear on your new iPhone, instructing you to hold your old iPhone near the new one. Align the animation in the camera frame of the old iPhone.
4. Once the animation is correctly aligned, a message will appear on both devices confirming the connection. You’ll also be prompted to enter your old iPhone’s passcode on the new iPhone.
5. Follow the on-screen instructions to complete the setup process. This will include options to transfer your Apple ID, settings, and data such as photos, videos, messages, and apps.
6. The data transfer will begin, and the progress will be displayed on both devices. The time it takes will vary depending on the size of the data being transferred and the speed of your Wi-Fi connection.
7. Once the transfer is complete, your new iPhone will restart and display a “Transfer Complete” message. You can now continue setting up your new iPhone or start using it right away.
Using the Quick Start feature ensures that you’ll have all your essential data transferred to your new iPhone quickly and efficiently. It eliminates the need for manual data transfer and reduces the risk of errors or omissions during the process. Keep in mind that some data, such as Apple Pay and Touch ID settings, will require you to re-enter information or set them up again manually.
Next, let’s explore another method of transferring data from your old iPhone to the new one using iCloud.
Transferring Data using iCloud
One of the easiest and most convenient ways to transfer data from one iPhone to another is by using iCloud. iCloud is Apple’s cloud storage service that allows you to store your data securely and access it across multiple devices.
To transfer data using iCloud, you will need to have a stable internet connection and enough iCloud storage space to accommodate the data you want to transfer.
Here are the steps to transfer data using iCloud:
- Make sure both iPhones are connected to Wi-Fi and plugged into a power source.
- On your old iPhone, go to Settings and tap on your name at the top of the screen.
- Select “iCloud” and then choose “iCloud Backup.”
- Tap on “Back Up Now” to create a backup of your data on iCloud.
- Once the backup is complete, turn on your new iPhone and go through the setup process until you reach the “App & Data” screen.
- Choose the option “Restore from iCloud Backup.”
- Sign in to your Apple ID and select the backup you just created.
- Wait for the restore process to complete. This may take some time depending on the size of your backup and the speed of your internet connection.
- Once the restore is finished, your new iPhone will have all the data from your old iPhone, including your apps, settings, photos, messages, and more.
It’s important to note that transferring data using iCloud requires both iPhones to have a stable internet connection. Additionally, the speed of the transfer may vary depending on the size of the backup and the speed of your internet connection.
If you have a large amount of data to transfer, such as a large photo library or a lot of videos, it may take longer to complete the transfer using iCloud. In such cases, it’s recommended to use a Wi-Fi connection for faster transfer speeds.
Furthermore, make sure you have enough iCloud storage space to accommodate the data you want to transfer. If you don’t have enough space, you may need to purchase additional iCloud storage or free up space by deleting unnecessary files or data.
Overall, transferring data using iCloud is a convenient and efficient method, especially for users who are already familiar with using iCloud for backup and storage. It eliminates the need for cables or external devices and allows you to transfer your data seamlessly from one iPhone to another.
Transferring Data using iTunes
If you prefer to transfer data from one iPhone to another using your computer, iTunes is the way to go. iTunes allows you to create a backup of your old iPhone and then restore that backup onto your new iPhone. This method ensures that all your apps, settings, and data are transferred seamlessly.
Here’s a step-by-step guide on how to transfer data using iTunes:
- Update iTunes: Make sure you have the latest version of iTunes installed on your computer. You can download it from the Apple website or update it through the App Store.
- Connect your old iPhone: Use a Lightning to USB cable to connect your old iPhone to your computer and open iTunes.
- Select your device: Once your iPhone is connected, click on the device icon that appears in the upper-left corner of the iTunes window.
- Create a backup: In the Summary tab, under the Backups section, click on “Back Up Now” to create a backup of your old iPhone’s data on your computer. Wait for the backup process to complete; this may take some time depending on the amount of data you have.
- Disconnect your old iPhone: Once the backup is complete, disconnect your old iPhone from your computer.
- Connect your new iPhone: Use the same Lightning to USB cable to connect your new iPhone to your computer.
- Restore the backup: In the iTunes window, click on the device icon again and go to the Summary tab. Under the Backups section, click on “Restore Backup…” and select the backup you created earlier. Click “Restore” to begin the data transfer process.
- Wait for the transfer: iTunes will start transferring the backup data to your new iPhone. Ensure that your new iPhone stays connected to your computer until the transfer is complete.
- Set up your new iPhone: Once the transfer is finished, your new iPhone will restart and prompt you to follow the on-screen instructions to set it up. Make sure to select the option to restore from iTunes backup and choose the backup you just transferred.
By following these steps, you can easily transfer all the data from your old iPhone to your new iPhone using iTunes. It’s important to note that the time it takes to transfer the data may vary depending on the size of the backup and the speed of your computer.
Now that you know how to transfer data using iTunes, you can confidently make the switch to a new iPhone without worrying about losing any important information. Happy transferring!
Troubleshooting and Common Issues
While transferring data from one iPhone to another is usually a smooth process, there are instances where you may encounter some issues. In this section, we will explore common problems that users face during the transfer process and provide troubleshooting steps to resolve them.
1. Connection Issues: One of the most common issues during the transfer process is a poor or unstable connection between the two iPhones. Ensure that both devices are connected to a stable Wi-Fi network or have a strong cellular signal. If you are using Quick Start, make sure both iPhones are close to each other and Wi-Fi and Bluetooth are turned on.
2. Insufficient Storage Space: If you are transferring a large amount of data, such as photos, videos, or apps, make sure that there is enough storage space available on the target iPhone. You can check the available storage by going to Settings > General > iPhone Storage. If storage is low, consider deleting unnecessary files or apps before initiating the transfer.
3. Incompatible iOS Versions: Ensure that both iPhones have compatible iOS versions. If one iPhone is running an older iOS version than the other, you may encounter compatibility issues during the transfer process. It is recommended to update both devices to the latest iOS version before starting the transfer.
4. App-specific Issues: Certain apps may have their own specific requirements or settings that can affect the data transfer process. For example, some apps require you to log in again after the transfer, while others may need additional permissions to access certain data. Make sure to read the app’s documentation or contact the app developer for any specific instructions or troubleshooting steps.
5. Incomplete Data Transfer: Sometimes, the transfer process may not complete successfully, leading to incomplete data transfer. If this happens, try restarting both iPhones and initiating the transfer again. Additionally, ensure that both devices have sufficient battery level or are connected to a power source during the transfer to prevent any interruptions.
6. Backup and Restore Issues: If you are transferring data using iCloud or iTunes, ensure that both iPhones have a recent backup available. If the backup is incomplete or corrupt, it may cause issues during the transfer process. You can check the backup status and initiate a backup by going to Settings > [Your Name] > iCloud > iCloud Backup or by connecting the iPhone to a computer and using iTunes.
7. Other Common Issues: Some other common issues during the transfer process include slow data transfer speeds, interrupted transfers, or errors and prompts that prevent the process from completing. In such cases, try restarting both iPhones, updating their software, and following the recommended troubleshooting steps provided by Apple support.
Remember, if you encounter any issues that you are unable to resolve, it is always a good idea to reach out to Apple support or visit an Apple Store for further assistance. They have trained professionals who can guide you through the troubleshooting process and ensure a successful transfer of data between your iPhones.
Tips for Faster Data Transfer
When it comes to transferring data from one iPhone to another, it’s important to ensure that the process is as fast and efficient as possible. To help you achieve a seamless data transfer, here are some tips to make the process faster:
1. Close Unnecessary Apps: Before initiating the transfer, make sure to close any unnecessary apps running in the background. This will free up system resources and allow the data transfer to proceed more quickly.
2. Use a High-Speed Internet Connection: To expedite the transfer process, it’s essential to have a stable and high-speed internet connection. Connect to a Wi-Fi network that offers fast speeds to ensure a smooth and speedy data transfer.
3. Update both iPhones to the Latest Software: Keeping both iPhones up to date with the latest software versions can help optimize the data transfer process. It ensures compatibility between the devices and minimizes any potential issues that could slow down the transfer.
4. Disable Background App Refresh: Disabling the “Background App Refresh” feature on both iPhones can help allocate more resources to the data transfer. This can be done by going to “Settings,” selecting “General,” and then “Background App Refresh.”
5. Remove Unnecessary Data: Before transferring data, take the time to declutter your iPhone by deleting any unnecessary photos, videos, or apps. This will reduce the overall data size, resulting in a faster transfer.
6. Use USB 3.0 or Thunderbolt Cable: If you’re transferring data using a cable, opt for a USB 3.0 or Thunderbolt cable. These cables offer faster data transfer speeds compared to older generations of cables.
7. Disable Location Services and Push Notifications: Temporarily disabling location services and push notifications on both iPhones can help speed up the data transfer process. Go to “Settings” and navigate to the respective options to disable them temporarily.
8. Restart Both iPhones: Sometimes, a simple restart can help improve the overall performance and speed up the data transfer. Restart both iPhones before initiating the transfer to refresh their systems.
9. Use Third-Party Transfer Apps: There are several third-party apps available that specialize in transferring data between iPhones. These apps often offer faster transfer speeds and additional features that can streamline the process.
10. Keep Both iPhones Close Together: During the transfer process, ensure that both iPhones are kept close together to maintain a strong and stable connection. This will help prevent any interruptions that could slow down the transfer.
By following these tips, you can significantly reduce the time it takes to transfer data from one iPhone to another. Enjoy a seamless and quick transfer process to ensure that your new iPhone is up and running with all your essential data in no time.
Conclusion
In conclusion, transferring data from one iPhone to another can be a straightforward and efficient process. Whether you prefer to use iCloud, iTunes, or third-party apps, the speed and success of the transfer will depend on several factors, including the size of the data, the quality of your internet connection, and the method you choose.
With iCloud, you can transfer data wirelessly and seamlessly, making it a convenient option for most users. However, if you have a large amount of data or a slow internet connection, using iTunes and a lightning cable may be a quicker approach. Finally, third-party apps like iMazing provide additional flexibility and advanced features for data transfer.
Remember to always back up your data before initiating any transfer and follow the instructions carefully to avoid any potential data loss. By taking the time to properly set up your new iPhone and transfer your data, you can ensure a smooth transition and continue enjoying a seamless mobile experience.
FAQs
1. How long does it take to transfer data from one iPhone to another?
The time it takes to transfer data from one iPhone to another can vary depending on several factors. Generally, the process can take anywhere between a few minutes to several hours. The duration of the transfer depends on the size of the data being transferred, the speed of the internet connection, and the efficiency of the transfer method used, such as using iCloud or iTunes.
2. Which method is faster for transferring data between iPhones: iCloud or iTunes?
Both iCloud and iTunes can be used to transfer data between iPhones, but the speed of the transfer can vary. In general, iCloud tends to be faster when transferring smaller files such as contacts, photos, and app data. On the other hand, iTunes can be faster for transferring large files like videos and music. It is recommended to choose the method that suits your specific needs and the size of the data you are transferring.
3. Can I speed up the data transfer process between iPhones?
There are a few steps you can take to speed up the data transfer process between iPhones. Firstly, ensure a stable and high-speed internet connection. You can connect both iPhones to a Wi-Fi network for faster transfer speeds. Additionally, closing any unnecessary apps or processes on both iPhones can improve the speed of the transfer. Lastly, make sure that both iPhones have sufficient battery life or are connected to a power source to prevent any interruptions during the transfer.
4. Can I continue using my iPhone while data is being transferred?
While data is being transferred from one iPhone to another, it is generally recommended to avoid using the iPhone to ensure a smooth transfer process. Using the iPhone during the transfer can cause interruptions and may prolong the transfer duration. It is advisable to let the transfer process complete before actively using the iPhone again.
5. What should I do if the data transfer process gets stuck or takes too long?
If the data transfer process gets stuck or takes longer than expected, there are a few steps you can try to resolve the issue. Firstly, check the internet connection on both iPhones and ensure it is stable. If using iCloud, verify that you have enough available storage space. Additionally, you can try restarting both iPhones and restarting the transfer process. If the issue persists, it is recommended to contact Apple Support for further assistance.