
Are you the proud owner of a brand new iPhone? Congratulations! Getting a new iPhone is an exciting experience as it opens up a world of possibilities and features. However, setting up a new iPhone can be a bit overwhelming, especially if it’s your first time. But don’t worry, we’re here to help you navigate through the process and make it as smooth as possible.
In this comprehensive guide, we’ll walk you through the step-by-step process of setting up your new iPhone. From unboxing it to configuring the initial settings, installing apps, transferring data, and customizing your device, we’ll cover everything you need to know to get your new iPhone up and running in no time. So, grab your new iPhone and let’s dive in to discover how to set it up seamlessly.
Inside This Article
- Step 1: Powering on your iPhone
- Step 2: Setting up Wi-Fi connection
- Step 3: Activating your iPhone
- Step 4: Creating or signing in to your Apple ID
- Step 5: Restoring from iCloud backup
- Step 6: Restoring from iTunes backup
- Step 7: Setting up Face ID or Touch ID
- Step 8: Setting up Passcode and Security
- Step 9: Customizing your iPhone’s settings
- Step 10: Transferring data from your old iPhone
- Step 11: Installing essential apps
- Step 12: Syncing with iTunes or Finder (for macOS Catalina and later)
- Step 13: Setting up Apple Pay
- Step 14: Configuring iCloud settings
- Step 15: Enabling Find My iPhone feature
- Step 16: Managing App Store downloads and updates
- Step 1: Powering on your iPhone
- Step 2: Setting up Wi-Fi connection
- Step 3: Activating your iPhone
- Step 4: Creating or signing in to your Apple ID
- Step 5: Restoring from iCloud backup
- Step 6: Restoring from iTunes backup
- Step 7: Setting up Face ID or Touch ID
- Step 8: Setting up Passcode and Security
- Step 9: Customizing your iPhone’s settings
- Step 10: Transferring data from your old iPhone
- Step 11: Installing essential apps
- Step 12: Syncing with iTunes or Finder (for macOS Catalina and later)
- Step 13: Setting up Apple Pay
- Step 14: Configuring iCloud settings
- Step 15: Enabling Find My iPhone feature
- Getting Started with your New iPhone
- Step 1: Powering on your iPhone
- Step 2: Setting up Wi-Fi connection
- Step 3: Activating your iPhone
- Step 4: Creating or signing in to your Apple ID
- Step 5: Restoring from iCloud backup
- Step 6: Restoring from iTunes backup
- Step 7: Setting up Face ID or Touch ID
- Step 8: Setting up Passcode and Security
- Step 9: Customizing your iPhone’s settings
- Step 10: Transferring data from your old iPhone
- Step 11: Installing essential apps
- Step 12: Syncing with iTunes or Finder (for macOS Catalina and later)
- Step 13: Setting up Apple Pay
- Step 14: Configuring iCloud settings
- Step 15: Enabling Find My iPhone feature
- Step 16: Managing App Store downloads and updates
- Conclusion
- FAQs
Getting Started with your New iPhone:
Congratulations on your new iPhone! Whether you’re upgrading from an older model or joining the Apple family for the first time, setting up your new device is an exciting experience. In this guide, we will walk you through the essential steps to get your iPhone up and running smoothly.
Step 1: Powering on your iPhone
The first step is to power on your iPhone. Locate the power button, usually located on the right-hand side or the top of the device, and press and hold it until the Apple logo appears on the screen. Once the logo appears, your iPhone is starting up.
Step 2: Setting up Wi-Fi connection
After your iPhone boots up, you will be prompted to connect to a Wi-Fi network. Select your preferred network from the list and enter the password if required. Having a stable internet connection is crucial for the next steps.
Step 3: Activating your iPhone
Follow the on-screen instructions to activate your iPhone. This usually involves selecting your country or region, agreeing to the terms and conditions, and verifying your SIM card if applicable. If your iPhone is carrier locked, you may need to insert a compatible SIM card to complete the activation process.
Step 4: Creating or signing in to your Apple ID
Your Apple ID is the key to accessing various Apple services like the App Store, iCloud, and more. If you already have an Apple ID, choose the option to sign in. If you don’t have one, you can create a new Apple ID right from your iPhone. Just follow the prompts to enter your details and set up a secure password.
Step 5: Restoring from iCloud backup
If you were using an older iPhone that was backed up to iCloud, you have the option to restore your data during the setup process. Choose the “Restore from iCloud Backup” option and sign in to your Apple ID to access your backups. Select the appropriate backup file and wait for the restore process to complete.
Step 6: Restoring from iTunes backup
If you have an iTunes backup from a previous iPhone, you can choose the “Restore from iTunes Backup” option instead. Connect your new iPhone to your computer and open iTunes. Select your device and choose the backup you want to restore from.
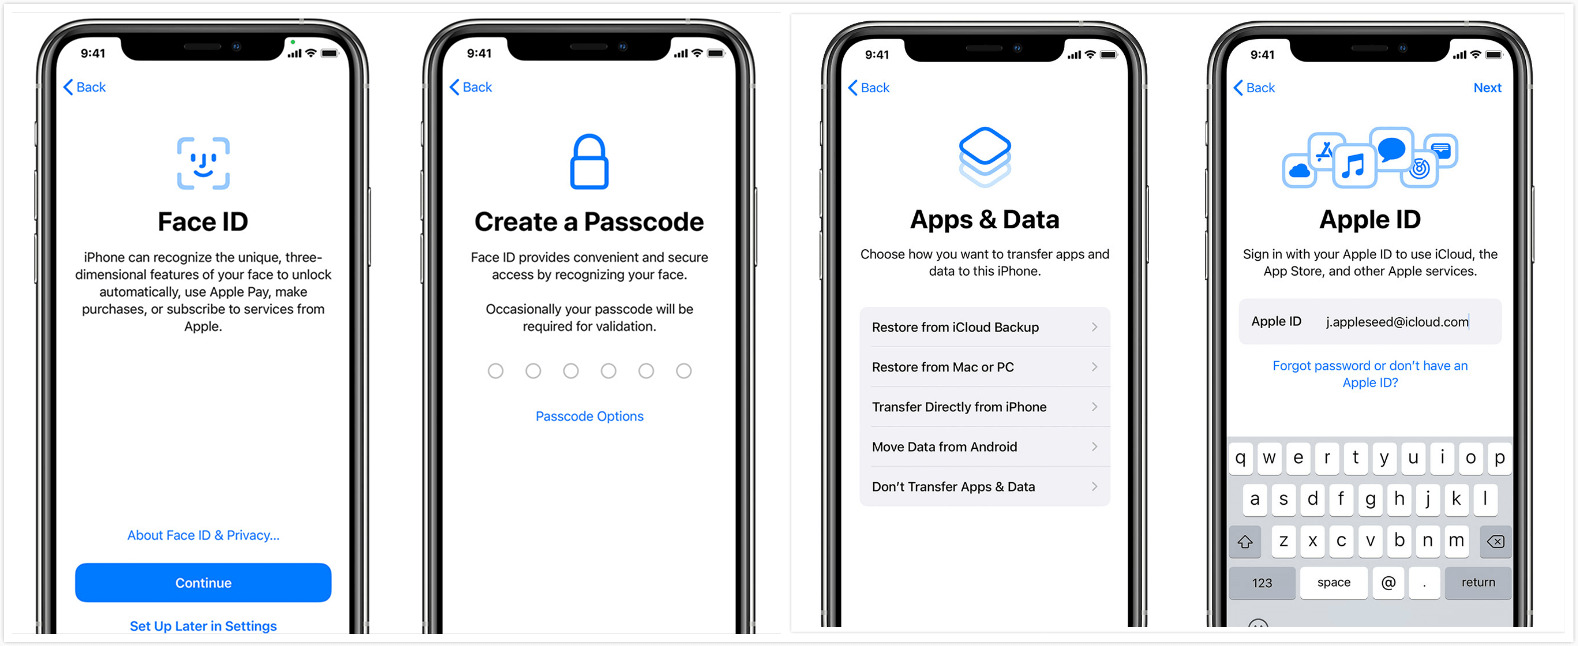
Step 7: Setting up Face ID or Touch ID
Depending on your iPhone model, you may have the option to set up Face ID or Touch ID for secure authentication. These features allow you to unlock your device and make secure payments without typing a password. Follow the on-screen instructions to set up either Face ID (using facial recognition) or Touch ID (using your fingerprint).
Step 8: Setting up Passcode and Security
Even with Face ID or Touch ID enabled, it’s a good idea to set up a passcode as an extra layer of security. Choose a passcode that is easy for you to remember but difficult for others to guess. Avoid using simple combinations like “1234” or “0000.”
Step 9: Customizing your iPhone’s settings
Now that your iPhone is set up, it’s time to customize it to your preferences. Explore the settings menu and adjust options like display brightness, sounds, notifications, and more. You can also personalize your home screen layout by rearranging apps or creating folders.
Step 10: Transferring data from your old iPhone
If you’re upgrading from an older iPhone, there are several ways to transfer your data to your new device. You can use iCloud, iTunes, or the Quick Start feature to migrate your contacts, photos, apps, and more. Choose the method that suits you best and follow the instructions to complete the transfer.
Step 11: Installing essential apps
Your new iPhone comes with a range of pre-installed apps, but there are many more available on the App Store. Take some time to download and install essential apps like social media, messaging, productivity, and entertainment apps. Search the App Store, read reviews, and select the ones that meet your needs.
Step 12: Syncing with iTunes or Finder (for macOS Catalina and later)
If you prefer managing your iPhone’s content through your computer, you can sync it with iTunes (for Windows) or Finder (for macOS Catalina and later). Connect your iPhone to your computer using a Lightning cable and follow the prompts to sync your media, contacts, and other data.
Step 13: Setting up Apple Pay
Apple Pay allows you to make secure payments at supported retail stores, online, and within apps. To set up Apple Pay, go to the Wallet & Apple Pay section in the settings menu. Follow the instructions to add your credit or debit cards and set Apple Pay as your default payment method.
Step 14: Configuring iCloud settings
iCloud is a cloud storage service that automatically backs up your device and syncs your data across all your Apple devices. To configure iCloud settings, go to the iCloud section in the settings menu. Select the items you want to sync, such as photos, contacts, calendars, and documents.
Step 15: Enabling Find My iPhone feature
It’s essential to enable the Find My iPhone feature to locate your device in case it gets lost or stolen. Go to the Find My section in the settings menu and toggle on the Find My iPhone option. This will allow you to track your device, remotely lock it, or erase its data if necessary.
Step 16: Managing App Store downloads and updates
Lastly, take control of your App Store downloads and updates. You can choose to enable automatic updates or manually update your apps. Additionally, you can manage your app subscriptions, change payment methods, and explore curated app recommendations for a great user experience.
With these steps, you’re well on your way to enjoying your new iPhone to its fullest potential. Take some time to explore the features and apps available and make your iPhone a personalized and powerful companion in your daily life.
Step 1: Powering on your iPhone
Congratulations on your new iPhone! The first step in setting up your device is to power it on. Though it may seem like a simple process, let’s go through it together to ensure that you start off on the right foot.
To power on your iPhone, locate the power button. Depending on the model, this button may be located on the side or top of the device. Once you have located the power button, press and hold it until the Apple logo appears on the screen.
It may take a few moments for your iPhone to fully boot up. During this time, you’ll see the Apple logo followed by a loading bar or spinning wheel. Once your iPhone is fully powered on, you’ll be greeted with the setup screen.
Now that your iPhone is powered on, you’re ready to move on to the next step in the setup process. Keep in mind that if you purchased a brand-new iPhone, you’ll have to go through the initial setup process. However, if you are setting up a replacement iPhone, you may be prompted to transfer settings and data from your previous device.
Before moving on, take a moment to familiarize yourself with the physical features of your iPhone, such as the volume buttons, mute switch, and charging port. This will come in handy as you navigate through different functions and settings on your device.
Now that your iPhone is up and running, it’s time to dive into the exciting world of customization and personalization. Stay tuned for the next steps in setting up your new iPhone.
Step 2: Setting up Wi-Fi connection
After powering on your new iPhone, the next step is to set up a Wi-Fi connection. This is essential for accessing the internet, downloading apps, and using various online services. Here’s how to do it:
- On the initial setup screen, you’ll be prompted to choose a Wi-Fi network. Tap on the name of your network to connect.
- If your network is password protected, enter the password when prompted. Make sure to type it accurately as Wi-Fi passwords are case sensitive.
- If you can’t find your Wi-Fi network in the list, tap on “Other Network” and manually enter the network name (SSID) and password.
- If you’re connecting to a public Wi-Fi network, you may be redirected to a login or acceptance page. Follow the on-screen instructions to connect.
- Once connected, your iPhone will remember the network and automatically connect to it whenever it’s in range.
It’s important to note that if you don’t have access to Wi-Fi during the initial setup, you can still proceed by selecting the option to set up your iPhone manually. However, it’s highly recommended to connect to Wi-Fi as soon as possible to enjoy the full functionality of your device.
Having a stable and secure Wi-Fi connection is essential for downloading apps, streaming media, backing up your data to iCloud, and many other features that make the iPhone an integral part of our lives. By following these simple steps, you’ll be able to set up your Wi-Fi connection seamlessly and start enjoying your new iPhone to its fullest potential.
Step 3: Activating your iPhone
Once your iPhone is powered on, the next step in setting it up is to activate it. Activation is essential to connect your device to your carrier’s network and enable the cellular features of your iPhone. Here’s how you can activate your new iPhone:
1. Start by ensuring that your iPhone has a SIM card inserted. The SIM card is provided by your carrier and allows your device to connect to cellular networks. If you’re upgrading from a previous iPhone and your carrier supports eSIM technology, you might be able to activate your device without a physical SIM card.
2. Follow the on-screen prompts to select your language and region. These settings will determine the language and regional preferences for your device.
3. Connect your iPhone to Wi-Fi. This step is necessary to complete the activation process and ensure a stable internet connection for downloading updates and setting up your device.
4. If you have an existing SIM card, you’ll be prompted to enter the SIM card PIN. This PIN is provided by your carrier and is used to secure your SIM card from unauthorized access. Enter the PIN and follow any additional prompts from your carrier.
5. If you’re activating your iPhone for the first time or using a new SIM card, you’ll need to follow the on-screen instructions to set up a new cellular plan. This may involve selecting your carrier, choosing a plan, and providing any necessary personal information.
6. Wait for your iPhone to complete the activation process. This may take a few minutes, and your device may restart during this time. You might also see a message indicating that your iPhone is being activated. Once the activation is complete, you’ll be taken to the home screen.
7. Verify that your iPhone is successfully activated by making a test call or connecting to the internet using cellular data. If you encounter any issues, contact your carrier for assistance.
That’s it! Your iPhone is now activated and ready to be used. The activation process is an important step in setting up your device, as it ensures that you can make calls, send messages, and access cellular data. With your iPhone successfully activated, you can move on to the next steps in the setup process.
Step 4: Creating or signing in to your Apple ID
Creating or signing in to your Apple ID is an essential step to take when setting up your new iPhone. Your Apple ID is what connects you to the Apple ecosystem, allowing you to access various services such as the App Store, iCloud, Apple Music, and more. Follow the steps below to create a new Apple ID or sign in with your existing Apple ID:
- If you don’t have an Apple ID yet, open the App Store on your iPhone and tap on “Create Apple ID”.
- If you already have an Apple ID, tap on “Sign In” and enter your credentials.
- Fill out the required information, including your name, email address, password, security questions, and date of birth. Make sure to choose a strong and unique password to protect your account.
- Agree to the terms and conditions, and choose whether or not you want to receive updates, news, and special offers from Apple. This is optional, and you can change the settings later if you wish.
- Verify your email address by following the instructions in the email sent to the address you provided.
- Once your Apple ID is created or signed in, you can choose to enable iCloud services, such as backing up your data, syncing photos, and more. This can be done in the settings menu, under your Apple ID profile.
Having an Apple ID not only allows you to access various services, but it also helps you personalize your iPhone experience. With your Apple ID, you can download apps, purchase content from the App Store, sync your data across multiple devices using iCloud, and even use Apple Pay for convenient and secure payments.
Remember to keep your Apple ID credentials secure and avoid sharing them with anyone. This will help protect your personal information and keep your account safe.
Step 5: Restoring from iCloud backup
Restoring from an iCloud backup is a convenient way to transfer all your data, settings, and apps from your previous iPhone to your new one. Here’s how you can do it:
- Turn on your new iPhone and proceed with the initial setup process until you reach the “Apps & Data” screen.
- Select “Restore from iCloud Backup” option. You will be prompted to sign in to your Apple ID, if you haven’t already done so.
- Enter your Apple ID credentials and agree to the terms and conditions.
- Choose the most recent backup from the list of available backups. Ensure that this backup includes all the data you want to transfer.
- Tap “Restore” and wait for the restore process to complete. This may take some time, depending on the size of your backup and your internet connection speed.
- Once the restore is finished, your iPhone will restart. Follow the on-screen instructions to complete the setup process.
- Your iPhone will now be restored to the state it was in when the backup was created. All your apps, settings, and data will be transferred to your new device.
It’s important to note that during the restore process, your iPhone needs to be connected to a Wi-Fi network and plugged into a power source to ensure uninterrupted transfer and to save battery life. Also, make sure you have enough free space on your new iPhone to accommodate the data from the backup.
If you have a large amount of data or a slow internet connection, the restore process may take a while. In such cases, it’s recommended to connect your iPhone to Wi-Fi and leave it plugged in overnight to complete the restore.
Restoring from an iCloud backup is a seamless way to migrate your data from an old iPhone to a new one. It ensures that all your apps, settings, photos, messages, and other data are seamlessly transferred, so you can pick up right where you left off.
Step 6: Restoring from iTunes backup
If you have an iTunes backup of your previous iPhone saved on your computer, you can easily restore your new iPhone from that backup. Here’s how:
- Connect your new iPhone to your computer using the USB cable.
- Launch iTunes on your computer. If you’re using macOS Catalina or later, open Finder instead.
- In iTunes or Finder, select your connected iPhone.
- In the Summary tab, click on the “Restore Backup” button.
- A list of available backups will appear. Choose the backup that you want to restore from.
- Click on the “Restore” button and let the process complete.
- Once the restore is finished, your new iPhone will restart and you’ll be prompted to set it up.
It’s important to note that restoring from an iTunes backup will overwrite all data on your new iPhone with the data from the backup. Make sure to select the correct backup file and ensure that you have a recent backup that includes all the data you want to restore.
Restoring from an iTunes backup can be useful if you don’t have access to a stable Wi-Fi connection or if you prefer to restore your data directly from your computer. It’s a convenient option if you regularly back up your iPhone using iTunes and want to quickly transfer everything to your new device.
Remember to keep your new iPhone connected to your computer during the entire restore process to ensure a successful transfer of your data. Once the restore is complete, you can proceed with the setup and start using your new iPhone with all your previously backed up data intact.
Step 7: Setting up Face ID or Touch ID
One of the standout features of newer iPhones is the ability to use Face ID or Touch ID for secure authentication. Face ID uses facial recognition technology, while Touch ID utilizes a fingerprint sensor. Here’s how you can set up Face ID or Touch ID on your new iPhone:
- After activating your iPhone, go to the Settings app on the home screen.
- Scroll down and tap on “Face ID & Passcode” (or “Touch ID & Passcode” for models with Touch ID).
- You will be prompted to enter your passcode. If you haven’t set one yet, you will need to create a passcode first.
- Now, follow the on-screen instructions to set up Face ID or Touch ID.
- For Face ID, position your face within the frame provided and move your head in a circular motion. This allows the TrueDepth camera system to capture different angles of your face.
- For Touch ID, place the registered finger on the Home button and lift it off to capture different parts of the fingerprint.
- Once the setup process is complete, you can use Face ID or Touch ID to unlock your iPhone, authenticate App Store purchases, and access various apps that support biometric authentication.
It is important to note that both Face ID and Touch ID are secure methods of unlocking your iPhone and protecting your data. They are designed to work seamlessly and provide convenience while maintaining the highest level of security.
If you have privacy concerns or prefer not to use Face ID or Touch ID, you can always opt to use a passcode instead. Simply go to the Face ID & Passcode or Touch ID & Passcode settings and select “Turn Passcode On” to create a numerical passcode for your device.
Setting up Face ID or Touch ID on your new iPhone is a simple and straightforward process. It offers a convenient and secure way to access your device and protect your personal information. Enjoy the benefits of this advanced biometric technology and experience a seamless user experience with your new iPhone.
Step 8: Setting up Passcode and Security
One of the first things you should do when setting up your new iPhone is to set up a passcode and enhance the security of your device. Here’s how you can do it:
- Go to the “Settings” app on your iPhone.
- Scroll down and tap on “Touch ID & Passcode” or “Face ID & Passcode”, depending on the model of your iPhone.
- If you have a Face ID-supported iPhone, you will be prompted to set up Face ID. Follow the on-screen instructions to scan your face and set up Face ID.
- If you have a Touch ID-supported iPhone, you will be prompted to set up Touch ID. Place your finger on the Home button and follow the on-screen instructions to complete the setup.
- After setting up Face ID or Touch ID, you will be prompted to create a passcode.
- Choose a secure passcode that you can remember but others cannot easily guess. Avoid using common patterns like 1234 or repeated numbers.
- Confirm your passcode by entering it again.
Once you have set up your passcode, your iPhone will be protected from unauthorized access. It is recommended to enable additional security features like “Erase Data” and “Data Protection” to enhance the security of your device.
“Erase Data” is a feature that erases all the data on your iPhone after ten failed passcode attempts. This can protect your personal information in case your iPhone falls into the wrong hands.
“Data Protection” is a feature that encrypts your data on the iPhone, making it difficult for anyone to access your data without the passcode. It is automatically enabled when you set up a passcode, so no additional action is required from your end.
Setting up a passcode and enabling these security features is crucial to keep your personal data safe and secure. It is recommended to keep your passcode confidential and avoid sharing it with anyone.
Remember, security is important, and taking these steps will help you protect your personal information on your iPhone.
Step 9: Customizing your iPhone’s settings
Once you’ve completed the initial setup process for your new iPhone, it’s time to dive into customizing the device’s settings to suit your preferences. Here are some key settings you should consider adjusting:
1. Display and Brightness
Head to the Settings app and tap on “Display & Brightness.” From here, you can adjust the brightness of your screen, enable or disable True Tone display, and choose a wallpaper for your device’s home screen and lock screen.
2. Sounds and Haptics
Under “Settings,” tap on “Sounds & Haptics” to customize your iPhone’s audio and vibration settings. You can adjust the volume, choose different ringtones and notification sounds, and even enable or disable haptic feedback for certain interactions.
3. Notifications
Take control of your iPhone’s notifications by going to “Settings” and selecting “Notifications.” From here, you can decide which apps can send you notifications, customize the alert style for each app, and organize your notifications by creating notification groups.
4. Privacy
Privacy and security are essential, and your iPhone offers various options to protect your data. Head to “Settings” and tap on “Privacy” to review and manage app permissions for accessing your location, camera, microphone, contacts, and more. You can also control which apps have access to your health data and other sensitive information.
5. Control Center
The Control Center provides quick access to essential settings and shortcuts. To customize it, go to “Settings,” tap on “Control Center,” and then select “Customize Controls.” Here you can add or remove specific controls, such as Wi-Fi, Bluetooth, screen mirroring, and more.
6. Siri and Search
Personalize your experience with Siri and the Search functionality by visiting “Settings” and selecting “Siri & Search.” From here, you can enable or disable Siri, customize voice feedback, and manage which apps can appear in search results.
7. Battery
Battery life is crucial, and your iPhone offers tools to optimize it. Go to “Settings,” tap on “Battery,” and you’ll find valuable information about battery usage, including which apps consume the most power. You can also enable Low Power Mode to conserve battery life when needed.
8. Accessibility
Your iPhone has various accessibility features designed to make the device more accessible to everyone. To access these settings, go to “Settings” and tap on “Accessibility.” From there, you can enable features like VoiceOver, Magnifier, Closed Captions, and more, based on your individual needs.
By taking the time to customize these settings, you can tailor your iPhone to meet your specific requirements and enhance your overall user experience. Don’t hesitate to explore other settings within the “Settings” app to discover more ways to personalize your device.
Step 10: Transferring data from your old iPhone
When you get a new iPhone, one of the first things you’ll want to do is transfer your data from your old device. Fortunately, Apple has made this process seamless and efficient. Here’s how you can transfer your data from your old iPhone to your new one:
- Create a backup: Before you begin the transfer process, it’s important to create a backup of your old iPhone. You can do this by connecting your old iPhone to your computer and using iTunes or Finder (for macOS Catalina and later) to create a backup. Alternatively, you can back up your old iPhone using iCloud. Simply go to Settings > [Your Name] > iCloud > iCloud Backup, and tap on “Back Up Now”.
- Set up your new iPhone: Power on your new iPhone and follow the on-screen instructions to set it up. Connect your new iPhone to Wi-Fi and sign in with your Apple ID.
- Choose the transfer method: During the setup process, you will be prompted to choose a transfer method. You have two options: Restore from iCloud Backup or Restore from iTunes Backup. Select the option that corresponds to the backup method you used in Step 1.
- Select the backup: If you chose Restore from iCloud Backup, you will be asked to sign in to your Apple ID and choose a backup to restore from. If you chose Restore from iTunes Backup, connect your new iPhone to your computer and select the backup you created in Step 1.
- Wait for the transfer to complete: The transfer process may take some time, depending on the size of your backup and the speed of your internet connection. Make sure your new iPhone is connected to Wi-Fi and keep it powered on and connected to a charger during the transfer.
- Finish the setup: Once the transfer is complete, follow the on-screen instructions to finish setting up your new iPhone. You may be asked to enter your Apple ID password, set up Face ID or Touch ID, and customize your settings.
Transferring your data from your old iPhone to your new one is an essential step in getting started with your new device. It ensures that all your important data, including contacts, messages, photos, and apps, are seamlessly transferred to your new iPhone, allowing you to pick up where you left off.
Step 11: Installing essential apps
Once you have set up your new iPhone and customized its settings, the next step is to install essential apps that will enhance your smartphone experience. Here are some key apps you should consider installing:
- Productivity Apps: Install productivity apps that help you stay organized, such as a calendar app, notes app, and task management app. Some popular options include Google Calendar, Evernote, and Todoist.
- Communication Apps: Download communication apps to stay connected with friends and family. The essential apps in this category include messaging apps like WhatsApp and Messenger, as well as social media apps like Facebook and Instagram.
- Email App: Install an email app to manage your emails efficiently. Apple’s default Mail app is a solid option, but you can also explore alternatives like Microsoft Outlook or Gmail.
- Web Browser: While Safari comes pre-installed on your iPhone, you may want to try other web browsers for different features and customization options. Consider downloading Google Chrome or Mozilla Firefox.
- Entertainment Apps: To enjoy entertainment on your iPhone, install streaming apps like Netflix, Spotify, or Apple Music. These apps will allow you to stream movies, TV shows, and music directly on your device.
- Health and Fitness Apps: If you are conscious about your health and fitness, consider downloading apps like Nike Training Club, MyFitnessPal, or Headspace. These apps can help you track your workouts, monitor your nutrition, and practice mindfulness.
- Finance Apps: Take control of your finances by installing banking apps, expense trackers, and budgeting apps. Some popular finance apps include Mint, PayPal, and Venmo.
- Travel Apps: If you love to travel, make sure to download travel apps that can assist you during your trips. Apps like Google Maps, Airbnb, and TripAdvisor are great tools for finding directions, booking accommodations, and discovering local attractions.
Remember, these suggestions are just a starting point. The App Store is filled with a wide range of apps catering to various interests and needs. Explore different categories and read reviews to discover apps that align with your personal preferences.
Once you have identified the apps you want to install, open the App Store on your iPhone. Tap on the “Search” tab at the bottom of the screen and type in the name of the app you want to download. Locate the app from the search results and tap on the “Get” or the cloud icon to initiate the download. Depending on the size of the app and your internet connection, the installation process may take a few seconds to a few minutes.
After the app is downloaded and installed, you can tap on the app icon on your home screen to open and start using it. Repeat this process for each app you want to install on your iPhone.
By installing essential apps that cater to your needs and interests, you can make the most out of your new iPhone and enjoy a rich and personalized user experience.
Step 12: Syncing with iTunes or Finder (for macOS Catalina and later)
Once you’ve set up your new iPhone, you’ll want to sync it with your computer to transfer any media files, such as music, videos, and photos. If you’re using a Mac with macOS Catalina or later, you’ll use Finder for syncing, while Windows users can continue to use iTunes.
Here’s how to sync your iPhone with either iTunes or Finder:
- Connect your iPhone to your computer using a USB cable.
- If you’re using a Mac with macOS Catalina or later, open Finder. If you’re using a Windows computer or a Mac with an older version of macOS, open iTunes.
- In Finder or iTunes, you should see your iPhone listed under the devices section. Click on your iPhone to select it.
- Next, navigate to the appropriate section to choose what content you want to sync. This could be music, movies, TV shows, podcasts, or photos.
- Once you’ve chosen the content you want to sync, click on the “Apply” or “Sync” button to initiate the syncing process.
- Wait for the syncing process to complete. The time it takes will depend on the amount of data being transferred.
- Once the sync is complete, you can disconnect your iPhone from your computer.
It’s worth noting that depending on your settings, your iPhone may automatically sync whenever it’s connected to your computer. Alternatively, you can manually initiate a sync by following the steps outlined above.
Syncing your iPhone with iTunes or Finder allows you to keep your media files up to date and easily transfer content between your computer and your device. It’s a convenient way to manage your media library and ensure that you have access to your favorite music, videos, and photos on the go.
Remember to regularly sync your iPhone to keep your content backed up and to make space for new files. By keeping your device synced with your computer, you can ensure that you have the most up-to-date content whenever you need it.
Step 13: Setting up Apple Pay
Apple Pay is a convenient and secure way to make payments using your iPhone. By setting up Apple Pay, you can make purchases at retail stores, in apps, and online without the need for physical credit or debit cards. Here’s how to set it up:
- Open the Wallet app on your iPhone. If you can’t find it, swipe down on the home screen and type “Wallet” in the search bar.
- Tap on the “+” (plus) button located in the top-right corner of the screen. This will initiate the setup process.
- Follow the on-screen prompts to add your credit or debit cards to Apple Pay. You can either manually enter the card details or use your iPhone’s camera to scan the card.
- Once you’ve added the card, your bank will need to verify it. This can be done either by a phone call, text message, or through your bank’s mobile app.
- After verification, you may need to accept the terms and conditions provided by your bank.
- If you have multiple cards added, you can set a default card for Apple Pay by going to Settings > Wallet & Apple Pay, and selecting “Default Card”.
- To make a payment with Apple Pay, simply hold your iPhone near the contactless payment terminal at a store. Your iPhone will recognize the payment terminal and prompt you to authenticate the payment using either Face ID, Touch ID, or your device passcode.
- You can also use Apple Pay within compatible apps and websites by selecting the Apple Pay option at checkout and authenticating the payment using Face ID, Touch ID, or your device passcode.
It’s important to note that not all stores, apps, or websites support Apple Pay, so you may need to check if it’s available before attempting to use it. Additionally, Apple Pay is available in select countries, so make sure it’s supported in your region.
By setting up Apple Pay on your iPhone, you can enjoy a seamless and secure payment experience. No more fumbling for physical cards or worrying about someone stealing your information. With just a tap or a glance, you can complete transactions with ease.
Step 14: Configuring iCloud settings
Configuring your iCloud settings is an essential step in setting up your new iPhone. iCloud is a cloud storage service provided by Apple that allows you to store and sync your data across multiple devices. Follow these steps to configure your iCloud settings:
- Open the Settings app on your iPhone.
- Tap on your Apple ID at the top of the screen to access your Apple ID settings.
- Tap on iCloud.
- You will be presented with a list of apps and features that can be enabled for iCloud syncing. Toggle the switch to the right of each app to enable or disable iCloud syncing for that app.
- Some of the important iCloud features include:
- iCloud Drive: This allows you to store files in the cloud and access them on all your devices. Toggle the switch to enable iCloud Drive.
- Photos: By enabling iCloud Photos, your photos and videos will automatically be synced across your devices. It also allows you to optimize storage on your device by keeping smaller versions of your photos and videos in iCloud. Toggle the switch to enable iCloud Photos.
- Contacts, Calendars, Reminders: These features allow you to sync your contacts, calendars, and reminders across all your devices. Toggle the switches to enable syncing for these features.
- Find My: Find My iPhone is a useful feature that helps you locate your iPhone if it gets lost or stolen. Toggle the switch to enable Find My iPhone.
- iCloud Keychain: iCloud Keychain securely stores your passwords and credit card information, allowing you to autofill login credentials and make payments easily. Toggle the switch to enable iCloud Keychain.
- Health: If you use the Health app to track your health and fitness data, you can enable syncing through iCloud. Toggle the switch to enable Health syncing.
Once you have configured your desired iCloud settings, your iPhone will start syncing the selected data with your iCloud account. This ensures that your important data is always up to date and accessible on all your devices.
Keep in mind that some iCloud features may require a subscription or additional setup. For example, if you want to store more than the free 5GB of iCloud storage, you can upgrade to a paid plan through the Settings app.
Configuring your iCloud settings provides you with a seamless experience across your Apple devices, allowing you to access your data and settings wherever you go. It also provides a backup for your important data, ensuring that you don’t lose it in case your iPhone gets lost, damaged, or replaced.
Step 15: Enabling Find My iPhone feature
One of the key features that can help you locate your iPhone if it gets lost or stolen is Find My iPhone. By enabling this feature, you can track the location of your device, play a sound on it to help you locate it, remotely lock it, or even erase its data to prevent unauthorized access. Here’s how to enable Find My iPhone:
- Go to the Settings app on your iPhone and tap on your Apple ID at the top of the screen.
- Select “Find My” from the list of options.
- Toggle on the “Find My iPhone” switch to enable it. You may also want to enable “Send Last Location” which will send the last known location of your iPhone to Apple when your battery is critically low.
- On the same screen, tap on “Enable Offline Finding” to allow your iPhone to be located even if it’s not connected to the internet.
- Next, go back to the previous screen and tap on “Find My iPhone” to adjust additional settings. Here, you can decide whether you want to enable “Send Last Location” to send your iPhone’s location when the battery is low, and whether you want to allow others to find and send notifications to your iPhone.
- That’s it! Your Find My iPhone feature is now enabled, and you can use it to locate, track, and secure your device in case it goes missing.
It’s important to note that you will need to have the Find My iPhone feature enabled on your device in order to use other services and features like Activation Lock and iCloud backups. By keeping this feature enabled, you can provide an additional layer of security for your iPhone and have peace of mind knowing that you can track it down if it ever gets lost or stolen.
Getting Started with your New iPhone
Setting up a new iPhone is an exciting experience, as it opens up a world of possibilities and functionality. Whether you’re upgrading from an older iPhone or switching from a different smartphone, this guide will walk you through the essential steps to get your new device up and running.
Step 1: Powering on your iPhone
The first step is to power on your new iPhone by pressing and holding the power button on the side or top of the device. You will see the Apple logo appear, indicating that your iPhone is booting up. Once it’s turned on, you’ll be greeted with the “Hello” screen.
Step 2: Setting up Wi-Fi connection
Next, you’ll need to connect your iPhone to a Wi-Fi network. On the “Hello” screen, you will be prompted to choose a Wi-Fi network. Select your desired network from the list and enter the password if required. If you don’t have access to Wi-Fi at the moment, you can skip this step and set up a connection later.
Step 3: Activating your iPhone
If you have purchased a new iPhone from a carrier or authorized retailer, you may need to activate it. Follow the on-screen instructions to activate your iPhone, which usually involves inserting a SIM card and entering your account information.
Step 4: Creating or signing in to your Apple ID
Your Apple ID is an essential component of your iPhone experience as it grants you access to Apple services and features. If you already have an Apple ID, you can sign in during the setup process. If you don’t have one yet, you can create a new Apple ID by tapping on “Create a Free Apple ID” and following the prompts.
Step 5: Restoring from iCloud backup
If you have an existing iPhone backup stored in iCloud, you can choose to restore your new iPhone from that backup. This will transfer your settings, apps, and data to the new device seamlessly. Simply select the “Restore from iCloud Backup” option and sign in to your iCloud account to proceed.
Step 6: Restoring from iTunes backup
If you have a backup of your previous iPhone stored in iTunes, you can connect your new iPhone to your computer and select the “Restore from iTunes Backup” option during the setup process. Follow the instructions in iTunes to select the desired backup and restore your data.
Step 7: Setting up Face ID or Touch ID
Modern iPhones come equipped with biometric authentication methods like Face ID or Touch ID, which offer convenient and secure ways to unlock your device. Follow the prompts to set up Face ID or Touch ID during the setup process. This will enhance the security of your iPhone and streamline the unlocking process.
Step 8: Setting up Passcode and Security
In addition to Face ID or Touch ID, it’s important to set up a passcode as an additional layer of security for your iPhone. Choose a passcode that is easy for you to remember but difficult for others to guess. Make sure to enable features like “Erase Data” after a number of unsuccessful attempts to further protect your device.
Step 9: Customizing your iPhone’s settings
Now it’s time to personalize your iPhone by customizing its settings. Go through the various options available, such as wallpaper, display brightness, notification preferences, and sounds. Configure your preferences to make your iPhone feel like it’s tailored specifically to you.
Step 10: Transferring data from your old iPhone
If you’re upgrading from an older iPhone, you may want to transfer your data, such as photos, contacts, and apps, to your new device. Apple provides several methods to accomplish this, such as using iCloud, iTunes, or the Quick Start feature for devices running iOS 12.4 or later. Follow the instructions provided to transfer your data seamlessly and efficiently.
Step 11: Installing essential apps
Once your iPhone is set up, it’s time to explore the App Store and download the essential apps that you need. Whether it’s social media, productivity, entertainment, or utility apps, the App Store offers a vast selection to enhance your iPhone experience. Search for your desired apps, tap on “Get” to download, and wait for them to install on your device.
Step 12: Syncing with iTunes or Finder (for macOS Catalina and later)
If you prefer to manage your iPhone’s content and sync it with your computer, you can use iTunes for Windows or Finder for macOS Catalina and later. Connect your iPhone to your computer, open iTunes or Finder, and select your device. From there, you can sync music, photos, videos, and other media files between your iPhone and computer.
Step 13: Setting up Apple Pay
Apple Pay is a convenient and secure way to make payments using your iPhone. During the setup process, you will have the option to set up Apple Pay by adding your credit or debit cards. Follow the prompts to securely enter your card details, and you’ll be ready to make purchases with just a tap of your iPhone.
Step 14: Configuring iCloud settings
iCloud is Apple’s cloud storage and cloud computing service that enables you to access and sync your data across all of your Apple devices. During the setup process, you can choose which iCloud services to enable, such as iCloud Drive, Contacts, Calendars, and Photos. Configure your preferences accordingly to take full advantage of iCloud’s features.
Step 15: Enabling Find My iPhone feature
Find My iPhone is a useful feature that allows you to locate, lock, or erase your iPhone remotely in case it is lost or stolen. To enable this feature, go to “Settings,” tap on your Apple ID, select “Find My,” and toggle on “Find My iPhone.” You can also enable “Send Last Location” to help track your device’s location even if the battery is critically low.
Step 16: Managing App Store downloads and updates
Once your iPhone is all set up, you’ll need to manage app downloads and updates. By default, your iPhone will automatically download app updates, but you can customize these settings. Open the App Store, go to your profile, and tap on “App Updates.” From there, you can choose to automatically update apps, update them manually, or disable updates altogether.
Conclusion
Setting up a new iPhone can be an exciting and overwhelming experience. However, with the right knowledge and guidance, the process becomes much simpler. In this article, we have covered all the essential steps to help you set up your new iPhone seamlessly.
From activating your device and connecting to a Wi-Fi network to transferring data from your old phone and customizing your settings, we have provided a comprehensive guide to ensure a smooth setup process.
Remember to take advantage of features like iCloud backup and Find My iPhone for added security and convenience. Additionally, exploring the App Store and downloading must-have apps will enhance your iPhone experience.
By following the instructions outlined in this article, you can quickly get your new iPhone up and running, ready to enjoy all the amazing features it has to offer. So, go ahead and start personalizing your device, exploring the countless possibilities that await!
FAQs
1. How do I set up a new iPhone?
Setting up a new iPhone is a simple and straightforward process. To get started, turn on your iPhone by pressing and holding the power button until the Apple logo appears. Follow the on-screen instructions to select your language, connect to a Wi-Fi network, and sign in with your Apple ID or create a new one. You can then restore your apps, contacts, and data from a previous device or set up your iPhone as a new device. Don’t forget to customize your settings, such as enabling Face ID or Touch ID, setting up Siri, and choosing your preferred display and accessibility options.
2. Can I transfer data from my old phone to a new iPhone?
Yes, you can easily transfer your data from your old phone to your new iPhone. If your old device is an iPhone, you can use the Quick Start feature to transfer your data wirelessly. Simply place your old and new iPhones close to each other, and follow the instructions to transfer your data, including apps, settings, messages, and photos. If your old device is an Android phone, you can use the “Move to iOS” app from the Google Play Store. This app allows you to wirelessly transfer your contacts, messages, photos, and more to your new iPhone during the setup process.
3. How do I download apps on my new iPhone?
To download apps on your new iPhone, open the App Store app and tap on the “Search” tab at the bottom of the screen. You can search for a specific app using the search bar or browse through the featured apps and categories. Once you find the app you want to download, tap on it to view its details and then tap on the “Get” or “Download” button. Depending on your settings, you may need to authenticate using Face ID, Touch ID, or your Apple ID password. The app will then download and install on your iPhone.
4. How do I set up email and other accounts on my new iPhone?
Setting up email and other accounts on your new iPhone is easy. To add an email account, go to the Settings app, scroll down and tap on “Mail,” then select “Accounts” and choose “Add Account.” From there, select your email provider, such as Gmail, Yahoo, or Outlook, and follow the on-screen instructions to add your email address and password. For other accounts, such as social media or cloud storage, you can usually go to the respective app’s settings or preferences and sign in with your account credentials.
5. How do I personalize my new iPhone?
Personalizing your new iPhone allows you to make it uniquely yours. You can customize your home screen by rearranging app icons, creating folders, and adding widgets. To do this, simply touch and hold any app icon until they start wiggling, then drag and drop the app icons to rearrange them. To create a folder, drag and drop one app icon onto another. You can also add widgets to your home screen by swiping right on the home screen, scrolling to the bottom, and tapping on the “Edit” button. From there, you can add or remove widgets based on your preferences. Additionally, you can change your wallpaper, set up different ringtones and alerts, and adjust various settings in the Settings app to personalize your iPhone according to your liking.