
Are you wondering how to add a cellular plan to your iPhone? Look no further, as we have got you covered! Adding a cellular plan to your iPhone is a straightforward process that allows you to stay connected, make calls, send messages, and browse the internet without relying solely on Wi-Fi. Whether you’re switching to a new carrier or looking to activate a new line, we will provide you with step-by-step instructions to make the process seamless. With just a few taps, you’ll be ready to utilize the full capabilities of your iPhone on a cellular network. So, let’s dive in and learn how to add a cellular plan to your iPhone in no time!
Inside This Article
- # How to Add Cellular Plan to My iPhone
- Checking Compatibility
- Contacting Your Carrier
- Activating the Cellular Plan
- Troubleshooting and Tips
- Conclusion
- FAQs
# How to Add Cellular Plan to My iPhone
Adding a new cellular plan to your iPhone can be a straightforward process that allows you to stay connected wherever you go. Whether you’re setting up a new device or switching carriers, this guide will walk you through the steps to add a cellular plan to your iPhone.
Checking Compatibility
Before adding a cellular plan to your iPhone, it’s important to ensure that your device is compatible with the carrier you wish to use. Check if your iPhone model supports the necessary network bands and technologies by visiting the carrier’s website or contacting their customer support. This will help avoid any compatibility issues later on.
Contacting Your Carrier
Once you’ve confirmed compatibility, the next step is to contact your desired carrier to inquire about their available cellular plans. Reach out to their customer service or visit their website to explore the different options. Be prepared to provide your iPhone’s IMEI or MEID number, which can be found in the Settings app under “About.” This information helps the carrier determine if your device can be activated on their network.
Activating the Cellular Plan
After selecting a suitable cellular plan, the next step is to activate it on your iPhone. If you’ve opted for an eSIM plan, you can directly activate it by scanning the QR code provided by the carrier. Alternatively, if you have a physical SIM card, follow these steps:
- Insert the SIM card into the SIM tray on your iPhone. The tray is usually located on the side or top of the device.
- Go to the Settings app and tap on “Cellular” or “Mobile Data.”
- Select “Add Cellular Plan” and follow the on-screen instructions.
- Enter any required details, such as your carrier account information or registration code.
- Once the activation process is complete, your iPhone will be connected to the new cellular plan, and you can start using it for calls, texts, and data.
Troubleshooting and Tips
If you encounter any issues while adding a cellular plan to your iPhone, here are a few troubleshooting tips:
- Restart your iPhone after inserting the SIM card to ensure proper recognition.
- Update your iPhone’s software to the latest version available.
- Double-check the SIM card for any signs of damage or misalignment.
- Contact your carrier’s customer support for assistance if the activation process fails.
Remember, adding a cellular plan to your iPhone opens up a world of possibilities for staying connected. With the right carrier and plan, you’ll enjoy seamless communication and internet access wherever you go. Follow these steps, and you’ll be on your way to enhancing your iPhone’s capabilities.
Checking Compatibility
Before adding a cellular plan to your iPhone, it’s important to check the compatibility. This ensures that your device will work with the chosen carrier and that you’ll have a seamless experience. Here are a few steps to follow:
1. Verify your iPhone model: Check the model number of your iPhone, which can be found in the Settings app under General > About. Cross-reference this number with the supported models listed on your carrier’s website.
2. Check for carrier lock: Determine if your iPhone is carrier-locked or unlocked. If it’s locked, it means that it’s tied to a specific carrier, and you might need to contact them for further assistance. An unlocked iPhone gives you the freedom to choose any compatible cellular plan.
3. Review network bands: Different carriers operate on various network bands. Make sure your iPhone supports the necessary bands for your desired carrier. You can find this information on the carrier’s website or by contacting their customer support.
4. Consider eSIM compatibility: Some carriers offer eSIMs, which are embedded SIM cards that allow you to activate a cellular plan digitally without a physical SIM card. Check if your iPhone supports eSIM functionality, as this can simplify the activation process.
By following these steps and ensuring compatibility, you’ll be well-prepared to add a cellular plan to your iPhone. Let’s move on to the next section to learn how to contact your carrier.
Contacting Your Carrier
When it comes to adding a cellular plan to your iPhone, one of the essential steps is to contact your carrier. Your carrier is the company that provides your mobile service, such as AT&T, Verizon, T-Mobile, or Sprint. Getting in touch with them is crucial to ensure a seamless process of activating your cellular plan. Here’s what you need to do:
1. Find the contact information: Start by locating the contact information for your carrier. Typically, you’ll find their customer service phone number on their website or on your monthly billing statement. Make sure to note down this information before reaching out to them.
2. Dial the customer service number: Use the phone app on your iPhone to dial the customer service number of your carrier. You may need to navigate through an automated menu system, but keep following the prompts until you are connected to a representative.
3. Provide necessary details: Once connected, the representative will ask for specific details to verify your identity and account. Be prepared to provide information such as your name, phone number, account number, and any other verification details your carrier may require.
4. Explain your request: Clearly communicate that you want to add a cellular plan to your iPhone. This will help the representative understand your needs and provide you with the relevant information and assistance. If you have a specific cellular plan in mind or if you need guidance in selecting one, be sure to mention it during the conversation.
5. Follow the carrier’s instructions: The carrier representative will guide you through the process of adding a cellular plan to your iPhone. They may ask you to provide them with your iPhone’s IMEI number or any other necessary information to complete the activation process. Follow their instructions carefully, and ask for clarification if anything is unclear.
6. Confirm the activation: Once the activation process is complete, double-check with the representative to ensure that the cellular plan has been successfully added to your iPhone. They can also assist you in setting up any additional features or services, such as voicemail or international calling, if needed.
7. Take note of important information: Before ending the call, make sure to write down any important information provided by the carrier representative, such as the activation date or any other relevant details. It’s always good to have a written record in case you need to refer back to it later.
Contacting your carrier is an important step in adding a cellular plan to your iPhone. By following these steps and effectively communicating with the carrier representative, you’ll ensure a smooth activation process and start enjoying the benefits of your new cellular plan on your iPhone.
Activating the Cellular Plan
Once you have obtained a cellular plan for your iPhone, it’s time to activate it. Activating the cellular plan is a straightforward process that can be done directly on your iPhone. Here are the steps to follow:
- Make sure you have a SIM card from your cellular carrier. This SIM card contains the necessary information to connect to your carrier’s network.
- Insert the SIM card into your iPhone. To do this, locate the SIM card tray on the side of your iPhone and use the SIM ejector tool (or a small paperclip) to open it. Carefully insert the SIM card into the tray and then reinsert the tray into your iPhone.
- Power on your iPhone if it’s not already on. You’ll be prompted to set up your iPhone. Follow the on-screen instructions to complete the initial setup process.
- Once the setup process is complete, go to the “Settings” app on your iPhone and tap on “Cellular” or “Mobile Data.” The name may vary slightly depending on your iOS version.
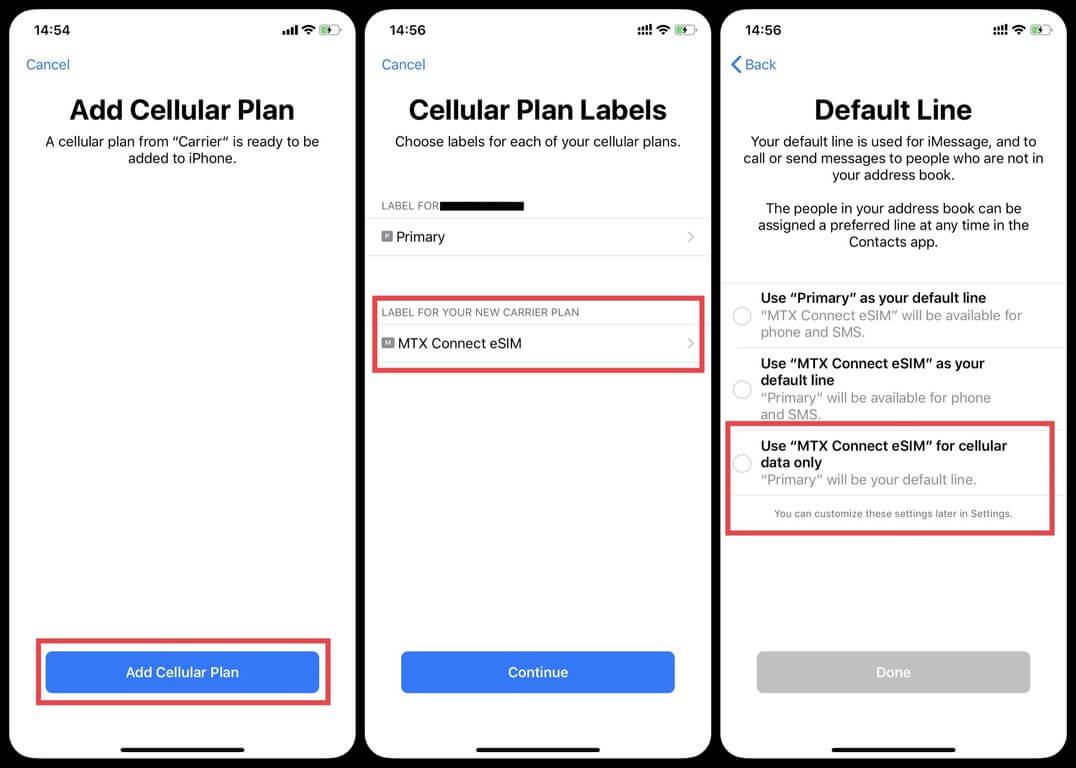
- In the Cellular settings, you should see an option to “Add Cellular Plan” or “Add a New Plan.” Tap on this option.
- Your iPhone will now guide you through the process of activating the cellular plan. This typically involves scanning a QR code provided by your cellular carrier or entering the necessary details manually.
- Follow the prompts and provide any additional information or authorization that may be required by your carrier.
- Once the activation process is complete, your iPhone should now be connected to your cellular plan. You’ll see the signal bars on the top-left corner of the screen indicating that you have cellular coverage.
Congratulations! You have successfully activated your cellular plan on your iPhone. You can now enjoy the benefits of cellular connectivity, such as making calls, sending messages, and using mobile data.
If you encounter any issues during the activation process, here are a few troubleshooting tips:
- Ensure that your SIM card is inserted correctly and securely.
- Restart your iPhone and try the activation process again.
- Contact your cellular carrier for assistance. They can provide further guidance and troubleshoot any network-related issues.
- Make sure your iPhone is running the latest version of iOS. Updating to the latest software can sometimes resolve activation problems.
- If all else fails, you may need to visit your carrier’s retail store or contact their customer support for further assistance.
Troubleshooting and Tips
When adding a cellular plan to your iPhone, you may come across some common issues or have questions about optimizing your experience. Here are some troubleshooting tips to help you along the way:
1. No service or poor signal: If you’re experiencing low signal strength or no service, try toggling Airplane Mode on and off in the Settings. This can help reset your network connections and improve signal reception. You can also try moving to a different location to see if the signal improves.
2. Activation issues: If you’re having trouble activating your cellular plan, double-check that you have inserted the SIM card correctly. Make sure it is properly seated in the SIM card tray and that the tray is securely inserted into the iPhone. If the problem persists, contact your carrier for assistance.
3. Compatibility issues: Before adding a cellular plan to your iPhone, ensure that it is compatible with the device. Not all iPhones support all carriers or bands, so check with your carrier or refer to Apple’s official website for compatibility information.
4. Data usage: Keep an eye on your data usage to avoid exceeding your plan’s allowance. You can monitor your data usage in the Settings app under “Cellular” or “Mobile Data.” Consider enabling Wi-Fi whenever possible to conserve cellular data.
5. Roaming: If you plan on using your iPhone while traveling internationally, make sure to activate roaming services with your carrier. However, be aware that international roaming can be expensive, so it’s a good idea to check the rates and options before you travel.
6. Updating carrier settings: Occasionally, carriers release updates that improve network connectivity and performance. To ensure you have the latest carrier settings, go to Settings > General > About. If an update is available, you’ll see a prompt to install it.
7. Battery drain: Using cellular data can consume more battery power compared to using Wi-Fi. If you notice excessive battery drain after adding a cellular plan, consider disabling cellular data for apps that you don’t need to use while on the go.
8. Plan management: Take advantage of the carrier’s self-service options to manage your cellular plan. Many carriers offer mobile apps that allow you to track usage, pay bills, and modify plan settings directly from your iPhone.
Remember, if you’re struggling with any issues while adding a cellular plan to your iPhone, don’t hesitate to reach out to your carrier for assistance. They have trained professionals who can help resolve your concerns and ensure a smooth activation process.
Conclusion
Adding a cellular plan to your iPhone is a simple and straightforward process that can enhance your mobile experience. Whether you’re looking to stay connected while on the go, need reliable internet access outside of Wi-Fi network range, or want the convenience of making calls and sending messages directly from your device, a cellular plan is essential.
By following the steps outlined in this guide, you can seamlessly add a cellular plan to your iPhone and gain access to a wide range of features and services. Remember to choose a plan that aligns with your usage needs and budget, and consider factors such as coverage, data allowance, and network reliability.
With a cellular plan, you’ll be able to enjoy the freedom and flexibility of staying connected wherever you are. So go ahead and take the plunge – add a cellular plan to your iPhone and take your mobile experience to new heights!
FAQs
Q: Can I add a cellular plan to my iPhone?
A: Absolutely! Adding a cellular plan to your iPhone is a straightforward process that allows you to enjoy the convenience of making calls, sending texts, and accessing the internet wherever you go. Keep reading to find out how to do it.
Q: How do I add a cellular plan to my iPhone?
A: To add a cellular plan to your iPhone, follow these steps:
- Ensure that your iPhone is connected to a Wi-Fi network or has cellular data enabled.
- Open the Settings app on your iPhone.
- Scroll down and tap on “Cellular” or “Mobile Data.”
- Select “Add Cellular Plan.”
- Scan the QR code provided by your wireless carrier or manually enter the necessary information.
- Follow any additional prompts or instructions to complete the setup.
Once the setup is complete, your iPhone will be ready to use with the added cellular plan.
Q: What information do I need to add a cellular plan to my iPhone?
A: When adding a cellular plan to your iPhone, you will typically need to provide the following information:
- Carrier name
- Plan details
- Network settings (such as APN, username, and password)
- IMEI or ICCID number to identify your iPhone
This information is typically provided by your wireless carrier when you sign up for a new cellular plan.
Q: Can I add multiple cellular plans to my iPhone?
A: Yes, depending on your iPhone model and carrier, you can add multiple cellular plans to your device. This can be useful if you travel frequently or need to separate personal and business usage. To add multiple plans, follow the same steps mentioned earlier and select “Add Cellular Plan” for each plan you wish to add.
Q: How do I switch between cellular plans on my iPhone?
A: To switch between cellular plans on your iPhone, follow these steps:
- Open the Settings app on your iPhone.
- Scroll down and tap on “Cellular” or “Mobile Data.”
- Under the “Cellular Plans” section, select the desired plan.
- Your iPhone will switch to the selected plan, and you can now make calls, send texts, and use data using that plan.
It’s important to note that some iPhones may require a dual-SIM setup or eSIM functionality to switch between plans.