
Are you excited about getting a new iPhone and want to transfer your eSIM to your new device seamlessly? Look no further! In this article, we will explore three easy ways to transfer your eSIM to a new iPhone effortlessly. The eSIM technology eliminates the need for a physical SIM card, allowing you to activate cellular service digitally. With eSIM, you can switch carriers or add multiple plans without the hassle of swapping physical SIM cards. Whether you’re upgrading to the latest iPhone model or simply switching to a new device, we’ve got you covered. Let’s dive in and discover the different methods you can use to transfer your eSIM to your new iPhone.
Inside This Article
- Method 1: Using the mobile operator’s app or website
- Method 2: Using the iPhone’s built-in eSIM transfer feature
- Method 3: Contacting your mobile operator for assistance
- Conclusion
- FAQs
Method 1: Using the mobile operator’s app or website
One of the easiest and most convenient ways to transfer an eSIM to a new iPhone is by using the mobile operator’s app or website. Many mobile operators provide dedicated apps or online portals where you can manage your account, services, and eSIM settings.
The first step is to download the mobile operator’s app from the App Store or visit their website on your existing iPhone. Once you have the app installed or the website open, follow the instructions provided to access your account.
Next, navigate to the eSIM or “Manage eSIM” section within the app or website. Here, you should see an option to transfer your eSIM to a new device. Click on this option to initiate the transfer process.
Depending on your mobile operator, you may be prompted to enter some additional information, such as the new iPhone’s IMEI or serial number. This is to ensure the eSIM is transferred to the correct device.
After entering the necessary information, follow the on-screen prompts to complete the eSIM transfer. The process may take a few minutes, so be patient while the transfer is in progress.
Once the transfer is complete, you will receive a confirmation message on your existing iPhone, indicating that the eSIM has been successfully transferred to the new device.
It’s important to note that the exact steps may vary slightly depending on your mobile operator and the specific app or website interface they provide. If you encounter any difficulties or have questions, don’t hesitate to reach out to your mobile operator’s customer support for assistance.
By utilizing the mobile operator’s app or website, you can easily transfer your eSIM to a new iPhone without the need for physical SIM card swaps. This method is simple, convenient, and ensures a seamless transition to your new device.
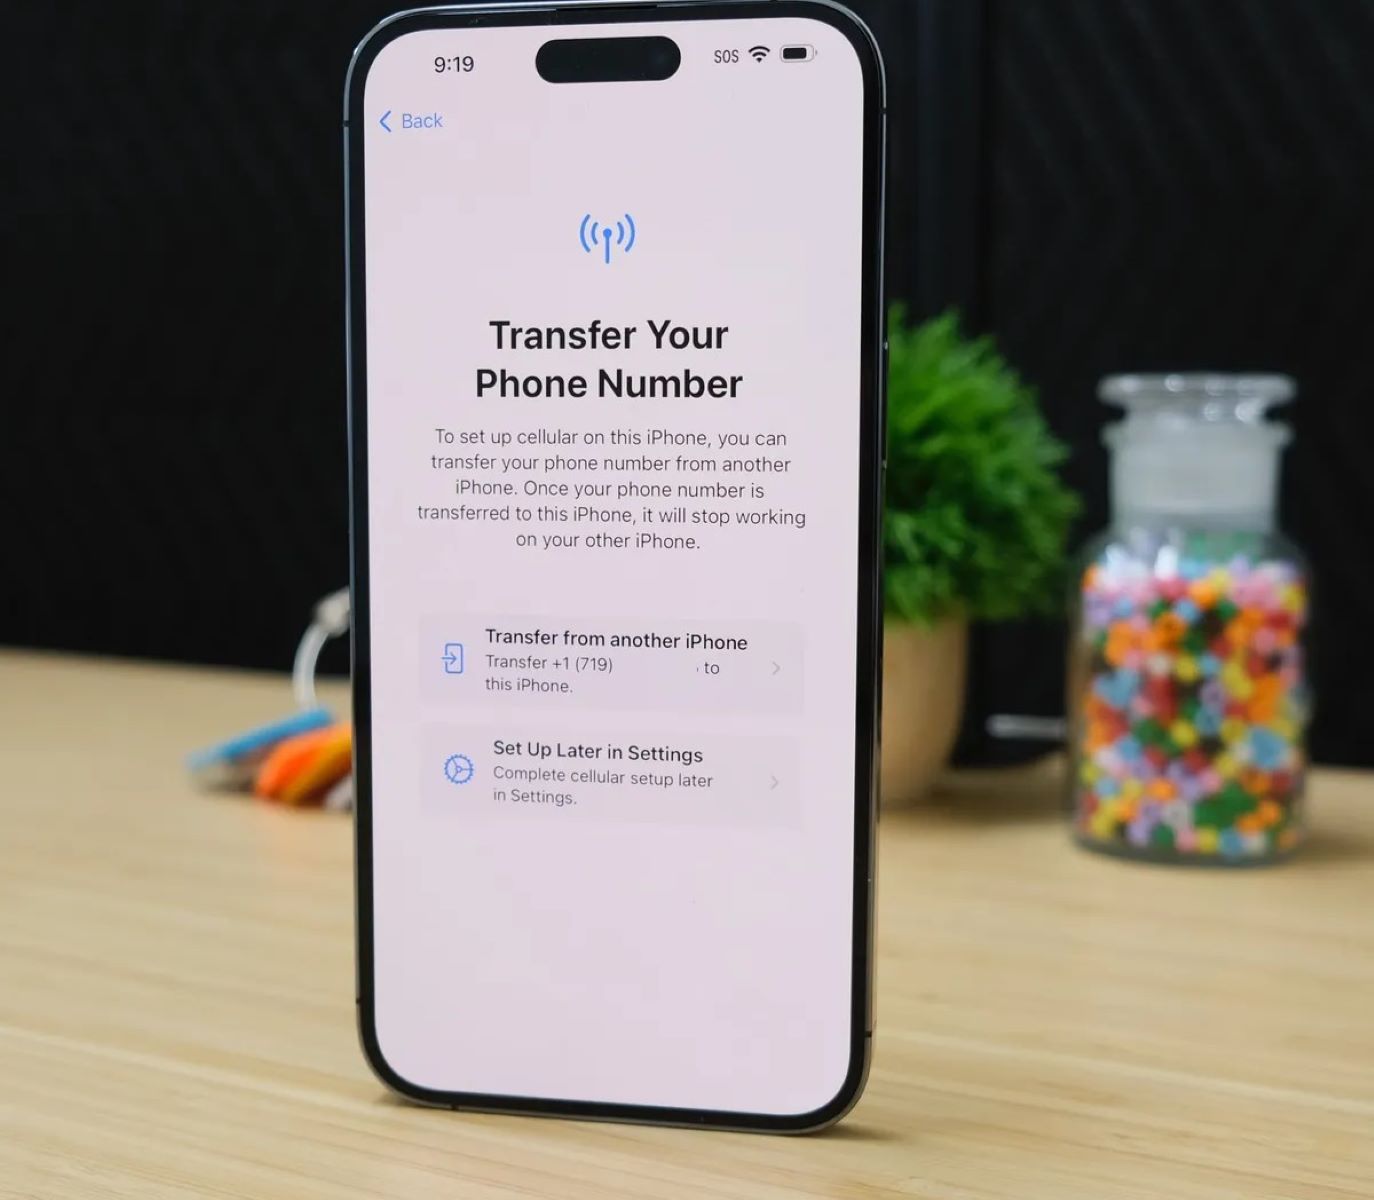
Method 2: Using the iPhone’s built-in eSIM transfer feature
Transferring an eSIM to a new iPhone has become much simpler with the built-in eSIM transfer feature. With this method, you can easily migrate your eSIM from your old iPhone to your new one without the need for any external apps or assistance from your mobile operator. Here’s how you can do it:
1. Start by activating and setting up your new iPhone. Make sure it is connected to Wi-Fi and has the latest iOS version installed.
2. Once your new iPhone is set up, go to the “Settings” app and navigate to “Mobile Data” or “Cellular” settings.
3. Look for the option to “Transfer or Add Cellular Plan.” This option should be available under the eSIM section.
4. Tap on “Transfer Cellular Plan” and follow the on-screen prompts. Your iPhone will guide you through the process of transferring your eSIM from the old device to the new one.
5. You may be asked to provide additional information, such as a confirmation code or the QR code associated with your eSIM. Make sure to have this information handy, as it will be required to complete the transfer.
6. Once the transfer process is complete, your new iPhone should have successfully activated the eSIM, allowing you to make calls, send messages, and access mobile data using your existing cellular plan.
7. It is recommended to double-check your carrier and eSIM settings to ensure that everything is functioning correctly. You can do this by going to “Settings,” then “Cellular” or “Mobile Data,” and verifying that your eSIM is active and selected as the preferred cellular plan.
By using the iPhone’s built-in eSIM transfer feature, you can easily transfer your eSIM to your new device in just a few simple steps. This method eliminates the need for third-party apps or contacting your mobile operator, making the transition to a new iPhone seamless and hassle-free.
Method 3: Contacting your mobile operator for assistance
If you are facing difficulties in transferring your eSIM to a new iPhone using the previous methods, or if your mobile operator has specific instructions or requirements, it is advisable to contact them directly for assistance. Mobile operators have dedicated customer support channels that can help you with any eSIM transfer-related issues.
When reaching out to your mobile operator, be prepared to provide them with the necessary information such as your current eSIM profile details, the new iPhone’s IMEI number, and any other relevant details they may require for the transfer process.
Mobile operators often have a dedicated helpline or customer support number that you can dial to speak with a representative. They will guide you through the eSIM transfer process and ensure that your new iPhone is activated and connected to their network without any issues.
Keep in mind that contacting your mobile operator for assistance may involve some waiting time as their support staff attend to other customers. However, it is a reliable and convenient option, especially if you are unsure about the transfer process or encounter any technical difficulties along the way.
By contacting your mobile operator directly, you can also address any concerns or queries you might have regarding your mobile plan or additional services associated with your eSIM. They can provide you with all the necessary information and ensure a smooth transition to your new iPhone.
Conclusion
In conclusion, transferring your eSIM to a new iPhone is a straightforward process that can be done in a few simple steps. Whether you choose to use the QR code scanning method, the manual entry method, or the carrier app method, you have options to suit your preference and convenience. With the increasing popularity of eSIM technology, it’s important to stay informed and take advantage of the benefits it offers.
By transferring your eSIM, you can easily switch to a new iPhone while keeping your cellular plan intact. This means you can enjoy the benefits of eSIM, such as greater flexibility, dual SIM functionality, and the ability to switch carriers without needing a physical SIM card.
With the step-by-step instructions provided in this article, you can confidently navigate the process of transferring your eSIM to a new iPhone. So, the next time you upgrade your device, make sure to consider transferring your eSIM for a seamless and hassle-free transition to your new device.
FAQs
Q: What is eSIM?
A: An eSIM, or embedded SIM, is a digital SIM card that is built into select mobile devices. It eliminates the need for a physical SIM card and allows users to activate a cellular plan without having to insert a physical SIM card.
Q: Can I transfer my eSIM to a new iPhone?
A: Yes, you can transfer your eSIM to a new iPhone. There are a few different methods you can use, such as transferring the eSIM using the built-in eSIM migration feature, scanning a QR code, or contacting your mobile carrier for assistance.
Q: How do I transfer my eSIM using the built-in migration feature?
A: To transfer your eSIM using the built-in migration feature, follow these steps:
- On your current iPhone, go to Settings.
- Tap on Cellular.
- Select the desired cellular plan using eSIM.
- Tap on Transfer eSIM to your new iPhone.
- Follow the on-screen instructions to complete the transfer.
Q: How do I transfer my eSIM by scanning a QR code?
A: To transfer your eSIM by scanning a QR code, follow these steps:
- Make sure you have the QR code provided by your mobile carrier.
- On your new iPhone, go to Settings.
- Tap on Cellular.
- Select Add Cellular Plan.
- Scan the QR code using your iPhone’s camera.
- The eSIM will be activated and transferred to your new iPhone.
Q: What should I do if I encounter issues while transferring my eSIM?
A: If you encounter any issues while transferring your eSIM, it is recommended to contact your mobile carrier for assistance. They will be able to guide you through the process and troubleshoot any problems you may be experiencing.