
The iPhone is not only a powerful device for making calls and browsing the internet; it also serves as a multimedia hub for music lovers. With its advanced audio features and customizable equalizer, the iPhone allows users to fine-tune their audio settings and enhance their listening experience.
The iPhone equalizer is a built-in tool that adjusts the audio frequencies to optimize the sound output based on personal preference and the type of music being played. Whether you’re a fan of bass-heavy beats or prefer a more balanced sound, the iPhone equalizer can help you achieve the perfect audio settings.
In this article, we’ll dive into how to adjust the iPhone audio settings using the iPhone equalizer. We’ll explore the different preset options, explain how to create custom presets, and provide tips for getting the best sound quality out of your iPhone.
Inside This Article
- Understanding the iPhone Equalizer
- Adjusting iPhone Audio Settings
- Fine-tuning the iPhone Equalizer
- Conclusion
- FAQs
Understanding the iPhone Equalizer
The iPhone is not only a powerful communication device but also a portable music player. With its built-in Equalizer feature, you can easily adjust the audio settings to optimize your listening experience. But what exactly is the iPhone Equalizer, and how does it work?
The iPhone Equalizer is a tool that allows you to manipulate the frequency response of the audio output on your device. By adjusting the equalizer settings, you can enhance certain frequencies, such as bass or treble, to suit your personal preference or the type of music you are listening to.
Think of the equalizer as a set of controls that give you the ability to fine-tune the audio output on your iPhone. With a few simple adjustments, you can boost the bass for a more impactful sound, or enhance the treble to bring out the crispness in vocals and high-frequency instruments.
One of the key benefits of the iPhone Equalizer is its ability to compensate for different listening environments. For example, if you’re listening to music in a noisy environment, you can adjust the equalizer settings to emphasize certain frequencies and make them more prominent, allowing you to hear the music more clearly.
The iPhone Equalizer also provides presets that are designed to optimize the audio output for specific music genres or listening scenarios. Whether you’re into rock, classical, or electronic music, you can choose a preset that enhances the characteristics of that genre and brings out the best in your favorite tracks.
While the iPhone Equalizer is a great tool for improving your audio experience, it’s important to note that using it excessively or inappropriately can result in distortion or an unnatural sound. It’s best to experiment with different equalizer settings and find the balance that suits your preferences without compromising the integrity of the original audio.
Now that you have a better understanding of what the iPhone Equalizer is and how it works, let’s explore how to adjust the audio settings on your iPhone to get the most out of this powerful feature.
Adjusting iPhone Audio Settings
Are you looking to optimize your iPhone audio experience? With the iPhone’s built-in Equalizer, you have the ability to adjust audio settings and personalize your sound. Whether you’re a music enthusiast, a podcast lover, or simply want to enhance the clarity of phone calls, the iPhone Equalizer has you covered. In this article, we will guide you through the process of adjusting the audio settings on your iPhone to achieve the best sound possible.
To begin adjusting your iPhone audio settings, follow these simple steps:
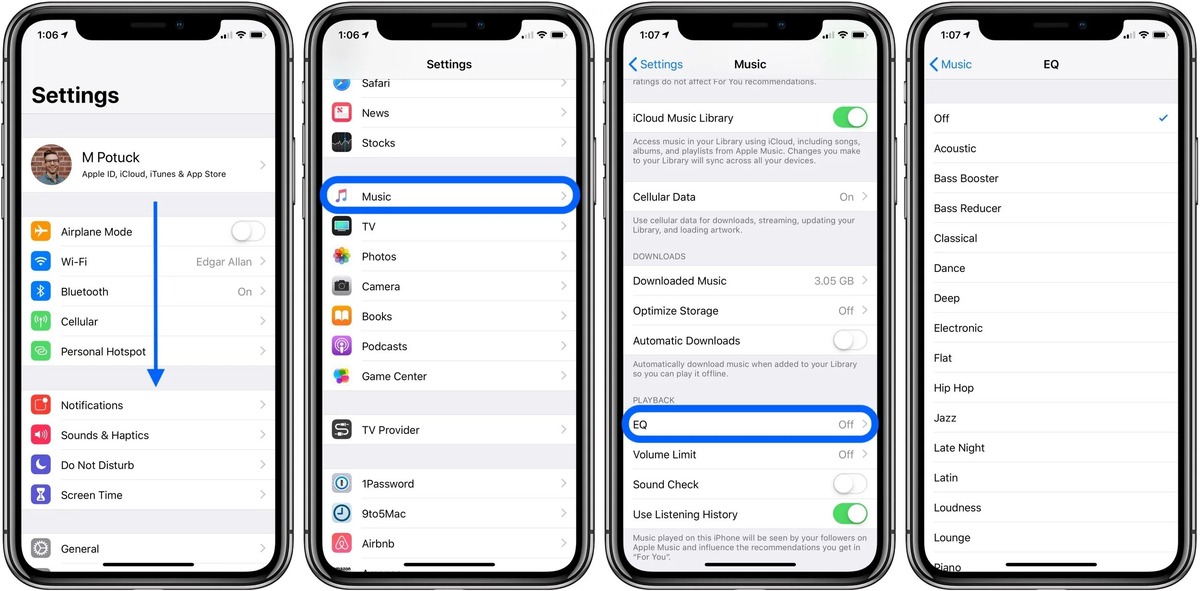
- Open the Settings app on your iPhone.
- Scroll down and tap on Music (for music-related audio settings) or Podcasts (for podcast-related audio settings).
- Under the Playback section, tap on EQ to access the Equalizer options.
Once you have reached the Equalizer options, you will find a variety of presets to choose from. Each preset is carefully crafted to enhance a particular genre or audio type. For example, the “Rock” preset boosts the bass and treble for a more impactful sound, while the “Spoken Word” preset enhances vocals for podcast and audiobook listening.
If you prefer a customized audio experience, you can create your own personalized Equalizer settings. To do this, follow these steps:
- Tap on the Manual option at the top of the Equalizer options page.
- You will see a set of sliders representing different frequency bands. Adjust these sliders to your preference by sliding them up or down.
- Play some audio and tweak the sliders until you achieve the desired sound.
- Once you are satisfied with your custom settings, tap on Done to save them.
Keep in mind that adjusting the iPhone Equalizer settings will affect all audio playback on your device, including music, podcasts, and videos. Experimenting with different presets or creating your own custom settings can greatly enhance your listening experience and make your favorite media truly come alive.
It is important to note that the iPhone Equalizer settings are specific to each audio source. For example, changes made in the “Music” section will not affect audio playback in the “Podcasts” section. Therefore, if you want to optimize audio settings for both music and podcasts, you will need to adjust the Equalizer settings in both sections accordingly.
Now that you know how to adjust the audio settings on your iPhone using the Equalizer, you can take your audio experience to the next level. Whether you’re rocking out to your favorite tunes, catching up on the latest podcasts, or simply making a phone call, optimizing your audio settings will ensure that you enjoy crystal clear sound, personalized to your liking.
Fine-tuning the iPhone Equalizer
Now that you have a basic understanding of the iPhone Equalizer and how to adjust audio settings, it’s time to take it a step further and fine-tune your sound experience. Fine-tuning allows you to customize the audio settings to suit your preferences and enhance the quality of your listening experience.
Here are some tips to help you fine-tune the iPhone Equalizer:
- Experiment with the pre-set options: The iPhone Equalizer comes with several pre-set options such as Bass Booster, Jazz, Rock, and more. Take some time to explore these options and see which one suits your preferred audio style. Each preset is designed to enhance specific audio frequencies, so find the one that resonates with your taste.
- Adjust the sliders manually: If the pre-set options don’t quite hit the mark, you can manually adjust the sliders in the equalizer to control specific audio frequencies. Move the sliders up or down to increase or decrease the intensity of a particular frequency and fine-tune the sound according to your preferences. You can experiment with different combinations to achieve the desired audio quality.
- Save your custom settings: Once you have fine-tuned the equalizer to your liking, you can save your custom settings for future use. To do this, go to Settings > Music > EQ and tap on “Save” after adjusting the sliders. This way, you can quickly access your personalized equalizer settings without having to fine-tune them repeatedly.
- Test your settings with different genres: To ensure that your equalizer settings work well across different types of music, test them with various genres. Play songs from different genres like rock, pop, classical, or jazz to see how your settings affect the audio quality. This will help you ensure that your audio settings are versatile and provide an enjoyable listening experience across the board.
Fine-tuning the iPhone Equalizer allows you to optimize your audio experience and tailor it to your personal preferences. Whether you’re a bass enthusiast or someone who appreciates crisp trebles, the iPhone Equalizer gives you the flexibility to enhance specific frequencies and create the perfect sound signature for your ears.
Remember, the key to achieving the best audio quality lies in experimenting with different settings and finding the perfect balance that suits your ears. So go ahead, dive into the world of the iPhone Equalizer, and fine-tune your audio to perfection.
Conclusion
Adjusting audio settings on your iPhone using the iPhone Equalizer is a simple and effective way to customize your sound experience. Whether you’re listening to music, watching videos, or making calls, having the ability to fine-tune the audio settings can enhance your overall enjoyment. With the iPhone Equalizer, you can modify the frequency response and balance to suit your preferences and optimize the sound quality on your device.
Remember to experiment with different EQ presets and adjust them according to the type of audio content you’re consuming. Finding the right audio settings can make a significant difference in the way you experience sound on your iPhone. So, take some time to explore the iPhone Equalizer settings and personalize your audio experience today.
By leveraging the power of the iPhone Equalizer, you can truly take control of your audio settings and tailor them to your liking. So, go ahead and unleash the full potential of your iPhone’s audio capabilities with the iPhone Equalizer!
FAQs
1. Can I adjust the audio settings on my iPhone?
Absolutely! The iPhone comes with a built-in equalizer that allows you to customize the audio settings according to your preferences. Whether you want to enhance the bass for a more immersive music experience or adjust the treble for clearer vocals, the iPhone equalizer has got you covered.
2. How do I access the iPhone equalizer?
To access the iPhone equalizer, go to the Settings app on your iPhone and scroll down until you find “Music.” Tap on it, then tap on “EQ.” Here, you will see a list of different audio presets to choose from, as well as the option to create a custom equalizer setting.
3. What are the audio presets in the iPhone equalizer?
The iPhone equalizer offers a range of audio presets to instantly enhance your listening experience. Some of the presets include Bass Booster, Small Speakers, Vocal Booster, and more. Experiment with these presets to find the one that suits your audio preferences the best.
4. How can I create a custom equalizer setting on my iPhone?
Creating a custom equalizer setting on your iPhone is simple. After accessing the EQ settings as mentioned earlier, scroll to the bottom of the list and tap on “Custom.” Here, you can manually adjust the sliders for different frequencies to customize the audio output according to your liking. You can save your custom setting by giving it a name and tapping on “Done.”
5. Will adjusting the iPhone equalizer affect battery life?
Adjusting the iPhone equalizer typically does not have a significant impact on battery life. However, using certain presets that emphasize heavy bass or other intensive audio settings may slightly increase power consumption. Overall, the impact on battery life is minimal and should not be a cause for concern.