
Are you tired of constantly being tempted by time-wasting websites on your iPhone? Well, fear not! In this article, we will guide you through the process of banning websites on your iPhone, helping you regain control of your online habits and maximize productivity. Whether you want to restrict access to social media platforms or block certain websites altogether, we’ve got you covered. With just a few simple steps, you can customize your iPhone’s browsing experience and create a healthier digital environment for yourself. So, if you’re ready to say goodbye to distractions and hello to a more focused and efficient online experience, let’s dive in and learn how to ban websites on your iPhone!
Inside This Article
- Method 1: Using Screen Time Restrictions
- Method 2: Using Restrictions in Safari
- Method 3: Using a Content Blocking App
- Method 4: Using a VPN or Firewall App
- Conclusion
- FAQs
Method 1: Using Screen Time Restrictions
One effective way to ban websites on your iPhone is by utilizing the built-in Screen Time restrictions feature. This feature allows you to set up limitations on various aspects of your device, including web content.
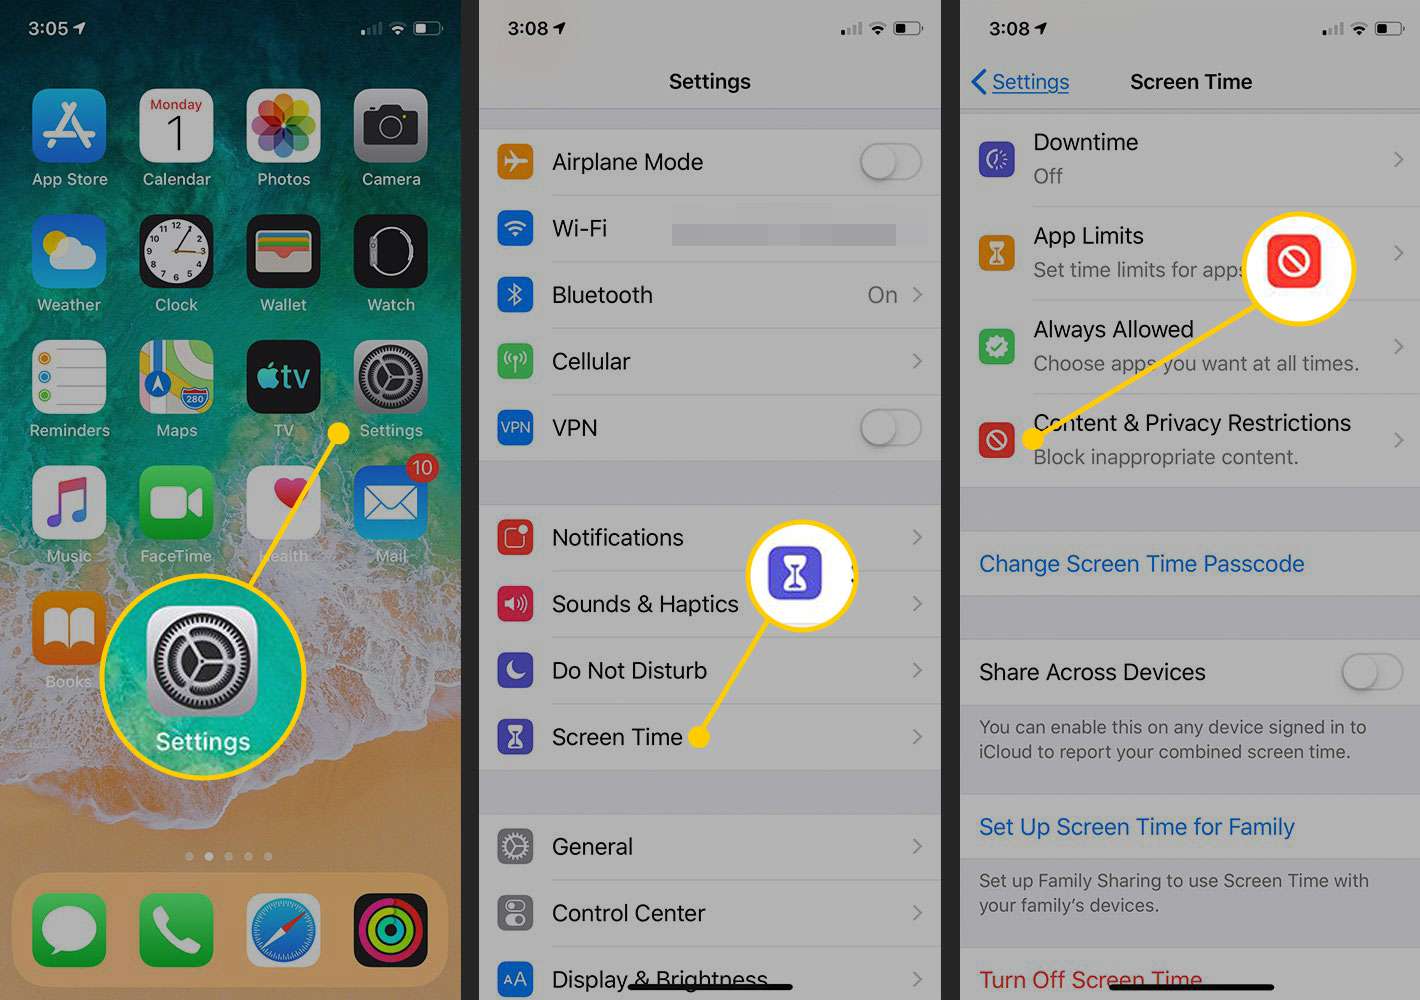
To begin, open the Settings app on your iPhone and tap on “Screen Time,” which is usually located near the top of the list. If you haven’t set up Screen Time before, you may need to follow the on-screen instructions to enable it.
Once you’re in the Screen Time settings, tap on “Content & Privacy Restrictions.” This option allows you to customize the restrictions according to your preferences.
In the Content & Privacy Restrictions menu, tap on “Content Restrictions.” Here, you can choose the type of content you want to restrict, including websites.
Tap on “Web Content” to access the web browsing restrictions. You will have three options to choose from: “Unrestricted Access,” “Limit Adult Websites,” and “Allowed Websites Only.”
If you want to completely ban websites, select “Allowed Websites Only.” This setting will only allow access to websites that you manually add to the “Always Allow” list.
To add websites to the “Always Allow” list, tap on “Add Website” under the “Allowed Websites” section. Enter the URL of the website you want to allow and tap on “Done” to save the changes.
With these settings in place, any other websites that are not on the “Allowed Websites” list will be blocked on your iPhone.
It’s important to note that this method may require you to set a Screen Time passcode to prevent unauthorized changes to the restrictions. This will prevent anyone from modifying the website ban settings.
By using the Screen Time restrictions, you can keep unwanted websites off your iPhone and ensure a safer browsing experience for yourself or anyone else using the device.
Method 2: Using Restrictions in Safari
If you want to ban websites on your iPhone, another method is to utilize the built-in restrictions feature within the Safari browser. This method allows you to block specific websites directly from Safari, preventing access to them on your device.
To set up website restrictions in Safari, follow these steps:
- Open the “Settings” app on your iPhone.
- Scroll down and tap on “Screen Time”.
- Tap on “Content & Privacy Restrictions”.
- If “Content & Privacy Restrictions” is already enabled, enter your passcode to continue. If not, tap on “Enable Restrictions” and create a passcode.
- Under “Content & Privacy Restrictions”, tap on “Content Restrictions”.
- Find and tap on “Web Content”.
- Choose “Limit Adult Websites”. This option will enable the built-in website filter that Apple provides.
- For additional control, tap on “Add Website” under the “Never Allow” section.
- Enter the URL of the website you want to ban and tap on “Done”.
By following these steps, you can effectively restrict access to specific websites on your iPhone. Whenever someone tries to access a banned website in Safari, they will be met with a message stating that the website is restricted.
It’s essential to note that this method only applies to the Safari browser and will not restrict access to these websites through other third-party apps or browsers.
If you want to lift the ban on a website, simply revisit the “Content & Privacy Restrictions” section, tap on “Web Content”, and remove the website from the “Never Allow” list.
Using restrictions in Safari provides a straightforward way to ban websites on your iPhone, offering you control over what websites can be accessed on your device.
Method 3: Using a Content Blocking App
If you want a more robust solution for banning websites on your iPhone, you can consider using a content blocking app. These apps are designed to block specific websites or categories of websites, providing you with enhanced control over your browsing experience.
Content blocking apps work by using predefined lists of blocked websites or allowing you to create your own custom block list. Once the app is installed and configured, it will prevent access to any websites on the block list, effectively banning them from your iPhone.
Here’s how you can utilize a content blocking app to ban websites on your iPhone:
- Start by finding a reliable content blocking app on the App Store. There are several options available, such as “BlockSite” and “Freedom” that offer comprehensive blocking capabilities.
- Install the chosen content blocking app on your iPhone.
- Launch the app and follow the on-screen instructions to set it up. This may include granting the necessary permissions to the app.
- Create your block list by adding the URLs of the websites you want to ban. If you prefer, you can also choose from pre-existing block lists or select specific website categories to block.
- Once you have configured the block list, activate the content blocking feature. This will enable the app to start blocking access to the selected websites.
With a content blocking app in place, you can now enjoy a more seamless browsing experience on your iPhone without worrying about accessing unwanted websites.
Remember that content blocking apps may vary in terms of features and capabilities. It is essential to choose an app that aligns with your specific needs and preferences. Additionally, keep in mind that some content blocking apps may come with a subscription fee or offer additional premium features.
Take advantage of these content blocking apps to regain control over your browsing experience and ban websites that you find inappropriate or distracting on your iPhone.
Method 4: Using a VPN or Firewall App
If you want to take your website blocking capabilities on your iPhone to the next level, using a VPN or Firewall app is the way to go. These apps provide advanced features and settings to help you effectively block websites and maintain control over your browsing experience.
1. Install a VPN or Firewall app: Start by downloading and installing a reliable VPN or Firewall app from the App Store. There are several options available such as NordVPN, ExpressVPN, or Norton. Choose an app that offers strong security features and a user-friendly interface.
2. Configure the app: Once you’ve installed the app, open it and follow the on-screen instructions to configure the settings. Most VPN or Firewall apps will have options to block specific websites or categories of websites. Look for features like website filters, blacklisting, or whitelist controls.
3. Block websites: After configuring the app, you can start blocking websites. Enter the URLs of the websites you want to block or select categories of websites to block. Some apps even provide options to block websites based on keywords or content types.
4. Set up password protection: To prevent unauthorized access to the app settings, it’s recommended to set up password protection. This ensures that only you can make changes to the blocked websites or app settings.
5. Test the blocking: Once you’ve blocked the websites, it’s a good idea to test if the blocking is working properly. Open your browser and try accessing a blocked website. If everything is set up correctly, you should be redirected to a blocked page or receive an error message.
6. Fine-tune the settings: If you find that certain websites are not being blocked or you want to add more websites to the blocklist, go back to the app settings and make the necessary adjustments. You can also explore additional features like scheduling, allowing access during certain hours of the day, or blocking specific apps.
Using a VPN or Firewall app gives you extensive control over website blocking on your iPhone. However, it’s worth noting that some apps may require a paid subscription or in-app purchases to unlock all the features. Choose a reliable app that suits your needs and budget, and enjoy a safe and customized browsing experience on your iPhone.
Mobile phones have become an integral part of our daily lives, and the ability to ban websites on iPhone provides added control and security. By following the simple steps mentioned in this article, users can easily block access to specific websites, making it ideal for parents to protect their children from inappropriate content or for individuals who want to limit their browsing habits. The built-in restrictions and parental controls on iPhone devices empower users to create a safe online environment and maintain productivity. Nevertheless, it’s important to remember that while banning websites can be effective, it is not a foolproof solution and should be used in conjunction with other safety measures. With the ability to control internet access on iPhones, users can enjoy a safer, more tailored browsing experience that aligns with their preferences and values.
FAQs
Q: Can I block websites on my iPhone?
Yes, you can! Apple provides a built-in feature called “Screen Time” that enables you to block specific websites or categories of websites on your iPhone.
Q: How do I use the Screen Time feature to block websites?
To use the Screen Time feature to block websites on your iPhone, follow these steps:
– Open the Settings app on your iPhone
– Tap on “Screen Time”
– Tap on “Content & Privacy Restrictions”
– Enable the “Content & Privacy Restrictions” toggle
– Tap on “Content Restrictions”
– Tap on “Web Content”
– Choose either “Limit Adult Websites” or “Allowed Websites Only”
– To add specific websites to the block list, tap on “Add Website” under “Never Allow” and enter the website URLs you want to block.
Q: Can I block specific websites without using the Screen Time feature?
Yes, you can! If you prefer not to use the Screen Time feature, you can install third-party apps from the App Store that offer website blocking capabilities. These apps usually provide more advanced options and settings compared to the built-in Screen Time feature.
Q: Are there any drawbacks to blocking websites on my iPhone?
While blocking websites can be a useful feature to limit access to certain content, it’s important to keep in mind that it may also block legitimate websites or important resources. Make sure to review the list of blocked websites periodically to ensure that you haven’t accidentally blocked any useful sites.
Q: Can I unblock websites that I’ve previously blocked?
Yes, you can unblock websites that you’ve previously blocked. Simply follow the same steps mentioned earlier in the “How do I use the Screen Time feature to block websites?” section, and remove the website URLs from the blocked list.