
How To Make 3D Holograms With Your Smartphone
In the age of innovation and technological advancement, our smartphones continue to surprise us with their capabilities. One such mind-boggling feature is the ability to create 3D holograms right from the comfort of your own device. Imagine being able to project virtual images that appear to hover in mid-air, adding an element of futuristic wonder to your everyday life.
In this article, we will delve into the fascinating world of 3D holograms and guide you through the steps to create your own mesmerizing visual spectacles with just a few taps on your smartphone. Whether you’re an amateur enthusiast looking for a fun DIY project or a tech-savvy individual eager to explore the possibilities of 3D imaging, we’ve got you covered. So, grab your smartphone, and let’s dive into the exciting realm of creating 3D holograms!
Inside This Article
- Understanding 3D Holograms
- What You’ll Need
- Step-by-Step Guide to Making 3D Holograms:
- Tips and Tricks for Better Results
- Troubleshooting Common Issues
- Conclusion
- FAQs
Understanding 3D Holograms
3D holograms are a fascinating form of visual technology that have captured the imagination of people around the world. Unlike traditional 2D images, holograms create the illusion of depth, allowing objects to appear as if they are floating in mid-air. This cutting-edge technology has gained popularity in recent years, particularly in the entertainment and advertising industries.
At their core, 3D holograms are created using a combination of light, optics, and projection techniques. These holographic images are formed by recording the interference pattern of light beams reflected off an object or scene. When the hologram is projected, it recreates the original object or scene, giving the viewer a sense of depth and dimensionality.
Holograms can be viewed without the need for special glasses or devices, making them accessible and immersive for audiences. They have the ability to captivate and engage viewers, creating a truly interactive visual experience. From holographic displays in museums and trade shows to holographic performances by artists and musicians, the possibilities for incorporating 3D holograms into various forms of media are vast.
One key concept to understand about 3D holograms is the difference between “reflection holograms” and “projection holograms”. Reflection holograms require a specific lighting setup and angle of view to reveal the holographic image, while projection holograms can be viewed from different angles and do not require any specific lighting conditions.
Another important aspect to grasp is the idea of spatial depth in holograms. Unlike flat 2D images, holograms have the ability to create a sense of depth and perspective, giving them a more realistic and lifelike appearance. This is achieved through the recording and projecting of multiple viewpoints, which allows the viewer to perceive different angles of the object or scene.
Understanding the technology behind 3D holograms opens up a world of possibilities for creative expression and visual storytelling. Whether used in advertising, entertainment, or even educational contexts, holograms have the power to captivate and amaze audiences by bringing objects and scenes to life in a way that was once only possible in science fiction.
What You’ll Need
To create impressive 3D holograms with your smartphone, you won’t need any fancy equipment or expensive gadgets. In fact, you only need a few simple things to get started. Here’s a breakdown of what you’ll need:
- A Smartphone: The most important component of this process is, of course, your smartphone. Make sure your device is equipped with a high-resolution display and a gyroscopic sensor, as these features will greatly enhance the 3D hologram experience.
- Hologram App: Next, you’ll need to download a hologram app from your device’s app store. There are plenty of options available, both free and paid, so choose one that has good user reviews and offers a wide range of holographic effects.
- Clear Plastic Sheet: To create the actual hologram projector, you’ll need a clear plastic sheet. This can be acrylic or even a CD case. Just make sure it’s easy to cut and sturdy enough to hold its shape.
- Marker or Pen: To mark and outline the necessary shapes on the plastic sheet, you’ll need a marker or pen. This will help you cut the sheet accurately and create a well-defined projector.
- Scissors or Craft Knife: To precisely cut the plastic sheet along the marked lines, you’ll need a pair of scissors or a craft knife. Be careful while cutting, as accuracy is crucial for the hologram projector to work effectively.
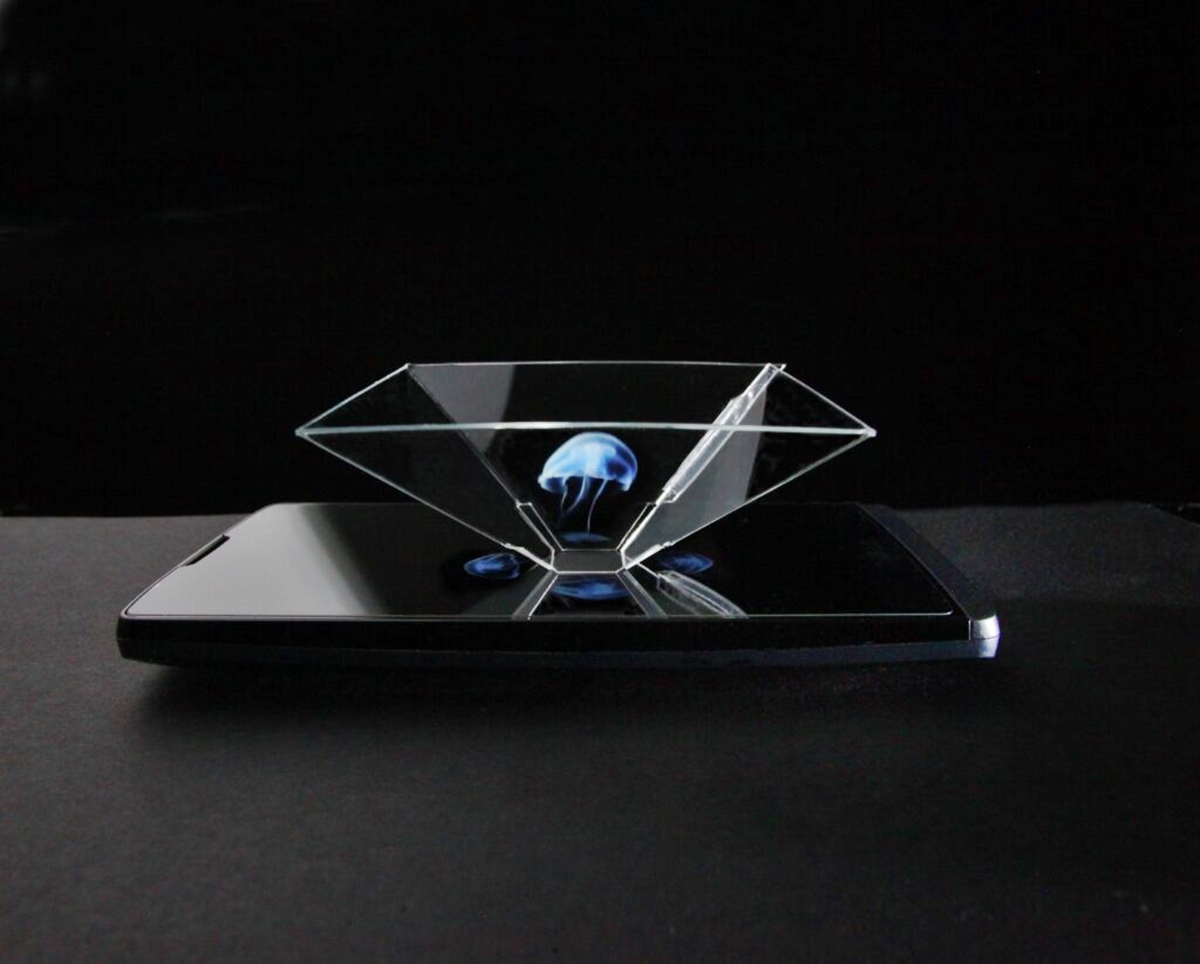
- Tape or Glue: Finally, you’ll need tape or glue to assemble the projector. Following the instructions provided by the hologram app, you’ll attach the plastic sheet to form a pyramid shape. The adhesive you choose should be strong enough to hold the shape securely.
Once you’ve gathered all these essentials, you’re ready to embark on your 3D hologram-making journey. With just a smartphone and a few basic materials, you’ll soon be able to create captivating holographic projections that will amaze your friends and family.
Step-by-Step Guide to Making 3D Holograms:
Creating 3D holograms with your smartphone is an exciting and innovative way to bring virtual objects to life. With just a few simple steps, you can amaze your friends and family with stunning holographic projections. In this step-by-step guide, we will walk you through the process of making 3D holograms using your smartphone.
Choosing the Right Hologram App:
The first step in making 3D holograms is selecting the right hologram app for your smartphone. There are numerous apps available in the app store that can generate holographic projections. Take some time to read the reviews and choose an app that best suits your needs.
Preparing Your Smartphone:
Before you can start creating holographic content, you need to prepare your smartphone. Start by ensuring that your device’s screen is clean and free from any smudges or fingerprints. This will help to enhance the clarity of the holographic projection.
It is also important to adjust the brightness and screen timeout settings on your smartphone. Increasing the brightness and extending the screen timeout will ensure that the hologram is bright and visible for an extended period of time.
Creating 3D Holographic Content:
Now it’s time to create the 3D holographic content that you want to project. This can be done using various techniques, such as creating 3D models or using specialized holographic apps. Some hologram apps allow you to convert regular images or videos into holographic content.
Experiment with different types of content to find what works best for you. Whether it’s a floating object, a virtual pet, or a holographic animation, the possibilities are endless. Get creative and have fun with it!
Projecting and Viewing the Hologram:
Once you have created your holographic content, it’s time to project and view the hologram. Find a darkened room or area with minimal ambient light to ensure optimal visibility of the hologram.
Place your smartphone on a flat surface and launch the hologram app. Position your smartphone so that the hologram’s projection area aligns with the screen. As the hologram is projected, you will be able to view it from different angles and enjoy the immersive experience.
Remember, the quality of the hologram will depend on the resolution and display capabilities of your smartphone. Higher-resolution screens tend to produce sharper and more vibrant holograms.
By following this step-by-step guide, you can easily create and enjoy 3D holograms with your smartphone. So go ahead, unleash your creativity, and let the world of holography unfold right before your eyes!
Tips and Tricks for Better Results
Creating 3D holograms with your smartphone can be a fascinating and immersive experience. To help you achieve better results and make the most out of your holographic creations, here are some valuable tips and tricks:
1. Ensure a Clean and Smooth Surface: Before projecting your hologram, make sure the surface you place it on is clean and smooth. Any dust or imperfections could affect the clarity of the holographic image.
2. Optimize Lighting Conditions: The lighting in the room plays a crucial role in the visibility of the hologram. Avoid bright or direct light sources, as they can interfere with the holographic projection. Dimming the lights or creating a darkened environment will enhance the holographic effect.
3. Adjust the Screen Brightness: To achieve optimal hologram projection, adjust your smartphone’s screen brightness to a level that balances visibility and clarity. Experiment with different brightness settings to find the one that works best for your hologram.
4. Choose Appropriate Content: The content you select for your hologram can greatly impact the quality of the projection. Choose images or videos that are high in contrast and have distinct shapes and colors. This will result in a more vivid and captivating holographic display.
5. Control the Viewing Angle: The viewing angle of the hologram can affect its visibility. Experiment with different angles to find the sweet spot where the hologram appears the clearest and most lifelike. Make sure to position yourself and the hologram viewer accordingly.
6. Eliminate Distractions: Minimize any distractions in the room that could divert attention from the hologram. Turn off noisy appliances or devices and ensure that the area around the hologram is free from clutter. This will create a more immersive and focused holographic experience.
7. Keep Your Smartphone Stable: To avoid shaky projections and distorted holograms, keep your smartphone stable during the projection. Use a tripod or a stable surface to securely hold your smartphone in place. This will result in a clearer and more stable holographic image.
8. Experiment with Different Hologram Sizes: Don’t be afraid to try different sizes for your holograms. You can experiment with various dimensions to find the one that suits your content best. Smaller holograms may have more details, while larger ones can create a more immersive experience.
9. Share and Showcase Your Creations: Once you’ve created impressive holograms, share and showcase them with others. Capture videos or photos of the holographic display and share them on social media or with friends and family. This will not only inspire others but also allow you to receive feedback and suggestions for improvement.
By following these tips and tricks, you can enhance the quality and impact of your smartphone-made 3D holograms. Let your creativity soar and create mesmerizing experiences that leave a lasting impression!
Troubleshooting Common Issues
Creating 3D holograms with your smartphone can be an exciting and immersive experience. However, like any other technology, it’s not uncommon to encounter some issues along the way. Don’t worry, we’ve got you covered! Here are some common troubleshooting tips to help you overcome any hurdles and enjoy your 3D holograms to the fullest:
1. Dim or Blurry Holographic Image: If your holographic image appears dim or blurry, it could be due to improper lighting. Make sure you are in a well-lit room or use additional lighting sources to enhance the hologram’s visibility.
2. Lack of Depth and Clarity: Sometimes, the 3D effect of your hologram might not be as pronounced as you’d like. To address this, ensure that your smartphone is positioned at the correct angle and distance from the hologram projector. Experiment with different positions to find the sweet spot for optimal depth and clarity.
3. Distorted or Misaligned Hologram: If your hologram appears distorted or misaligned, double-check that your smartphone is properly centered in the hologram projector. Additionally, make sure that the holographic content you are using is compatible with the hologram app and projector you are using.
4. Unresponsive Hologram App: If the hologram app is unresponsive or crashes frequently, try closing the app and relaunching it. If the issue persists, uninstall and reinstall the app or try using an alternative hologram app that suits your device and operating system.
5. Compatibility Issues: Ensure that your smartphone and hologram projector are compatible with each other. Some hologram projectors may have size or device-specific requirements. Check the specifications and user manual of both devices to ensure they are compatible and functioning optimally together.
6. Insufficient Holographic Content: If you’re not satisfied with the available holographic content, consider creating your own using 3D modeling software or search for additional content online. Having diverse and engaging holographic content can enhance your overall hologram experience.
7. Limited Viewing Angle: Keep in mind that 3D holograms are best viewed from specific angles. When positioning your hologram projector, experiment with different angles to find the optimal viewing position. Remember, the viewing angle can vary depending on the hologram app and projector you are using.
8. Weak Holographic Effect: If your hologram lacks the “wow” factor, ensure that you are using a high-quality hologram projector. Cheap or poorly made projectors may not produce the desired holographic effect. Invest in a reputable and reliable hologram projector for better results.
By keeping these troubleshooting tips in mind, you’ll be able to overcome common issues and make the most out of your 3D hologram experience. Remember, experimenting and adjusting various parameters can help you achieve the best possible results. So, don’t be afraid to try different approaches and have fun exploring the fascinating world of 3D holography!
Conclusion
Creating 3D holograms with your smartphone is an exciting and innovative way to engage with technology. With just a few simple steps and the right materials, you can transform your mobile phone into a holographic projector. By following the techniques outlined in this article, you’ll be able to bring your favorite images and videos to life in stunning 3D holographic form.
Not only does smartphone hologram technology provide a unique visual experience, but it also showcases the potential for creativity and exploration in the digital world. Whether you’re looking to entertain friends and family or explore a new form of visual storytelling, making 3D holograms with your smartphone offers endless possibilities.
So, grab your smartphone and start exploring the world of holograms today. Get ready to amaze and captivate your audience with mesmerizing 3D visuals that go beyond the confines of traditional screens. The future of mobile entertainment is here, and it’s in the palm of your hand!
FAQs
1. Can I make 3D holograms with any smartphone?
While not all smartphones are equipped with the necessary technology to create 3D holograms, many modern smartphones have the capability. It’s best to check if your smartphone has a hologram projection feature or the necessary hardware components before attempting to make 3D holograms.
2. What applications or software do I need to make 3D holograms?
There are several applications and software available that can help you create 3D holograms. Some popular options include Holo, HoloPlay, and Holapex. These apps typically utilize augmented reality (AR) technology to generate 3D holographic visuals. Check your smartphone’s app store for available options that are compatible with your device.
3. Do I need any additional accessories to make 3D holograms?
In most cases, you won’t need any additional accessories to create 3D holograms with your smartphone. However, some apps may recommend using a holographic prism or a special film to enhance the holographic effect. These accessories are optional and can be purchased separately if desired.
4. Are there specific requirements for creating 3D holograms?
The requirements for creating 3D holograms may vary depending on the app or software you’re using. Generally, you’ll need a well-lit environment to ensure optimal projection quality. Some apps may also require specific image or video formats for creating holographic content. Always refer to the instructions provided by the app or software you’re using for the best results.
5. Can I share my 3D holograms with others?
Yes, you can share your 3D holograms with others. Most apps and software allow you to record videos or capture screenshots of your holographic creations. You can then share these files through various platforms such as social media, messaging apps, or email. Keep in mind that the recipients may need compatible devices or apps to view the holograms properly.