
In today’s fast-paced digital world, our smartphones have become an indispensable part of our lives. With their advanced features and capabilities, iPhones have revolutionized the way we communicate, work, and stay entertained. Among the many features that iPhones offer, the ability to mark certain contacts or apps as favorites is a handy tool that allows quick and easy access to frequently used items. However, over time, our preferences may change, and we may find ourselves with a cluttered favorites list. If you’re wondering how to remove favorites on your iPhone, you’ve come to the right place. In this article, we will guide you through the step-by-step process of removing unwanted favorites from your iPhone, ensuring a clutter-free and personalized smartphone experience.
Inside This Article
- Method 1: Removing Favorites from the Phone App
- Method 2: Deleting Favorites from the Contacts App
- Method 3: Removing Favorites from Safari
- Method 4: Clearing Favorites from the Phone’s Widgets
- Other Considerations
- Conclusion
- FAQs
Method 1: Removing Favorites from the Phone App
If you have accumulated a long list of favorites in your iPhone’s Phone app and want to remove some of them, follow these simple steps:
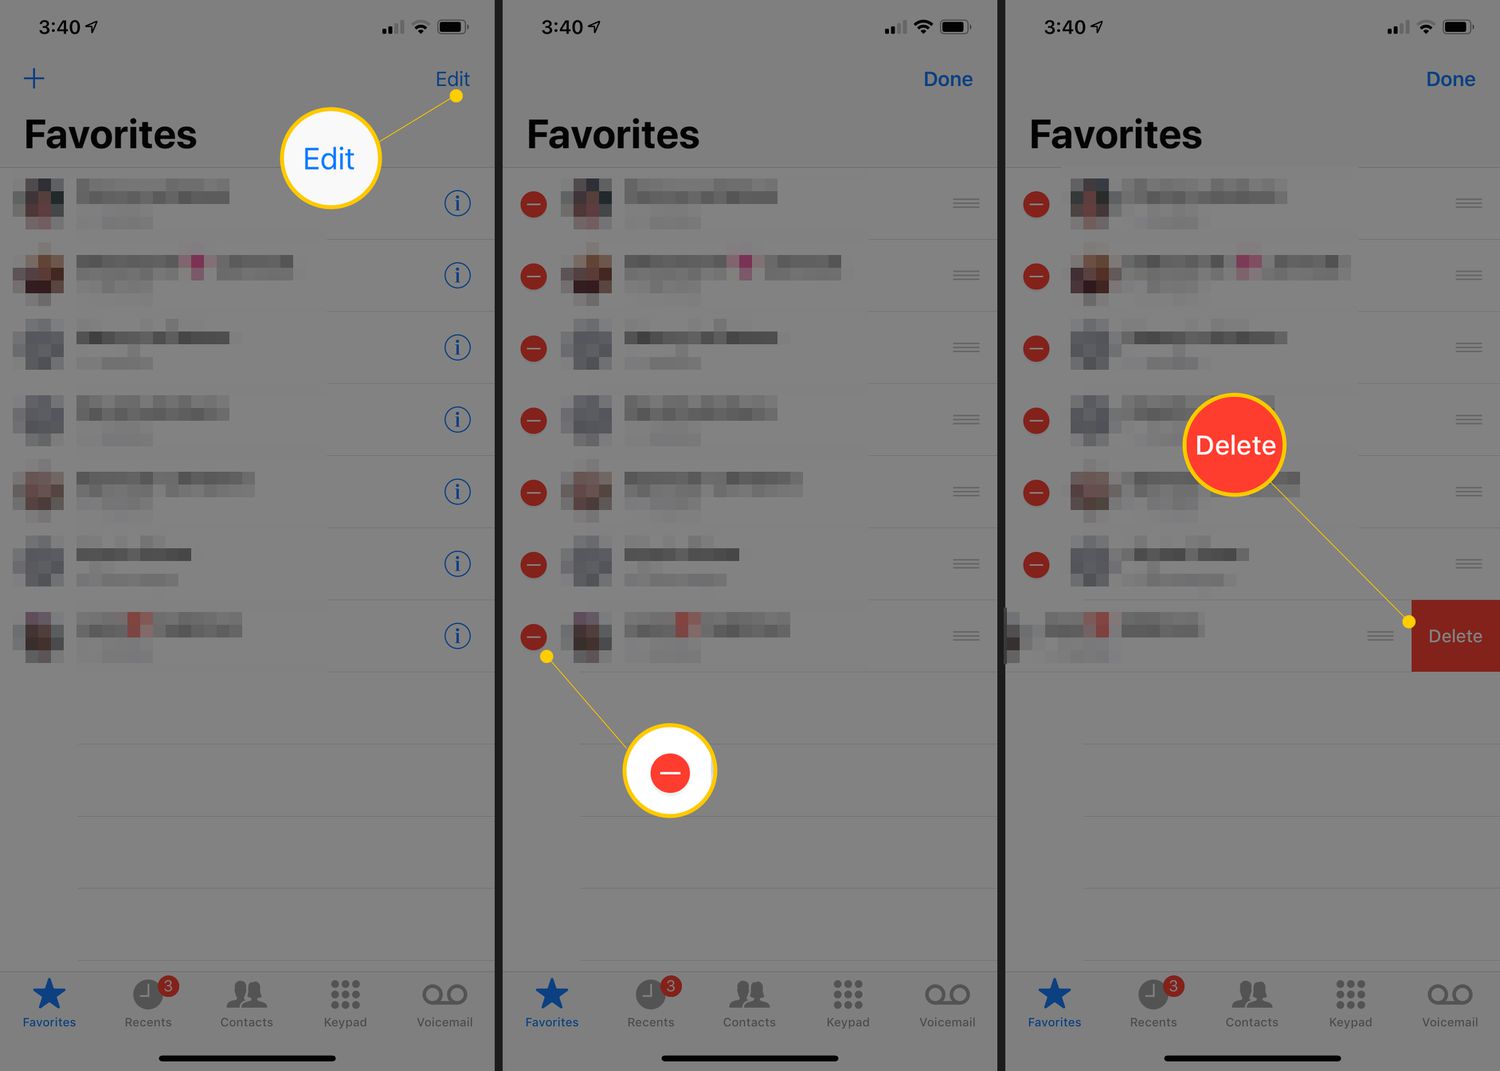
1. Open the Phone app on your iPhone
2. Navigate to the “Favorites” tab located at the bottom of the screen
3. You will see a list of all your favorite contacts. Tap on the “Edit” button in the top-right corner of the screen.
4. A red minus icon will appear next to each contact. Tap on the minus icon next to the contact you want to remove from your favorites list.
5. A delete confirmation dialog box will appear. Tap on the “Remove from Favorites” option to confirm the deletion.
6. Repeat steps 4 and 5 for each contact you want to remove from your favorites list.
By following these steps, you can easily remove unwanted favorites from your iPhone’s Phone app and keep your list organized and up-to-date.
Method 2: Deleting Favorites from the Contacts App
If you have certain contacts as favorites on your iPhone and want to remove them, the Contacts app provides a simple and straightforward method. Follow the steps below to delete favorites from the Contacts app:
- Launch the Contacts app on your iPhone.
- Navigate to the “Favorites” tab located at the bottom of the screen.
- You will see a list of all your favorite contacts. Scroll through the list and find the contact you want to remove.
- Tap on the contact’s name to view their details.
- Next, tap on the “Edit” option in the top-right corner of the screen.
- Scroll down in the contact’s editing view until you see the “Remove from Favorites” option.
- Tap on “Remove from Favorites.”
- Finally, tap on “Done” to save the changes.
Once you have completed these steps, the selected contact will no longer be listed as a favorite in your Contacts app.
By following these simple steps, you can easily remove your favorites from the Contacts app on your iPhone. This can be helpful if you want to declutter your favorites list or if you no longer need quick access to certain contacts.
Method 3: Removing Favorites from Safari
If you have saved certain websites as favorites in Safari on your iPhone, you may want to remove them at some point. Here’s how you can remove favorites from Safari:
1. Open the Safari app on your iPhone and tap on the bookmarks icon at the bottom of the screen (the icon looks like an open book).
2. In the bookmarks screen, tap on the “Favorites” tab.
3. Here, you will see a list of your saved favorite websites. To remove a favorite, simply swipe left on the website entry.
4. When the delete button appears, tap on it to remove the favorite from Safari.
5. Repeat this process for each favorite you want to remove from Safari.
By following these steps, you can easily remove favorites from Safari and keep your browsing experience clutter-free.
Method 4: Clearing Favorites from the Phone’s Widgets
If you have favorites added to your iPhone’s widgets, you may want to clear them at some point. Widgets provide quick access to your most used apps, contacts, and other information right from your Home Screen. However, if your favorites have changed or you simply want to declutter your widgets, here’s how you can remove favorites from your iPhone’s widgets.
To begin, unlock your iPhone and navigate to your Home Screen. Next, swipe right to access the widgets panel. Here, you’ll see a list of widgets that you have enabled on your device.
Locate the widget that contains your favorites. This can vary depending on the version of iOS you have installed and the specific widgets you have activated. Common widgets that may contain favorites include the “Favorites” widget or the “Contacts” widget.
Once you’ve identified the widget, press and hold it until the icons on your Home Screen start to jiggle. Look for a small “x” or a minus sign on the top left corner of the widget. Tap on the “x” or the minus sign to remove the widget from your Home Screen.
After removing the widget, your favorites will no longer be displayed in the widget. However, please note that removing the widget does not delete the favorites themselves. Your contacts or apps will still be accessible from the respective apps or through other features on your iPhone.
If you wish to add different favorites to your widgets or rearrange them, you can do so by tapping the “+” button in the widgets panel. This will allow you to select and customize your widgets according to your preferences.
Remember that widgets are a convenient way to quickly access information, but it’s essential to periodically review and update them to keep your Home Screen clutter-free and personalized. You can easily add or remove favorites as your needs or preferences change.
With the steps outlined above, you can now easily clear favorites from the widgets on your iPhone. Take a few moments to customize your widgets and make your Home Screen truly your own.
Other Considerations
When it comes to removing favorites on your iPhone, there are a few additional considerations to keep in mind:
1. Syncing: If you have your iPhone synced with iCloud or other devices, removing a favorite on one device may also remove it on others. So, if you’re removing a favorite contact or website from one device, it’s a good idea to check if it gets removed from all synced devices.
2. App updates: Occasionally, app updates may change the way favorites are managed or displayed. It’s a good idea to check for app updates regularly to ensure that you have the latest features and options for managing favorites properly.
3. Privacy: Removing a favorite from your iPhone may affect your privacy settings. For example, if you remove a favorite contact, they may no longer be seen as a frequently contacted person in your device’s suggested contacts. So, when you remove a favorite, be aware of any potential privacy implications.
4. Backup: Before making any changes to your favorites, it’s always a good idea to back up your iPhone. This will ensure that you don’t lose any important data in case something goes wrong during the removal process.
5. Customization: Depending on the version of iOS you’re using, you may have various customization options for managing and organizing favorites. Explore the settings and preferences of your device to discover additional ways to customize your favorites list.
Remember, removing favorites from your iPhone is a personal preference, and it can be done easily with just a few taps. By considering the factors mentioned above, you can remove favorites without any hassle and tailor your device to suit your needs and preferences.
Conclusion
In conclusion, removing favorites on your iPhone is a simple and straightforward process that can help you declutter your device and organize your contacts effectively. Whether you want to remove a favorite contact or clear your entire favorites list, the steps are easy to follow and can be done in a matter of minutes.
By accessing the Contacts app and making use of the “Edit” or “Remove from Favorites” options, you can easily manage your favorite contacts and ensure that your iPhone remains organized and efficient. Remember to always double-check before removing any contacts to avoid accidentally deleting essential ones.
Now that you have a clear understanding of how to remove favorites on your iPhone, take some time to declutter your contacts list and streamline your device. Enjoy the benefits of a clean and well-organized phonebook, making it easier to find the contacts you need and enhancing your overall user experience on your iPhone.
FAQs
1. Can I remove favorites on my iPhone?
Yes, you can easily remove favorites on your iPhone by following a few simple steps. Let me guide you through the process.
2. Why would I want to remove favorites on my iPhone?
There could be several reasons why you would want to remove favorites on your iPhone. Perhaps you no longer frequently contact that person or the relationship has changed. Additionally, removing favorites can help declutter your device and make it easier to navigate.
3. How do I remove a favorite contact?
To remove a favorite contact on your iPhone, follow these steps:
- Open the Phone app on your iPhone.
- Tap on the “Favorites” tab at the bottom of the screen.
- Swipe left on the contact you want to remove.
- Tap the “Delete” button that appears on the right-hand side.
- Confirm the deletion by tapping “Remove from Favorites”.
4. Can I remove multiple favorites at once?
Unfortunately, there is no built-in feature on the iPhone that allows you to remove multiple favorites at once. You will need to follow the process mentioned in the previous question to remove each favorite individually.
5. Will removing a favorite contact delete their number from my iPhone entirely?
No, removing a favorite contact will only remove them from the favorites list on your iPhone. Their contact information will still be stored in your iPhone’s Contacts app, and you can still find and call them using the search function or by browsing through your contacts.