
Having a favorite contact on your iPhone can be a convenient way to quickly access important people in your life. Whether it’s a family member, a close friend, or a colleague, having them saved as a favorite can save you valuable time when making calls or sending messages. However, as relationships evolve and circumstances change, you may find yourself needing to remove a favorite contact from your iPhone.
In this article, we will guide you through the process of removing a favorite on your iPhone. We’ll explore both the iOS settings and the Contacts app method to ensure that you have all the options at your disposal. So, whether you want to declutter your favorites or simply update your list, we’ve got you covered. Let’s dive in and discover how to remove a favorite contact from your iPhone.
Inside This Article
Steps to Remove a Favorite on iPhone
Removing a favorite contact or bookmark on your iPhone is a simple process that can be done in a few easy steps. Whether you want to remove a contact from the Phone app, a bookmark from Safari, or a favorite from the Messages app, we’ve got you covered. In this guide, we will walk you through the steps to remove a favorite on iPhone using various methods.
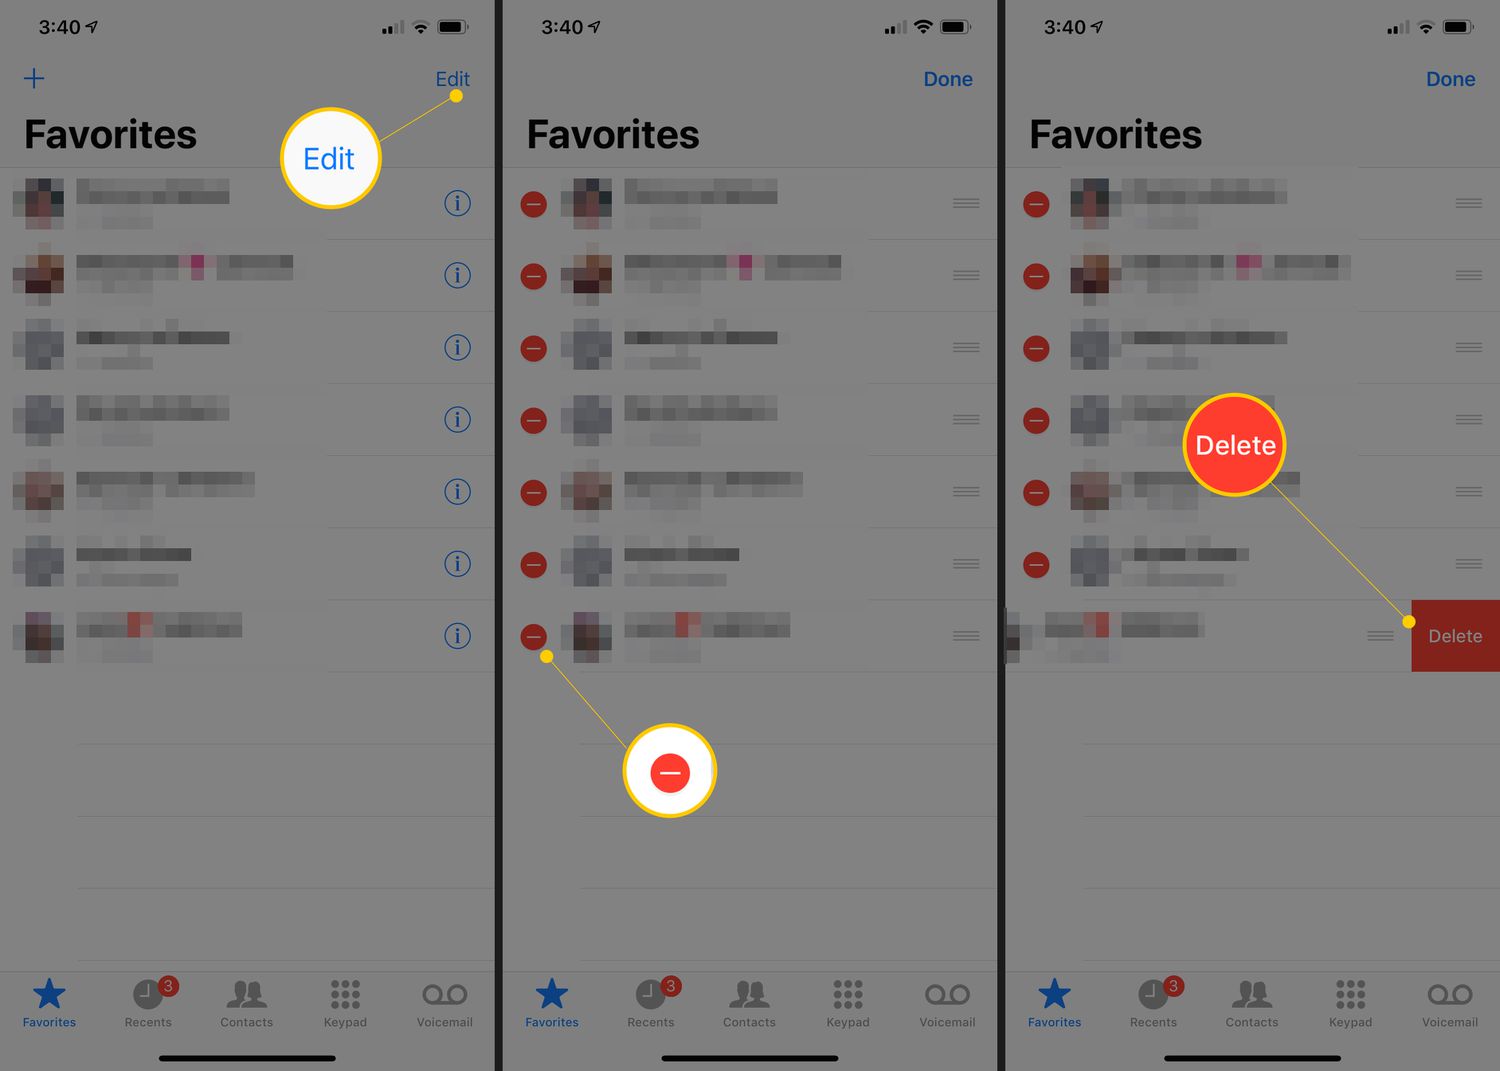
Method 1: Removing a Favorite from Phone App
If you have added a contact as a favorite in the Phone app and want to remove it, follow these steps:
- Open the Phone app on your iPhone.
- Tap on the “Favorites” tab at the bottom of the screen.
- Find the contact you want to remove and swipe left on their name.
- A “Delete” button will appear. Tap on it to remove the contact from your favorites.
By following these steps, you can easily remove a favorite contact from the Phone app.
Method 2: Removing a Favorite from Contacts App
If you have added a contact as a favorite in the Contacts app and want to remove it, here’s how:
- Open the Contacts app on your iPhone.
- Find the contact you want to remove from favorites.
- Tap on the contact’s name to open their details.
- Scroll down to the bottom and tap on the “Remove from Favorites” option.
By following these steps, you can easily remove a favorite contact from the Contacts app.
Method 3: Removing a Favorite from Messages App
If you have added a contact as a favorite in the Messages app and want to remove it, follow these steps:
- Open the Messages app on your iPhone.
- Tap on the conversation with the favorite contact.
- Tap on the contact’s name at the top of the screen.
- Scroll down and tap on “Remove from Favorites” option.
By following these steps, you can easily remove a favorite contact from the Messages app.
Method 4: Removing a Favorite from Safari App
If you have added a webpage as a favorite in the Safari app and want to remove it, here’s how:
- Open the Safari app on your iPhone.
- Tap on the bookmarks icon at the bottom of the screen.
- Tap on the “Favorites” tab at the top of the screen.
- Find the bookmark you want to remove and swipe left on it.
- Tap on the “Delete” button that appears to remove the bookmark from your favorites.
By following these steps, you can easily remove a favorite bookmark from the Safari app.
Removing a favorite on your iPhone is a quick and straightforward process, whether you want to remove a contact from the Phone or Contacts app, or a bookmark from the Safari app. By utilizing the methods outlined in this guide, you can declutter your favorites list and keep it organized with only the most relevant entries.
Conclusion
In conclusion, removing a favorite on your iPhone is a simple and straightforward process that can help you declutter your device and optimize your user experience. Whether you want to remove a favorite contact, app, or website, the steps outlined in this guide will allow you to easily accomplish your goal.
Remember to regularly reassess your favorites and remove any that are no longer relevant or useful to you. This will help you maintain a streamlined and organized iPhone interface, ensuring that you can quickly access the content and contacts that matter most to you.
By following the instructions provided in this article, you can effortlessly remove favorites on your iPhone and make room for new additions that better reflect your current needs and preferences. So go ahead, take control of your favorites, and enjoy a more personalized and efficient mobile experience!
FAQs
1. How do I remove a favorite on iPhone?
To remove a favorite on iPhone, follow these steps:
– Open the Phone app.
– Go to the “Favorites” tab at the bottom.
– Find the contact you want to remove from favorites.
– Swipe left on the contact’s name.
– Tap on the “Delete” option that appears on the right.
– Confirm the deletion by tapping “Remove from Favorites”.
– The contact will be removed from your favorites list.
2. Can I remove multiple favorites at once on iPhone?
Unfortunately, there is no built-in option to remove multiple favorites at once on iPhone. You will have to remove each contact individually by following the steps mentioned above.
3. Will removing a contact from favorites delete it from my iPhone?
No, removing a contact from favorites does not delete it from your iPhone. The contact will still be stored in your Contacts app and accessible whenever you need it. Removing a contact from favorites only removes it from the special “Favorites” list in the Phone app.
4. Can I re-add a contact to favorites after removing it?
Yes, you can re-add a contact to favorites after removing it. To do this, simply find the contact in your Contacts app, tap on their name, and then tap on the “Add to Favorites” option.
5. Is there a way to organize the order of the favorites on iPhone?
Yes, you can organize the order of the favorites on iPhone. To do this, go to the “Favorites” tab in the Phone app, tap on “Edit” in the top right corner, and then drag the contacts up or down to rearrange their order. Once you’re done, tap on “Done” to save the changes.