
Welcome to our guide on how to remove a photo from the Photos widget on the iPhone running iOS 14! The Photos widget is a convenient feature that allows you to view and showcase your favorite images directly on your home screen. However, there may be times when you want to remove a specific photo from the widget. Whether it’s a picture you no longer want to see or one that you’d like to replace with another, we’ve got you covered. In this article, we will walk you through the step-by-step process of removing a photo from the Photos widget on your iPhone. With our easy-to-follow instructions, you’ll be able to customize your widget content effortlessly. Let’s dive in and learn how to declutter and update your Photos widget!
Inside This Article
- Overview of the Photos Widget on iOS 14
- Steps to Remove a Photo from the Photos Widget
- Conclusion
- FAQs
Overview of the Photos Widget on iOS 14
The Photos Widget is a new feature introduced in iOS 14 that allows you to add a personalized touch to your iPhone’s home screen. It provides a visually appealing way to showcase your favorite photos right on your device’s home screen. With the Photos Widget, you can easily view and access your cherished memories without the need to open the Photos app.
One of the great things about the Photos Widget is its ability to automatically curate and display your most recent and relevant photos. It utilizes intelligent algorithms to pick images based on factors such as date, location, and even the people in your photos. This ensures that you are presented with a dynamic and personalized photo collection every time you glance at your home screen.
The Photos Widget comes in various sizes, allowing you to choose the one that fits your preferences and home screen layout. At a glance, you can see a single photo or a small stack of images that you can swipe through to view each one individually. This adds a delightful touch to your home screen, making it feel more lively and captivating.
Moreover, the Photos Widget is designed to seamlessly integrate with other widgets and apps on your iPhone. This means that you can customize your home screen by placing the Photos Widget alongside other widgets, such as the Weather or Calendar widget, for a more personalized and efficient experience.
Overall, the Photos Widget on iOS 14 offers a convenient and visually appealing way to showcase your favorite photos right on your home screen. With its intelligent curation, customizable sizes, and seamless integration, it adds a touch of personalization to your iPhone’s interface, allowing you to enjoy your cherished memories at a glance.
Steps to Remove a Photo from the Photos Widget
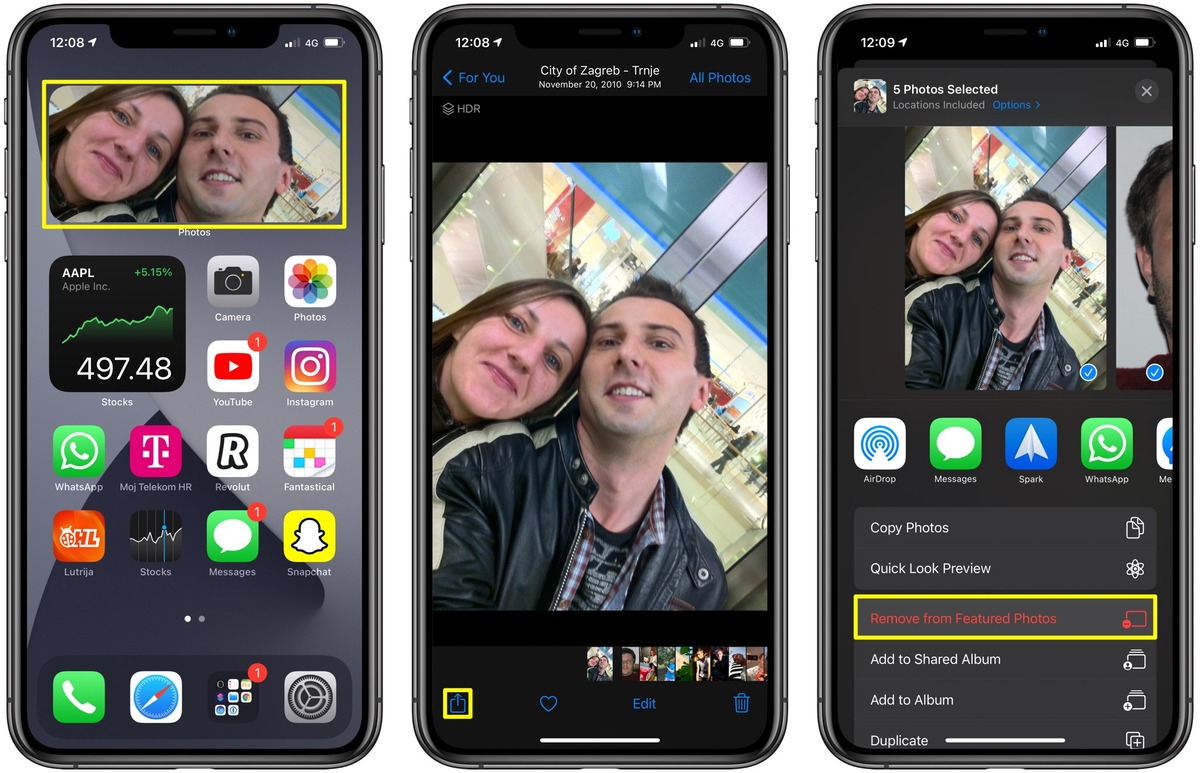
If you’re using iOS 14 on your iPhone, you may have noticed the new Photos widget that displays a rotating collection of your favorite images on your home screen. While this feature allows you to enjoy your cherished memories at a glance, you might also want to remove a specific photo from the rotating selection. Here’s a step-by-step guide on how to do it:
1. Start by unlocking your iPhone and navigating to your home screen.
2. Locate the Photos widget and long-press on it until the icons start wiggling and a small “X” appears in the corner of the widget.
3. Tap on the “X” icon to enter the edit mode for the widget.
4. The widget will now expand and display the photo gallery it is drawing from. Scroll through the images until you find the photo you want to remove.
5. Once you’ve identified the photo, tap on it to select it.
6. A pop-up menu will appear with options to remove the photo or adjust the widget settings. Tap on the “Remove” option.
7. Confirm the removal by tapping on “Remove Photo” in the dialog box that appears.
8. The selected photo will no longer be part of the rotating collection in the Photos widget.
9. To exit the edit mode, press the home button or swipe up from the bottom of the screen, depending on your iPhone model.
10. Your photos widget is now updated with the removal of the selected photo, and it will no longer appear in the rotation on your home screen.
Overall, removing a photo from the Photos widget on the iPhone is a simple and convenient process. With the introduction of iOS 14, Apple has made it even easier for users to customize their devices and personalize their home screens.
By following the step-by-step instructions outlined in this article, you can quickly remove any unwanted photo from the Photos widget and maintain a clutter-free and aesthetically pleasing home screen. Whether you want to update your widget with the latest memories or simply remove a photo that no longer fits your preferences, iOS 14 provides the flexibility you need.
Remember, exploring and experimenting with your iPhone’s features can unlock a world of possibilities. Don’t be afraid to try new things, customize your device to suit your style, and make the most out of your iPhone’s capabilities.
FAQs
1. How do I remove a photo from the Photos Widget on my iPhone?
To remove a photo from the Photos Widget on your iPhone running iOS 14, follow these steps:
- 1. Press and hold on the Photos Widget on your home screen.
- 2. Tap the “Edit Widget” option that appears in the menu.
- 3. Locate the photo you want to remove and tap on the minus (“-“) button in the top left corner of the photo.
- 4. Confirm the removal by tapping “Remove Photo” when prompted.
- 5. Tap “Done” to save the changes and exit the editing mode.
Your selected photo will now be removed from the Photos Widget on your iPhone.
2. Can I customize the Photos Widget on my iPhone?
Yes, you can customize the Photos Widget on your iPhone by choosing which specific photos appear in the widget. Here’s how:
- 1. Press and hold on the Photos Widget on your home screen.
- 2. Tap the “Edit Widget” option that appears in the menu.
- 3. Tap the “Choose Photo” option.
- 4. Select the photos you want to display in the widget from your photo library.
- 5. Tap “Done” to save the changes and exit the editing mode.
Now, the Photos Widget on your iPhone will display the customized set of photos you selected.
3. Can I change the size of the Photos Widget on my iPhone?
Yes, you can change the size of the Photos Widget on your iPhone. The Photos Widget comes in three sizes: small, medium, and large. To change the size, follow these steps:
- 1. Press and hold on the Photos Widget on your home screen.
- 2. Tap the “Edit Widget” option that appears in the menu.
- 3. Swipe left or right to select the size you want (small, medium, or large).
- 4. Tap “Done” to save the changes and exit the editing mode.
The Photos Widget will now appear in the new size you selected.
4. Why aren’t my photos showing up in the Photos Widget on my iPhone?
If your photos are not showing up in the Photos Widget on your iPhone, try the following troubleshooting steps:
- 1. Check if the Photos Widget is added to your home screen. If not, add it by pressing and holding on an empty area of your home screen, tapping the “+” icon, and selecting the Photos Widget.
- 2. Ensure that the Photos Widget is properly configured. Press and hold on the widget, tap “Edit Widget,” and make sure the correct source album is selected.
- 3. Verify that the photos you want to display in the widget are present in the selected source album.
- 4. Restart your iPhone by turning it off and on again.
If the issue persists, there may be a problem with your device or software, and you may need to seek further assistance from Apple Support.
5. Can I remove the Photos Widget from my iPhone entirely?
Yes, you can remove the Photos Widget from your iPhone by following these steps:
- 1. Press and hold on the Photos Widget on your home screen.
- 2. Tap the “Remove Widget” option that appears in the menu.
- 3. Confirm the removal by tapping “Remove” when prompted.
The Photos Widget will now be removed from your iPhone, and you will no longer see it on your home screen.