
Are you fed up with the unsightly scratches or bubbles on your phone screen protector? Don’t worry, because in this article, we will guide you on how to remove a phone screen protector safely and effectively. Whether it’s a tempered glass protector or a thin film, we have got you covered with simple step-by-step instructions. We understand that a damaged or improperly installed screen protector can hinder your smartphone experience by compromising touch sensitivity and clarity. So, let’s get started and learn the proper techniques to remove that stubborn screen protector without leaving any residue or damaging your device’s screen. Say goodbye to those annoying bubbles and scratches and enjoy a pristine screen once again!
Inside This Article
- Overview
- Supplies Needed
- Step 1: Prepare for Removal
- Step 2: Lift the Protector
- Step 3: Remove any Residue
- Step 4: Clean the Screen
- Step 5: Apply a New Screen Protector (optional)
- Conclusion
- FAQs
Overview
Removing a phone screen protector can be a daunting task, but with the right approach and the right tools, it can be a breeze. Whether you want to replace your old screen protector with a new one or just want to enjoy the naked screen of your phone, this article will guide you through the process step by step.
Before proceeding with the removal, it is important to gather the necessary supplies. You will need a microfiber cloth, a credit card or a thin plastic card, some adhesive remover (if needed), and a small amount of patience. Once you have everything ready, you’re all set to begin the removal process.
In the following steps, we will outline how to remove a phone screen protector without causing any damage to your device.
Remember, each phone screen protector may have slight variations in its design and adhesive strength. Therefore, if you encounter any difficulties during the removal process, it is always a good idea to consult the manufacturer’s instructions or seek professional assistance.
Supplies Needed
Before you begin the process of removing a screen protector from your phone, make sure you have the following supplies handy:
- Microfiber cloth: This soft, lint-free cloth is ideal for cleaning the screen and removing any residue left behind by the screen protector.
- Isopropyl alcohol: A small amount of isopropyl alcohol mixed with water can be used to break down any adhesive on the screen protector.
- Tape or adhesive remover: In case the screen protector leaves any stubborn adhesive residue, you may need tape or adhesive remover to help lift it off.
- Credit card or plastic scraper: A stiff plastic card or scraper can be useful for gently lifting and peeling off the screen protector.
- New screen protector (optional): If you plan on replacing the old screen protector with a new one, make sure you have a high-quality replacement ready.
Having these supplies at your disposal will ensure a smooth and effective screen protector removal process.
Step 1: Prepare for Removal
Before you begin removing the screen protector from your phone, it’s important to gather the necessary supplies and create a suitable workspace. Here are the steps to prepare for the removal process:
1. Find a clean and well-lit area: Choose a spot where you can easily see the screen protector and have enough space to work comfortably.
2. Gather the required supplies: Make sure you have the following items on hand:
- Microfiber cloth or screen cleaning solution
- Tape, such as scotch tape or packing tape
- Credit card or any flat plastic card
- Cotton swabs or soft cloth
- Isopropyl alcohol or adhesive remover (optional, only if the protector is difficult to remove)
3. Power off your phone: This step is crucial for safety reasons. Turn off your phone to avoid any accidental screen touches while removing the protector.
4. Clean the screen: Use a microfiber cloth or a screen cleaning solution to remove any dirt, fingerprints, or smudges from the screen. Ensuring a clean surface will make the removal process easier.
5. Familiarize yourself with the protector: Take a moment to examine the screen protector. Check if it has any corners or edges that may have adhered more firmly to the phone’s screen.
By following these preparatory steps, you’ll be ready to tackle the next stage of removing your phone’s screen protector with confidence and ease.
Step 2: Lift the Protector
Now that you’ve prepared the screen protector for removal, it’s time to gently lift it off the surface of your mobile phone. Follow these steps to ensure a smooth and successful process:
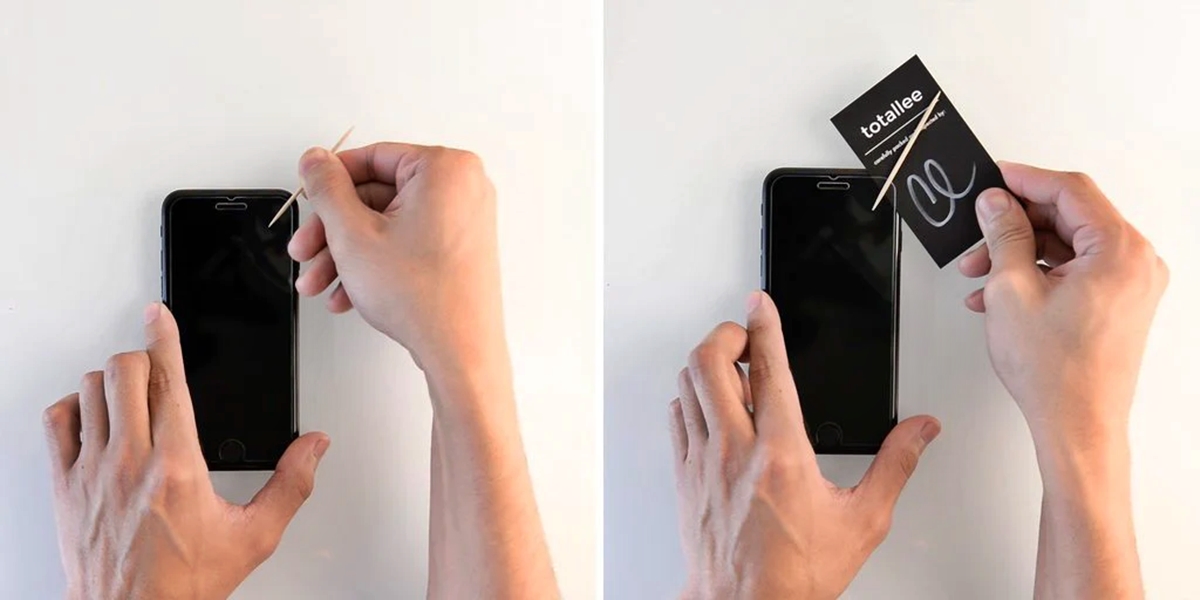
1. Locate an Edge: Carefully examine the edges of the screen protector to find a starting point for removal. Look for any gaps or lifted corners where you can insert your fingernail or a thin, non-abrasive tool.
2. Use Fingernail or Tool: Once you’ve located an edge, use your fingernail or the non-abrasive tool to carefully lift it up. Be gentle to avoid causing any damage to your phone’s screen. If the protector is firmly attached, you may need to apply a bit of pressure to lift it.
3. Slow and Steady: As you begin to lift the protector, do so slowly and steadily, ensuring that it doesn’t tear or leave any residue behind. Avoid pulling too forcefully, as this can cause the protector to break or leave adhesive residue on the screen.
4. Peel Backwards: When lifting the protector, try to peel it backward in a single, smooth motion. Avoid peeling it upwards, as this may increase the risk of tearing or leaving residue. If you encounter any resistance or the protector doesn’t peel easily, stop and reassess your approach.
5. Handle with Care: Throughout the process of lifting the protector, handle it with care. Keep your fingers clean and try to avoid touching the adhesive side as much as possible. This helps prevent any unnecessary smudges or fingerprints that may affect the clarity of your phone’s screen.
6. Dispose and Recycle: Once you’ve successfully lifted the protector from your phone, dispose of it properly according to local recycling guidelines. Many screen protectors can be recycled, so be sure to check with your local recycling facility for the appropriate disposal methods.
By following these steps, you’ll be able to easily and safely lift the screen protector from your mobile phone without causing any damage. Remember to proceed with caution and take your time to ensure a smooth removal process.
Step 3: Remove any Residue
After successfully lifting off the phone screen protector, you may notice some residue left behind on the screen. This residue can be a result of adhesive from the protector or dirt and dust that accumulated over time. It’s crucial to remove this residue properly to ensure a clean and clear screen.
Here’s how you can effectively remove any residue:
- Inspect the residue: Take a close look at the residue on the screen. If it’s primarily adhesive residue, it may appear sticky and gummy. In contrast, dust and dirt residue may have a powdery or sandy texture.
- Use adhesive removal techniques: If the residue is adhesive-based, you can try using an adhesive remover specifically designed for electronic devices. Apply a small amount of the remover to a soft, lint-free cloth or a cotton swab and gently rub the residue in circular motions until it lifts off. Be careful not to apply excessive force or use harsh chemicals that could damage the screen.
- Clean with isopropyl alcohol: Isopropyl alcohol is an effective solution for removing stubborn residue. Dampen a clean cloth with isopropyl alcohol and gently wipe away the residue. The alcohol will help dissolve the adhesive or dirt, allowing it to be easily wiped off. Ensure that the cloth is not dripping wet, as excess liquid could seep into the phone’s components.
- Use a microfiber cloth: Once you have removed the majority of the residue, take a clean microfiber cloth and gently wipe the screen to remove any remaining marks or streaks. Microfiber cloths are designed to be gentle on screens and leave no scratches or lint behind.
- Inspect for any leftover residue: After cleaning, inspect the screen closely to ensure that no residue remains. If there are any stubborn spots, repeat the above steps until the screen is completely clean.
Note: It’s important to be cautious while removing residue, as excessive rubbing or the use of abrasive materials can potentially damage the screen. Always follow manufacturer guidelines and use gentle, non-abrasive techniques.
Step 4: Clean the Screen
After successfully removing the screen protector from your phone, it’s crucial to clean the screen thoroughly before applying a new one or using the device without any protector. Here are the steps to ensure a spotless screen:
1. Start by using a microfiber cloth or a soft, lint-free cloth to wipe away any visible dust or debris from the screen surface. Gently rub in a circular motion, making sure to cover the entire screen area. This helps to remove loose particles that could potentially scratch the screen.
2. For stubborn smudges or fingerprints on the screen, dampen a corner of the cloth with a small amount of water or a screen-cleaning solution specifically designed for electronic devices. Avoid using harsh chemicals or abrasive cleaners as they can damage the screen’s coating.
3. Carefully wipe the dampened cloth over the smudged areas, applying gentle pressure. Again, use circular motions to clean the screen thoroughly. Be sure to dry the screen completely before moving to the next step.
4. If there are still noticeable smears or smudges on the screen, you can use a specialized screen-cleaning spray or wipes. Follow the instructions provided by the manufacturer for the best results. These products are designed to effectively remove oils and dirt without leaving streaks or residue on the screen.
5. Once you have finished cleaning the screen, inspect it from different angles to ensure there are no streaks or residue left behind. If you notice any areas that need further cleaning, repeat the process until the screen is completely clean and clear.
6. Finally, allow the screen to air dry for a few minutes before reapplying a screen protector or using the device. This ensures that any moisture from the cleaning process evaporates, leaving the screen in perfect condition.
By following these steps, you can maintain a clean and pristine screen for optimal visibility and touchscreen responsiveness. Remember to clean your screen regularly to minimize the buildup of dirt and keep it looking as good as new.
Step 5: Apply a New Screen Protector (optional)
If you have successfully removed your old phone screen protector and you want to keep your device protected, applying a new screen protector is a great option. Here’s a step-by-step guide on how to apply a new screen protector:
- Gather the necessary supplies: To apply a new screen protector, you will need a microfiber cloth, a dust removal sticker, and the new screen protector itself. Make sure you choose a high-quality protector that is compatible with your phone model.
- Clean the screen: Use the microfiber cloth to thoroughly clean the screen of your phone. Remove any fingerprints, smudges, or dust particles. A clean screen will ensure the best adherence of the new screen protector.
- Align the screen protector: Carefully align the screen protector with the edges and cutouts of your phone’s screen. Take your time to ensure it is properly aligned. You can use the phone’s buttons, sensors, and camera as reference points for alignment.
- Peel off the backing: Once the screen protector is aligned, gently peel off the backing from one side of the protector.
- Apply the protector: Start applying the screen protector from one side, slowly pressing it down onto the screen. Use a credit card or the included applicator to smooth out any bubbles or wrinkles as you go. Apply firm but gentle pressure to ensure proper adhesion.
- Remove bubbles: If you notice any air bubbles under the screen protector, gently lift the affected area and use the credit card or applicator to push them out towards the edge of the screen. Take your time to ensure a bubble-free installation.
- Final touches: Once the screen protector is fully applied, use a microfiber cloth to gently wipe away any fingerprints or smudges on the surface of the protector. This will ensure optimal clarity and touchscreen responsiveness.
Remember, applying a new screen protector is optional but highly recommended to keep your phone’s screen protected from scratches, dust, and fingerprints. Follow these steps carefully for a smooth and bubble-free installation.
Conclusion
Removing a phone screen protector may seem daunting, but with the right approach, it can be a breeze. By following the step-by-step instructions and using the proper tools, you can safely remove your phone screen protector without causing any damage to your device.
Remember to start by cleaning the screen and gathering the necessary tools such as a credit card or pry tool. Then, apply gentle pressure and gradually lift the protector from one corner. Take your time and be patient throughout the process to avoid any mishaps.
Once the protector is removed, be sure to clean the screen thoroughly before applying a new protector or leaving it bare. This will ensure optimal functionality and protection for your device.
Whether you’re replacing an old protector or experimenting with a new one, following these steps will help you remove the phone screen protector with ease and convenience.
FAQs
1. Why would I want to remove a phone screen protector?
There are several reasons why you might want to remove a phone screen protector. It could be old and worn out, causing it to peel or bubble up, which affects the visibility and touchscreen sensitivity. Or perhaps you’ve decided to switch to a different type of screen protector, such as a tempered glass one, for added protection. Whatever the reason, knowing how to remove a phone screen protector properly is essential.
2. How do I remove a screen protector without damaging my phone?
To remove a screen protector without damaging your phone, follow these steps:
- Start by locating a corner or edge of the screen protector.
- Gently lift that corner or edge using your fingernail or a thin, flat object like a credit card.
- Apply steady and gentle pressure as you lift the corner or edge and slowly peel off the screen protector.
- If you encounter any resistance, pause and make sure you’re not pulling too hard, as this could potentially damage the phone’s screen.
- Once the screen protector is successfully removed, clean any residue or sticky residue using a microfiber cloth and screen cleaner.
3. Can I reuse a screen protector after removing it?
In most cases, it is not recommended to reuse a screen protector once it has been removed. The adhesive used on screen protectors generally loses its effectiveness after it has been applied and then removed. Reapplying a used screen protector may not provide the same level of protection or adhere properly to the phone’s screen. It’s best to invest in a new screen protector for optimal performance and protection.
4. Are there any alternatives to screen protectors?
Yes, there are a few alternatives to traditional screen protectors. One option is using a tempered glass screen protector, which offers enhanced durability and better protection against scratches and cracks. Another alternative is a liquid screen protector, which involves applying a liquid coating to the phone’s screen to provide scratch resistance. However, it’s important to note that liquid screen protectors do not offer the same level of impact protection as tempered glass protectors.
5. Can removing a screen protector void my phone’s warranty?
Generally, removing a screen protector will not void your phone’s warranty. Screen protectors are considered accessories and do not typically impact the warranty of the device itself. However, it’s always a good idea to refer to your phone’s warranty terms and conditions or contact the manufacturer to get a clear understanding of any specific warranty guidelines related to screen protectors.