
The Xperia Z1S is a popular smartphone known for its sleek design and impressive features. However, accidents happen, and sometimes the screen of your Xperia Z1S may get damaged or cracked. If you find yourself in this situation, don’t fret! In this article, we will guide you on how to replace the screen of your Xperia Z1S step by step, ensuring that you can enjoy your phone’s functionality once again. Whether you’re a DIY enthusiast or just looking to save some money on repairs, our comprehensive instructions will help you navigate through the process with ease. So, let’s get started and restore your Xperia Z1S’s screen to its original glory!
Inside This Article
- Overview of the Xperia Z1S Screen Replacement
- Tools and Materials Needed
- Step-by-Step Guide to Replace Screen on Xperia Z1S
- Tips for a Successful Screen Replacement
- Conclusion
- FAQs
Overview of the Xperia Z1S Screen Replacement
The Xperia Z1S is a popular cell phone model that offers a sleek design and advanced features. However, accidents happen, and one of the most common issues users face is a cracked or damaged screen. Fortunately, replacing the screen on the Xperia Z1S is a viable solution that can restore your phone’s functionality and aesthetic appeal.
Whether your screen is shattered, displaying lines, or unresponsive to touch, replacing it can significantly improve your mobile experience. By following a few simple steps, you can successfully replace the screen on your Xperia Z1S, saving yourself the cost and inconvenience of purchasing a new phone.
To ensure a successful screen replacement, it is important to gather the necessary tools and materials beforehand. Having everything you need at hand will make the process much smoother and more efficient. Let’s take a look at the tools and materials required for the Xperia Z1S screen replacement.
Tools and Materials Needed
When it comes to replacing the screen on your Xperia Z1S, having the right tools and materials is essential. Here is a list of everything you will need to successfully complete the screen replacement:
- Replacement Screen: Make sure to purchase a high-quality screen that is specifically designed for the Xperia Z1S model.
- Small Phillips Screwdriver: This will be needed to remove the screws securing the phone’s back cover.
- Plastic Pry Tool: Use this tool to carefully and safely pry open the phone’s back cover without causing any damage.
- Tweezers: These will come in handy for handling small components and connectors during the replacement process.
- Adhesive Tape: You will need adhesive tape to secure the new screen properly once it has been installed.
- Heat Gun or Hair Dryer: This is used to soften the adhesive holding the old screen in place and make it easier to remove.
- Cleaning Cloth: A soft and lint-free cloth is essential for wiping away any dust or fingerprints from the screen and other components.
- Prismatic Opener: This specialized tool will help you separate the old screen from the rest of the phone’s assembly.
- Adhesive Remover: In case there is any residue left behind by the old adhesive, an adhesive remover will help clean it up.
Having all these tools and materials ready before you begin the screen replacement process will ensure a smooth and successful repair. It’s important to note that the specific tools required may vary slightly depending on the brand or version of the replacement screen you choose, so always check the manufacturer’s instructions or online tutorials for any additional requirements.
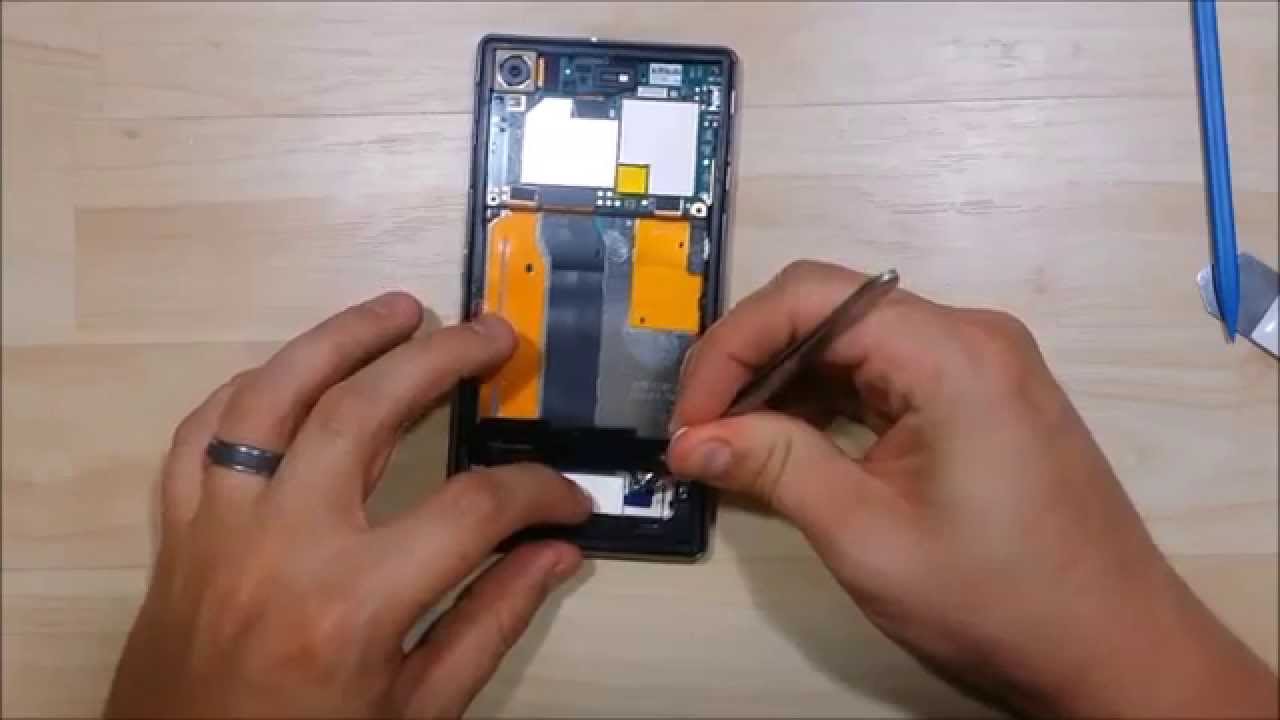
Step-by-Step Guide to Replace Screen on Xperia Z1S
If you’ve unfortunately cracked or damaged the screen on your Xperia Z1S, don’t worry! With the right tools and a little bit of patience, you can replace the screen yourself. Follow this step-by-step guide to get your Xperia Z1S looking brand new again:
- Gather the necessary tools: Before you begin, make sure you have all the required tools. This includes a small Phillips screwdriver, a plastic opening tool or spudger, a suction cup, and a replacement screen specifically designed for the Xperia Z1S.
- Power off the device: To ensure your safety and prevent any damage, turn off your Xperia Z1S before you start the screen replacement process. Simply press and hold the power button, then select “Power off” from the options provided.
- Remove the back cover: Use a plastic opening tool or your fingernail to gently pry off the back cover of your Xperia Z1S. Start from one of the corners and carefully work your way around the edges until the cover pops off.
- Take out the battery and SIM card: Locate the battery and SIM card slots near the top of the device. Use your fingers or the plastic opening tool to remove the battery and SIM card from their respective slots.
- Unscrew the screws: Using a small Phillips screwdriver, carefully remove the screws securing the back panel of your Xperia Z1S. Keep these screws in a safe place, as you will need them later when reassembling the device.
- Separate the back panel: Once the screws are removed, insert a plastic opening tool or spudger between the back panel and the main body of the device. Gently pry apart the two components until they are fully separated.
- Disconnect the ribbon cables: Inside the device, you will find several ribbon cables connecting the screen assembly to the motherboard. Use a plastic opening tool or your fingers to carefully disconnect these ribbon cables by gently lifting up the tabs holding them in place.
- Remove the broken screen assembly: With the ribbon cables disconnected, you can now remove the broken screen assembly from your Xperia Z1S. Use a plastic opening tool or your fingers to carefully lift it out of the device.
- Install the replacement screen: Take the new screen assembly and align it with the empty slot in your Xperia Z1S. Gently press it down to ensure it is securely in place.
- Reconnect the ribbon cables: Carefully reattach the ribbon cables to the new screen assembly. Make sure they are properly lined up and securely connected before proceeding.
- Reassemble the device: Begin by reattaching the back panel to the main body of your Xperia Z1S. Press it firmly until it snaps into place. Then, use the small Phillips screwdriver to reinsert and tighten the screws.
- Insert the battery and SIM card: Take the battery and SIM card you removed earlier and place them back into their respective slots. Ensure they are properly aligned and inserted.
- Replace the back cover: Line up the back cover with the main body of your Xperia Z1S and press it gently until it clicks into place.
- Power on your device: Finally, press and hold the power button until your Xperia Z1S turns on. Congratulations, you have successfully replaced the screen on your Xperia Z1S!
Remember, performing a screen replacement yourself carries some level of risk, and it may void your warranty. If you are not confident in your abilities or are concerned about potential complications, it is always best to seek professional assistance. Additionally, make sure to carefully follow all instructions and exercise caution throughout the process to prevent any further damage to your device.
Tips for a Successful Screen Replacement
Replacing the screen on your Xperia Z1S can seem like a daunting task, but with the right tips and techniques, you can successfully complete the replacement. Here are some valuable tips to keep in mind:
1. Gather the necessary tools and materials: Before starting the screen replacement, make sure you have all the required tools and materials. This typically includes a screwdriver set, a pry tool, a replacement screen, adhesive, and a heat gun or hairdryer for removing the old screen.
2. Work in a clean and organized workspace: Clear a clean and clutter-free workspace to perform the screen replacement. A clean environment will minimize the chances of dust or debris getting into the device during the process.
3. Take your time and be patient: Screen replacements require precision and patience. Rushing through the process can lead to mistakes or damage to the device. Take your time and follow each step carefully to ensure a successful outcome.
4. Disconnect the battery: Before starting the replacement, it is crucial to disconnect the battery to avoid any risk of electrical damage. Refer to the device’s manual or online resources to learn how to safely disconnect the battery.
5. Follow a step-by-step guide: It is essential to have a detailed step-by-step guide or video tutorial to follow during the screen replacement process. This will help you stay organized and ensure you don’t miss any crucial steps.
6. Use the right tools for each task: Different parts of the screen replacement process may require specific tools. Make sure you use the appropriate tools for each task to avoid any unnecessary damage or complications.
7. Be gentle when removing the old screen: When removing the old screen, apply gentle pressure and use a pry tool to carefully separate it from the device. Avoid using excessive force as it can cause damage to the device or other components.
8. Test the replacement screen before fully assembling: After installing the replacement screen, it’s crucial to test it before fully assembling the device. Connect the necessary cables and power on the device to check if the screen is functioning properly.
9. Use adhesive correctly: When applying adhesive to attach the replacement screen, make sure to follow the manufacturer’s instructions. Use just enough adhesive to secure the screen without creating any excess that could seep into the device.
10. Seek professional help if needed: If you find the screen replacement process too challenging or encounter any difficulties, it’s best to seek professional help. Don’t hesitate to reach out to a qualified technician who can assist you in completing the task successfully.
By following these tips, you can increase your chances of having a successful screen replacement on your Xperia Z1S. Remember to take your time, work carefully, and seek assistance if necessary.
In conclusion, learning how to replace the screen of your Xperia Z1S can save you time, money, and the frustration of dealing with a cracked or damaged screen. By following the step-by-step guide and using the right tools, you can easily replace the screen and have your phone looking as good as new.
Remember to always take necessary precautions and work in a well-lit and clean environment to ensure a successful repair process. If you’re unsure or uncomfortable with performing the replacement yourself, it’s always a good idea to seek professional help from a certified technician.
With a newly replaced screen, you can continue to enjoy the full functionality and visual experience of your Xperia Z1S without any hindrances. Don’t let a broken screen hold you back – take control of your phone’s repair and restore its original beauty.
FAQs
**Q: How do I replace the screen on my Xperia Z1S?**
Replacing the screen on your Xperia Z1S can be done with a few simple steps. First, ensure you have the necessary tools, which typically include a small screwdriver, a plastic opening tool, and a replacement screen. Next, power off your device and remove the SIM card tray. Carefully heat the edges of the phone using a hairdryer or heat gun to soften the adhesive. Then, use the plastic opening tool to gently pry off the back cover. Once the back cover is removed, unscrew the screws securing the screen assembly. Disconnect the cables connecting the screen to the motherboard and carefully remove the old screen. Finally, attach the replacement screen, reconnect the cables, secure the screws, and reassemble the device.
**Q: Where can I buy a replacement screen for my Xperia Z1S?**
You can buy a replacement screen for your Xperia Z1S from various online retailers or specialized mobile phone repair shops. Popular online platforms like Amazon or eBay often have a wide range of options to choose from. When purchasing a replacement screen, make sure to check the compatibility with your specific Xperia Z1S model and ensure that the screen is of high quality.
**Q: Can I replace the screen on my Xperia Z1S myself or should I get professional help?**
Replacing the screen on your Xperia Z1S can be done by yourself if you have the necessary tools, technical skills, and confidence to do so. However, it is important to note that replacing the screen is a delicate process that requires precision and caution. If you are not familiar with mobile phone repairs or do not feel comfortable doing it yourself, it is highly recommended to seek professional help. Professional technicians have the expertise and experience to perform the screen replacement safely and efficiently.
**Q: How much does it cost to replace the screen on an Xperia Z1S?**
The cost of replacing the screen on an Xperia Z1S can vary depending on several factors such as the source of the replacement screen and the location of the repair service. If you choose to replace the screen yourself, the cost will be primarily determined by the price of the replacement screen. On the other hand, if you opt for professional help, the cost may include both the price of the replacement screen and the labor charges. It is advisable to research and compare prices from different sources or repair services to get an idea of the overall cost.
**Q: Are there any risks involved in replacing the screen on my Xperia Z1S?**
Replacing the screen on your Xperia Z1S does come with some risks, especially if you are not familiar with mobile phone repairs. Mishandling the delicate components or not following the correct procedures can potentially damage the device further. Additionally, if the replacement screen is of low quality, it may affect the touch sensitivity or display quality. To minimize the risks, it is crucial to educate yourself on the proper techniques, use high-quality replacement parts, and exercise caution throughout the process.