
Do you own the latest iPhone 13 Pro Max and want to learn how to screen record on it? Well, you’ve come to the right place! Screen recording allows you to capture dynamic content on your phone’s screen, whether it’s a tutorial, a gaming session, or a funny interaction that you want to share with your friends. With the advanced features and capabilities of the iPhone 13 Pro Max, capturing your screen has never been easier. In this article, we will guide you through the step-by-step process of screen recording on your iPhone 13 Pro Max, ensuring that you can effortlessly capture, save, and share your favorite moments on your device. So, let’s dive in and discover how to unlock the power of screen recording on your iPhone 13 Pro Max!
Inside This Article
- Enabling the Screen Recording Feature
- Accessing the Control Center
- Initiating the Screen Recording
- Saving and Managing Screen Recordings
- Conclusion
- FAQs
Enabling the Screen Recording Feature
If you own an iPhone 13 Pro Max, you are in luck because it comes with a built-in screen recording feature that allows you to capture everything happening on your device’s display. Whether you want to record a tutorial, demonstrate a gameplay session, or simply save a funny video from social media, the screen recording feature can be incredibly useful. In this article, we will guide you through the process of enabling the screen recording feature on your iPhone 13 Pro Max.
To start, open the “Settings” app on your iPhone 13 Pro Max. It is usually represented by a gear icon and can be found on your home screen or in the app library. Once in the Settings menu, scroll down until you find the “Control Center” option and tap on it.
In the Control Center settings, you will see a list of all the available controls that you can add or remove from the Control Center. Look for the “Screen Recording” option and tap on the green plus sign next to it. This will add the screen recording control to the Control Center.
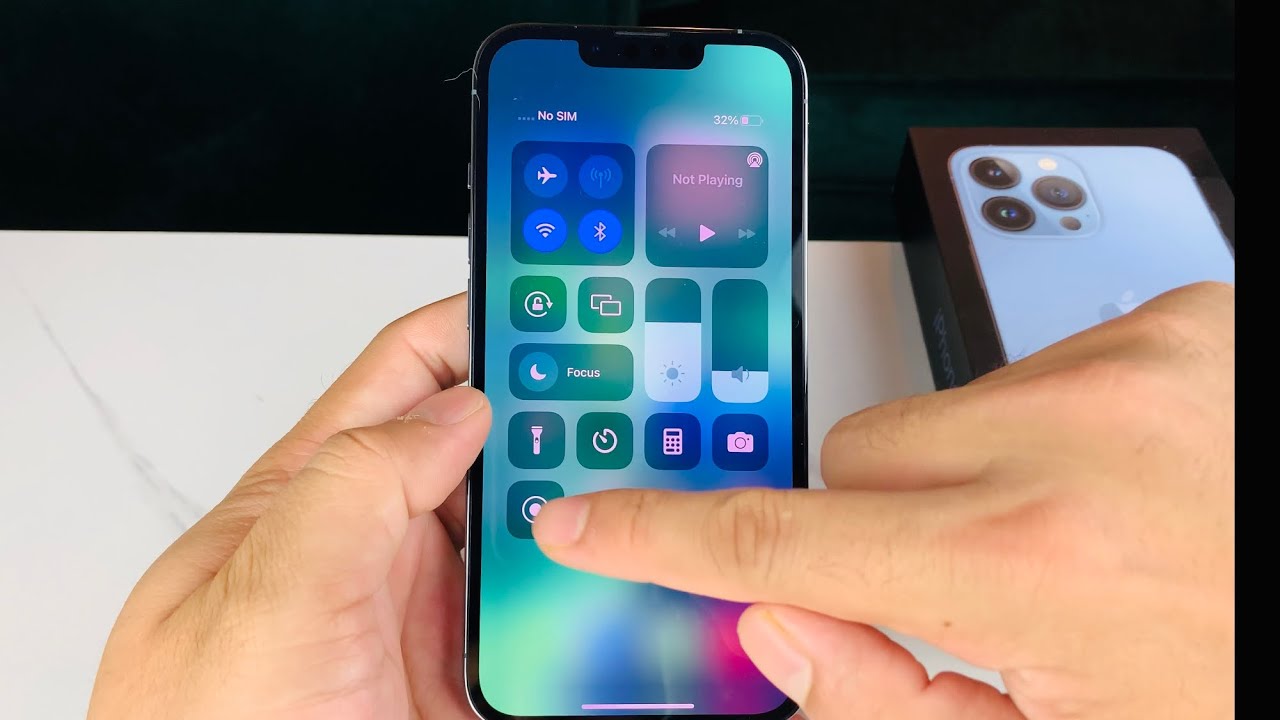
With the screen recording control added, you can now access it easily from the Control Center and initiate screen recordings whenever you need. To open the Control Center, simply swipe down from the top-right corner of your iPhone’s screen. You will see a collection of icons and controls.
Once you have opened the Control Center, locate the screen recording icon. It looks like a circle surrounded by another circle. Tap on it to start the screen recording. A countdown timer of three seconds will appear to give you time to prepare.
While the screen recording is in progress, a red status bar will appear at the top of your screen. This indicates that the recording is ongoing. You can now navigate and interact with your iPhone 13 Pro Max as usual, and everything you do will be captured in the screen recording.
To stop the screen recording, simply tap on the red status bar and select the “Stop” option. Alternatively, you can open the Control Center again and tap on the screen recording icon to end the recording.
After stopping the screen recording, you can find the captured video in the Photos app on your iPhone 13 Pro Max. From there, you can edit, share, or delete the recording as desired.
Enabling the screen recording feature on your iPhone 13 Pro Max gives you the ability to capture important moments, create instructional videos, or simply have fun recording and sharing your mobile experiences. With just a few taps, you can unleash the power of screen recording and take your iPhone usage to the next level.
Accessing the Control Center
The Control Center is a convenient feature on your iPhone 13 Pro Max that allows you to access various settings and functions with just a swipe and a tap. To access the Control Center:
1. Start by unlocking your iPhone, so you are on the home screen or any other app screen.
2. Swipe down from the top-right corner of the screen. This action will open the Control Center.
3. If you have a device with Face ID, such as the iPhone 13 Pro Max, ensure that you swipe down from the top-right corner, specifically from the right ear (where the battery and signal indicators are located).
4. For devices with Touch ID, swipe up from the bottom edge of the screen to open the Control Center.
Once you have accessed the Control Center, you can see a variety of quick settings and shortcuts. These include wireless connectivity options, display and sound controls, camera and flashlight toggles, and much more. The Control Center provides easy access to common functionality, including screen recording.
Continue reading to learn how to initiate the screen recording feature on your iPhone 13 Pro Max.
Initiating the Screen Recording
Once you have enabled the screen recording feature on your iPhone 13 Pro Max, you can easily initiate the recording process in just a few simple steps.
To start recording your screen, first open the app or navigate to the screen that you want to capture. Whether it’s a gameplay session, a tutorial, or a video call, make sure that the content you want to record is on display.
Next, access the Control Center by swiping down from the top-right corner of the screen. On older iPhone models, you need to swipe up from the bottom of the screen to open the Control Center.
Within the Control Center, you’ll find several control buttons and shortcuts. Look for the “Screen Recording” button, which looks like a solid white circle within a round button. Tap on it once to start the screen recording process.
When you tap on the screen recording button, a countdown of three seconds will appear to give you time to prepare. After the countdown, the recording will begin, and a red status bar will appear at the top of the screen to indicate that the screen is being recorded.
While the screen recording is in progress, you can freely navigate through different apps, menus, and screens without interrupting the recording. This allows you to capture everything you need in a smooth and continuous manner.
To stop the screen recording, you can either tap on the red status bar at the top of the screen and select “Stop” from the popup menu, or you can access the Control Center again and tap on the screen recording button to end the recording.
Once you have stopped the recording, your screen recording will be saved as a video file in the Photos app. From there, you can edit, share, or delete the recording as per your preference.
Remember, initiating the screen recording on your iPhone 13 Pro Max is simple and convenient, allowing you to capture important moments, create tutorials, or share your gameplay with ease.
Saving and Managing Screen Recordings
Once you have successfully recorded your screen on your iPhone 13 Pro Max, it’s important to know how to save and manage these recordings. Here are a few simple steps to help you navigate this process:
1. After finishing your screen recording, a preview of the recording will appear as a thumbnail in the bottom-left corner of your screen.
2. To save the recording, tap the thumbnail. This will open the recording in a new window where you can review and make any necessary edits.
3. If you’re satisfied with the recording and don’t require any edits, tap the “Done” button in the top-right corner of the screen.
4. A prompt will appear, asking whether you want to save the recording to your Photos app. Tap “Save Video” to save it to your device.
5. The saved recording will now be accessible in your Photos app. You can find it by opening the app and navigating to the “Recents” or “Videos” tab.
6. To manage your screen recordings, you can utilize the various options available in the Photos app. For example, you can edit the video, add captions, apply filters, or even share it with others.
7. If you want to delete a screen recording, simply open the recording in the Photos app, tap the trash can icon, and confirm your decision by selecting “Delete Video”.
By following these steps, you can easily save and manage your screen recordings on your iPhone 13 Pro Max. Whether you’re creating tutorial videos or capturing important moments on your device, being able to efficiently save and organize your recordings ensures that they are easily accessible whenever you need them.
Screen recording on the iPhone 13 Pro Max is a powerful and useful feature that allows you to capture and share your device’s activity with others. Whether you want to create tutorials, share gameplay, or demonstrate a process, the screen recording feature provides a seamless way to do so.
By following the simple steps outlined in this article, you can easily enable and utilize the screen recording feature on your iPhone 13 Pro Max. Remember to take advantage of the various customization options available, such as adding audio, adjusting the recording quality, and using the microphone. This will allow you to create professional-looking recordings that meet your specific needs.
With the ability to screen record on your iPhone 13 Pro Max, you can showcase your expertise, share your knowledge, and engage with others in a whole new way. So go ahead, give screen recording a try, and unleash your creativity.
FAQs
1. Can I screen record on my iPhone 13 Pro Max?
Absolutely! The iPhone 13 Pro Max comes with a built-in screen recording feature that allows you to capture videos of your screen in high quality. With just a few taps, you can record gameplay, tutorials, or any other activity on your iPhone’s display.
2. How do I activate screen recording on my iPhone 13 Pro Max?
To activate screen recording on your iPhone 13 Pro Max, follow these steps:
- Open the Settings app on your iPhone.
- Scroll down and tap on Control Center.
- Tap on Customize Controls.
- Find the Screen Recording option and tap the green “+” button next to it to add it to your Control Center.
- Exit the Settings app and swipe down from the top-right corner of your screen to access the Control Center.
- Tap on the screen recording icon (a white circle inside a gray square) to start recording.
3. Can I screen record with audio on my iPhone 13 Pro Max?
Yes, you can screen record with audio on your iPhone 13 Pro Max. By default, the screen recording feature captures both the device’s audio and the microphone audio. This means you can record the sound coming from your device as well as any audio you speak or external sounds around you during the recording.
4. Where can I find my screen recordings on my iPhone 13 Pro Max?
After you finish recording your screen on the iPhone 13 Pro Max, the video will be automatically saved to the Photos app. Simply open the Photos app, go to the “Recents” album, and you’ll find your screen recordings there. From there, you can edit, share, or delete them as needed.
5. How long can I screen record on my iPhone 13 Pro Max?
The screen recording feature on the iPhone 13 Pro Max allows you to record for an unlimited amount of time. Unlike earlier versions of iOS, which had a time limit for screen recordings, you can now record as long as you have sufficient storage space on your device. Just make sure to monitor your available storage to avoid running out of space while recording.