
The iPhone 13 is one of the most sought-after smartphones on the market, offering a plethora of features and capabilities. One of the essential functionalities of the iPhone 13 is screen recording, allowing users to capture and preserve important moments, create tutorials, or share exciting gameplay. Being able to record your screen on the iPhone 13 can be incredibly useful in various scenarios, both for personal and professional purposes. In this article, we will guide you through the process of screen recording on the iPhone 13, detailing the steps you need to follow and the options available to customize your recordings. Whether you are a tech enthusiast or a casual user, mastering the art of screen recording on the iPhone 13 will undoubtedly enrich your experience with this exceptional device.
Inside This Article
- Steps to Screen Record on iPhone 13
- Enabling the Screen Record feature
- Accessing the Control Center
- Initiating the screen recording
- Stopping the screen recording
- Conclusion
- FAQs
Steps to Screen Record on iPhone 13
Screen recording is a handy feature that allows you to capture the actions and activities on your iPhone 13. Whether you want to save a memorable moment from a game, create a tutorial, or document a bug, screen recording can come in handy. Here’s a step-by-step guide on how to screen record on your iPhone 13.
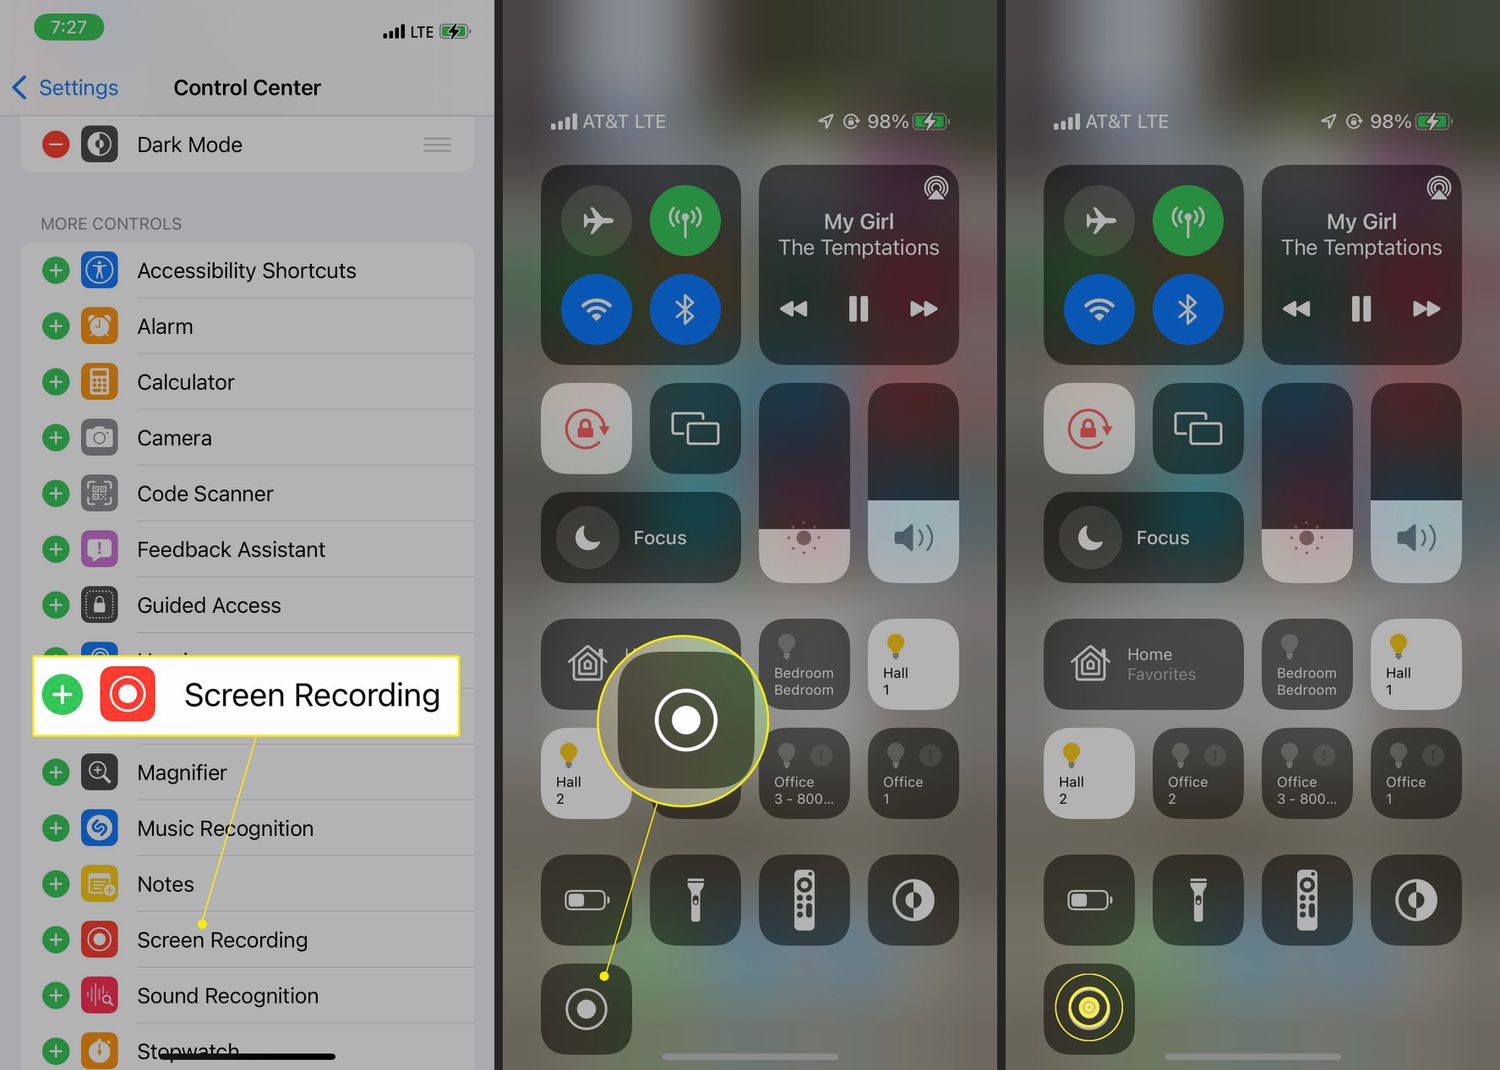
- Enabling the Screen Record feature: Start by going to the Settings app on your iPhone 13. Scroll down and tap on “Control Center”. Here, you’ll find a list of various functions that can be accessed from the Control Center. Look for “Screen Recording” and tap on the green ‘+’ button next to it to add it to the active controls.
- Accessing the Control Center: To access the Control Center, swipe down from the top-right corner of your iPhone 13 screen. Alternatively, if you have a Home Button on your device, swipe up from the bottom of the screen.
- Initiating the screen recording: Once you’re in the Control Center, look for the Screen Recording icon, which resembles a solid white circle within a larger circle. Tap on it to start the screen recording. You may be prompted to choose whether you want to record audio from your device’s microphone as well.
- Stopping the screen recording: To stop the screen recording, open the Control Center again and tap on the red recording indicator at the top of the screen. Alternatively, you can tap on the red status bar at the top of the screen and choose “Stop” from the menu that appears.
That’s it! Now you know how to screen record on your iPhone 13. Remember to save and share your recordings, and make sure to keep an eye on your available storage space, as screen recordings can take up a significant amount of storage.
Enabling the Screen Record feature
Screen recording on the iPhone 13 is a handy feature that allows you to capture and save what’s happening on your device’s screen. To enable the screen record feature, follow these steps:
- Unlock your iPhone 13 and head to the home screen.
- Navigate to the “Settings” app and tap on it.
- Scroll down and find the “Control Center” option. Tap on it.
- Within the Control Center settings, locate the “Customize Controls” section.
- Look for the “Screen Recording” option and tap on the green plus icon next to it. This will add the Screen Record feature to your Control Center.
Accessing the Control Center
To access the Control Center on your iPhone 13 and begin the screen recording process, simply follow these steps:
- Swipe down from the top-right corner of your iPhone’s screen. This gesture will open the Control Center.
Initiating the screen recording
Once you have accessed the Control Center, you can start the screen recording by performing the following actions:
- From the Control Center, look for the screen recording icon. It resembles a white circle inside a larger circle.
- Tap on the screen recording icon to initiate the recording. A three-second countdown will appear.
- After the countdown, your iPhone 13 will begin recording everything that happens on the screen.
Stopping the screen recording
To stop the screen recording on your iPhone 13, follow these simple steps:
- Swipe up from the bottom of the screen or swipe down from the top-right corner to access the Control Center.
- Locate the red recording indicator at the top of the screen or in the status bar.
- Tap on the red recording indicator to stop the screen recording.
- A confirmation pop-up will appear asking if you want to stop the recording. Tap on “Stop” to end the recording.
- The screen recording will be saved to your device’s Photos app for you to view and share as desired.
Conclusion
Screen recording on the iPhone 13 is a valuable feature that allows users to capture and share their device’s display with ease. Whether you want to create tutorials, demonstrate a new app, or save memorable moments from a game, screen recording on the iPhone 13 offers a convenient solution. With its simple and intuitive interface, anyone can start recording their iPhone screen in seconds.
By following the step-by-step guide mentioned in this article, you can now confidently navigate through the screen recording process on your iPhone 13. Remember to adjust the settings according to your preferences, utilize the built-in editing tools, and efficiently manage your recordings using the Photos app.
Screen recording has become an essential tool for many iPhone users, allowing them to capture and share their experiences in a dynamic and engaging way. So go ahead and unleash your creativity with screen recording on the iPhone 13!
FAQs
1. Can I screen record on iPhone 13?
Yes, you can screen record on your iPhone 13. The latest iPhone models come with a built-in screen recording feature that allows you to capture and save the activities happening on your screen. Whether you want to record a gaming session, create a tutorial, or save a memorable moment, screen recording on iPhone 13 is a convenient and straightforward process.
2. How do I enable screen recording on my iPhone 13?
To enable screen recording on your iPhone 13, follow these steps:
- Swipe up from the bottom of your screen to access the Control Center.
- Tap on the Screen Recording button, which looks like a circle within a circle.
- A countdown timer will appear, indicating when the recording will start.
- To stop the screen recording, tap on the red recording indicator at the top of the screen or swipe down and tap on the Stop button from the Control Center.
3. Where can I find my screen recordings on iPhone 13?
Once you have finished recording your screen on iPhone 13, the video will be saved in the Photos app. You can access your screen recordings by following these steps:
- Open the Photos app on your iPhone 13.
- Navigate to the “Albums” tab located at the bottom of the screen.
- Scroll down and look for the “Screen Recordings” album.
- Tap on the album to view all your screen recordings.
4. Can I edit my screen recordings on iPhone 13?
Yes, you can edit your screen recordings on iPhone 13 using the built-in editing tools in the Photos app. Once you have selected a screen recording from the “Screen Recordings” album, tap on the “Edit” button. From there, you can trim the video, add filters, adjust brightness and contrast, and even add text or annotations to enhance your recording.
5. Can I share my screen recordings from iPhone 13?
Absolutely! Once you have edited your screen recording or even if you haven’t made any edits, you can easily share it from your iPhone 13. Simply open the screen recording in the Photos app, tap on the Share button, and choose the platform or app you want to share it with. You can share your screen recordings via email, social media, messaging apps, or even save them to your cloud storage.