
Are you tired of slow internet speeds on your iPhone? It’s time to make the switch to 4G and experience lightning-fast connectivity on your device. With the growing demand for faster internet, 4G has become the go-to network for mobile users around the world. In this article, we will guide you through the process of switching to 4G on your iPhone, ensuring that you can enjoy seamless browsing, streaming, and downloading without any lags or interruptions. So, whether you’re upgrading to a new iPhone or simply want to take advantage of the latest network technology, we’ve got you covered. Get ready to unlock the full potential of your iPhone and embrace the power of 4G!
Inside This Article
- Enable 4G LTE on iPhone
- Check for 4G Coverage
- Update iPhone Software
- Reset Network Settings
- Conclusion
- FAQs
Enable 4G LTE on iPhone
Having a fast and reliable internet connection is essential in today’s digital world. If you own an iPhone, you have the option to enable 4G LTE, which offers faster download and upload speeds compared to 3G. Here’s a step-by-step guide on how to enable 4G LTE on your iPhone.
1. Open the Settings app on your iPhone. It’s represented by a gear icon and can be found on your home screen.
2. Scroll down and tap on “Cellular” or “Mobile Data” (depending on your iOS version).
3. In the Cellular/Mobile Data settings, you’ll find an option called “Cellular Data Options.” Tap on it.
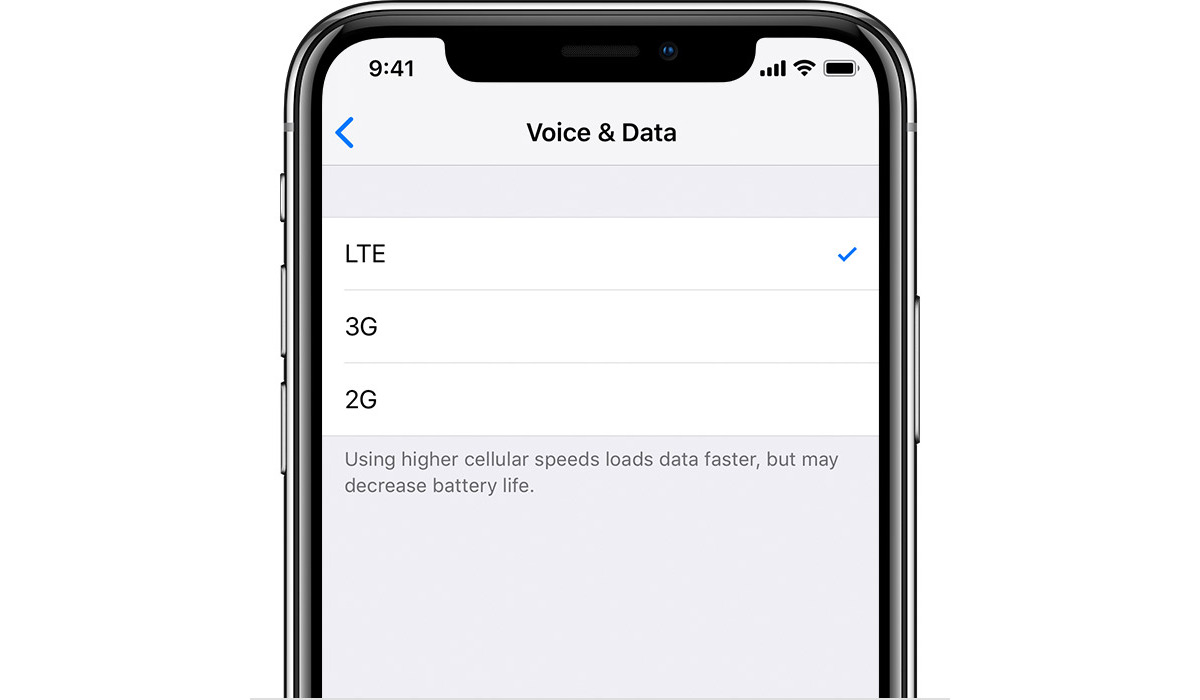
4. Under Cellular Data Options, tap on “Voice & Data.”
5. Here, you’ll see different network modes available for selection. Choose the “4G” or “LTE” option.
6. If the “4G” or “LTE” option is not available, it means your iPhone may not be 4G-compatible. In this case, you will have to upgrade to a newer iPhone model that supports 4G.
7. Once you have selected the “4G” or “LTE” option, your iPhone will now connect to the 4G network whenever it’s available.
It’s important to note that enabling 4G LTE may consume more data, so make sure you have an adequate data plan to avoid any unexpected charges. Additionally, the availability of 4G coverage may vary depending on your carrier and location.
By enabling 4G LTE on your iPhone, you can enjoy faster internet speeds, smoother video streaming, and quicker app downloads. Stay connected and make the most out of your iPhone’s capabilities!
Check for 4G Coverage
If you’re looking to switch to 4G on your iPhone, the first step is to check if you have 4G coverage in your area. While most areas now have 4G coverage, it’s always wise to confirm before going through the process of switching.
To check for 4G coverage, follow these steps:
- Open the “Settings” app on your iPhone.
- Scroll down and tap on “Cellular” or “Mobile Data”, depending on your device’s settings.
- Look for the “Cellular Data Options” or “Mobile Data Options” menu and select it.
- Tap on “Voice & Data” or “Enable LTE”.
- Choose the option that includes “4G” or “LTE”.
- Now, wait for your iPhone to search for available networks. It may take a few moments.
- If you see 4G, LTE, or a similar indicator next to the network name, it means you have 4G coverage in your area.
If you don’t see the 4G indicator, it’s possible that your area doesn’t have 4G coverage yet. In such cases, you may still be able to use 3G or even older network technologies. However, if accessing 4G is important to you, you might consider reaching out to your network provider to inquire about future 4G expansion plans in your area.
Remember that 4G coverage can vary depending on your location, so it’s always a good idea to check periodically. Additionally, network coverage can be affected by factors such as buildings, obstructions, or network congestion, so keep that in mind when assessing the quality of your 4G connection.
Update iPhone Software
Updating your iPhone’s software is essential to ensure that you have the latest features and bug fixes. Apple regularly releases software updates that bring improvements to performance, security, and compatibility. In this article, we will guide you through the process of updating your iPhone’s software.
1. Check for available updates
To check if there is an update available for your iPhone, go to “Settings” and tap on “General.” Then, select “Software Update.” Your iPhone will automatically check for any updates. If there is an available update, you will see a prompt with the option to “Download and Install.”
2. Connect to a stable Wi-Fi network
Before downloading the software update, ensure that your iPhone is connected to a stable Wi-Fi network. Software updates can be large in size, so using Wi-Fi will help you avoid excessive data usage and ensure a faster download speed.
3. Plug in your iPhone
Make sure your iPhone is plugged into a power source before starting the software update. Updating your iPhone can drain the battery, and it is best to keep it plugged in to ensure a smooth installation process.
4. Start the update process
If you have a pending software update, simply tap on “Download and Install” to initiate the update process. Your iPhone will start downloading the update, and you can monitor the progress in the “Software Update” section in the “Settings” app.
5. Install the update
Once the download is complete, your iPhone will ask you to install the update. Tap on “Install Now” to begin installing the software update. Your iPhone may restart several times during the installation process, which is normal. Make sure not to interrupt the installation by turning off your iPhone.
6. Set up your iPhone after the update
After the software update is installed, your iPhone will restart, and you will be prompted to complete the setup process. Follow the on-screen instructions to set up your iPhone, and make sure to sign in with your Apple ID to regain access to your apps and settings.
7. Troubleshooting
If you encounter any issues during the update process, such as a stalled installation or an error message, try the following troubleshooting steps:
- Force restart your iPhone by pressing and holding the Power button and the Volume Down button (for iPhone X and newer models) or the Home button and the Power button (for iPhone 8 and earlier models) until the Apple logo appears.
- Ensure that you have enough storage space on your iPhone to accommodate the software update. You can check the available storage in the “Settings” app under “General” and “iPhone Storage.”
- If the update continues to fail, you may need to connect your iPhone to a computer and update using iTunes or Finder.
By regularly updating your iPhone’s software, you can enjoy the latest features, performance enhancements, and security updates. Keeping your device up to date ensures a smooth and optimized user experience. Remember to back up your iPhone before updating, just in case anything goes wrong during the process.
Reset Network Settings
Sometimes, when you’re facing issues with your network connection on your iPhone, resetting the network settings can help resolve the problem. Resetting the network settings will erase all your current network configurations, including Wi-Fi passwords, Bluetooth connections, and cellular settings. Here’s how you can reset the network settings on your iPhone:
- Open the Settings app on your iPhone.
- Scroll down and tap on “General”.
- Scroll down again and tap on “Reset”.
- Tap on “Reset Network Settings”.
- You may be prompted to enter your passcode or provide your Apple ID password for confirmation.
- Tap on “Reset Network Settings” again to confirm.
- Your iPhone will now restart and the network settings will be reset.
After the restart, your iPhone will be back to its default network settings. You will need to set up your Wi-Fi connection and re-enter any saved Wi-Fi passwords. Additionally, you may need to reconnect your Bluetooth devices and adjust your cellular settings if necessary.
It’s important to note that resetting the network settings will not delete any of your personal data or media. It only affects your network configurations. If you’re still experiencing network issues after resetting the network settings, you may need to contact your service provider for further assistance.
Conclusion
In conclusion, making the switch to 4G on your iPhone can transform your mobile experience. With faster data speeds, smoother streaming, and improved overall performance, 4G connectivity is the way forward for modern smartphone users.
By following the simple steps outlined in this article, you can easily enable 4G on your iPhone and start enjoying all the benefits it offers. Remember to check if your carrier supports 4G, update your network settings, and ensure you have a compatible data plan.
With 4G, you can browse the internet, stream videos, download apps, and play online games with remarkable speed and efficiency. Stay connected wherever you go and make the most of your iPhone’s capabilities.
So don’t wait any longer, enhance your mobile experience by switching to 4G on your iPhone today!
FAQs
1. How do I switch to 4G on my iPhone?
To switch to 4G on your iPhone, follow these steps:
- Go to the Settings app on your iPhone.
- Select Mobile Data (or Cellular Data, depending on your iPhone model).
- Toggle on the “Enable 4G” or “Enable LTE” option.
- Your iPhone will now connect to the 4G network if it’s available in your area.
2. What is 4G and why is it important?
4G, also known as the fourth-generation wireless technology, provides faster internet speeds and improved network performance compared to its predecessors. It enables you to download and stream content, browse the web, and use data-intensive applications more efficiently. Switching to 4G on your iPhone ensures that you can take full advantage of these benefits and enjoy a seamless online experience.
3. Can all iPhones be switched to 4G?
Yes, all modern iPhone models support 4G connectivity. However, it’s worth noting that the availability of 4G networks may vary depending on your location and your carrier’s coverage. Make sure to check if your area has 4G coverage and that your carrier supports it before attempting to switch to 4G on your iPhone.
4. Will switching to 4G affect my battery life?
Using 4G on your iPhone may have a slightly higher impact on battery life compared to using 3G or 2G networks. This is because 4G networks require more power to maintain faster data speeds. However, the difference in battery life is usually minimal and may not be noticeable in day-to-day usage. If you’re concerned about battery life, you can always switch back to a lower network mode when you don’t require the faster speeds of 4G.
5. How can I check if I’m connected to the 4G network?
To check if your iPhone is connected to the 4G network, look for the “LTE” or “4G” indicator at the top of your iPhone’s screen. This indicator will usually be displayed next to the signal strength bars. You can also check the “Mobile Data” or “Cellular Data” section in your iPhone settings, which will show that 4G is enabled and the network you are connected to.