
Are you struggling to text on your Jitterbug Flip phone? Don’t worry, we’ve got you covered! In this article, we will provide you with a comprehensive guide on how to text on your Jitterbug Flip phone. Whether you’re a beginner or simply need a refresher, we’ll walk you through the steps to compose, send, and manage your text messages. With its simplified interface and user-friendly features, the Jitterbug Flip phone is perfect for individuals who prefer a more straightforward cell phone experience. So, let’s dive in and discover how you can effectively communicate through texts on your Jitterbug Flip phone.
Inside This Article
- Setting Up Your Jitterbug Flip Phone
- Sending Text Messages on Your Jitterbug Flip Phone
- Adding Contacts to Your Jitterbug Flip Phone
- Customizing Your Texting Experience on the Jitterbug Flip Phone
- Conclusion
- FAQs
Setting Up Your Jitterbug Flip Phone
Setting up your Jitterbug Flip Phone is a breeze. Whether you’re a tech-savvy individual or new to cell phones, these simple steps will have you up and running in no time.
1. Inserting the SIM Card: Start by locating the SIM card slot on your Jitterbug Flip Phone. Open the back cover and gently insert the SIM card into its designated slot. Make sure it’s securely in place before closing the cover.
2. Charging the Battery: Connect your Jitterbug Flip Phone to the charging cable and plug it into a power source. Allow the battery to charge fully before turning on your phone for the first time.
3. Powering On: Once your phone is charged, press and hold the power button until the Jitterbug logo appears on the screen. Your phone will then begin the initial setup process.
4. Language and Region Settings: Follow the on-screen prompts to select your language and set your region. This step ensures that your Jitterbug Flip Phone displays the appropriate language and regional settings.
5. Wi-Fi Setup (Optional): If you have access to a Wi-Fi network, you can connect your Jitterbug Flip Phone to it during the setup process. This will allow you to use data services and browse the internet without using your cellular data.
6. Activating Your Phone: To activate your Jitterbug Flip Phone, you may need to contact your cellular service provider. They will guide you through the activation process, which typically involves providing some information about your account and phone.
7. Setting Up Voicemail: Voicemail allows you to receive and listen to messages when you’re unavailable. Follow the instructions from your service provider to set up your voicemail on the Jitterbug Flip Phone.
8. Personalizing Your Phone: Now that your Jitterbug Flip Phone is set up, you can customize it to suit your preferences. Adjust the volume, brightness, and font size settings to your liking. You can also personalize your home screen by selecting wallpapers and arranging app icons.
Setting up your Jitterbug Flip Phone is a straightforward process that ensures you get the most out of your device. Follow these steps, and soon enough, you’ll be enjoying the convenience and functionality of your new cell phone.
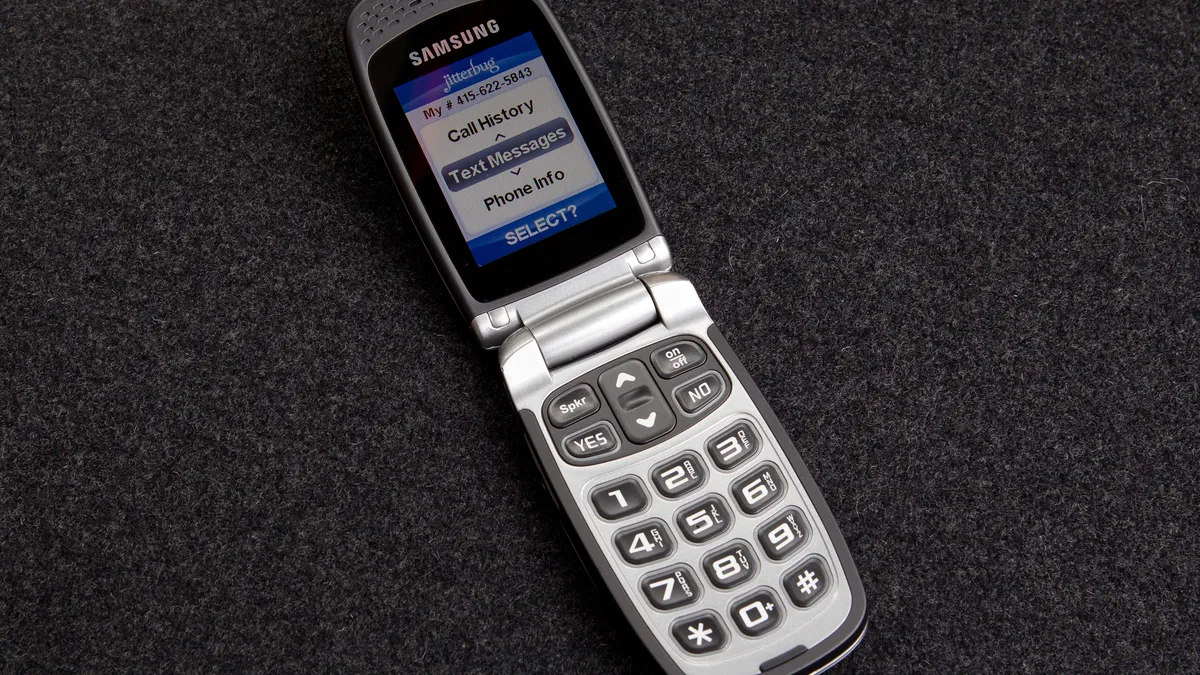
Sending Text Messages on Your Jitterbug Flip Phone
Sending text messages on your Jitterbug Flip Phone is a simple and convenient way to stay connected with your friends and family. Whether you’re sending a quick message or having a longer conversation, the Jitterbug Flip Phone makes it easy to communicate via text. Here’s how:
1. Open the Messaging App: Locate the messaging app on your Jitterbug Flip Phone. It is usually represented by an icon with an envelope or speech bubble.
2. Compose a New Message: Once you have opened the messaging app, select the option to compose a new message. This will allow you to create a new text message from scratch.
3. Enter the Recipient’s Number: Type in the recipient’s phone number using the keypad on your Jitterbug Flip Phone. Make sure to include the area code if necessary.
4. Compose Your Message: Using the keypad on your Jitterbug Flip Phone, start typing your message. The Jitterbug Flip Phone has a predictive text feature that suggests words as you type, making it easier and faster to compose your message.
5. Send Your Message: Once you have finished composing your message, review it to ensure it says what you want it to. Press the send button, usually denoted by an arrow or paper airplane icon. Your message will then be sent to the recipient.
6. Reply to a Message: If you receive a text message and want to reply, simply open the message and select the option to reply. This will open a new message window where you can compose and send your response.
7. View Sent and Received Messages: To view your sent and received messages, navigate to the messaging app and select the appropriate option to view your message history. This will allow you to see a list of all the text messages you have sent and received.
8. Delete Messages: If you want to declutter your message history, you have the option to delete individual messages or entire conversations. Simply navigate to the message you want to delete, select the delete option, and confirm your selection.
Text messaging on the Jitterbug Flip Phone is a user-friendly experience that keeps you connected and informed. Whether you’re sending a quick message to check in with a loved one or engaging in a longer conversation, the Jitterbug Flip Phone makes it effortless to stay in touch.
Adding Contacts to Your Jitterbug Flip Phone
Adding contacts to your Jitterbug Flip Phone allows you to easily access and communicate with your friends, family, and important contacts. Here’s how you can add contacts to your Jitterbug Flip Phone:
1. Open the Contacts application on your Jitterbug Flip Phone. This can usually be found in the main menu or on the home screen.
2. Select the option to add a new contact. This may be labeled as “New Contact,” “Add Contact,” or something similar.
3. Enter the contact’s name using the keypad on your Jitterbug Flip Phone. Use the arrow keys and the OK/Select button to navigate and select the desired letters. Use the “#” key to switch between uppercase and lowercase letters.
4. Once you have entered the contact’s name, press the OK/Select button to move to the next field, which is usually the phone number field.
5. Enter the contact’s phone number using the keypad. If the contact has multiple phone numbers, such as a home number and a mobile number, you can use the options provided to specify the type of number.
6. After entering the phone number, press the OK/Select button to save the contact. The Jitterbug Flip Phone may ask you to confirm the contact details before saving.
7. Repeat steps 2-6 to add more contacts to your Jitterbug Flip Phone.
Once you have added contacts to your Jitterbug Flip Phone, you can easily access them and initiate calls or send messages. Simply open the Contacts application, select the desired contact, and choose the appropriate action, such as calling or texting.
It’s important to regularly update your contacts on the Jitterbug Flip Phone to ensure that you have the most up-to-date information. If any of the contact details change, follow the same steps mentioned above to edit or delete the contact, and then add the updated details.
By adding contacts to your Jitterbug Flip Phone, you can effortlessly stay connected with the people who matter most to you.
Customizing Your Texting Experience on the Jitterbug Flip Phone
With the Jitterbug Flip Phone, you have the ability to customize your texting experience to suit your preferences. Whether it’s changing the text font, adjusting the display settings, or personalizing the appearance of your messages, the Jitterbug Flip Phone offers a range of options to make your texting experience more enjoyable. Here are some tips to help you get started:
1. Adjusting the Text Font: The Jitterbug Flip Phone allows you to change the font size and style of your text messages. To do this, go to the “Settings” menu and navigate to the “Display” or “Text Settings” option. From there, you can select the desired font size and style that best suits your vision and reading comfort.
2. Customizing Display Settings: Depending on your preference, you can adjust the display settings of your Jitterbug Flip Phone to enhance your texting experience. In the “Settings” menu, look for options such as “Brightness” and “Contrast” to modify the screen’s appearance. Experiment with different settings to find what works best for you.
3. Personalizing Message Appearance: The Jitterbug Flip Phone allows you to add a personal touch to your text messages by customizing the background color, text color, and even adding emojis. To do this, go to the “Settings” menu and find the “Message Settings” or “Display Settings” option. From there, you can choose different themes and colors to make your messages stand out.
4. Enabling Predictive Text: The Jitterbug Flip Phone comes with a predictive text feature that can make typing and sending messages faster. To enable this feature, go to the “Settings” menu and navigate to the “Language” or “Text Settings” option. Look for the “Predictive Text” or “Word Suggestions” feature and turn it on. This will provide word suggestions as you type, making it easier to compose messages.
5. Creating Quick Texts: Another way to customize your texting experience on the Jitterbug Flip Phone is by creating quick texts. These are pre-written messages that you can easily insert into your conversations. To set up quick texts, go to the “Settings” menu and look for the “Quick Text” or “Shortcuts” option. From there, you can create and customize your own quick texts for frequently used phrases or responses.
By taking advantage of these customization options, you can personalize your texting experience on the Jitterbug Flip Phone to best suit your needs and preferences. Whether it’s adjusting the text font, modifying display settings, or adding a personal touch to your messages, these features allow you to make the most out of your texting experience with the Jitterbug Flip Phone.
In conclusion, the Jitterbug Flip Phone provides a simple and user-friendly solution for texting. With its easy-to-use interface, large buttons, and clear display, texting on this device is accessible to users of all ages, including seniors. The Jitterbug Flip Phone also offers helpful features like predictive text and customizable message settings, making it even more convenient to stay connected with loved ones.
Whether you’re new to texting or prefer a straightforward communication device, the Jitterbug Flip Phone offers a reliable solution. Its intuitive design and functionality make it a popular choice for those seeking a hassle-free texting experience. So, if you’re looking for a cell phone that prioritizes simplicity and ease of use, the Jitterbug Flip Phone is definitely worth considering. Stay connected with your loved ones effortlessly and enjoy the convenience of texting anywhere you go.
FAQs
1. Can I send text messages on a Jitterbug flip phone?
Yes, you can send text messages on a Jitterbug flip phone. While flip phones are commonly associated with basic calling and texting capabilities, the Jitterbug flip phone offers a simple and user-friendly interface for sending and receiving text messages.
2. How do I compose a text message on a Jitterbug flip phone?
To compose a text message on a Jitterbug flip phone, simply open the messaging app on the device. Then, select “New Message” or a similar option to begin composing your message. Use the phone’s keypad to enter the desired text and navigate through the available options, such as sending the message, adding attachments, or entering contact information.
3. Can I receive picture messages on a Jitterbug flip phone?
No, Jitterbug flip phones do not support picture messaging. These devices are primarily designed for basic communication needs, focusing on calls and text messages. While you can send and receive text messages with a Jitterbug flip phone, picture messages are not supported.
4. How many characters can a text message on a Jitterbug flip phone contain?
A text message on a Jitterbug flip phone can contain up to 160 characters. If your message exceeds this limit, it will be split into multiple messages, and the recipient may receive them as separate texts. Keep this in mind when composing your messages to ensure they are concise and fit within the character limit.
5. Can I use emoticons or emojis in my text messages on a Jitterbug flip phone?
No, Jitterbug flip phones do not support emoticons or emojis in text messages. These devices have a more basic messaging interface, which does not include support for graphical elements such as emoticons. Your text messages will consist solely of text without any additional visual elements.