
Are you looking to transfer your music from one iPhone to another? Whether you’ve upgraded to a new iPhone or just want to share your favorite tunes with a friend, transferring music between devices can be a seamless and convenient process. In this article, we will explore various methods to transfer music from one iPhone to another, ensuring that your music collection stays intact and easily accessible on your new device. From using Apple’s built-in features to utilizing third-party apps, we’ll guide you step-by-step so you can enjoy your favorite songs on your new iPhone with just a few taps. So, let’s dive in and discover how to effortlessly transfer your music collection from one iPhone to another!
Inside This Article
- Overview
- Method 1: Using iTunes to Transfer Music
- Method 2: Using iCloud to Transfer Music
- Method 3: Using Third-Party Applications to Transfer Music
- Conclusion
- FAQs
Overview
Transferring music from one iPhone to another is a common need for many users. Whether you’re upgrading to a new iPhone or sharing your favorite tracks with a friend, having a simple and efficient method to transfer your music is essential. Fortunately, there are multiple ways to accomplish this task, ensuring that you can enjoy your favorite tunes on your new device without any hassle.
In this article, we will explore three different methods to transfer music from one iPhone to another. We will cover using iTunes, utilizing iCloud, and utilizing third-party applications. Each method has its own advantages and considerations, allowing you to choose the one that best suits your needs.
Whether you prefer a traditional approach, cloud-based solution, or third-party app, you’ll find all the information you need to successfully transfer music between iPhones in this comprehensive guide. So, without further ado, let’s dive into the methods and get your music transferred swiftly and seamlessly.
Method 1: Using iTunes to Transfer Music
When it comes to transferring music from one iPhone to another, one of the most reliable and widely used methods is using iTunes. iTunes is a free software application developed by Apple that allows you to manage your music, videos, and other media files on your iOS devices.
Follow these simple steps to transfer your music using iTunes:
Step 1: Connect your old iPhone to your computer using a USB cable and launch iTunes. Make sure you have the latest version of iTunes installed on your computer.
Step 2: Once your iPhone is connected, click on the device icon that appears in the iTunes window.
Step 3: Select the “Music” tab from the left sidebar in iTunes.
Step 4: Check the box next to “Sync Music” and choose whether you want to sync your entire music library or selected playlists, artists, albums, or genres.
Step 5: Click on the “Apply” or “Sync” button at the bottom right corner of the iTunes window to start transferring your music from your old iPhone to your iTunes library.
Step 6: Once the music transfer is complete, disconnect your old iPhone from the computer.
Step 7: Connect your new iPhone to the computer using a USB cable and launch iTunes.
Step 8: Click on the device icon in iTunes and select the “Music” tab.
Step 9: Check the box next to “Sync Music” and choose to sync your entire music library or select specific playlists, artists, albums, or genres.
Step 10: Click on the “Apply” or “Sync” button to start transferring the music from your iTunes library to your new iPhone.
Step 11: Once the music transfer is complete, disconnect your new iPhone from the computer.
That’s it! Your music should now be successfully transferred from your old iPhone to your new iPhone using iTunes. Remember to keep your iTunes library up to date to ensure that all your latest music is transferred to your new device.
Method 2: Using iCloud to Transfer Music
If you prefer a wireless and hassle-free method to transfer your music from one iPhone to another, using iCloud is a great option. iCloud is Apple’s cloud storage and computing service that allows you to sync and access your data across all your Apple devices.
Before you begin the transfer process, ensure that both iPhones are signed in to the same iCloud account and connected to a stable Wi-Fi network. Here’s how to transfer music from iPhone to iPhone using iCloud:
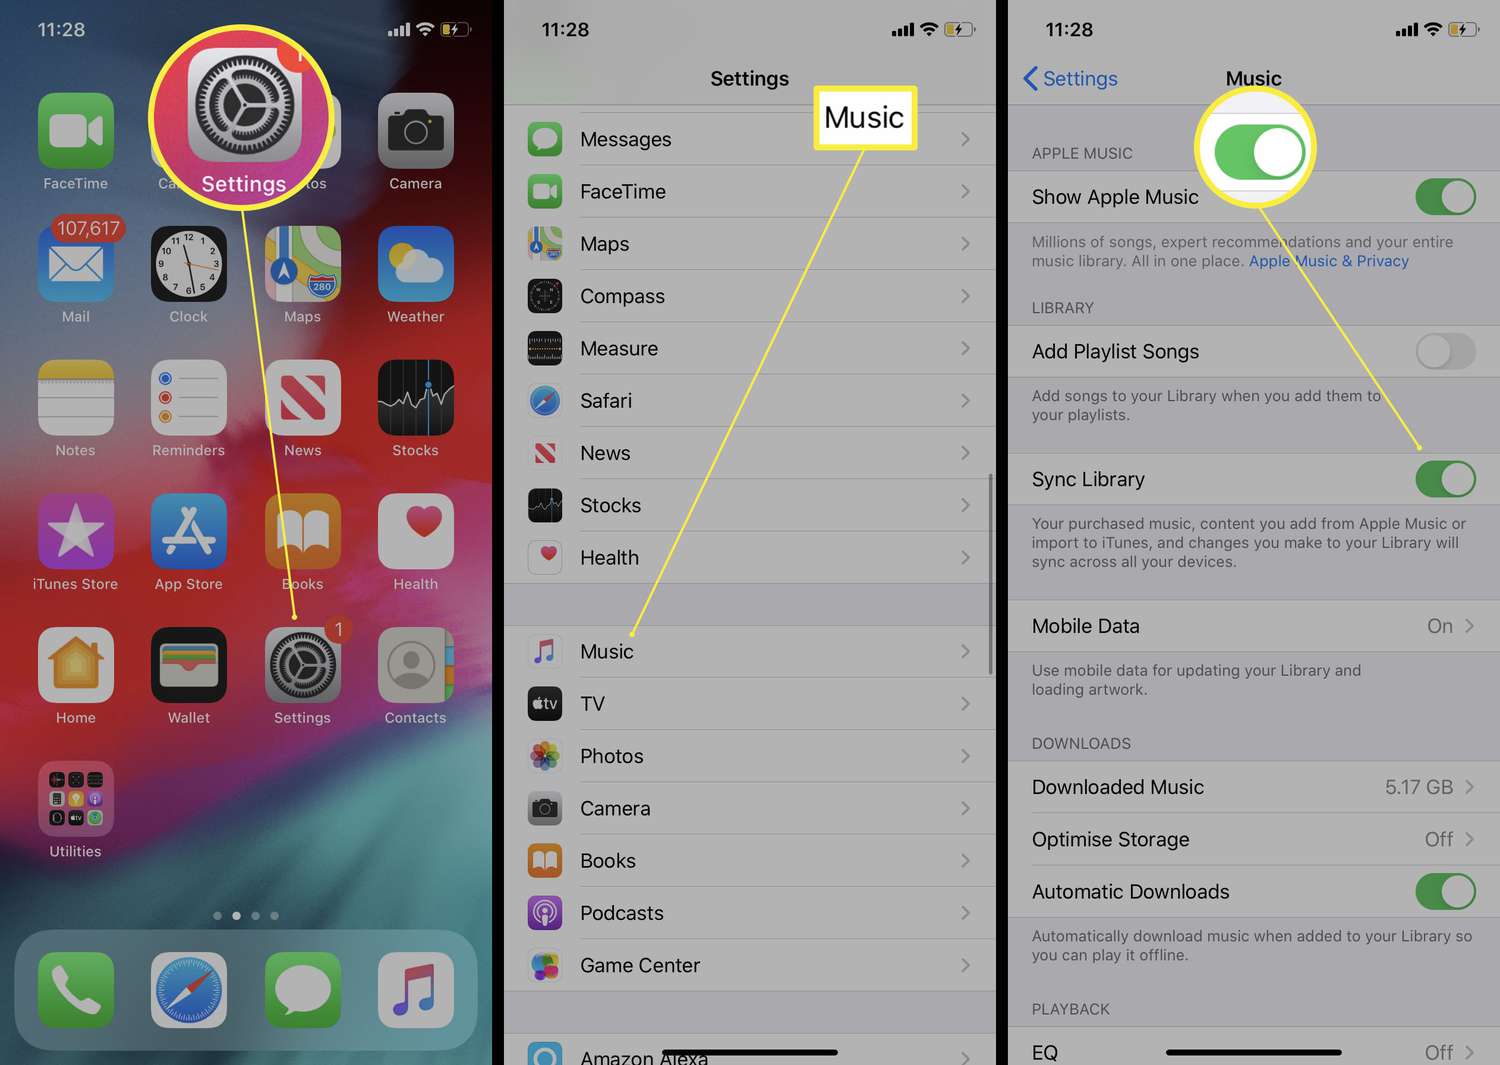
- On your old iPhone, open the “Settings” app.
- Tap on your name at the top of the Settings menu, then select “iCloud.”
- Under the iCloud settings, make sure that the “Music” toggle is enabled. This will ensure that your music library is backed up to iCloud.
- Wait for the synchronization process to complete. This may take some time, depending on the size of your music library and the speed of your internet connection.
- On your new iPhone, go through the initial setup process until you reach the “Apps & Data” screen.
- Tap on “Restore from iCloud Backup.”
- Sign in to your iCloud account using the same credentials used on your old iPhone.
- Choose the most recent iCloud backup that contains your music library and proceed with the restoration process.
- Once the restoration is complete, open the “Music” app on your new iPhone.
- Your music library should now be available on your new iPhone, including any playlists, albums, or songs that were present on your old device.
It’s important to note that using iCloud to transfer music will only work if you have enough available iCloud storage to accommodate your music library. If your music library exceeds your current iCloud storage plan, you may need to upgrade your plan or consider alternative methods of transferring your music, such as using iTunes or third-party applications.
Using iCloud to transfer music offers the advantage of convenience and simplicity. It ensures that you can easily access your favorite songs on your new iPhone without the need for cables or additional software. However, keep in mind that this method relies on a stable internet connection and sufficient iCloud storage space.
Consider the size of your music library and the speed of your internet connection before opting for this method. Additionally, if you have any specific playlists or custom organizational settings, it’s essential to double-check that they are successfully transferred during the iCloud backup and restore process.
Now that you know how to use iCloud to transfer music from one iPhone to another, you can enjoy your favorite tunes on your new device without missing a beat!
Method 3: Using Third-Party Applications to Transfer Music
If you’re looking for an alternative method to transfer your music from one iPhone to another, you can consider using third-party applications. These apps provide a seamless and efficient way to transfer your music library without the need for complex procedures or relying on iTunes or iCloud.
There is a wide range of third-party applications available on the App Store that cater specifically to transferring music between iPhones. These apps offer user-friendly interfaces, convenient features, and fast transfer speeds, making the process quick and hassle-free.
To get started, simply search for music transfer apps on the App Store and choose one that suits your needs. Some popular options include AnyTrans, iMazing, and Syncios. These apps usually offer both paid and free versions, so you can decide which one best fits your budget and requirements.
Once you have downloaded and installed the music transfer app on both iPhones, follow the app’s instructions to connect the devices. Typically, you will need to connect both iPhones to the same Wi-Fi network or use a USB cable for a direct connection.
Next, open the app on your old iPhone and select the music that you want to transfer. You can usually choose to transfer entire playlists, albums, or individual songs. Once you have made your selection, initiate the transfer process, and wait for the app to complete the transfer.
After the transfer is finished, open the app on your new iPhone and check if the music has been successfully transferred. In some cases, you may need to manually import the transferred music into your device’s default music app. The app should provide instructions on how to do this.
Using third-party applications to transfer music offers you more flexibility and control over the transfer process. You can easily choose specific songs or playlists to transfer, ensuring that you only transfer the music you want. Additionally, these apps often support transferring other types of media, such as videos and photos, further expanding their usefulness.
However, it’s important to note that using third-party applications may involve additional costs, especially for premium versions or in-app purchases. Be sure to carefully read the app’s features and pricing details before making a decision.
Technology has made it incredibly convenient to transfer music from iPhone to iPhone. Whether you are upgrading to a new device or sharing your favorite tunes with a friend, the process is simple and efficient. With methods like iCloud, iTunes, and third-party applications, you can seamlessly transfer your entire music library in just a few steps.
Remember to back up your music before initiating the transfer, and always ensure that both iPhones are connected to a stable internet connection. Whether you want to transfer purchased songs, non-purchased tracks, or even playlist arrangements, there are solutions available for all your needs. So, don’t worry about losing your cherished music collection; instead, embrace the convenience and enjoy your favorite tunes on your new iPhone.
From wireless transfers to using a computer as an intermediary, the possibilities are endless. So, go ahead and bring your music with you wherever you go – the iPhone to iPhone music transfer process has never been easier!
FAQs
1. Can I transfer music from iPhone to iPhone?
Absolutely! You can easily transfer music from one iPhone to another using various methods such as iCloud, iTunes, or third-party apps. These methods allow you to transfer your favorite songs, playlists, and even entire music libraries to your new iPhone effortlessly.
2. How can I transfer music using iCloud?
To transfer music using iCloud, you need to make sure that both iPhones are signed in to the same iCloud account. On your old iPhone, go to “Settings” > [Your Name] > “iCloud” > “Music” and enable the “iCloud Music Library” option. Then, on your new iPhone, follow the same steps and turn on the “iCloud Music Library” option. Wait for the music to sync, and you’ll have your music transferred to your new device.
3. What if I don’t want to use iCloud?
If you prefer not to use iCloud, you can transfer music from iPhone to iPhone using iTunes. Connect your old iPhone to your computer and open iTunes. Select your device, go to the “Music” tab, and check the box next to “Sync Music.” Choose the music you want to transfer and click on the “Apply” button to begin the sync. Then, connect your new iPhone to the computer and repeat the process to transfer the music to your new device.
4. Are there any third-party apps that can help me transfer music?
Yes, there are several third-party apps available that can help you transfer music from iPhone to iPhone. Some popular options include AnyTrans, iMazing, and Syncios. These apps provide user-friendly interfaces and advanced features to make music transfers quick and easy. Simply download the app, follow the instructions, and you’ll be able to transfer your music seamlessly.
5. Will transferring music from iPhone to iPhone affect the quality of the songs?
No, transferring music from iPhone to iPhone will not affect the quality of your songs. Whether you use iCloud, iTunes, or a third-party app, the music files are transferred as they are, without any loss in audio quality. So, you can enjoy your favorite tunes on your new iPhone with the same great sound as before.