
If you’re looking to export data from Salesforce, you’ve come to the right place!
Salesforce is a powerful customer relationship management (CRM) platform that allows businesses to manage their customer data effectively. However, there may be instances where you need to export this data for analysis, reporting, or migration purposes. Whether you want to extract leads, contacts, opportunities, or any other data from Salesforce, we’ve got you covered.
In this article, we will guide you through the process of exporting data from Salesforce step by step. We will explore different methods and techniques, including using built-in Salesforce tools, third-party apps, and even coding solutions. So, whether you’re a Salesforce admin, a business owner, or an aspiring data analyst, read on to learn how to export data from Salesforce and unlock valuable insights for your business.
Inside This Article
- Overview
- Step 1: Access the Salesforce Data Export Wizard
- Step 2: Choose the Objects to Export
- Step 3: Select the Data Range and Format
- Step 4: Specify the File and Delivery Options
- Step 5: Review and Confirm the Export
- Additional Tips and Considerations
- Conclusion
- FAQs
Overview
Exporting data from Salesforce is a crucial process for businesses that need to analyze or migrate their data. With the vast amounts of information stored in Salesforce, having the ability to extract the data is essential for decision making and business operations. In this article, we will explore different methods of exporting data from Salesforce, including the use of Data Export, Reports, and Apex Data Loader.
Whether you need to export data for backup purposes, data analysis, or transferring data to another system, Salesforce provides various options to meet your specific requirements. These methods offer flexibility and scalability, allowing you to export both standard and custom objects, as well as related records, attachments, and other data elements.
By leveraging the power of these data export methods, you can gain valuable insights from your Salesforce data, integrate it with other systems, or perform complex data transformations for reporting purposes. Let’s dive deeper into each of the methods to understand their advantages and use cases.
Step 1: Access the Salesforce Data Export Wizard
Accessing the Salesforce Data Export Wizard is the first step to export data from your Salesforce account. This powerful tool allows you to extract your data in a structured format so you can utilize it outside of the Salesforce platform.
To access the Data Export Wizard, follow these simple steps:
- Log in to your Salesforce account using your credentials.
- Navigate to the setup menu by clicking on your profile avatar at the top-right corner of the page and selecting “Setup” from the drop-down menu.
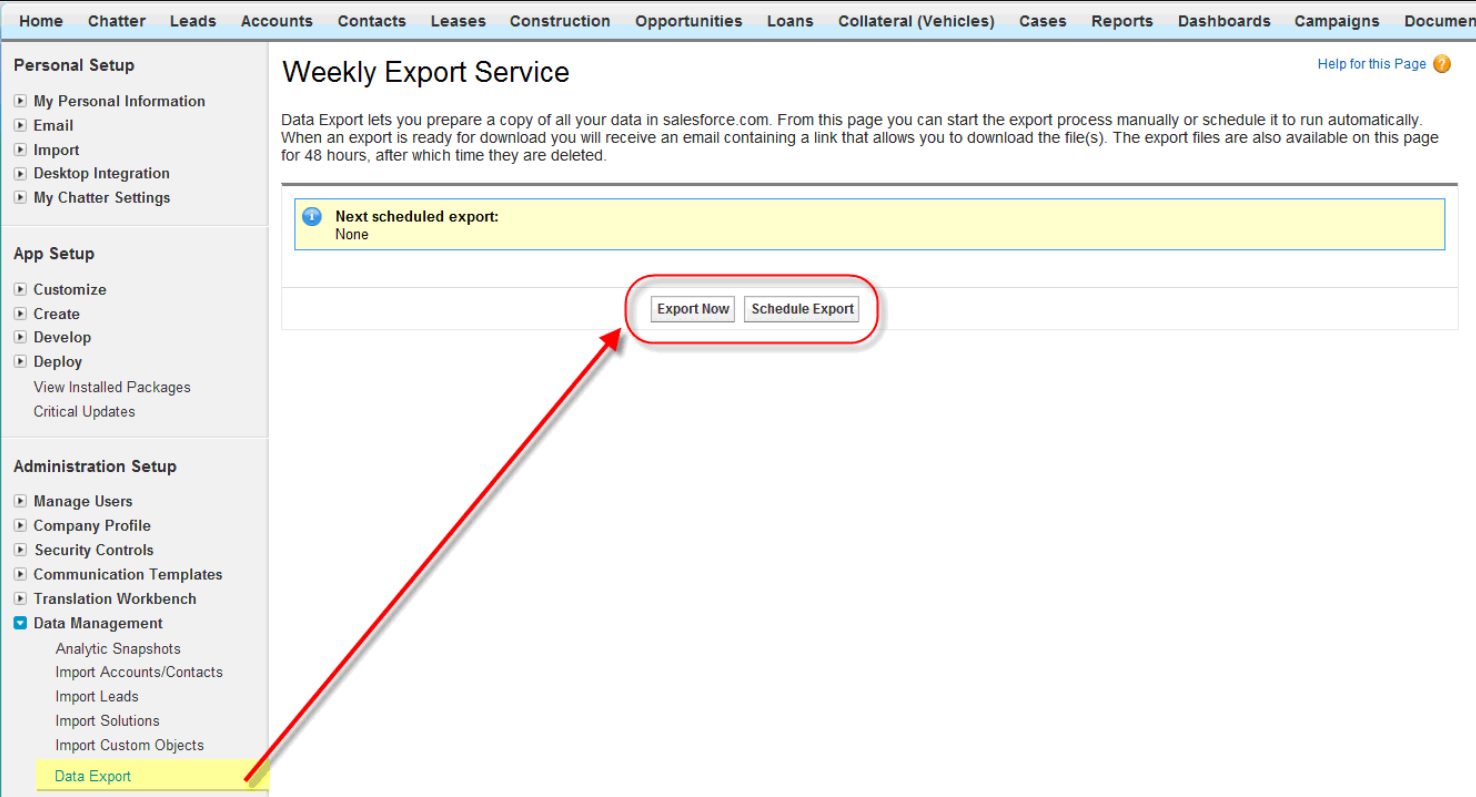
- In the left-hand sidebar of the Setup page, scroll down and locate the “Data Management” section.
- Under the “Data Management” section, click on “Data Export” to access the Data Export Wizard.
Once you’ve accessed the Data Export Wizard, you’re ready to proceed with the next steps to export your desired data from Salesforce.
Step 2: Choose the Objects to Export
Once you have decided on the method of exporting data from Salesforce, the next step is to choose the objects you want to export. Salesforce allows you to export data from multiple objects simultaneously, giving you the flexibility to extract the data you need to meet your requirements.
To choose the objects for export, you can follow these steps:
1. Navigate to the Setup Menu: From your Salesforce homepage, click on the “Setup” option located at the top-right corner of the screen. This will open the Setup menu.
2. Search for “Data Export” or “Data Loader“: In the Setup menu, use the search bar to search for either “Data Export” or “Data Loader. Click on the appropriate option that appears in the search results.
3. Access the Export/Import Wizard: Once you have clicked on the Data Export or Data Loader option, you will be directed to the Export/Import Wizard page. Here, you can begin the process of exporting data from Salesforce.
4. Select the Objects: In the Export/Import Wizard, you will have the option to select the objects you want to export. This can be done by checking the boxes next to the names of the objects. You can select multiple objects at once.
5. Customize the Data Selection: Depending on the method you are using to export data, you may have the option to further customize the data selection. For example, with Data Loader, you can specify filters and queries to extract specific records from the selected objects.
6. Review and Confirm: After selecting the objects and customizing the data selection, take a moment to review your choices. Ensure that you have chosen the correct objects and data criteria for export. Once you are satisfied, proceed to the next step.
By following these steps, you can easily choose the objects you want to export from Salesforce. Remember to consider your data requirements and business needs while selecting the objects for export.
Step 3: Select the Data Range and Format
Once you have chosen the objects and fields to include in your data export, the next step is to select the data range and format. This step determines how much data you want to export and the file format in which it will be saved.
When selecting the data range, you have several options available. You can choose to export all records, a specific date range, or even a custom set of records based on specific criteria. This flexibility allows you to tailor your data export to meet your specific needs.
Next, you need to decide on the file format in which you want to save the exported data. Salesforce offers various formats such as CSV, Excel, XML, and JSON. The choice of format depends on the compatibility with the system or software you plan to import the data into. It’s important to ensure that the format you choose supports the structure and integrity of the exported data.
Additionally, you can specify other options like the character encoding and field delimiter to further refine the exported data format. These options enable you to align the exported data with the requirements of the target system or application.
It is recommended to carefully review and adjust the data range and format settings before starting the export process. This ensures that you extract the relevant data and have it in a compatible format for smooth data importation into your desired destination.
Once you have made the necessary selections for the data range and format, you are ready to proceed to the next step to start the actual data export process.
Step 4: Specify the File and Delivery Options
Once you have selected the data to export and defined the criteria, it’s time to specify the file and delivery options. This step determines how the exported data will be saved and where it will be delivered.
In Salesforce, there are several file formats available for exporting data, including CSV (Comma-Separated Values), Excel, XML, and more. You can choose the format that best suits your needs and the application you plan to import the data into.
After selecting the file format, you need to specify the destination of the exported file. Salesforce provides you with multiple delivery options to choose from. You can save the file to your computer, send it via email, or even store it in a designated folder within Salesforce.
If you choose to save the file to your computer, you can specify the location where the file will be saved. This allows you to easily locate and access the exported data later on.
If you prefer to have the file delivered via email, you will need to provide the recipient email address and choose whether you want to receive a download link or an attachment. This is a convenient option if you want to share the exported data with others.
Additionally, Salesforce allows you to schedule recurring exports. This means you can set up a specific time and frequency for exporting data automatically. This is particularly useful if you need to regularly update external systems or generate reports on a recurring basis.
Before finalizing the export, double-check your file and delivery options to ensure they align with your requirements. This will help ensure a seamless and accurate export of your Salesforce data.
Now that you have specified the file and delivery options, you’re ready to proceed to the final step of the data export process.
Step 5: Review and Confirm the Export
Once you have selected the data to be exported and specified the export settings, it is crucial to review and confirm the export process before initiating it. This step ensures that you are exporting the correct data and that all settings are properly configured.
Here are some important actions to take during this step:
- Double-check the selected data: Before initiating the export, thoroughly review the data you have selected for export. Confirm that you have included all the necessary fields and records that you need. This will help prevent any future inconvenience caused by exporting incomplete or incorrect data.
- Verify the export settings: Ensure that the export settings, such as file format, destination folder, and data filters, are correctly configured. Review each setting to make sure it aligns with your specific export requirements.
- Preview the exported results: If possible, take advantage of any preview functionality provided by the export tool. This allows you to see a sample of the exported data before proceeding. By previewing the results, you can detect any potential issues or discrepancies and make necessary adjustments before performing the actual export.
- Confirm the export: Once you have reviewed and verified the selected data and export settings, it’s time to confirm the export. Depending on the tool you are using, this may involve clicking a “Confirm” or “Export” button or executing a specific command. Be sure to carefully follow the instructions provided by the export tool.
- Monitor the export progress: While the export process is underway, it’s essential to monitor its progress. Depending on the size and complexity of the data being exported, the process may take some time. Keep an eye on the export status and ensure that it completes successfully.
By diligently reviewing and confirming the export, you can minimize the risks of exporting incorrect or incomplete data. This step adds an extra layer of assurance, allowing you to proceed with confidence and peace of mind.
Additional Tips and Considerations
When exporting data from Salesforce, there are a few additional tips and considerations to keep in mind to ensure a smooth and successful process. Let’s take a look at some of these important factors:
1. Plan your export: Before initiating the data export, it’s essential to have a clear plan in place. Determine the specific data you want to export and define the criteria for selecting the records. This will help you avoid exporting unnecessary data and save time.
2. Check data integrity: Before exporting the data, it’s crucial to ensure its integrity. Clean up any duplicate or incorrect records to prevent issues during the export process. It’s also a good practice to validate the data for accuracy and consistency.
3. Consider data volume: Large datasets can affect the export process and may result in longer processing times. If you are dealing with a significant amount of data, consider breaking down the export into smaller batches or schedule the export during off-peak hours when server traffic is lower.
4. Handle sensitive data: If you are exporting sensitive or confidential data, take extra precautions to protect it. Ensure that you have the necessary security measures in place, such as role-based access controls, encryption, or anonymization techniques, to safeguard the data during the export process.
5. Validate the export: After completing the data export, it’s essential to validate the exported data to ensure its accuracy and completeness. Compare the exported data with the source data in Salesforce to confirm that all the necessary records and fields have been exported correctly.
6. Document the process: Keep a record of the data export process, including the date, time, and specific parameters used. This documentation can serve as a reference for future exports and troubleshooting purposes. It’s also helpful to include any relevant notes or observations to provide additional context.
7. Regularly review export procedures: As your Salesforce data grows and evolves, periodically review and update your data export procedures. This ensures that you are following the best practices and incorporating any new features or changes introduced by Salesforce.
By considering these additional tips and taking the necessary precautions, you can streamline and optimize the data export process from Salesforce, ensuring accurate and reliable results.
Conclusion
Exporting data from Salesforce is an essential task for businesses that need to analyze and manipulate their data outside of the platform. By following the steps outlined in this article, you can successfully export your data and gain valuable insights.
Remember to carefully consider your export requirements and select the appropriate data export method. Whether you choose to use the Salesforce Data Export feature, the Salesforce DataLoader, or an API integration, make sure to follow best practices for data security and integrity.
By harnessing the power of data export, you can optimize your business processes, improve decision-making, and uncover valuable trends and patterns. So, go ahead and start exporting your Salesforce data to unlock the full potential of your organization!
FAQs
1. Can I export data from Salesforce?
Absolutely! Salesforce provides various options to export data from its platform. You can extract data using Salesforce’s built-in tools such as Data Loader, Export Reports, or the Salesforce Data Export feature.
2. What is the Salesforce Data Loader?
The Salesforce Data Loader is a powerful tool that allows you to export, update, or insert large volumes of data in Salesforce. It provides a user-friendly interface and supports various data formats like CSV and XML.
3. How do I export reports from Salesforce?
Exporting reports from Salesforce is quick and straightforward. From the Report tab, run the desired report, then click on the “Export Details” or “Export Summary” button. You can choose to export the report as a CSV, Excel, or PDF file.
4. Can I schedule automatic data exports in Salesforce?
Yes, you can schedule automatic data exports in Salesforce using the Data Export feature. This allows you to select the desired objects, data range, and file format. Salesforce will then generate and deliver the exported data to your email address or a designated FTP server at your specified intervals.
5. Are there any limitations or considerations when exporting data from Salesforce?
While exporting data from Salesforce is generally straightforward, there are a few considerations to keep in mind. Firstly, ensure you have the necessary access and permissions to export data. Additionally, be aware of any limitations set by your Salesforce edition, including the maximum number of records or file size that can be exported at once.