
Welcome to our guide on how to reinstall the wireless network adapter on Windows 7. The wireless network adapter is a crucial component that allows your computer to connect to Wi-Fi networks. However, sometimes issues can arise, causing the adapter to malfunction or stop working altogether. Reinstalling the adapter can often resolve these problems and get you back online in no time. In this article, we will walk you through the step-by-step process of reinstalling the wireless network adapter on Windows 7. Whether you are experiencing connectivity issues or just want to ensure your wireless adapter is running smoothly, our guide will provide you with the necessary instructions to get you up and running again.
Inside This Article
- Step 1: Open Device Manager
- Step 2: Locate the Wireless Network Adapter
- Step 3: Uninstall the Wireless Network Adapter
- Step 4: Restart Your Computer
- Step 5: Reinstall the Wireless Network Adapter
- Step 6: Update the Wireless Network Adapter Driver
- Step 7: Verify the Reinstallation
- Step 8: Restart your Computer (Optional)
- Conclusion
- FAQs
Step 1: Open Device Manager
Device Manager is a built-in Windows tool that allows you to manage and update your computer’s hardware devices. To open Device Manager in Windows 7, you can follow these steps:
1. Click on the “Start” button located at the bottom left corner of your screen.
2. In the search box, type “Device Manager” and press Enter.
3. The Device Manager window will open, displaying a list of all the hardware devices connected to your computer.
Alternatively, you can also access Device Manager by right-clicking on the “Computer” icon on your desktop or in the Start menu, selecting “Properties,” and then clicking on the “Device Manager” link on the left side of the window that appears.
Once you have opened Device Manager, you can proceed to the next step to locate the wireless network adapter that you want to reinstall.
Step 2: Locate the Wireless Network Adapter
Now that you’ve opened Device Manager, it’s time to locate the wireless network adapter. This is the component responsible for connecting your computer to Wi-Fi networks. To find it, you’ll need to navigate through the categories in Device Manager.
Scroll down the list of devices until you find the category labeled “Network adapters.” This category contains all the network-related devices installed on your computer. Expand it by clicking on the arrow to the left of its name.
Once expanded, you will see a list of network adapters, including the wireless network adapter. The name of the wireless adapter may vary depending on the manufacturer, but it usually contains keywords like “Wi-Fi,” “Wireless,” or the name of the manufacturer itself.
If you’re having trouble identifying the wireless network adapter, look for any icon that resembles an antenna or signal bars. This can help you quickly spot the correct device.
Keep in mind that some computers may have multiple network adapters, such as an Ethernet adapter and a wireless adapter. Make sure you select the correct one by double-checking the name and the icon.
Once you have located the wireless network adapter, you are ready to proceed to the next step: uninstalling it.
Step 3: Uninstall the Wireless Network Adapter
Uninstalling the wireless network adapter is a crucial step in the process of reinstalling it on Windows 7. Follow the steps below to successfully uninstall the adapter:
- Open the Device Manager by pressing the Windows key + X and selecting “Device Manager” from the menu that appears.
- In the Device Manager window, locate the “Network adapters” category and click on the arrow next to it to expand the list of devices.
- Find the wireless network adapter in the list. It is usually labeled with the brand and model of the adapter.
- Right-click on the wireless network adapter and select “Uninstall” from the context menu.
- A confirmation dialog will appear asking if you want to uninstall the device. Check the box that says “Delete the driver software for this device” and click on “OK” to proceed with the uninstallation.
By deleting the driver software, you ensure that the old driver is completely removed from your system. This step is necessary to prevent any conflicts or issues when reinstalling the adapter later.
Once you have successfully uninstalled the wireless network adapter, you can proceed to the next step, which is restarting your computer.
Step 4: Restart Your Computer
After successfully uninstalling the wireless network adapter, the next step in the process is to restart your computer. This step is crucial as it allows your system to refresh and reset any changes made during the uninstallation process.
To restart your computer, simply click on the “Start” menu button in the bottom left corner of your screen. From the options that appear, click on “Restart.” Alternatively, you can press the Windows key on your keyboard and then select the “Restart” option.
Once you initiate the restart, your computer will go through a complete shutdown and then start up again. This process usually takes a few minutes, so be patient and allow your computer to fully complete the restart.
During the restart, your computer will reload all necessary system files, including those related to your wireless network adapter. This ensures that any dependencies or configurations required for the adapter to function properly are correctly initialized.
Rebooting your computer also clears out any temporary data or cache files that may have been causing issues with the wireless network adapter. By doing so, any conflicts or errors that were present before the uninstallation can be resolved at this stage.
After the restart, your computer will return to the desktop screen. At this point, your wireless network adapter will not be functional, but don’t worry. The next step is to reinstall the wireless network adapter, which we will cover in detail in the following section.
Step 5: Reinstall the Wireless Network Adapter
Once you have successfully uninstalled the wireless network adapter, it’s time to reinstall it. Here’s how you can do it:
1. In the Device Manager window, click on the “Action” tab at the top, and then select “Scan for hardware changes” from the drop-down menu. This will prompt your computer to search for any new hardware and install the necessary drivers.
2. Alternatively, you can also click on the “Action” tab, and then select “Add legacy hardware”. This option will launch the Hardware Wizard, which will guide you through the process of reinstalling the wireless network adapter.
3. Follow the on-screen instructions to complete the installation. In most cases, Windows will automatically detect and install the appropriate driver for your wireless network adapter. However, if prompted, you may need to select the driver from a list or insert a driver installation disc that came with your adapter.
4. Once the installation is complete, restart your computer to ensure that the changes take effect. After rebooting, your wireless network adapter should be reinstalled and ready to use.
Please note that the exact steps may vary slightly depending on your specific computer and operating system. It’s always a good idea to refer to the documentation provided by your device manufacturer for detailed instructions.
By reinstalling the wireless network adapter, you can troubleshoot and resolve any issues related to its functionality. This step is often recommended if you’re experiencing frequent connection problems or if the adapter is not detected by your computer.
In case the reinstallation does not solve the issue, you may need to consider updating the driver for the wireless network adapter. This can be done in the next step, “Step 6: Update the Wireless Network Adapter Driver”.
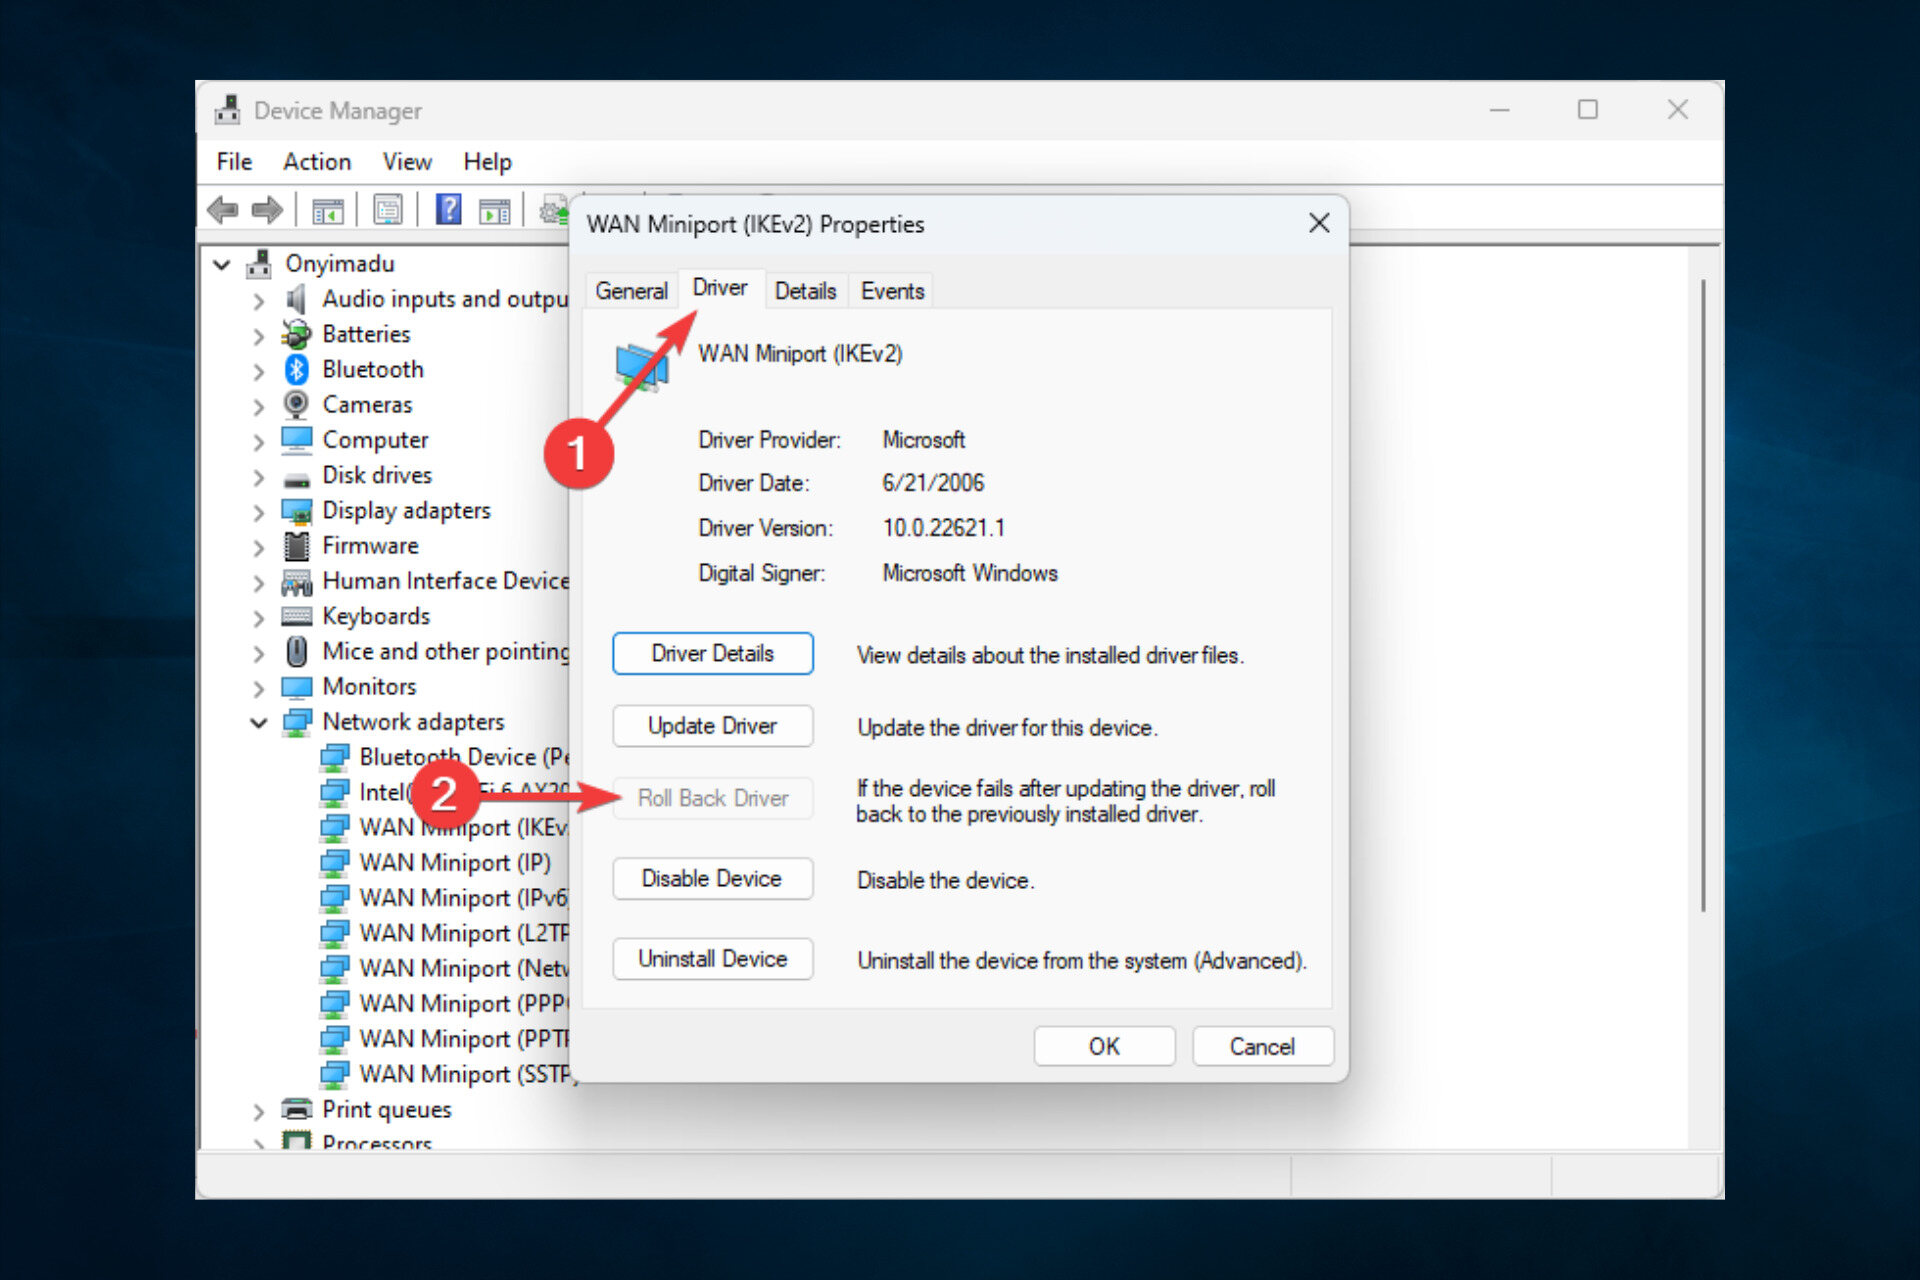
Step 6: Update the Wireless Network Adapter Driver
Updating the wireless network adapter driver is crucial for ensuring optimal performance and compatibility with your Windows 7 system. Here’s how you can update the driver:
1. Visit the Manufacturer’s Website: Start by visiting the website of the manufacturer that produced the wireless network adapter. They typically provide driver updates for their devices.
2. Locate the Driver Download Section: Once on the manufacturer’s website, navigate to the support or download section. Look for the wireless network adapter driver downloads specific to your device model.
3. Download the Latest Driver: Look for the most recent driver version available for your wireless network adapter. Download the driver file to your computer. Make sure to choose the correct version for your operating system (Windows 7).
4. Install the Driver: After downloading the driver file, locate it on your computer and run the installer. Follow the on-screen instructions to complete the installation process. It may involve accepting license agreements or restarting your computer.
5. Restart Your Computer: After installing the updated driver, it’s a good practice to restart your computer. This ensures that the changes are fully applied and the driver is functioning correctly.
6. Check for Driver Updates: Keep in mind that drivers get updated regularly to improve performance and fix any bugs or compatibility issues. It’s recommended to periodically check for driver updates on the manufacturer’s website or use a driver update software to automate the process.
Updating the wireless network adapter driver can resolve issues like slow internet speeds, connectivity problems, or compatibility issues with different networks. It’s an essential step to maintain a stable and reliable wireless connection on your Windows 7 system.
Step 7: Verify the Reinstallation
After reinstalling the wireless network adapter on your Windows 7 computer, it’s crucial to verify that the process was successful. This step ensures that your device is properly functioning and can connect to wireless networks without any issues.
To verify the reinstallation, follow these steps:
- Open the Start menu and navigate to the Control Panel.
- In the Control Panel, click on “Network and Internet” and then select “Network and Sharing Center.”
- Under the “View your active networks” section, you should see the name of your wireless network. If the wireless network icon is not visible or if it displays a red “X,” there might still be an issue with the wireless network adapter installation.
- If the wireless network icon is visible and shows that you are connected to a network, try accessing websites or performing other network-related tasks to ensure that the connection is working properly.
- Additionally, you can try connecting to other wireless networks to confirm that your device can establish connections without any problems.
If, after following these steps, you are unable to connect to any wireless networks or encounter any errors, you may need to repeat the reinstallation process or seek further assistance from technical support.
It is important to note that the steps to verify the reinstallation may vary slightly depending on your specific computer model and the version of Windows 7 you are using. However, the general process remains the same.
By verifying the reinstallation of the wireless network adapter, you can ensure that your computer is ready to connect to wireless networks and enjoy uninterrupted internet access.
Step 8: Restart your Computer (Optional)
After successfully reinstalling the wireless network adapter on your Windows 7 computer, you have the option to restart your computer. While this step is marked as optional, it is highly recommended to restart your computer to ensure that all changes take effect and the adapter is fully functional.
Restarting your computer is beneficial in several ways. Firstly, it allows the operating system to recognize and configure the newly installed adapter properly. It also helps to refresh system settings and clear any temporary files or cache that might interfere with the functionality of the adapter.
Furthermore, a reboot can help resolve any lingering software conflicts or issues that might have been present before the reinstallation. By restarting your computer, you give it a fresh start and eliminate any potential obstacles for a seamless wireless network connection.
If you choose to restart your computer, make sure to save any ongoing work and close all open applications beforehand. This will prevent any data loss or interruption during the restart process.
To perform a restart, click on the “Start” button in the bottom left corner of your screen, select “Restart” from the power options menu, and wait for your computer to shut down and boot up again. Once your computer has restarted, allow it a few moments to fully initialize all system components.
After your computer has restarted, you can proceed to test your wireless network connection to ensure that the adapter is functioning properly. Try connecting to your Wi-Fi network and see if you can browse the internet or access other online services without any issues.
If you encounter any problems or difficulties after the restart, it may be necessary to troubleshoot further or seek additional assistance. However, in most cases, restarting your computer should resolve any residual issues and allow you to enjoy a stable and reliable wireless network connection on your Windows 7 computer.
Remember, while restarting your computer is optional, it is strongly recommended as it can help guarantee the optimal performance of your wireless network adapter.
Conclusion
In conclusion, reinstalling the wireless network adapter in Windows 7 can be a simple yet effective solution to fix connectivity issues. By following the steps outlined in this guide, you can ensure that your wireless network adapter is properly installed and configured, allowing you to seamlessly connect to the internet.
Remember to always check for the latest drivers from the manufacturer’s website to ensure optimal performance and compatibility. Additionally, consider troubleshooting other possible causes such as router or modem issues if problems persist.
By having a solid understanding of how to reinstall the wireless network adapter in Windows 7, you can troubleshoot and resolve connectivity issues with ease, ensuring a smooth and uninterrupted internet experience.
FAQs
1. Why would I need to reinstall my wireless network adapter on Windows 7?
There are several reasons why you might need to reinstall your wireless network adapter on Windows 7. It could be due to driver issues, compatibility problems, or network connectivity issues. Reinstalling the adapter can often resolve these issues and restore your internet connection.
2. How do I uninstall the wireless network adapter on Windows 7?
To uninstall the wireless network adapter on Windows 7, you can follow these steps:
- Click on the “Start” button and open the Control Panel.
- Select “Device Manager” from the Control Panel options.
- Expand the “Network Adapters” category.
- Right-click on your wireless network adapter and select “Uninstall”.
- Follow the on-screen prompts to complete the uninstallation.
3. How do I reinstall the wireless network adapter on Windows 7?
To reinstall the wireless network adapter on Windows 7, you can try the following steps:
- Open the Control Panel and go to “Device Manager”.
- Expand the “Network Adapters” category.
- Right-click on any device and select “Scan for hardware changes”.
- Windows will automatically search for and install the missing or uninstalled wireless network adapter.
- If the automatic installation fails, you can visit the manufacturer’s website to download the latest driver for your wireless adapter and install it manually.
4. How do I troubleshoot wireless network connection issues on Windows 7?
If you’re experiencing wireless network connection issues on Windows 7, here are a few troubleshooting steps you can try:
- Restart your modem and router.
- Make sure the wireless adapter is enabled.
- Check if you’re within range of the wireless network.
- Update the wireless network adapter driver.
- Reset the TCP/IP stack.
- Disable firewall or antivirus software temporarily.
- Try connecting to a different wireless network.
5. Can I use an external USB wireless adapter instead of reinstalling the internal network adapter?
Yes, if you’re unable to reinstall the internal wireless network adapter on Windows 7, you can use an external USB wireless adapter as an alternative solution. Simply plug the USB adapter into an available USB port and follow the manufacturer’s instructions for installation and setup. It should allow you to connect to wireless networks without the need for the internal adapter.