
As a Mac user, you may find yourself wanting to print documents or photos wirelessly, without the hassle of connecting your computer to a printer via cables. Thankfully, with the advancements in technology, printing from a Mac to a wireless printer has become incredibly easy and convenient. Gone are the days of tangled wires and limited connectivity options.
In this article, we will guide you step by step on how to print from your Mac to a wireless printer. We will explore different methods and provide you with essential tips to ensure a seamless printing experience. So, whether you want to print important documents for work or print cherished memories captured in photos, we’ve got you covered. Let’s dive in and discover how you can unleash the power of wireless printing with your Mac.
Inside This Article
- Step 1: Check Printer Compatibility
- Step 2: Connect Mac to Wi-Fi Network
- Step 3: Install Printer Software on Mac
- Step 4: Add Wireless Printer in System Preferences
- Step 5: Set the Default Printer
- Step 6: Print a Test Page
- Troubleshooting Tips
- Conclusion
- FAQs
Step 1: Check Printer Compatibility
Before you start the process of printing from your Mac to a wireless printer, it’s crucial to check the compatibility of your printer with your Mac device. Not all printers are compatible with Mac systems, so it’s important to verify this information beforehand.
To determine if your printer is compatible, you can visit the manufacturer’s website and look for the specifications or supported operating systems for your model. This information will guide you in confirming whether your printer can be used with a Mac.
If you are unsure about the compatibility or unable to find the information on the manufacturer’s website, you can reach out to their customer support for assistance. They will be able to guide you and provide you with the necessary information regarding compatibility with Mac devices.
Checking the compatibility at the beginning will save you time and effort, ensuring that you can successfully print wirelessly from your Mac to the printer without any issues.
Step 2: Connect Mac to Wi-Fi Network
Connecting your Mac to a Wi-Fi network is a crucial step in the process of printing wirelessly from your Mac to a printer. Here’s how you can do it:
1. Open the “System Preferences” on your Mac. You can find this by clicking on the Apple logo in the top left corner of your screen and selecting “System Preferences.”
2. In the System Preferences window, click on the “Network” icon. This will open the network settings for your Mac.
3. On the left-hand side of the Network window, you will see a list of available network connections. Select the Wi-Fi option from the list.
4. Ensure that the toggle switch at the top of the window is set to “On” to enable Wi-Fi connectivity on your Mac.
5. Next, click on the “Advanced” button, located at the bottom right corner of the Network window. A new window will appear with additional Wi-Fi settings.
6. In the Advanced Wi-Fi settings window, click on the “Wi-Fi” tab. Here, you will see a list of all available Wi-Fi networks in your vicinity.
7. Locate and select your desired Wi-Fi network from the list. If your network is password-protected, enter the network password when prompted.
8. After entering the password, click on the “OK” button to save the Wi-Fi network settings. Your Mac will then connect to the selected Wi-Fi network.
9. Once connected, you will see a checkmark next to the Wi-Fi network name in the Advanced Wi-Fi settings window.
10. Finally, close the Advanced Wi-Fi settings window and exit the Network settings. Your Mac is now connected to the Wi-Fi network, allowing you to print wirelessly.
By following these steps, you will successfully connect your Mac to a Wi-Fi network, enabling seamless wireless printing from your Mac to a wireless printer.
Step 3: Install Printer Software on Mac
Once you have verified the compatibility of your wireless printer with your Mac, it’s time to install the necessary software. Follow these steps to ensure a smooth installation process:
1. Check for the Software CD: Start by checking if your printer came with an installation CD. If it did, insert the CD into your Mac’s CD/DVD drive.
2. Download Software: In case you don’t have the installation CD or if you prefer to download the latest version of the printer software, visit the manufacturer’s website. Look for the “Support” or “Downloads” section and find the appropriate driver for your specific printer model. Download the software file to your Mac.
3. Run the Installer: Locate the downloaded software file, usually in your Downloads folder, and double-click on it to run the installer. Follow the instructions provided by the installer to proceed with the installation.
4. Agree to Terms and Conditions: During the installation process, you may be prompted to review and accept the terms and conditions. Make sure to read them carefully and agree to proceed with the installation.
5. Provide Administrator Credentials: To install the printer software, you may need to enter your Mac’s administrator credentials. This ensures that only authorized users can make changes to your system. Enter the required information when prompted.
6. Complete the Installation: Once you have provided the necessary information, the installation process will continue. It may take a few minutes to complete, depending on the size of the software and the speed of your Mac.
7. Restart if Necessary: After the installation is finished, you might be prompted to restart your Mac. It is recommended to do so to ensure that all the necessary drivers and software components are properly loaded.
8. Verify Software Installation: After restarting your Mac, go to the “System Preferences” by clicking on the Apple menu in the top left corner of your screen. In the System Preferences window, look for the “Printers & Scanners” or “Print & Fax” option. If you can see your wireless printer listed, it means the software installation was successful.
By following these steps, you will be able to install the printer software on your Mac, enabling your wireless printer to communicate with your computer. Once the software is installed, you can move on to the next step of adding the printer to your list of devices.
Step 4: Add Wireless Printer in System Preferences
Once you have connected your Mac to the Wi-Fi network and installed the necessary printer software, the next step is to add the wireless printer to your system preferences. This allows your Mac to recognize and communicate with the printer seamlessly. Follow the steps below to add a wireless printer:
1. Open the “Apple” menu in the top left corner of your screen and select “System Preferences” from the dropdown menu.
2. In the System Preferences window, locate and click on the “Printers & Scanners” icon. This will open the Printers & Scanners settings.
3. To add a printer, click on the “+” (plus) button located below the list of printers on the left side of the window. This will bring up the “Add Printer” prompt.
4. Your Mac will now search for available printers. After a few moments, a list of detected printers will appear on the right side of the window. Select the wireless printer you want to add from the list.
5. Once you have selected the printer, click on the “Add” button. Your Mac will start connecting to the wireless printer and install the necessary drivers.
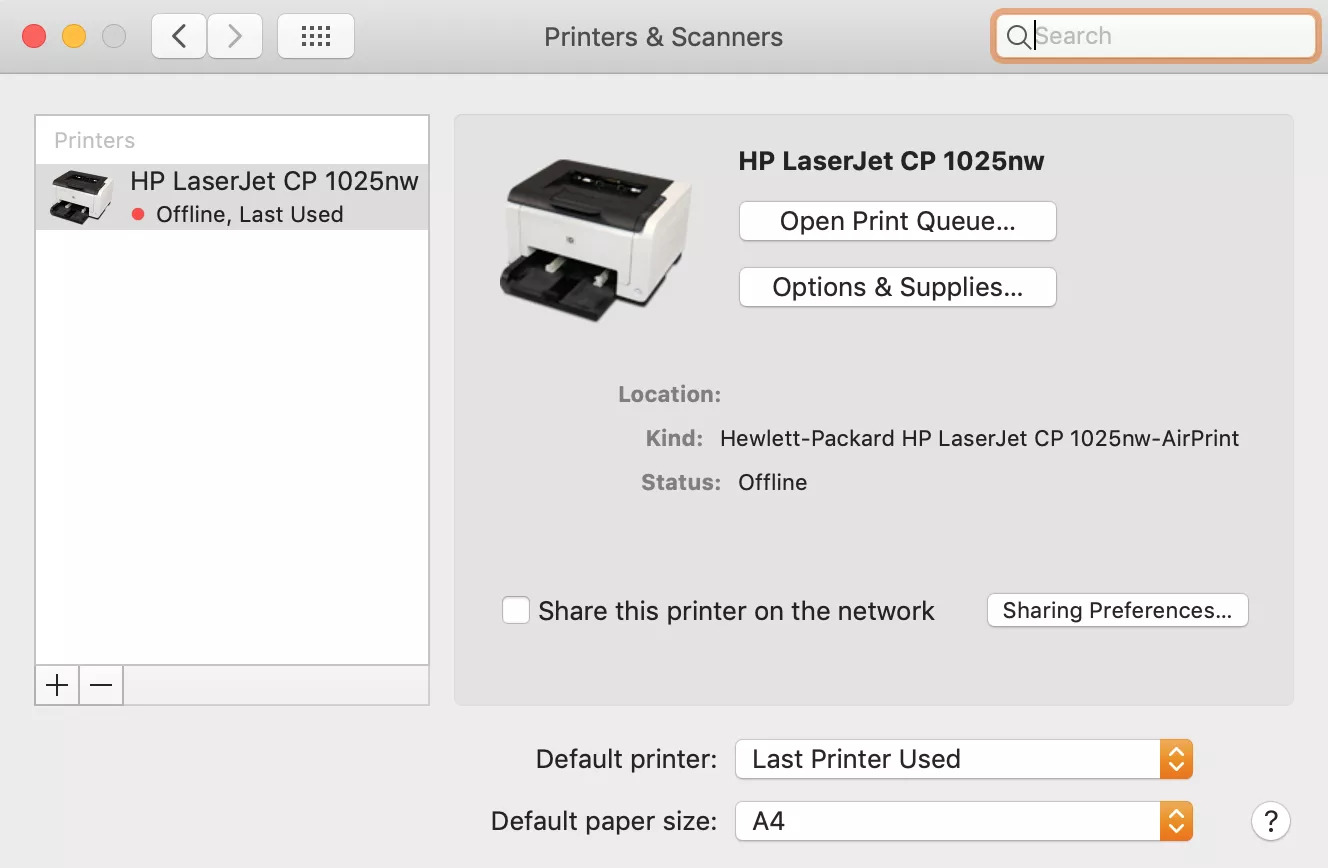
6. After the installation process is complete, the newly added printer will appear in the list of printers on the left side of the Printers & Scanners window. You can customize the printer settings by selecting it from the list and clicking on the “Options & Supplies” button.
Congratulations! You have successfully added a wireless printer to your Mac’s system preferences. Your Mac is now ready to print wirelessly to the selected printer.
Step 5: Set the Default Printer
Once you have successfully added your wireless printer to your Mac, it’s time to set it as the default printer. This ensures that every time you send a print command, it will automatically be directed to your wireless printer without having to manually select it from the print options.
To set the default printer on your Mac, follow these simple steps:
- Click on the Apple menu in the top-left corner of your screen and select “System Preferences.”
- In the System Preferences window, click on “Printers & Scanners.”
- You will see a list of all the printers that are currently added to your Mac. Look for your wireless printer in the left-hand sidebar and select it.
- Click on the “Set Default Printer” button located at the bottom of the printer list.
Once you have clicked on the “Set Default Printer” button, your wireless printer will be set as the default option for all print jobs on your Mac. From now on, every time you hit the print button, your Mac will automatically send the print job to your wireless printer.
Setting the default printer is especially useful if you have multiple printers connected to your Mac. It eliminates the need to manually select the printer each time you want to print a document or a photo.
However, if you ever want to change the default printer or revert back to a different printer, you can easily do so by following the same steps mentioned above and selecting the desired printer as the default option.
Now that you have set the default printer, you are ready to enjoy the convenience and ease of printing wirelessly from your Mac.
Step 6: Print a Test Page
Once you have successfully added your wireless printer to your Mac and set it as the default printer, it’s time to test the connection by printing a test page. This will help ensure that everything is set up correctly and that your printer is functioning properly.
To print a test page, follow these steps:
- Open the document or file that you want to test print.
- Go to the “File” menu at the top of your screen and select “Print.”
- In the print dialog box that appears, make sure your wireless printer is selected as the printing device.
- Adjust the print settings as desired, such as the number of copies, paper size, or orientation.
- Click on the “Print” button to start printing.
- Wait for the test page to print. This may take a few moments, depending on the complexity of the document and the speed of your printer.
After the test page has printed successfully, carefully inspect the printout for any issues. Check for any smudges, streaks, or misaligned text and graphics. If everything looks good, congratulations! Your Mac is now successfully connected to your wireless printer and you can start printing wirelessly.
If you encounter any problems during the test print, make sure that your printer is properly connected to your Wi-Fi network and that it has enough ink or toner. You may also need to check for any error messages on your printer’s display or refer to the printer’s user manual for troubleshooting instructions.
By printing a test page, you can verify that your wireless printer is working correctly with your Mac and that you can seamlessly print documents and files wirelessly. It’s a great way to confirm that the setup process was successful and that you’re ready to start enjoying the convenience of wireless printing.
Troubleshooting Tips
If you encounter any issues while trying to print from your Mac to a wireless printer, don’t worry! Here are some troubleshooting tips to help you resolve common problems:
1. Check the printer status: Ensure that the printer is powered on and connected to the same Wi-Fi network as your Mac. Make sure there are no error messages or paper jams that might be preventing it from printing.
2. Restart the printer: Sometimes, simply restarting the printer can resolve connectivity issues. Turn off the printer, wait for a few seconds, and then turn it back on.
3. Restart your Mac: If the printer is still not working, try restarting your Mac. This can help refresh the system and establish a new connection with the printer.
4. Check printer software compatibility: Ensure that you have installed the correct printer software that is compatible with your Mac’s operating system. Visit the printer manufacturer’s website to download the latest driver and software updates if needed.
5. Reset the printing system: If you’re still facing problems, you can reset the printing system on your Mac. Go to “System Preferences” > “Printers & Scanners,” right-click on the printer, and select “Reset Printing System.” Keep in mind that this will remove all printers from your Mac, so you’ll need to set them up again.
6. Check printer firmware: Make sure that the printer’s firmware is up to date. Check the printer manufacturer’s website for firmware updates and follow the instructions to install them, if available.
7. Ensure proper network connectivity: Verify that your Mac is connected to the correct Wi-Fi network and that the network is stable. Intermittent or weak Wi-Fi signals can cause printing issues.
8. Double-check printer settings: Confirm that the printer settings on your Mac are correctly configured. Open the “Printers & Scanners” section in “System Preferences,” select the printer, and ensure that the default settings, such as paper size and orientation, are accurate.
9. Try a different printing method: If the wireless printing method is not working, you can also attempt to connect your Mac to the printer using a USB cable. This method can help troubleshoot any potential Wi-Fi connectivity issues.
10. Reach out for support: If all else fails, don’t hesitate to contact the printer manufacturer’s support team or visit their online support resources. They will be able to provide tailored assistance to help you resolve any persistent issues.
By following these troubleshooting tips, you should be able to overcome common obstacles and successfully print from your Mac to a wireless printer. Happy printing!
Conclusion
Printing from a Mac to a wireless printer has never been easier. With the advancements in technology and the availability of wireless printing options, you can conveniently print documents, photos, and more without the hassle of cables and wires.
By following the simple steps outlined in this guide, you can easily set up your Mac to wirelessly connect with your printer. Whether you’re printing from your home office or on-the-go, you can enjoy the convenience of wireless printing and the freedom it provides.
Remember to ensure that your Mac and printer are connected to the same Wi-Fi network and that you have downloaded and installed the necessary printer drivers. With these essential components in place, you’ll be able to print from your Mac to your wireless printer with ease.
So go ahead, give it a try and experience the convenience and versatility of wireless printing from your Mac. Say goodbye to cumbersome cables and hello to seamless printing!
FAQs
1. Can I print from my Mac to a wireless printer?
Yes, you can print from your Mac to a wireless printer. Mac devices have built-in support for wireless printing, allowing you to conveniently print documents, photos, and other files without the need for any cables.
2. How do I set up a wireless printer on my Mac?
The steps to set up a wireless printer on your Mac may vary depending on the printer model and brand. However, in general, you can follow these steps:
- Make sure your wireless printer is connected to the same Wi-Fi network as your Mac.
- Open the “System Preferences” on your Mac.
- Click on “Printers & Scanners.”
- Click the “+” button to add a new printer.
- Select your wireless printer from the list of available printers.
- Follow the on-screen instructions to complete the setup process.
Once set up, your Mac should be able to detect and connect to the wireless printer for printing.
3. How do I print a document or file from my Mac to a wireless printer?
To print a document or file from your Mac to a wireless printer, follow these steps:
- Open the document or file you want to print.
- Click on “File” in the menu bar.
- Select “Print” or use the keyboard shortcut “Command + P”.
- In the print dialog box, ensure that your wireless printer is selected as the designated printer.
- Adjust any print settings, such as the number of copies, paper size, or print quality, as desired.
- Click on the “Print” button to start the printing process.
Your Mac will send the print job to the wireless printer, and it should start printing the document or file accordingly.
4. Why is my Mac not finding my wireless printer?
There could be several reasons why your Mac is not finding your wireless printer. Here are a few troubleshooting steps you can try:
- Make sure that your wireless printer is turned on and connected to the same Wi-Fi network as your Mac.
- Check if your Mac’s Wi-Fi is turned on and connected to the same network as the printer.
- Restart your Mac and the wireless printer.
- Update the printer driver software on your Mac.
- Try adding the printer manually by clicking on the “+” button in the “Printers & Scanners” settings.
If all else fails, consult the printer’s user manual or contact the manufacturer’s support for further assistance.
5. Can I print to a wireless printer without an internet connection?
In most cases, you need an active internet connection to connect and print to a wireless printer. However, some printers offer a feature called Wi-Fi Direct or a direct wireless connection, which allows you to print directly from your Mac to the printer without the need for an internet connection. Check your printer’s manual or support documentation to see if this feature is available and compatible with your Mac.