
Are you tired of squinting at your laptop screen while trying to watch your favorite TV show or movie? Well, we have the perfect solution for you – wireless projection! With wireless projection, you can easily project your laptop screen onto your TV without any messy cables or cords. Whether you want to enjoy a movie night with your friends or give a presentation in a larger setting, wireless projection can make your life so much easier.
In this article, we will guide you through the process of how to project your laptop to your TV wirelessly. We will cover everything from the basic setup to troubleshooting common issues. So, grab your laptop, turn on your TV, and let’s dive into the world of wireless projection!
Inside This Article
- Overview
- Option 1: Using Miracast
- Option 2: Using Chromecast
- Option 3: Using an HDMI Cable
- Option 4: Using a Wireless HDMI Adapter
- Conclusion
- FAQs
Overview
Projecting your laptop screen to your TV has never been easier thanks to wireless technology. Whether you want to stream movies, give a presentation, or display your photos on a bigger screen, there are several options available. In this article, we will explore four different methods to help you project your laptop to your TV wirelessly.
First, we will discuss using Miracast, a wireless display standard that allows you to mirror your laptop screen onto your TV without the need for any additional hardware. Next, we will look at Chromecast, a popular streaming device that can also be used to cast your laptop screen to your TV wirelessly. Then, we will explore the option of using an HDMI cable to connect your laptop to your TV. Lastly, we will discuss the use of a wireless HDMI adapter, which offers a convenient wireless solution for projecting your laptop screen to your TV.
By the end of this article, you will have a clear understanding of the different methods available and be able to choose the one that best suits your needs. So let’s dive in and discover how to project your laptop to your TV wirelessly!
Option 1: Using Miracast
If you’re looking for a convenient way to wirelessly project your laptop screen to your TV, Miracast is an excellent option. Miracast is a wireless display technology that allows you to mirror your laptop’s screen onto a compatible TV or display.
To use Miracast, both your laptop and TV need to support the technology. Most modern laptops running Windows 8.1 or later and TVs with built-in Miracast support should be compatible. However, it’s always a good idea to check the specifications of your devices to ensure compatibility.
To set up Miracast, follow these steps:
- Make sure your TV is turned on and set to the correct input source.
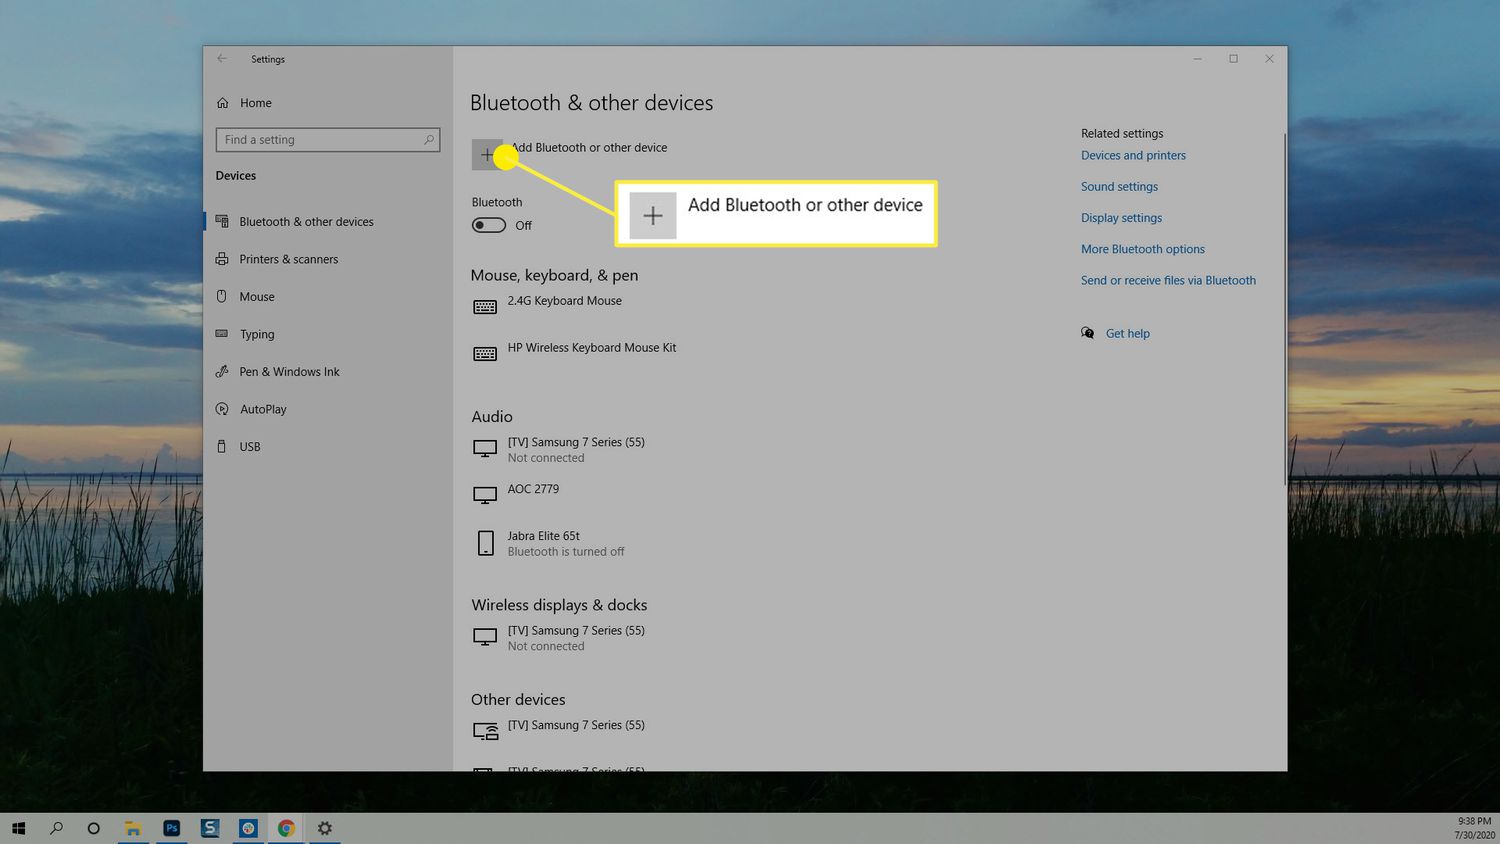
- On your laptop, go to the Settings menu and click on “Devices.”
- Select the “Connected devices” tab, and then click on “Add a device.”
- Your laptop will start searching for nearby devices. Select your TV from the list of available devices.
- Once connected, your laptop’s screen will start mirroring on your TV.
It’s important to note that the steps may vary slightly depending on the specific laptop model and operating system version you’re using. However, the general process remains the same.
With Miracast, you can enjoy the convenience of wireless screen sharing without the need for additional cables or adapters. You can stream your favorite movies, browse the web, or even give presentations on a larger screen, all without the hassle of connecting physical cables.
Keep in mind that Miracast may not support streaming certain copyrighted content due to Digital Rights Management (DRM) restrictions. However, for most everyday tasks and multimedia sharing, Miracast provides a seamless and hassle-free wireless projection experience.
Option 2: Using Chromecast
If you’re looking for a convenient and straightforward way to wirelessly project your laptop to your TV, then Chromecast is a fantastic option. With its easy setup process and seamless integration with various streaming services, Chromecast offers a user-friendly solution to stream content from your laptop onto the big screen.
Chromecast is a small device that plugs into your TV’s HDMI port, allowing you to transmit content from your laptop wirelessly. Here’s how to use Chromecast to project your laptop to the TV:
- Connect Chromecast to your TV: Start by plugging the Chromecast device into an available HDMI port on your TV. Ensure that your Chromecast and laptop are connected to the same Wi-Fi network.
- Install the Chromecast app: Download and install the Google Home app on your laptop. This app is available for both Windows and Mac. Launch the app once it’s installed.
- Set up Chromecast: Follow the on-screen instructions in the Google Home app to set up your Chromecast. This typically involves connecting it to your Wi-Fi network and giving it a name.
- Cast your laptop screen: Once the Chromecast is set up, open the Google Chrome browser on your laptop. Look for the three-dot menu icon in the top right corner and select “Cast” from the drop-down menu.
- Select Chromecast device: In the Cast menu, choose the Chromecast device that you want to connect to. If the device is successfully connected, you will see your laptop screen displayed on your TV.
With Chromecast, you can not only mirror your laptop screen but also stream videos, audio, and other content from your favorite apps and websites directly to your TV. You can enjoy a wide range of streaming services like Netflix, YouTube, Hulu, and more, with just a few clicks.
Chromecast is a versatile and affordable solution for wirelessly projecting your laptop to your TV. Whether you want to watch movies, share presentations, or play games on a larger screen, Chromecast makes it easy and convenient.
Option 3: Using an HDMI Cable
One of the most straightforward and reliable ways to project your laptop screen to a TV is by using an HDMI cable. This method allows you to transmit audio and video signals from your laptop to the TV with high-quality resolution.
To get started, make sure your laptop and TV have an HDMI port. Most modern laptops and TVs come equipped with HDMI ports, but double-check to ensure compatibility. If your laptop doesn’t have an HDMI port, you may need an HDMI adapter to connect the cable.
Once you have confirmed the presence of HDMI ports, follow these steps:
- Turn off your laptop and TV before connecting the HDMI cable.
- Locate the HDMI output port on your laptop.
- Connect one end of the HDMI cable to the laptop’s HDMI output port.
- Locate the HDMI input port on your TV.
- Connect the other end of the HDMI cable to the TV’s HDMI input port.
- Turn on your laptop and TV.
- Use your TV remote control to change the input source to the HDMI port that you connected your laptop to.
Now, your laptop screen should be mirrored on your TV. You can enjoy your favorite movies, videos, slideshows, or presentations on a larger screen with the convenience of HDMI connectivity.
Keep in mind that some laptops may require you to adjust display settings to ensure the proper resolution and screen mirroring. This can usually be done by going into your laptop’s display settings or using the “Function” key in combination with the proper function key (usually labeled with a screen icon).
Using an HDMI cable offers a reliable connection with minimal latency, making it ideal for tasks that require precision and real-time interaction. Whether you’re watching movies, gaming, or giving presentations, this option ensures a seamless experience between your laptop and TV.
Option 4: Using a Wireless HDMI Adapter
If you’re looking for a convenient and hassle-free way to connect your laptop to a TV wirelessly, using a Wireless HDMI Adapter is your go-to solution. This innovative device allows you to stream audio and video from your laptop to your TV without the need for any cables. It’s like having a virtual HDMI connection between your laptop and TV, providing a seamless and high-quality display of your laptop’s screen on the big screen.
So how does a Wireless HDMI Adapter work? It’s quite simple. First, you need to connect the HDMI output of the adapter to your TV’s HDMI input. Then, you plug the USB end of the adapter into your laptop to power it. The adapter acts as a wireless receiver, receiving the audio and video signals from your laptop and transmitting them to your TV. This eliminates the need for a physical HDMI cable and allows for a clutter-free setup.
One of the advantages of using a Wireless HDMI Adapter is its versatility. It works with virtually any laptop and TV that has HDMI ports, making it a great option for different setups. Whether you’re giving a presentation in a conference room or want to enjoy a movie night with friends, this wireless solution can effortlessly connect your laptop to the TV.
Another benefit of a Wireless HDMI Adapter is that it offers high-quality, lag-free streaming. The adapter uses advanced wireless technology to ensure a stable and reliable connection between your laptop and TV. This means you can stream videos, play games, or display any content from your laptop without experiencing any noticeable lag or delays.
Setting up a Wireless HDMI Adapter is also a breeze. Most adapters come with a simple plug-and-play design, requiring no additional software or drivers. Once connected, your laptop will recognize the adapter as a secondary display, giving you the option to mirror or extend your laptop’s screen to the TV. This allows you to customize your display and multitask seamlessly.
It’s important to note that the range of a Wireless HDMI Adapter can vary depending on the model and the surrounding environment. While some adapters provide a range of up to 100 feet, others may have a shorter range. It’s recommended to check the specifications of the adapter you choose to ensure it meets your needs.
Overall, using a Wireless HDMI Adapter is an excellent choice if you want to project your laptop to a TV wirelessly. With its easy setup, compatibility with most devices, high-quality streaming, and versatile applications, it offers a convenient and efficient way to enjoy a larger display without the hassle of cables.
Conclusion
Wirelessly projecting your laptop to a TV can greatly enhance your multimedia experience and provide a bigger and more immersive display. With the help of devices like Chromecast, Roku, or Miracast, you can easily mirror your laptop screen on your TV, allowing you to enjoy movies, videos, presentations, and more on the big screen from the comfort of your couch.
By following the steps mentioned in this guide, you can effortlessly set up wireless projection and enjoy the convenience and versatility it offers. Whether you’re watching a movie with friends and family, giving a professional presentation, or simply wanting to share content from your laptop on a larger screen, wireless laptop-to-TV projection can make it all possible.
Remember to ensure that your laptop and TV are compatible with wireless projection technology, select the right device or connection method, and follow the instructions provided. With a few simple steps, you can transform your TV into an extension of your laptop and maximize your entertainment and productivity.
FAQs
1. Can I project my laptop screen to a TV without using any cables?
Yes, you can! Many modern laptops and smart TVs come with built-in wireless projection capabilities. By connecting your laptop and TV to the same Wi-Fi network, you can easily project your laptop screen to the TV without the need for any cables.
2. How do I check if my laptop supports wireless screen projection?
To check if your laptop supports wireless screen projection, you can look for the “Project” option in your computer’s settings or display menu. Typically, laptops running on Windows operating systems have a “Project” button in the bottom-right corner of the taskbar. On Mac laptops, you can find the screen projection options in the System Preferences menu.
3. What if my laptop doesn’t have built-in wireless projection capabilities?
If your laptop doesn’t have built-in wireless projection capabilities, you still have options. You can use external devices like wireless display adapters or streaming sticks. These devices connect to your laptop via USB or HDMI and transmit the screen wirelessly to your TV. They are typically easy to set up and provide a reliable wireless projection experience.
4. Can I wirelessly project my laptop to any TV?
As long as your TV has the necessary wireless projection capabilities, you should be able to project your laptop screen wirelessly to any compatible TV. However, it’s always a good idea to check the specifications of your TV or consult the manufacturer’s documentation to ensure compatibility before attempting to wirelessly project your laptop.
5. What are the benefits of wirelessly projecting my laptop to a TV?
Wirelessly projecting your laptop to a TV offers several advantages. It allows you to enjoy a larger, more immersive display for presentations, movies, or gaming. It also enables you to share content with others in a more convenient way, making it perfect for group activities or collaborative work. Additionally, wireless projection eliminates the need for messy cables, providing a clutter-free and seamless experience.