
Are you facing difficulty in turning on the wireless capability on your Dell device? Fret not, as we are here to guide you through the process. Wireless capability allows you to connect to Wi-Fi networks, enabling seamless internet access, and ensuring that you stay connected wherever you go. Dell laptops and desktops typically come with a built-in wireless adapter that needs to be activated to enable wireless capability. In this article, we will walk you through the step-by-step process of how to turn on wireless capability on a Dell device, ensuring that you can quickly and easily establish wireless connections and enjoy a hassle-free internet experience. So, let’s dive right in and get your Dell device connected to Wi-Fi!
Inside This Article
- How to Turn On Wireless Capability on Dell
- Method 1: Using the Function Keys
- Method 2: Using the Device Manager
- Method 3: Using the Network Settings
- Method 4: Using the Dell Wireless Utility
- Conclusion
- FAQs
How to Turn On Wireless Capability on Dell
If you’ve been experiencing issues with your wireless connection on your Dell laptop, it may be because the wireless capability is turned off. Luckily, turning it back on is a simple process. In this guide, we’ll walk you through various methods to enable wireless capability on your Dell laptop.
Method 1: Using the Function Keys
One of the quickest ways to turn on the wireless capability on your Dell laptop is by using the function keys. Most Dell laptops have a dedicated function key combination that enables or disables the wireless adapter. Follow these steps:
- Step 1: Locate the Function Key Combination – Look for the function key (often labeled “Fn”) on your keyboard. It is usually located near the bottom-left corner.
- Step 2: Press the Right Combination to Enable Wireless Capability – While holding down the function key, press the designated wireless key. It is usually represented by an antenna icon or the letters “WLAN” or “WiFi”. This combination varies depending on the Dell laptop model, so refer to your laptop’s user manual to find the correct key combination.
Method 2: Using the Device Manager
If the function key method didn’t work or you prefer a different approach, you can also enable wireless capability through the Device Manager. Here’s how:
- Step 1: Open the Device Manager – Right-click on the “Start” button, then select “Device Manager” from the context menu that appears.
- Step 2: Locate the Wireless Adapter – Look for the “Network adapters” category. Expand it to see the list of installed network adapters.
- Step 3: Enable Wireless Capability – Right-click on your wireless adapter (it’s usually labeled with “Wireless” or “WiFi”) and select “Enable” from the drop-down menu. If the option says “Disable”, it means the wireless capability is already enabled.
Method 3: Using the Network Settings
Another way to turn on the wireless capability on your Dell laptop is through the Network Settings. Here’s how:
- Step 1: Open the Network Settings – Right-click on the network icon in the system tray (taskbar) and select “Open Network & Internet settings”.
- Step 2: Locate the Wireless Adapter – In the “Settings” window, click on “Change adapter options” under the “Advanced network settings” section.
- Step 3: Enable Wireless Capability – Right-click on your wireless adapter and select “Enable” from the context menu. If it says “Disable”, then the wireless capability is already enabled.
Method 4: Using the Dell Wireless Utility
If your Dell laptop comes with a Dell Wireless Utility, you can use it to enable the wireless capability. Here are the steps:
- Step 1: Install the Dell Wireless Utility – If you haven’t installed the Dell Wireless Utility, visit the Dell support website, search for your laptop model, and download the utility package. Install it on your laptop.
- Step 2: Open the Dell Wireless Utility – After the installation is complete, open the Dell Wireless Utility from the Start menu or desktop shortcut.
- Step 3: Enable Wireless Capability – In the utility window, look for the option to enable or disable wireless connectivity. Click on it to turn on the wireless capability if it’s currently disabled.
By following these methods, you should be able to successfully turn on the wireless capability on your Dell laptop. Enjoy a seamless and reliable wireless connection!
Method 1: Using the Function Keys
Step 1: Locate the Function Key Combination
Step 2: Press the Right Combination to Enable Wireless Capability
Using the function keys is a convenient way to turn on the wireless capability on your Dell laptop. Dell laptops often have a dedicated function key that can be used to toggle various features, including wireless capability. By following these simple steps, you can easily locate the function key combination and enable wireless capability.
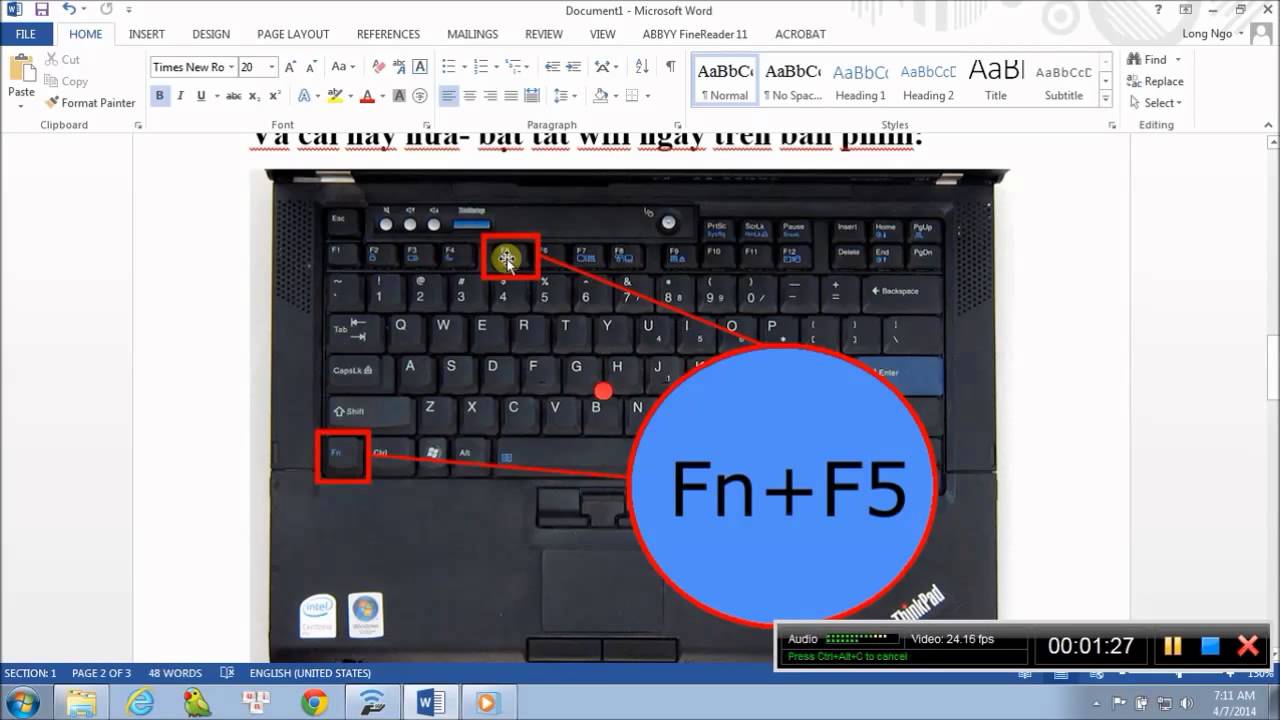
Step 1: Locate the Function Key Combination
To start, you need to locate the specific function key combination on your Dell laptop. This combination is usually marked with a wireless icon or the letters “Fn” on one of the function keys (F1 to F12). Look for the key that has either a wireless symbol, an antenna icon, or the letters “Fn” printed on it.
Step 2: Press the Right Combination to Enable Wireless Capability
Once you have identified the function key combination, press and hold the “Fn” key, and simultaneously press the wireless function key. This combination varies depending on the Dell laptop model, but it is commonly one of the function keys from F1 to F12. After pressing the right combination, you should see an on-screen notification or an LED indicator that indicates the wireless capability has been enabled.
It’s important to note that the specific function key combination may differ for each Dell laptop model. Consult your laptop’s user manual or visit the Dell support website for detailed instructions specific to your model.
Now that you know how to use the function keys to enable wireless capability on your Dell laptop, you can easily connect to Wi-Fi networks and enjoy a seamless online experience. Remember to make sure your wireless adapter is enabled in the device manager or network settings for the function keys to work correctly. Happy surfing!
Method 2: Using the Device Manager
Step 1: Open the Device Manager
To begin, you’ll need to open the Device Manager on your Dell laptop. The Device Manager is a built-in Windows utility that allows you to manage and control various hardware components of your computer. You can access the Device Manager by right-clicking on the Start button and selecting “Device Manager” from the menu that appears.
Step 2: Locate the Wireless Adapter
Once you have opened the Device Manager, you will see a list of all the hardware devices installed on your laptop. Look for the category labeled “Network adapters” and click on the arrow next to it to expand the list. This will display all the network adapters installed on your Dell laptop, including the wireless adapter.
Step 3: Enable Wireless Capability
Now that you have located the wireless adapter in the Device Manager, it’s time to enable the wireless capability. Right-click on the wireless adapter and select “Enable” from the context menu that appears. If the wireless adapter is already enabled, you may see the option to “Disable” instead. In that case, select “Disable” first and then select “Enable” to re-enable the wireless capability.
Enabling the wireless capability through the Device Manager allows you to directly control the functionality of the wireless adapter on your Dell laptop. This method is effective in cases where the wireless capability is disabled or not working properly.
Method 3: Using the Network Settings
Step 1: Open the Network Settings
In order to turn on wireless capability on your Dell laptop, you can utilize the network settings. To do this, start by opening the network settings on your laptop. You can easily access this by clicking on the network icon located in the system tray on the bottom right corner of your screen.
Step 2: Locate the Wireless Adapter
Once you have opened the network settings, you will need to locate the wireless adapter. Look for the section that mentions “Wi-Fi” or “Wireless.” In this section, you should be able to see the status of your wireless adapter, indicating whether it is turned on or off.
Step 3: Enable Wireless Capability
To turn on the wireless capability, simply click on the toggle switch or checkbox next to the wireless adapter. This action will enable the wireless capability on your Dell laptop. Once the wireless capability is turned on, your laptop will be able to connect to available Wi-Fi networks in the range.
By following these steps, you can easily turn on wireless capability on your Dell laptop using the network settings. This method allows you to quickly enable or disable the wireless feature whenever you need it, providing you with a seamless wireless connectivity experience.
Method 4: Using the Dell Wireless Utility
In addition to the previously mentioned methods, you can also enable wireless capability on your Dell laptop by using the Dell Wireless Utility. This utility software provides a graphical interface that allows you to manage your wireless settings and connections with ease.
Follow the step-by-step guide below to turn on wireless capability using the Dell Wireless Utility:
Step 1: Install the Dell Wireless Utility
The first step is to install the Dell Wireless Utility on your Dell laptop. You can do this by following these simple steps:
- Visit the official Dell website and navigate to the “Drivers & Downloads” section.
- Enter your laptop’s model number or serial number to find the correct drivers for your specific device.
- Locate the Dell Wireless Utility driver and click on the “Download” button.
- Once the download is complete, double-click on the downloaded file to start the installation process.
- Follow the on-screen instructions to complete the installation of the Dell Wireless Utility.
Step 2: Open the Dell Wireless Utility
After successfully installing the Dell Wireless Utility on your laptop, you can proceed to open the utility software. Here’s how:
- Go to the Windows Start menu by clicking on the Start icon located at the bottom left corner of your screen.
- Type “Dell Wireless Utility” in the search bar and select the utility from the search results.
- Alternatively, you can look for the Dell Wireless Utility icon in the system tray or taskbar and double-click on it to open the software.
Step 3: Enable Wireless Capability
Once you have the Dell Wireless Utility open, you can easily enable wireless capability by following these steps:
- Locate the “Enable/Disable Wireless” or a similar option in the Dell Wireless Utility interface.
- Click on the option to enable wireless capability on your Dell laptop.
- Wait for a few seconds while the utility scans for available wireless networks.
- Once the wireless capability is enabled, you should see a list of wireless networks available for connection.
By following these steps, you can effectively turn on wireless capability on your Dell laptop using the Dell Wireless Utility. This method provides a convenient and user-friendly way to manage your wireless settings and connections with ease.
Conclusion
In conclusion, enabling wireless capability on your Dell laptop is a straightforward process that can greatly enhance your computing experience. By following the steps outlined in this guide, you can easily activate the wireless feature and connect to wireless networks with ease. Remember to check the physical Wi-Fi switch or function key combination on your laptop, ensure that the wireless adapter is enabled in the device manager, and update the wireless driver if necessary. With wireless capability turned on, you can enjoy the freedom of wirelessly connecting to the internet, accessing online resources, and staying connected wherever you go. So go ahead and enable the wireless capability on your Dell laptop, and say goodbye to the limitations of wired connections!
FAQs
1. How do I turn on wireless capability on my Dell laptop?
To turn on wireless capability on your Dell laptop, you need to follow these steps:
– Make sure your laptop is powered on and logged in to an account with administrative privileges.
– Locate the wireless switch on your laptop. It can be a physical switch, a touch-sensitive button, or a combination of keys. Look for an antenna symbol or the word “Wireless” on the switch.
– Slide the switch to the on position, press the button, or use the key combination to enable the wireless capability.
Once the wireless capability is turned on, you should be able to connect to Wi-Fi networks and access the internet wirelessly.
2. Can I turn on wireless capability on my Dell laptop without a physical switch?
Yes, you can turn on wireless capability on your Dell laptop without a physical switch. If your laptop does not have a physical switch or button to enable wireless capability, you can use the Fn key in combination with a specific function key (e.g., Fn+F2 or Fn+F8) to toggle the wireless on/off. Look for a key with an antenna symbol or the word “Wireless” on it. Press the Fn key and the corresponding function key simultaneously to enable wireless capability.
3. Why can’t I find the wireless switch on my Dell laptop?
The location and appearance of the wireless switch may vary depending on the model of your Dell laptop. In some cases, the wireless switch may be a small sliding switch or a touch-sensitive button located on the sides or front edge of the laptop. However, not all Dell laptops have a physical wireless switch. If you cannot find the switch, you can try using the Fn key in combination with a specific function key to enable wireless capability (see the previous answer).
4. How do I know if wireless capability is enabled on my Dell laptop?
To check if wireless capability is enabled on your Dell laptop, you can look for the wireless indicator light, usually located near the wireless switch or on the laptop’s front edge. If the light is lit up, it indicates that wireless capability is enabled. You can also check the network icon in the system tray (bottom-right corner of the screen). If the wireless network icon is visible and not grayed out, it means that wireless capability is enabled.
5. My Dell laptop’s wireless capability is enabled, but I can’t connect to Wi-Fi. What should I do?
If your Dell laptop’s wireless capability is enabled but you’re unable to connect to Wi-Fi networks, try the following troubleshooting steps:
– Ensure that you’re within range of a Wi-Fi network and that the network is functioning properly.
– Restart your laptop and the Wi-Fi router.
– Update the wireless driver on your Dell laptop. Visit the Dell website, enter your laptop’s model number, and download the latest wireless driver for your specific model.
– Disable and re-enable the wireless adapter in the Device Manager. Right-click on the Start button, select Device Manager, expand the Network adapters category, right-click on the wireless adapter, and choose Disable. Wait a few seconds, right-click on the adapter again, and select Enable.
– Reset the network settings on your laptop. Go to Settings > Network & Internet > Status, and click on Network reset. Follow the on-screen instructions to reset the network settings.
– If the issue persists, contact Dell support for further assistance.