
In today’s digital age, wireless connectivity has become an essential feature for most laptops. Whether you want to browse the internet, stream videos, or connect with friends and colleagues, having a wireless connection on your laptop can greatly enhance your productivity and convenience. However, enabling wireless on a laptop may not always be a straightforward process, especially if you are new to technology or have recently upgraded your device.
In this article, we will guide you through the steps to enable wireless on your laptop. Whether you are using a Windows or Mac operating system, we will provide you with easy-to-follow instructions to ensure that you can get online wirelessly in no time. So, if you have been struggling to connect your laptop to a wireless network, follow along as we walk you through the process. Let’s dive in!
Inside This Article
- Troubleshooting Steps
- Updating Wireless Driver
- Enabling Wireless Adapter through Device Manager
- Conclusion
- FAQs
Troubleshooting Steps
Having trouble with your laptop’s wireless connection? Don’t worry, we’ve got you covered. Here are some troubleshooting steps to help you get your wireless up and running:
1. Check the basics: Start by checking if your laptop’s wireless switch or button is turned on. It’s often located on the side or front of the laptop, or it might be a combination of function keys. Make sure it’s set to the “On” position.
2. Restart your laptop and router: Sometimes, a simple restart can solve the problem. Try turning off your laptop and then turning it back on. Do the same for your wireless router by unplugging it from the power source, waiting for a few seconds, and then plugging it back in.
3. Check the Wi-Fi signal: Make sure you’re within the range of your Wi-Fi network. If you’re too far away, move closer to the router and see if the signal improves. Also, check if other devices can connect to the network; if they can, then the issue might be with your laptop.
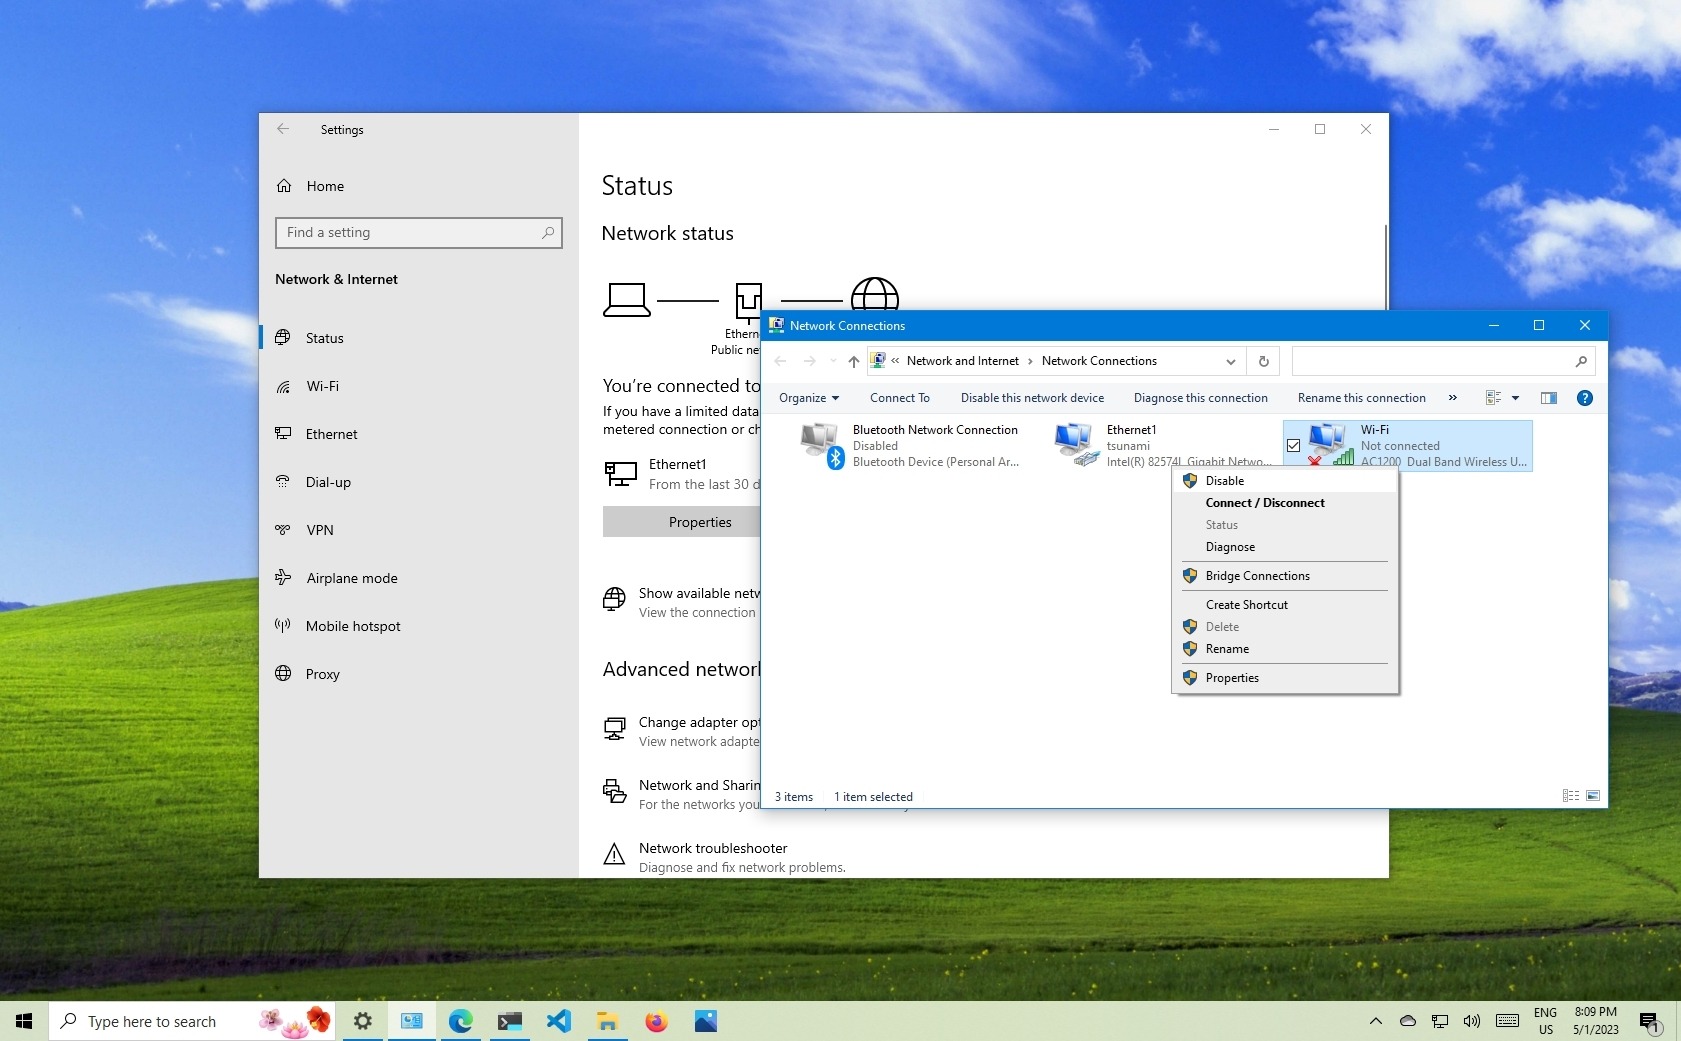
4. Disable and enable the wireless adapter: Go to the Control Panel on your laptop and navigate to the Network and Sharing Center. From there, click on “Change Adapter Settings” and find your wireless adapter. Right-click on it and select “Disable.” After a few seconds, right-click on it again and select “Enable.”
5. Check for interference: Sometimes, other electronic devices or physical objects can interfere with the Wi-Fi signal. Keep your laptop away from cordless phones, microwave ovens, and other Wi-Fi devices. Also, check if there are any large obstacles like walls or furniture blocking the signal.
6. Update your wireless driver: An outdated or incompatible wireless driver can cause connectivity issues. Go to the manufacturer’s website and download the latest driver for your wireless adapter. Install it and then restart your laptop to see if the problem is resolved.
7. Reset your network settings: If nothing else seems to work, you can try resetting your network settings. Go to the Control Panel, open the Network and Sharing Center, and click on “Troubleshoot problems.” Follow the on-screen prompts to diagnose and fix any network-related issues.
By following these troubleshooting steps, you should be able to resolve most common wireless connection problems on your laptop. If the issue persists, it might be worth contacting your laptop’s manufacturer or a professional technician for further assistance.
Updating Wireless Driver
Updating the wireless driver on your laptop is an essential step to ensure smooth and efficient wireless connectivity. A driver is a software component that allows the operating system to communicate with the hardware device, in this case, the wireless adapter of your laptop. Outdated or incompatible drivers can cause connectivity issues, slow speeds, or even complete loss of wireless functionality.
To update the wireless driver on your laptop, follow these simple steps:
1.
Identify the make and model of your wireless adapter. You can usually find this information in the Device Manager or by checking the manufacturer’s website.
2.
Visit the manufacturer’s website and navigate to the Support or Downloads section. Look for the appropriate drivers for your wireless adapter model and operating system.
3.
Download the latest drivers for your wireless adapter. Make sure to choose the drivers that are specifically meant for your operating system version and laptop model.
4.
Once the driver file is downloaded, locate it in your computer’s Downloads folder or the location where you saved it.
5.
Double-click the driver file to initiate the installation process. Follow the on-screen prompts to complete the installation. If prompted, restart your laptop after the installation is finished.
By updating your wireless driver, you can benefit from improved performance, increased stability, and enhanced security features. It is important to regularly check for driver updates, as manufacturers often release new versions to address compatibility issues and provide optimizations.
Note: If you encounter any issues during the driver installation or if you are unsure about the specific driver to download, it is recommended to seek assistance from the laptop manufacturer’s support team or a knowledgeable IT professional.
Enabling Wireless Adapter through Device Manager
If you’re facing issues with your laptop’s wireless adapter, one possible solution is to enable it through the Device Manager. The Device Manager is a built-in Windows tool that allows you to manage and troubleshoot different hardware components in your computer, including network adapters. By following a few simple steps, you can easily enable your wireless adapter and regain wireless connectivity on your laptop.
Here’s a step-by-step guide to help you enable your wireless adapter through the Device Manager:
1.
Press the Windows key + X on your keyboard and select “Device Manager” from the menu that appears. The Device Manager window will open.
2.
In the Device Manager window, look for the “Network Adapters” category and click the arrow next to it to expand the list.
3.
Locate your wireless adapter from the list of network adapters. It might be listed as “Wireless Network Adapter” or have a specific brand and model name.
4.
Right-click on your wireless adapter and select “Enable” from the context menu. If the adapter is already enabled, you will see the “Disable” option instead.
5.
Once you click “Enable”, Windows will activate the wireless adapter, and you should see the wireless icon appear in the system tray.
That’s it! Your wireless adapter is now enabled through the Device Manager. You should be able to connect to available Wi-Fi networks and enjoy wireless internet access on your laptop.
If the above steps don’t solve your issue, there might be other underlying problems causing the wireless adapter to malfunction. In such cases, it’s recommended to update your wireless driver or seek further assistance from technical support.
Remember, enabling your wireless adapter through the Device Manager is just one troubleshooting step. It’s important to also check for any physical switches on your laptop that control the wireless functionality and ensure they are turned on. Additionally, make sure you have the latest updates installed for your operating system to avoid any compatibility issues.
By following the steps outlined above and addressing any other potential issues, you can effectively troubleshoot and resolve problems with your laptop’s wireless adapter, allowing you to stay connected wherever you go.
The ability to enable wireless on a laptop is an essential feature in today’s connected world. It allows users to easily access the internet, connect to Wi-Fi networks, and stay connected while on the go. Whether it’s for work, entertainment, or staying in touch with friends and family, having a reliable wireless connection is a necessity.
In this article, we have explored different methods to enable wireless on a laptop. From using the built-in physical switch to toggling the wireless settings in the operating system, there are various ways to activate the wireless feature. By following the step-by-step guides and troubleshooting tips provided, users can overcome any issues they may encounter while enabling wireless on their laptops.
Remember to keep your laptop’s wireless drivers updated and use strong, secure passwords to protect your wireless network. With wireless connectivity enabled on your laptop, you can now enjoy the convenience and freedom of accessing the internet wirelessly from wherever you are.
FAQs
Q: Why is wireless not working on my laptop?
A: There can be several reasons why wireless is not working on your laptop. It could be due to a hardware issue, such as a malfunctioning wireless adapter, or a software issue, such as incorrect network settings or outdated drivers. It is also possible that the wireless feature on your laptop is disabled, either through a physical switch or a software setting.
Q: How do I check if my laptop has a wireless adapter?
A: To check if your laptop has a wireless adapter, you can look for a small Wi-Fi icon or antenna symbol on the laptop’s keyboard or the edges of the device. Alternatively, you can go to the device manager on your laptop and look for the Network Adapters category. If you see a wireless adapter listed there, it means your laptop has one.
Q: How do I enable wireless on my laptop?
A: The steps to enable wireless on a laptop may vary depending on the operating system you are using. In general, you can try the following steps:
- Look for a physical wireless switch on your laptop. It is usually located on the side or front of the device. Slide or press the switch to the “On” position.
- Press the Fn key (function key) along with the key that has a wireless icon on it. This keyboard combination is commonly used to toggle the wireless feature on and off.
- Access the wireless settings in the operating system. On Windows, you can usually find the Wi-Fi settings in the system tray or by going to the Network & Internet settings. On macOS, you can access the Wi-Fi settings by clicking on the Wi-Fi icon in the menu bar.
Q: How do I troubleshoot wireless connection issues on my laptop?
A: If you are experiencing wireless connection issues on your laptop, you can try the following troubleshooting steps:
- Restart your laptop and router.
- Check if other devices can connect to the wireless network.
- Update the wireless adapter drivers on your laptop.
- Disable and re-enable the wireless adapter in the device manager.
- Reset the network settings on your laptop.
- Try connecting to a different wireless network to see if the issue is specific to your network.
Q: Can I use a USB wireless adapter if my laptop doesn’t have built-in Wi-Fi?
A: Yes, if your laptop does not have a built-in Wi-Fi adapter, you can use a USB wireless adapter to enable wireless connectivity. A USB wireless adapter is a small device that plugs into a USB port on your laptop and provides Wi-Fi capabilities. It is an easy and convenient solution to add wireless connectivity to laptops that do not have built-in Wi-Fi.