
The Onn Wireless FM Transmitter is a versatile device that allows you to wirelessly play music, podcasts, or phone calls from your cell phone through your car’s stereo system. It provides a convenient and hassle-free way to enjoy your favorite audio content while on the go. With its user-friendly interface and simple setup, you can easily connect your cell phone to the FM transmitter and start streaming audio in no time. Whether you have a long commute or just love to listen to music while driving, the Onn Wireless FM Transmitter is a must-have accessory for any cell phone user. In this article, we will guide you on how to use the Onn Wireless FM Transmitter effectively, ensuring that you get the most out of this fantastic device.
Inside This Article
- What is an Onn Wireless FM Transmitter?
- Step 1: Connecting the Onn Wireless FM Transmitter
- Step 2: Tuning the FM Frequency
- Step 3: Pairing with Your Device
- Step 4: Adjusting Audio Settings
- Step 5: Testing the Connection
- Troubleshooting Common Issues
- Conclusion
- FAQs
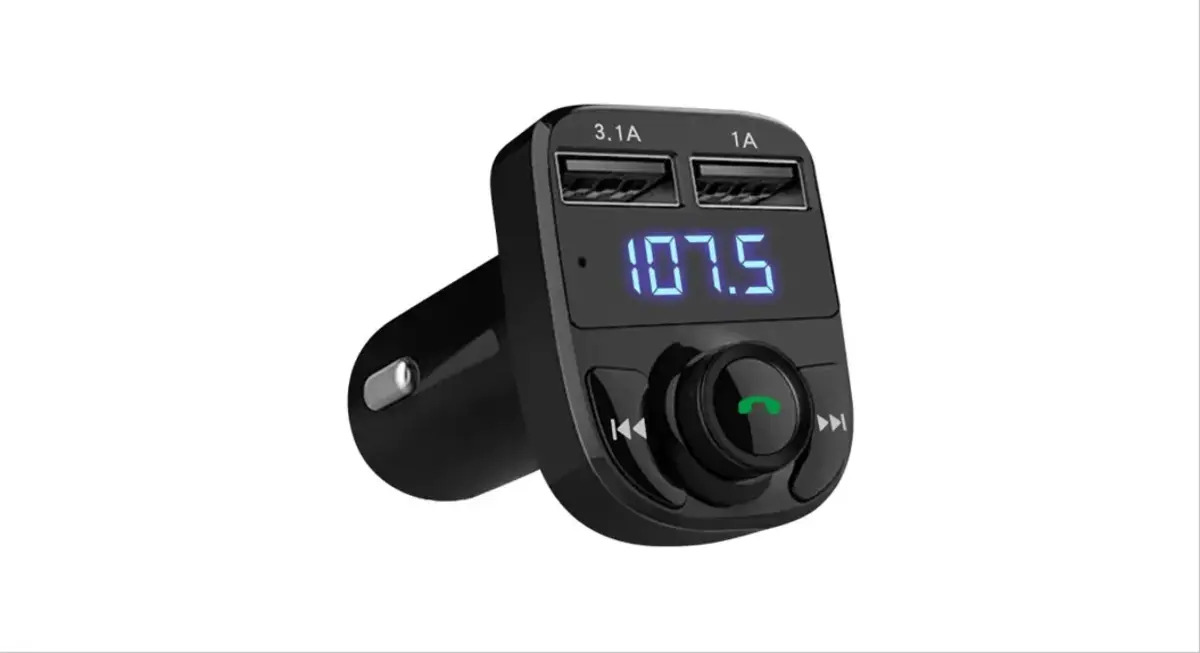
What is an Onn Wireless FM Transmitter?
An Onn Wireless FM Transmitter is a device that allows you to play audio from your phone, tablet, or other portable devices through your car’s FM radio. It works by transmitting the audio signal from your device wirelessly to a specific FM frequency, which you can tune into on your car stereo.
This convenient device is perfect for those who have older car models without built-in Bluetooth or auxiliary ports. With an Onn Wireless FM Transmitter, you can enjoy your favorite music, podcasts, or phone calls while on the go without the hassle of tangled wires or expensive upgrades to your car’s audio system.
The Onn Wireless FM Transmitter is compact, lightweight, and easy to use. It plugs into your car’s cigarette lighter socket and connects to your device via Bluetooth or an audio cable. Once connected, you can control the audio playback directly from your device or use the buttons on the transmitter itself.
This device also features a built-in microphone, allowing you to make hands-free calls while driving. The sound quality is clear and crisp, ensuring that both your voice and the other person’s voice are transmitted effectively through your car’s speakers.
An Onn Wireless FM Transmitter is a versatile accessory that can enhance your in-car audio experience. Whether you want to listen to music, podcasts, or make phone calls, this device provides a convenient and affordable solution for connecting your portable devices to your car’s audio system.
Step 1: Connecting the Onn Wireless FM Transmitter
Connecting your Onn Wireless FM Transmitter is an easy and straightforward process. By following these simple steps, you’ll be able to enjoy wireless audio streaming in no time.
1. Locate the power source in your car: The first step is to find a suitable power source in your car to connect the Onn Wireless FM Transmitter. This can be a 12V power outlet, also known as the cigarette lighter port, which is usually located in the dashboard or the center console. Plug the FM Transmitter into the power outlet.
2. Find a clear FM frequency: Next, you’ll need to find a clear FM frequency on your car radio that is not being used by any local radio stations. One way to do this is to scan through the FM radio frequencies and listen for any static or interference. Once you find a frequency with minimal interference, note it down for future use.
3. Set the FM Transmitter frequency: On the Onn Wireless FM Transmitter, there will be a frequency adjustment dial or buttons. Set this frequency to match the one you found on your car radio. This will establish a direct connection between the FM Transmitter and your car radio.
4. Connect your audio source: Now it’s time to connect your audio source, such as your smartphone or MP3 player, to the Onn Wireless FM Transmitter. Depending on the model, you may have options like Bluetooth, AUX cable, or USB connection. Choose the method that best suits your device and connect it to the FM Transmitter.
5. Adjust the volume and audio settings: Once everything is connected, adjust the volume on both your audio source and the car stereo to ensure a balanced audio level. You can also explore the audio settings on the FM Transmitter, such as bass and treble controls, to optimize the sound quality according to your preferences.
6. Test the audio playback: Finally, test the audio playback by playing your favorite music or streaming content from your audio source. Make sure you can hear the sound clearly through your car speakers. If the audio quality is not satisfactory or if there is any interference, you may need to adjust the FM Transmitter frequency or try a different audio source.
By following these steps, you’ll be able to easily connect your Onn Wireless FM Transmitter and enjoy wireless audio streaming in your car. Remember to refer to the user manual provided with your specific transmitter model for any additional instructions or troubleshooting tips.
Step 2: Tuning the FM Frequency
Once you have successfully connected your Onn Wireless FM Transmitter to your device, the next step is to tune the FM frequency. Tuning the FM frequency allows you to broadcast the audio from your device to your car’s FM radio.
Here’s how you can do it:
1. Start by turning on your car’s FM radio and set it to an unused frequency. It’s best to choose a frequency that is free from any local radio stations, so you can avoid interference.
2. Now, take a look at your Onn Wireless FM Transmitter. You will find a small display screen or a set of buttons that allow you to adjust the FM frequency. Use these controls to select the same frequency you set on your car’s FM radio.
3. Once you have set the matching frequency on both the transmitter and your car radio, you will be able to hear the audio from your device playing through the car’s speakers.
4. If you notice any interference or static during playback, try adjusting the frequency slightly. Sometimes, a small change in frequency can improve the audio quality.
5. It’s important to note that FM frequencies can vary depending on your location. If you are traveling to a different area, you may need to retune the frequency to find a clear channel.
By successfully tuning the FM frequency, you can now enjoy seamless and high-quality audio streaming from your device to your car’s speakers using the Onn Wireless FM Transmitter.
Step 3: Pairing with Your Device
Once you have successfully connected the Onn Wireless FM Transmitter to your car’s audio system, the next step is to pair it with your device. This will allow you to wirelessly stream music, podcasts, or phone calls through the FM transmitter.
To pair your device with the Onn Wireless FM Transmitter, follow these simple steps:
- Make sure the FM transmitter is powered on and in pairing mode. This is usually indicated by a blinking indicator light or an audible signal.
- On your device, go to the Bluetooth settings menu and turn on Bluetooth if it’s not already enabled. This will allow your device to search for nearby Bluetooth devices.
- In the Bluetooth settings menu, look for the Onn Wireless FM Transmitter in the list of available devices. It may appear as “Onn FM Transmitter” or a similar name.
- Select the Onn Wireless FM Transmitter from the list. Your device will initiate the pairing process.
- Once the pairing is complete, you should see a notification on your device confirming the successful connection.
It’s worth mentioning that some Onn Wireless FM Transmitters can support multiple device connections simultaneously. If you have multiple devices that you want to pair with the FM transmitter, simply repeat the steps above for each device.
Keep in mind that the pairing process may vary slightly depending on the specific model of the Onn Wireless FM Transmitter you are using, so it’s always a good idea to consult the user manual for detailed instructions.
Once your device is paired with the Onn Wireless FM Transmitter, you can start playing music, making phone calls, or enjoying any other audio content through your car’s speakers. Just make sure to adjust the FM frequency and audio settings on both the transmitter and your device for the best sound quality.
Step 4: Adjusting Audio Settings
Once you have connected and tuned your Onn Wireless FM Transmitter, the next step is to adjust the audio settings to ensure optimal sound quality. Here are a few important aspects to consider:
1. Volume Control: Most wireless FM transmitters come equipped with volume control options. Adjust the volume on both your device and the transmitter to find the right balance. Start with a low volume, gradually increasing it until you achieve the desired level without distortion.
2. Equalizer Settings: Some wireless FM transmitters offer built-in equalizers, allowing you to adjust the sound frequencies to suit your preference. Experiment with different presets or manually adjust the bass, midrange, and treble levels until you achieve the desired audio balance.
3. Noise Cancellation: Many transmitters provide noise cancellation features that help reduce background noise and interference. Enable this setting to enhance the clarity of your audio signal. Experiment with different noise cancellation levels to find the one that works best for your specific environment.
4. FM Signal Strength: Depending on your location and surrounding radio frequency interference, you may need to adjust the FM signal strength. This ensures a stable and clear connection with your car stereo. Look for options like “FM Signal Booster” or “Frequency Stability” in the settings menu of the transmitter.
5. Audio Input Source: Some transmitters offer multiple audio input sources, such as Bluetooth, USB, or AUX. Make sure to select the appropriate source for your device. For example, if you are using Bluetooth to connect your smartphone, choose the Bluetooth input option for optimal audio streaming.
6. Multifunction Buttons: Familiarize yourself with the buttons and controls on your Onn Wireless FM Transmitter. Some models have multifunction buttons that allow you to play/pause, skip tracks, answer calls, or adjust audio settings directly on the device. Refer to the user manual for specific instructions on how to use these buttons effectively.
Remember, the audio settings may vary depending on the specific model of your Onn Wireless FM Transmitter. It’s important to refer to the user manual for detailed instructions tailored to your device. By adjusting the audio settings according to your preference, you can enjoy a rich and immersive audio experience while using the FM transmitter.
Step 5: Testing the Connection
Once you have connected the Onn Wireless FM Transmitter and tuned the FM frequency, it’s time to test the connection. This step is crucial to ensure that the audio is being transmitted correctly from your device to the car stereo system. Follow the simple steps below to test the connection and make any necessary adjustments:
- Play Audio: Start playing audio on your device, such as music, podcasts, or audiobooks. Make sure the volume is set to a comfortable level.
- Tune the Car Radio: Turn on your car radio and switch it to the same FM frequency that you set on the Onn Wireless FM Transmitter. You should hear the audio from your device coming through the car speakers.
- Check for Static: Pay attention to any static or interference in the audio playback. If you notice any distortion or unclear sound, try adjusting the position of the transmitter or changing the FM frequency to find the optimal signal.
- Volume Control: Test the volume controls on your device and the car stereo system. Ensure that the volume settings are balanced and that you can adjust the level to your preference without any issues.
- Test Different Audio Sources: Experiment with different types of audio sources on your device to ensure that the Onn Wireless FM Transmitter can successfully transmit various types of audio content.
By following these steps and testing the connection, you can ensure that the Onn Wireless FM Transmitter is working properly and delivering a seamless audio experience in your car. If you encounter any issues during the testing process, refer to the troubleshooting section or consult the user manual for further guidance.
Troubleshooting Common Issues
Even with the convenience and simplicity of using an Onn Wireless FM Transmitter, there may be occasions when you encounter some common issues. Don’t worry, we’ve got you covered! Here are a few troubleshooting tips to help you resolve them:
1. Poor Signal Quality: If you’re experiencing static or weak signal quality while using the Onn Wireless FM Transmitter, try adjusting the FM frequency. Sometimes, interference from nearby radio stations can be the cause. Switching to a less congested frequency can often improve the signal quality.
2. Connectivity Issues: If your device fails to connect with the Onn Wireless FM Transmitter, double-check to ensure that the transmitter is properly connected to the device’s audio output port. Also, make sure that both the transmitter and your device are within the recommended range for a reliable connection.
3. Audio Distortion: In some cases, you may encounter audio distortion while using the transmitter. One possible reason could be that the volume of your device is set too high. Try lowering the volume and see if the distortion improves. Additionally, make sure that the transmitter is securely plugged into the audio output port to avoid any loose connections that may cause audio issues.
4. Power and Battery Problems: If you’re facing power or battery-related issues with the Onn Wireless FM Transmitter, first check the battery level. Ensure that the transmitter has adequate power to function properly. If the battery is low, replace it with a fresh one. If the issue persists, make sure that the transmitter is receiving power from the car’s power outlet or USB port, depending on the model.
5. Compatibility Issues: Occasionally, compatibility problems may arise when using the Onn Wireless FM Transmitter with certain devices. Verify that your device is compatible with the transmitter before making a purchase. If you’re unsure, consult the product’s documentation or reach out to the manufacturer for assistance.
6. Interference from Surroundings: External factors like tall buildings, bridges, or even severe weather conditions can cause interference with the FM signal. If you notice an increase in interference, try repositioning your vehicle or the transmitter to a location with fewer obstructions. This can often improve the signal strength and stability.
Remember, these are just some common troubleshooting tips, and the specific issues you encounter may vary. If you’re still experiencing problems with your Onn Wireless FM Transmitter, don’t hesitate to reach out to the manufacturer’s customer support for further assistance.
After exploring the features and benefits of the Onn Wireless FM Transmitter, it is clear that this device is a valuable tool for anyone seeking a convenient and versatile way to enjoy their favorite music in their car. With its easy installation process, sleek design, and compatibility with various devices, the Onn Wireless FM Transmitter offers a seamless audio experience on the go.
Whether you want to listen to your own music collection, stream podcasts, or make hands-free calls, the Onn Wireless FM Transmitter provides a solution for all your entertainment and communication needs. Say goodbye to static-filled radio signals and limited choice of radio stations. With the Onn Wireless FM Transmitter, you have complete control over what you listen to.
Investing in an Onn Wireless FM Transmitter is a great way to enhance your driving experience and make long commutes or road trips more enjoyable. With its user-friendly operation and reliable performance, it’s no wonder why the Onn Wireless FM Transmitter is a popular choice among car enthusiasts and music lovers alike.
FAQs
1. How does an FM transmitter work?
An FM transmitter is a device that uses radio waves to transmit audio signals from a source, such as a mobile phone, to an FM radio receiver. It works by converting the audio signal into an FM radio frequency and broadcasting it wirelessly. The FM radio receiver can then tune into that frequency to listen to the audio transmitted by the FM transmitter.
2. What is the purpose of using an FM transmitter?
Using an FM transmitter allows you to wirelessly connect your portable audio devices, such as smartphones or MP3 players, to your car’s FM radio. This way, you can listen to your favorite music or podcasts through your car’s sound system without the need for any additional cables or adapters.
3. How do I connect my device to an FM transmitter?
To connect your device to an FM transmitter, follow these steps:
- Plug the FM transmitter into your device’s headphone jack or connect it via Bluetooth if available.
- Tune your car’s FM radio to an unused frequency.
- Set the FM transmitter to the same frequency as your car’s FM radio.
- Start playing audio on your device, and you will hear it through your car’s speakers.
4. Can I use an FM transmitter with any car?
Yes, you can use an FM transmitter with any car that has an FM radio receiver. Since the FM transmitter broadcasts the audio signal wirelessly, it can work with any car that can tune into an FM frequency. However, it is important to note that the audio quality may vary depending on the specific FM transmitter and the car’s radio system.
5. Are there any limitations to using an FM transmitter?
While FM transmitters offer a convenient way to listen to audio through your car’s sound system, there are a few limitations to be aware of. Firstly, the audio quality may not be as good as a direct connection through auxiliary cables or Bluetooth. Additionally, in areas with a crowded radio frequency spectrum, you may experience interference from other radio stations. Lastly, the range of an FM transmitter is typically limited, so you may need to adjust the frequency as you drive between different areas to avoid interference.