
Welcome to the ultimate guide on how to set up and test your microphone in Windows 11. Whether you’re a podcaster, gamer, or simply someone who needs to use voice chat, having a properly configured microphone is essential. The good news is that Windows 11 offers a range of options and settings to ensure optimal microphone performance.
In this comprehensive guide, we will take you through the step-by-step process of setting up your microphone in Windows 11. We’ll cover everything from connecting your microphone to your computer to adjusting settings and testing the audio quality.
So, if you’re ready to make the most out of your microphone and ensure that your voice is crystal clear, let’s dive in and get started with the setup process!
Inside This Article
- Setting up your microphone
- Adjusting microphone settings in Windows 11
- Testing your microphone in Windows 11
- Troubleshooting microphone issues in Windows 11
- Conclusion
- FAQs
Setting up your microphone
Setting up your microphone is an essential step to ensure clear and accurate audio input on your Windows 11 device. Whether you’re using a built-in microphone or an external one, here are some simple steps to get you started.
1. Check hardware compatibility: Before setting up your microphone, make sure it is compatible with your Windows 11 device. Check the manufacturer’s website or user manual for specific compatibility requirements.
2. Connect your microphone: Plug in your microphone to the appropriate port on your computer. Most microphones use either a USB or audio jack connection. For USB microphones, simply insert the USB connector into an available USB port. For audio jack connections, match the color-coded jacks and plug in accordingly.
3. Adjust microphone position: Proper microphone positioning is crucial for optimal audio quality. Position the microphone at a comfortable distance from your mouth, typically around 6-8 inches, and ensure that it is facing towards you.
4. Check microphone settings: In Windows 11, you can access microphone settings by clicking on the Start menu, selecting Settings, and then choosing System. From the System menu, click on Sound, and under the Input section, you will find your microphone settings.
5. Enable microphone access: Make sure that the microphone access is enabled in Windows 11. Go to the Privacy settings, click on Microphone, and toggle on the “Allow apps to access your microphone” option.
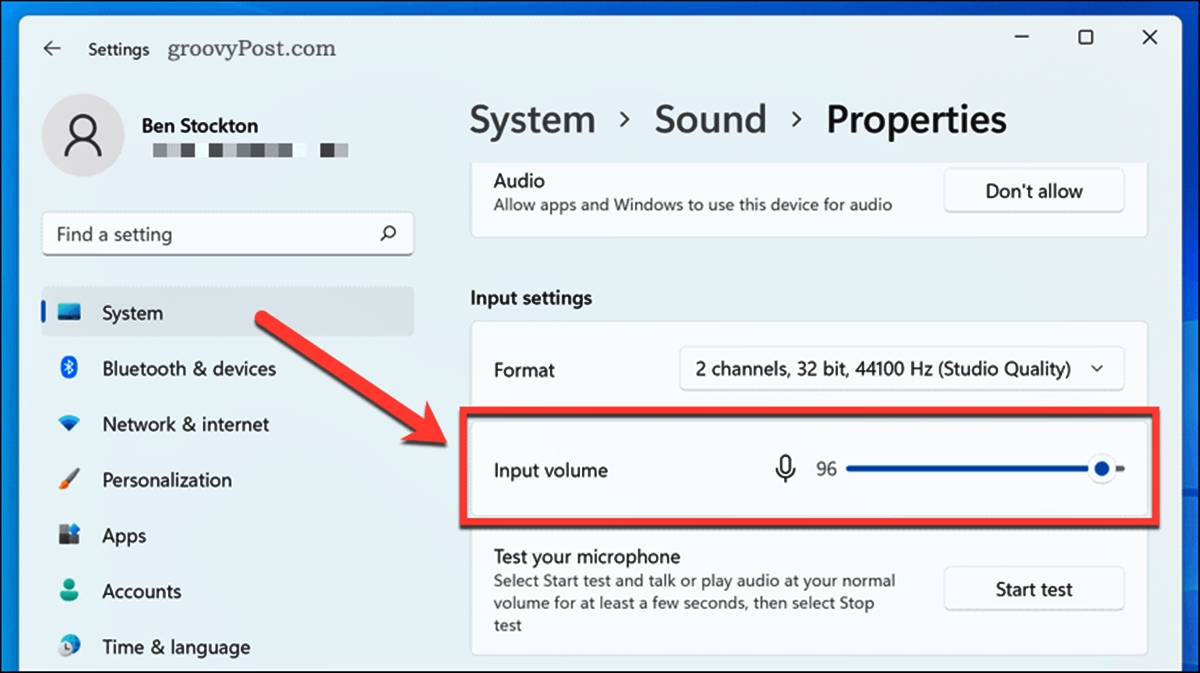
6. Adjust microphone volume: In the microphone settings, you can adjust the input volume level. Test different volume levels and set it to a level where your voice is clear and not distorted.
7. Test your microphone: Once you have set up your microphone and adjusted the settings, it’s important to test it. You can use the built-in Voice Recorder app in Windows 11 to record a short audio clip and playback to check the audio quality.
8. Consider microphone enhancements: Windows 11 offers various microphone enhancements, such as noise cancellation and echo reduction. Explore these options in the microphone settings to further optimize your audio experience.
With these simple steps, you can successfully set up your microphone on Windows 11 and start enjoying clear and crisp audio for your voice recordings, video conferencing, and other audio-related tasks.
Adjusting microphone settings in Windows 11
Setting up a microphone in Windows 11 is just the first step. To ensure optimal performance and audio quality, you may need to adjust the microphone settings. Here are some key settings you can customize to get the best out of your microphone.
1. Microphone volume: Start by adjusting the microphone volume level. Right-click on the speaker icon in the Windows taskbar, select “Open Sound settings,” and go to the “Sound” tab. Under the “Input” section, click on the microphone you want to adjust and use the slider to increase or decrease the microphone volume.
2. Microphone boost: If you find that the microphone volume is too low even after adjusting the volume level, you can enable the microphone boost option. To do this, go to the “Sound” tab in the Windows Sound settings as mentioned above, click on the microphone, and then click on “Device properties.” In the properties window, go to the “Additional device properties” section, navigate to the “Levels” tab, and check the “Microphone Boost” option if available.
3. Microphone enhancements: Windows 11 offers various enhancements that can improve the audio quality captured by your microphone. To access these enhancements, follow the steps mentioned earlier to open the microphone properties window. In the “Enhancements” tab, you’ll find options like noise suppression, acoustic echo cancellation, and others. Experiment with these enhancements to see which ones work best for you.
4. Default communication device: If you’re using multiple audio input devices, make sure your microphone is set as the default communication device. This ensures that applications and programs use the correct microphone for audio input. To set your microphone as the default communication device, go to the “Sound” tab in the Windows Sound settings, click on the microphone, and click on “Set as Default” under the “Input” section.
5. Test your microphone: After adjusting the microphone settings, it’s essential to test your microphone to ensure everything is working correctly. Refer to the previous section on how to test your microphone in Windows 11 to perform a thorough check of the audio input and ensure proper functionality.
By adjusting these microphone settings, you can optimize the audio quality and make the most out of your microphone in Windows 11. Don’t be afraid to experiment and find the settings that work best for your specific microphone and recording needs.
Testing your microphone in Windows 11
Once you have set up your microphone in Windows 11, it’s important to ensure that it is working properly. Performing a microphone test can help you determine if your microphone is capturing sound correctly and if the audio levels are suitable. Here’s how you can test your microphone in Windows 11:
1. Open the Start menu and click on the “Settings” icon.
2. In the Settings menu, click on “System” and then select “Sound” from the left sidebar.
3. Scroll down to the “Input” section and locate the “Test your microphone” option.
4. Click on the “Test” button to start the microphone test. Speak into your microphone clearly and listen for the audio playback.
5. After a few seconds, Windows 11 will play back the audio it captured from your microphone. Verify that the playback is clear and without any distortion or background noise.
6. If you are not satisfied with the audio quality, you can click on the “Troubleshoot” button to diagnose and resolve any microphone issues.
7. Additionally, you can adjust the microphone settings by clicking on the “Device properties” link next to the microphone test button. This will open the device properties window where you can further tweak the microphone settings like volume levels and enhancements.
8. Once you are done testing and adjusting your microphone settings, click on the “Close” button to exit the sound settings menu.
By following these steps, you will be able to test your microphone in Windows 11 and ensure that it is functioning properly. This is particularly important if you use your microphone for communication, recording, or gaming purposes.
Remember, it’s crucial to perform regular microphone tests to identify any issues early on and address them promptly. This will help you avoid frustrating experiences during important virtual meetings or when using voice commands on your device.
Troubleshooting microphone issues in Windows 11
Having trouble with your microphone in Windows 11? No need to worry! In this section, we will explore some common microphone issues and provide tips on how to troubleshoot them. Whether you’re experiencing low volume, distorted sound, or your microphone isn’t working at all, we’ve got you covered.
1. Check microphone connections: The first step in troubleshooting microphone issues is to ensure that your microphone is properly connected to your computer. Check if the microphone is securely plugged into the correct port. If you’re using an external microphone, try disconnecting and reconnecting it to see if that resolves the issue.
2. Update microphone drivers: Outdated or incompatible microphone drivers can cause issues with your microphone. To check for driver updates, go to the Device Manager in Windows 11. Locate the “Audio inputs and outputs” section and expand it. Right-click on your microphone and select “Update driver.” If an update is available, follow the on-screen instructions to install it.
3. Adjust microphone settings: Windows 11 offers a range of microphone settings that you can tweak to improve the performance of your microphone. Right-click on the volume icon in the taskbar and select “Open Sound settings.” Under the “Input” section, click on the dropdown menu to select your microphone. You can adjust the volume, mute/unmute the microphone, and enable noise cancellation if available.
4. Test your microphone: It’s important to test your microphone to ensure it’s functioning properly. Windows 11 provides a built-in microphone test tool. Open the Sound settings as mentioned above, and under the “Input” section, click on the “Device properties” link. In the new window, click on the “Additional device properties” link and navigate to the “Levels” tab. Here, you can test your microphone by speaking into it and checking the input level.
5. Disable unnecessary audio enhancements: Audio enhancements can sometimes interfere with your microphone’s performance. To disable them, go to the Sound settings, click on the “Device properties” link, and navigate to the “Enhancements” tab. Check the “Disable all enhancements” box and click “Apply” to save the changes.
6. Check privacy settings: Windows 11 has privacy settings that control microphone access for different apps. Ensure that the microphone is enabled for the specific app you’re using. Go to Windows Settings, click on “Privacy,” and navigate to the “Microphone” section. Turn on the “Allow apps to access your microphone” toggle and check if the specific app you’re using is granted access.
7. Restart your computer: Sometimes, a simple restart can fix microphone issues. Restart your computer and check if the microphone is working properly after rebooting.
8. Update Windows: Ensure that your Windows 11 is up to date with the latest updates. Microsoft often releases bug fixes and improvements that can resolve microphone issues. Go to Windows Settings, click on “Windows Update,” and select “Check for updates.” If there are any updates available, install them and restart your computer.
If you’ve tried all these troubleshooting steps and are still experiencing microphone issues in Windows 11, it may be worth considering contacting technical support for further assistance. They can provide additional guidance tailored to your specific situation and help resolve any underlying hardware or software issues.
By following these troubleshooting tips, you can hopefully resolve any microphone issues in Windows 11 and get back to seamless communication.
Conclusion
Setting up and testing your microphone in Windows 11 is a straightforward process that ensures you get the best audio experience while using your PC. By following the steps outlined in this article, you can easily configure your microphone settings and troubleshoot any issues that may arise.
Remember to check your microphone’s compatibility and ensure it is properly connected to your computer. Adjust the volume levels, make use of the microphone enhancements, and enable noise suppression if needed to optimize your audio quality.
Whether you need to use your microphone for video calls, gaming, recording podcasts, or any other application, Windows 11 provides you with the necessary tools to have clear and crisp audio. Don’t forget to test your microphone to confirm that it is functioning correctly before important meetings or recording sessions.
By mastering the microphone setup and testing process in Windows 11, you can enjoy crystal-clear audio and seamless communication in all your activities on your PC.
FAQs
Q: How do I set up my microphone in Windows 11?
A: To set up your microphone in Windows 11, follow these steps:
1. Connect your microphone to the appropriate port on your computer.
2. Right-click on the speaker icon in the taskbar and select “Open Sound settings”.
3. In the Sound settings window, scroll down to the “Input” section.
4. Under the “Input” section, select your microphone from the list of available devices.
5. Adjust the microphone volume by dragging the slider.
6. Test your microphone by speaking into it and checking the input level on the volume bar. If the input level is too low, try increasing the microphone boost level.
7. Once you are satisfied with the microphone setup, close the Sound settings window.
Your microphone is now set up and ready to use in Windows 11.
Q: How can I test if my microphone is working in Windows 11?
A: To test if your microphone is working in Windows 11, follow these steps:
1. Open the “Settings” app by clicking on the Start button and selecting the gear icon.
2. In the Settings app, click on “System” and then select “Sound”.
3. Scroll down to the “Input” section and make sure your microphone is selected as the default device.
4. Click on “Device properties” to open the microphone settings.
5. In the microphone settings, click on “Test your microphone” and follow the instructions to perform a microphone test.
6. Speak into your microphone and check if the input level is moving on the volume bar.
7. If the input level is moving, it means your microphone is working properly. If not, try troubleshooting the microphone or adjusting the settings.
That’s it! You have successfully tested your microphone in Windows 11.
Q: Why is my microphone not working in Windows 11?
A: There can be several reasons why your microphone is not working in Windows 11. Here are some troubleshooting steps you can try:
1. Make sure the microphone is properly connected to the computer and the port is working.
2. Check if the microphone is enabled in the Sound settings and set as the default device.
3. Adjust the microphone volume and boost levels in the Sound settings.
4. Update the microphone drivers by going to the manufacturer’s website or using the Windows Update.
5. Check if the microphone is blocked by any third-party applications or firewall settings.
6. Restart your computer and check if the microphone starts working.
If none of these steps solve the issue, it is recommended to seek further assistance from technical support or a professional.
Q: Can I use a USB microphone with Windows 11?
A: Yes, you can use a USB microphone with Windows 11. USB microphones are plug-and-play devices, which means they should be automatically recognized by Windows 11 when connected to the computer. Simply connect the USB microphone to an available USB port on your computer, and it should appear as an audio input device in the Sound settings. Make sure to select the USB microphone as the default device and adjust the volume levels as needed. USB microphones are a popular choice for recording audio, podcasting, streaming, and online meetings due to their convenience and quality.
Q: How can I improve the quality of my microphone in Windows 11?
A: To improve the quality of your microphone in Windows 11, try these tips:
1. Position the microphone close to your mouth to capture clear and loud audio.
2. Use a pop filter to reduce plosive sounds (such as “p” and “b” sounds) that can cause distortion.
3. Reduce background noise by using a noise-cancelling microphone or adjusting the microphone sensitivity.
4. Check for and install any available driver updates for your microphone.
5. Consider using a dedicated audio interface or sound card for better audio processing.
6. Experiment with different microphone settings, such as sample rate and bitrate, to find the best configuration for your needs.
By following these tips, you can enhance the quality of your microphone recordings and ensure crystal-clear audio in Windows 11.