
The iPhone 14 is a powerful and sophisticated device that offers a seamless user experience. However, there may be occasions when you encounter software issues or want to sell your device and erase all personal data. In such cases, performing a factory reset on your iPhone 14 becomes necessary. A factory reset will restore your device to its original settings, erasing all data and settings in the process. In this article, we will guide you through the steps to perform a factory reset on your iPhone 14, ensuring that your device is ready for a fresh start or for a new owner. So, whether you’re experiencing technical troubles or planning to hand your device to someone else, read on to learn how to easily and safely reset your iPhone 14.
Inside This Article
- Background Information
- Step 1: Backup Your Data
- Step 2: Prepare Your iPhone
- Step 3: Factory Reset Process
- Step 4: Restore Your iPhone
- Conclusion
- FAQs
Background Information
Before we dive into the process of factory resetting the iPhone 14, let’s understand the importance of this procedure and why you might need to perform it. Factory resetting your iPhone essentially restores it to its original factory settings, erasing all data and personalization you have made to the device. This can be useful in multiple scenarios like preparing your iPhone for resale, fixing software issues, or even just starting fresh with a clean slate.
By performing a factory reset, you essentially wipe the device clean, removing all apps, settings, and personal data. It’s a fresh start, as if you just unboxed your iPhone for the first time. However, it’s crucial to note that a factory reset is irreversible, so it’s vital to back up your data before proceeding with this process.
Whether you’re planning to sell your iPhone 14 or encountering persistent software issues, a factory reset is a reliable solution. It not only removes any potential malware or software glitches but also improves the overall performance and stability of your device.
Now that we understand the background information let’s move on and explore the step-by-step process of factory resetting your iPhone 14.
Step 1: Backup Your Data
The first step in the process of factory resetting your iPhone 14 is to ensure that all of your important data is backed up. This is crucial because once you perform the factory reset, all of your data, including photos, videos, contacts, and apps, will be erased from your device. Therefore, it is imperative to create a backup to avoid losing any valuable information.
There are several ways to backup your data on an iPhone 14. One of the most convenient methods is to use iCloud, Apple’s cloud-based storage service. To initiate the backup process, go to the “Settings” app on your iPhone and tap on your name at the top of the screen. Then, select “iCloud” and choose “iCloud Backup.” Toggle the switch to enable iCloud Backup, and click on “Back Up Now” to initiate the backup process. It is important to keep your iPhone connected to a Wi-Fi network during this process to ensure a stable and uninterrupted connection.
Alternatively, you can also use iTunes on your computer to create a backup of your iPhone 14. Connect your iPhone to your computer using a USB cable, open iTunes, and click on the device icon that appears on the top left corner of the screen. From there, select “Summary” in the left sidebar and click on “Back Up Now” under the “Manually Back Up and Restore” section. iTunes will then create a backup of your iPhone’s data, including settings, apps, and media files.
Remember to check that your backup is successfully created before proceeding to the next steps. You can do this by going to Settings > iCloud > iCloud Storage > Manage Storage, or by checking the backup status in iTunes. It is always a good idea to double-check and ensure your backup is complete before proceeding with the factory reset.
By following this first step of backing up your data, you can have peace of mind knowing that your important files and information are safely stored elsewhere. This will allow you to proceed confidently with the factory reset process, knowing that you have a backup that can be easily restored once the reset is complete.
Step 2: Prepare Your iPhone
Before proceeding with the factory reset process, it is essential to properly prepare your iPhone. Taking a few precautionary steps can help ensure a smooth and successful reset. Here are a few key things to consider:
1. Charge Your iPhone: Make sure your iPhone has enough battery power to complete the reset process. It is recommended to have at least 50% battery before starting. If your iPhone is low on battery, connect it to a charger and allow it to charge for a while.
2. Disconnect from Other Devices: If your iPhone is connected to any other devices, such as a computer or Bluetooth accessories, it is advisable to disconnect them before proceeding. Disconnecting these devices will prevent any potential conflicts during the reset process.
3. Remove SIM Card: It is not necessary to remove the SIM card from your iPhone, but if you prefer to keep your personal data and contacts secure, removing the SIM card beforehand can be a good precautionary measure.
4. Disable Find My iPhone: To ensure a successful reset, it is important to disable the “Find My iPhone” feature. This feature is designed to prevent unauthorized access to your device, and disabling it allows for a smoother reset process. To disable it, go to “Settings,” tap on your Apple ID at the top, select “Find My,” and toggle off the “Find My iPhone” option.
5. Sign Out of iCloud: It is also recommended to sign out of your iCloud account before initiating the factory reset. This step ensures that your personal data is not accidentally deleted during the reset process. To sign out of iCloud, go to “Settings,” tap on your Apple ID at the top, scroll down, and select “Sign Out.”
6. Erase Personal Data: Although the factory reset process will erase all data on your iPhone, it is still a good practice to manually remove any sensitive or personal information that you may have stored on your device. This can include contacts, photos, messages, and any other personal data you wish to erase before resetting your iPhone.
By following these preparation steps, you will ensure that your iPhone is ready for a factory reset. Taking the time to properly prepare your device will help minimize any potential issues and help you achieve a smooth and successful reset process.
Step 3: Factory Reset Process
Performing a factory reset on your iPhone 14 is a straightforward process that can be done directly on the device. This process will erase all data and settings, returning your iPhone to its original factory state. Follow the steps below to successfully factory reset your iPhone 14.
Step 1: Go to the Settings app on your iPhone 14. It can be easily accessed from your home screen by tapping on the gear-shaped icon.
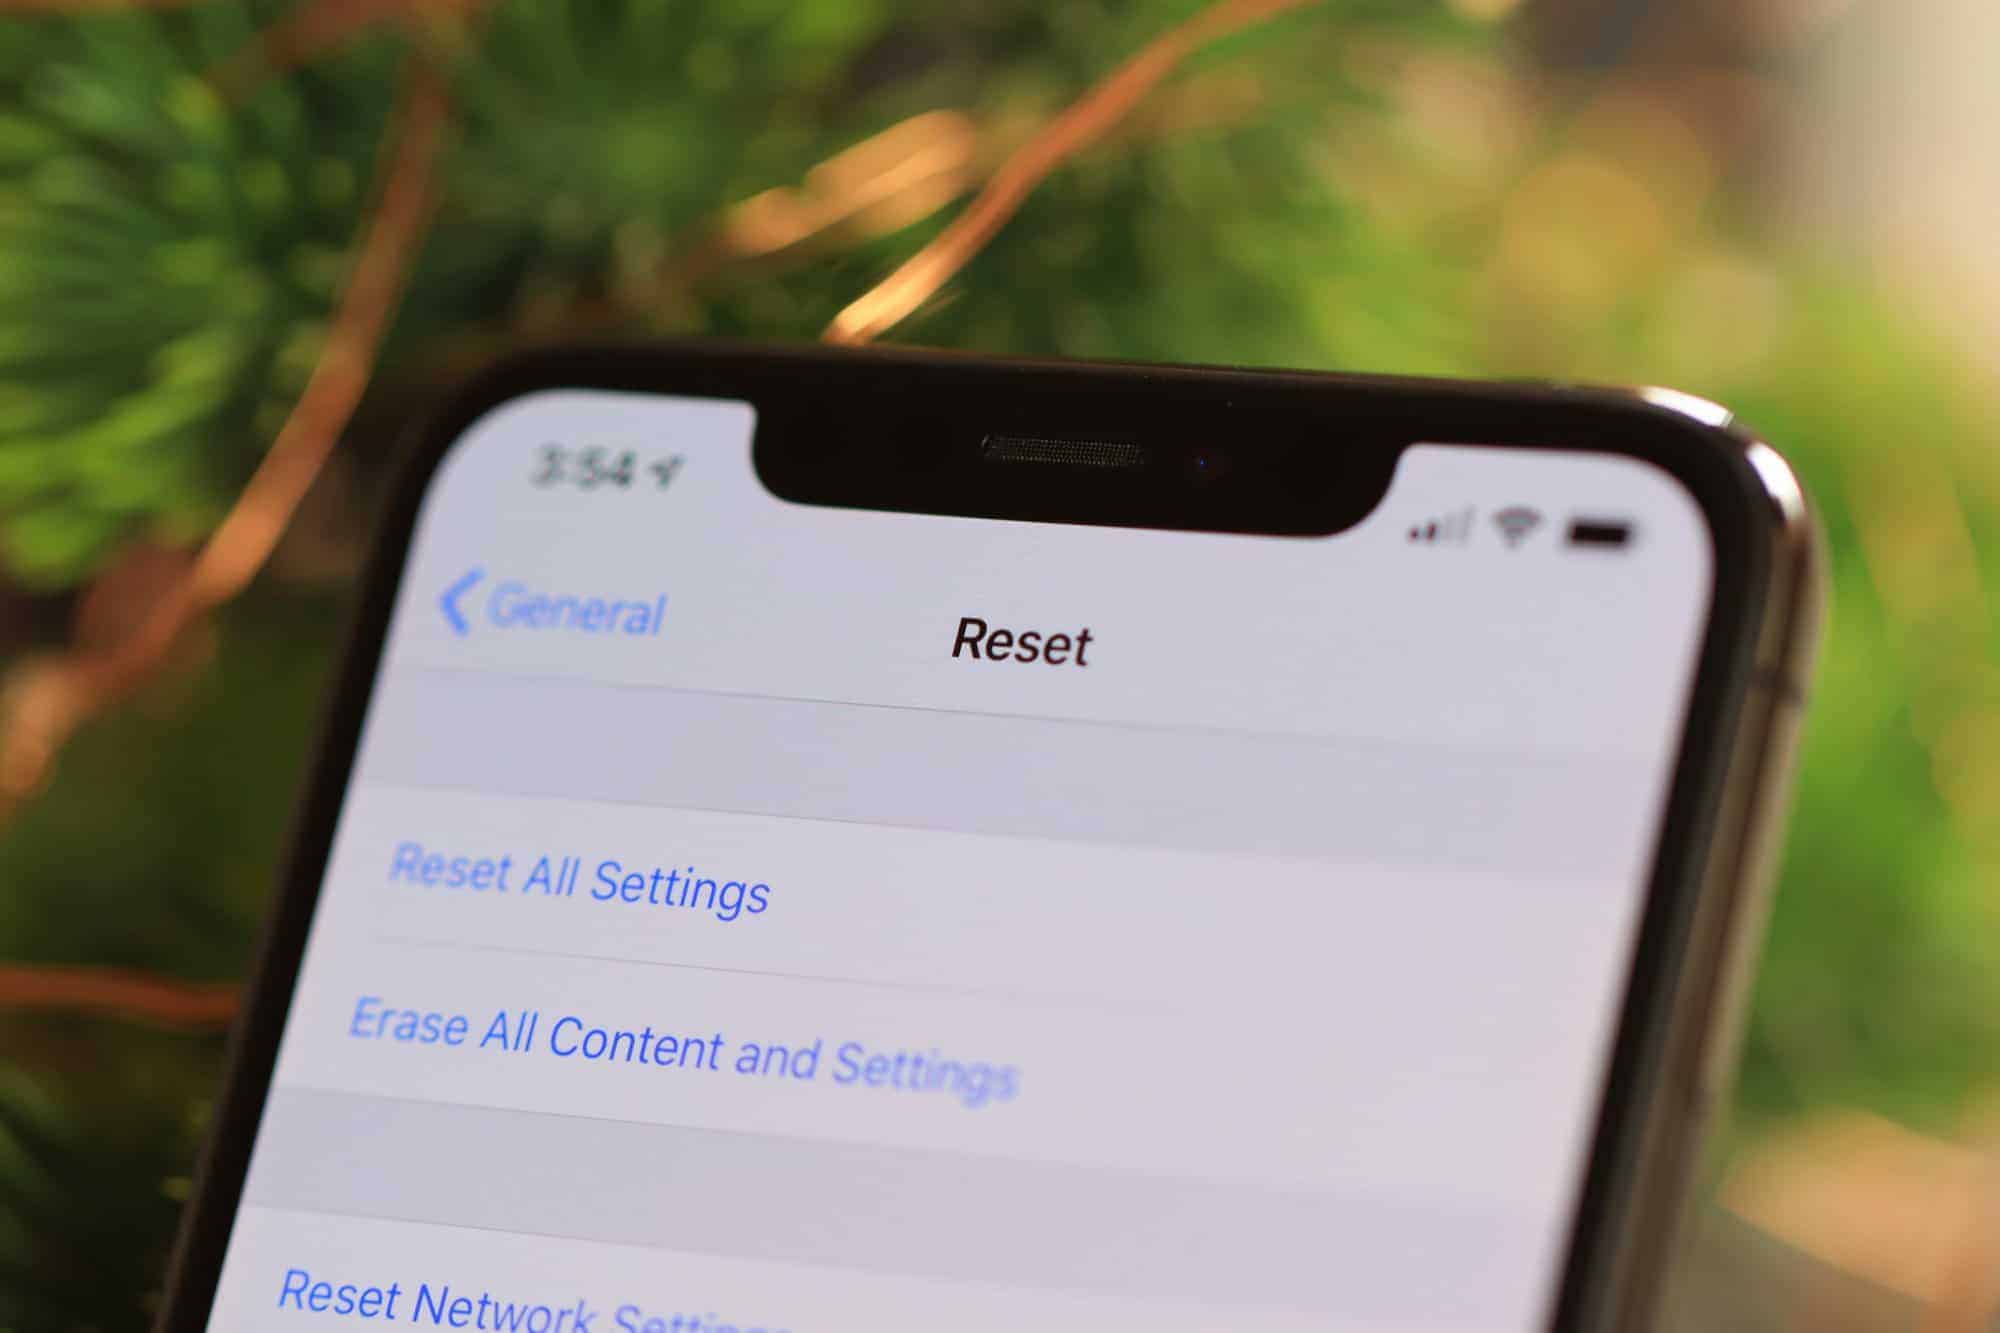
Step 2: In the Settings menu, scroll down and tap on the “General” option. This will open the general settings for your iPhone 14.
Step 3: Within the General settings, scroll down to find the “Reset” option and tap on it. This will bring up the reset options for your iPhone 14.
Step 4: In the Reset menu, you will see several options. To perform a factory reset, tap on the “Erase All Content and Settings” option.
Step 5: A warning message will appear, informing you that this action will delete all data on your iPhone 14. If you have already backed up your data and don’t need to recover anything, tap on “Erase Now” to confirm the factory reset.
Step 6: Your iPhone 14 will now start the factory reset process. The device will reboot and go through a series of steps to erase all data and settings, returning it to its original factory state.
Step 7: Once the factory reset is complete, your iPhone 14 will be ready to set up as if it were brand new. Follow the on-screen instructions to complete the setup process, including signing in with your Apple ID and restoring your backup, if desired.
It is important to note that performing a factory reset will permanently delete all data on your iPhone 14. Make sure to back up any important files or documents before proceeding with the reset.
Additionally, ensure that you have the necessary login credentials, such as your Apple ID and passwords, as you will need them during the setup process after the factory reset.
Keep in mind that a factory reset should only be done when necessary, such as when troubleshooting issues or preparing to sell or give away your iPhone 14. It is always a good idea to explore other troubleshooting options before resorting to a factory reset.
By following these steps, you can easily and safely perform a factory reset on your iPhone 14, restoring it to its original factory settings.
Step 4: Restore Your iPhone
After completing the factory reset process on your iPhone 14, it’s time to restore your device to its previous state. Restoring your iPhone will bring back all your personal data and settings, including apps, photos, contacts, and more. Follow the steps below to successfully restore your iPhone 14.
1. Connect your iPhone 14 to a stable Wi-Fi network. It is essential to have a reliable internet connection in order to restore your device.
2. On your iPhone, you will be prompted to set up your device. Select the option “Restore from iCloud Backup.”
3. Sign in to your iCloud account using your Apple ID and password. Make sure to use the same account that you used to back up your iPhone before the factory reset.
4. Choose the most recent iCloud backup from the available options. It’s recommended to select the backup that was created right before you performed the factory reset.
5. After selecting the backup, the restoration process will begin. Your iPhone will start downloading the backup data from iCloud, including your apps, settings, and other personal data.
6. Keep your iPhone connected to Wi-Fi and plugged into a power source until the restoration process is complete. This will ensure a seamless and uninterrupted restore.
7. Once the restoration is finished, your iPhone will reboot, and you will be prompted to enter your Apple ID and password again. Follow the on-screen instructions to proceed.
8. After entering your credentials, your iPhone will complete the setup process, and you will be able to access all your restored data and settings.
It’s important to note that the time it takes to restore your iPhone will depend on the size of the backup and the speed of your internet connection. It is recommended to have a strong and stable Wi-Fi connection for a faster and smoother restore process.
By following these steps, you can easily restore your iPhone 14 to its previous state after performing a factory reset. Your device will be back up and running with all your personal data intact.
In conclusion, knowing how to perform a factory reset on your iPhone 14 can be a valuable skill. Whether you are looking to troubleshoot issues, prepare your device for resale, or start afresh, a factory reset can provide a clean slate. By following the step-by-step guide provided in this article, you can confidently reset your iPhone 14 to its original settings, erasing all personal data and customizations.
Remember to back up your important data before proceeding with a factory reset to avoid permanent loss. Additionally, make sure you have a stable internet connection and sufficient battery life to avoid any interruptions during the reset process.
By understanding this essential function of your iPhone 14, you can maintain control over your device’s performance and ensure its optimal functionality. So, the next time you need to reset your iPhone 14, rest assured that you have the knowledge and skills to do so efficiently and effectively.
FAQs
Q: Why would I need to factory reset my iPhone 14?
A: There are several reasons why you might need to factory reset your iPhone 14. It could be due to a software issue or a malfunctioning device. You might also want to reset your iPhone to its original settings if you are planning to sell or give it away. A factory reset can help resolve any problems and ensure that your iPhone is ready for a fresh start.
Q: How do I factory reset my iPhone 14?
A: To factory reset your iPhone 14, go to the “Settings” app on your home screen and tap on “General.” Scroll down and select “Reset,” then choose “Erase All Content and Settings.” You may be prompted to enter your passcode or Apple ID password before proceeding. Once confirmed, your iPhone 14 will be reset to its factory settings.
Q: Will factory resetting my iPhone 14 delete all my data?
A: Yes, a factory reset will erase all the data on your iPhone 14, including your apps, photos, videos, messages, and settings. It is crucial to back up your data before performing a factory reset if you want to retain your information. You can use iCloud or iTunes to create a backup of your iPhone’s data before proceeding with the reset.
Q: How long does it take to factory reset an iPhone 14?
A: The time it takes to factory reset an iPhone 14 can vary depending on the amount of data on your device. On average, the process can take anywhere from a few minutes to an hour. It is advisable to ensure that your iPhone has enough battery power or is connected to a power source during the reset process to avoid any disruptions.
Q: Will a factory reset fix software issues on my iPhone 14?
A: Yes, a factory reset can often resolve software issues on an iPhone 14. By resetting your device to its factory settings, you eliminate any potentially problematic software configurations or conflicts. However, it is important to note that a factory reset should only be considered as a last resort if other troubleshooting steps have been unsuccessful.