
Have you ever gazed up at the night sky, captivated by the mesmerizing glow of the moon, and wished to capture its enchanting beauty with your iPhone 12 Pro Max? With its advanced camera capabilities, the iPhone 12 Pro Max allows you to embark on a celestial photography journey, enabling you to immortalize the moon’s radiance in stunning detail. In this comprehensive guide, we will delve into the art of capturing the moon with your iPhone 12 Pro Max at night. From understanding the optimal settings to mastering the techniques, you’ll uncover the secrets to seizing breathtaking lunar moments with your device. Let’s embark on this celestial adventure and unlock the potential of your iPhone 12 Pro Max’s camera to encapsulate the splendor of the moonlit night.
Inside This Article
- Selecting the Right Location
- Setting Up Your iPhone 12 Pro Max
- Adjusting Camera Settings
- Capturing the Image
- Conclusion
- FAQs
Selecting the Right Location
When it comes to capturing a stunning picture of the moon with your iPhone 12 Pro Max, selecting the right location is crucial. Look for a spot with minimal light pollution to ensure a clear and unobstructed view of the night sky. Consider heading to a secluded area away from the city lights, such as a park or open field, to minimize any interference. Additionally, check the weather forecast to ensure clear skies, as clouds can obstruct your view and affect the quality of the photo.
Moreover, consider the moon’s position in the sky. Research the moon’s phase and rise time to determine the best location for capturing your desired shot. Keep in mind that the moon’s position changes throughout the night, so choosing the right location based on its trajectory is essential for a successful photo. By carefully selecting a suitable location, you can maximize your chances of capturing a breathtaking image of the moon with your iPhone 12 Pro Max.
Setting Up Your iPhone 12 Pro Max
Before you embark on capturing the breathtaking beauty of the moon with your iPhone 12 Pro Max, it’s crucial to ensure that your device is set up optimally for this task. The iPhone 12 Pro Max boasts impressive camera capabilities, and by following these steps, you can harness its full potential for nighttime photography.
First and foremost, make sure that your iPhone 12 Pro Max is fully charged. Nighttime photography, especially of distant celestial objects, can be a drain on battery life. Ensuring your device has ample power will prevent any interruptions during the photo-taking process.
Next, consider using a tripod or a stable surface to keep your iPhone 12 Pro Max steady during the photo capture. This is particularly important for nighttime photography, as it minimizes the risk of blurriness caused by hand movements. Alternatively, you can explore using accessories such as a phone grip or a remote shutter release to further stabilize your device.
**
Adjusting Camera Settings
**
Before taking a picture of the moon with your iPhone 12 Pro Max, it’s crucial to adjust the camera settings for optimal results. Here’s how to do it:
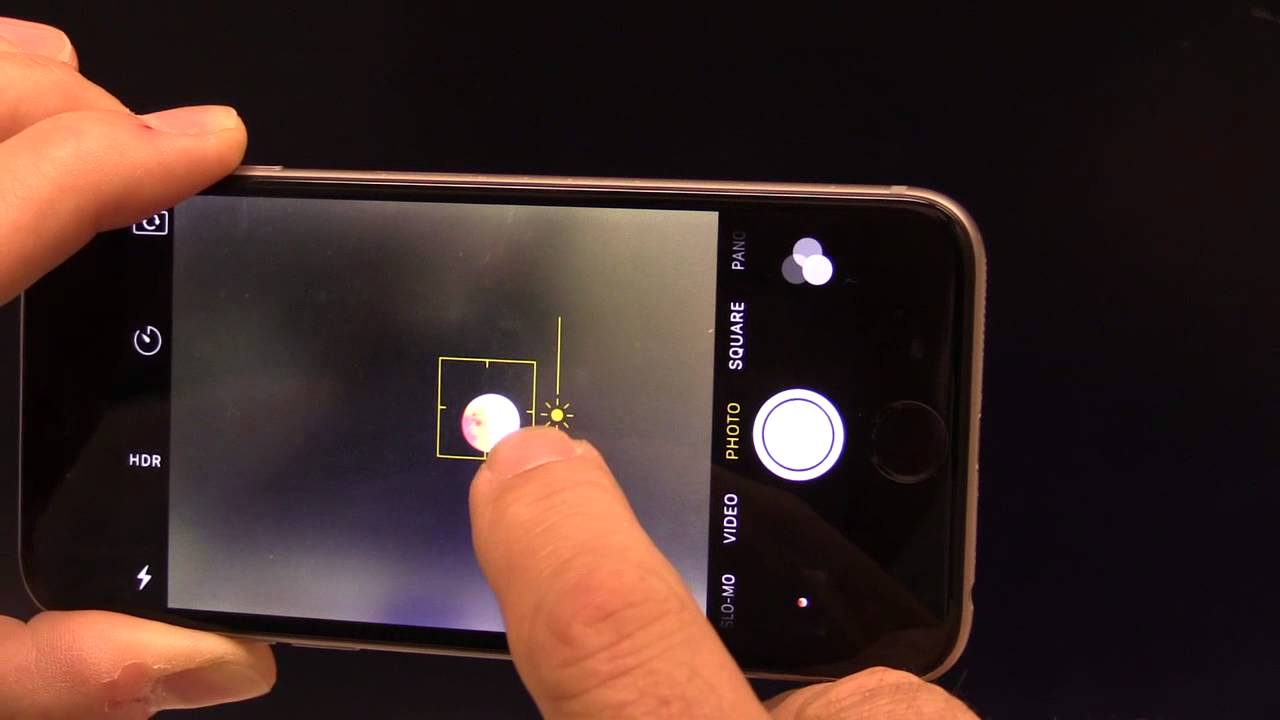
1. Use Manual Focus: Tap on the moon in the Camera app to focus manually. This ensures that the moon appears sharp and detailed in the final image.
2. Adjust Exposure: Swipe down on the screen to decrease the exposure. This prevents the moon from appearing overly bright and helps capture its natural details.
3. Enable Night Mode: If the ambient light is low, consider enabling Night Mode to enhance the moon’s visibility while maintaining the surrounding darkness.
4. Use a Tripod or Stable Surface: To minimize camera shake and capture a clear image, place your iPhone 12 Pro Max on a tripod or stable surface. This is especially important when shooting in low light conditions.
5. Experiment with Different Settings: Take multiple shots with varying settings to find the best combination for capturing the moon’s details while maintaining a balanced exposure.
Capturing the Image
Once you have set up your iPhone 12 Pro Max and adjusted the camera settings, it’s time to capture the image of the moon. Remember, patience is key when it comes to astrophotography, especially capturing the moon. Here are some tips to help you capture a stunning image of the moon with your iPhone 12 Pro Max:
1. Use a Tripod: To minimize camera shake and ensure a sharp image, use a tripod to stabilize your iPhone. This is crucial, especially when capturing the moon at night, as any movement can result in a blurry image.
2. Enable Night Mode: If you’re shooting in low light conditions, such as at night, consider using the Night Mode feature on your iPhone 12 Pro Max. This feature allows for longer exposure times, resulting in brighter and more detailed images of the moon.
3. Tap to Focus: When capturing the moon, tap on the moon in the camera frame to ensure that it is in focus. This will help you achieve a clear and detailed image of the moon’s surface.
4. Use the Timer: To further minimize camera shake, use the built-in timer on your iPhone 12 Pro Max. Set a brief delay before the image is captured to allow any vibrations from tapping the shutter button to settle, resulting in a sharper image.
5. Experiment with Exposure: Depending on the lighting conditions, you may need to adjust the exposure to achieve the desired level of brightness and detail in your moon image. Swipe up or down on the screen to adjust the exposure manually.
By following these tips and techniques, you can capture a breathtaking image of the moon using your iPhone 12 Pro Max, showcasing its impressive camera capabilities in low light conditions.
Conclusion
With the advanced camera capabilities of the iPhone 12 Pro Max, capturing stunning images of the moon at night has never been easier. The combination of Night mode, telephoto lens, and enhanced low-light performance empowers users to take breathtaking lunar photographs with remarkable clarity and detail. By following the tips and techniques outlined in this guide, you can elevate your astrophotography skills and unleash the full potential of your iPhone 12 Pro Max. Whether you’re an amateur stargazer or a seasoned photographer, the iPhone 12 Pro Max offers a gateway to the mesmerizing world of celestial photography, allowing you to preserve the enchanting beauty of the moon in all its celestial glory.
FAQs
Q: Can I take a picture of the moon with iPhone 12 Pro Max at night?
A: Yes, the iPhone 12 Pro Max’s advanced camera capabilities, including Night mode, make it possible to capture stunning shots of the moon at night.
Q: Do I need any additional accessories to take a picture of the moon with iPhone 12 Pro Max?
A: While the iPhone 12 Pro Max’s camera is powerful on its own, using a tripod can help stabilize the shot and ensure optimal results when capturing the moon at night.
Q: What settings should I use on my iPhone 12 Pro Max to photograph the moon at night?
A: Utilize the Night mode feature on your iPhone 12 Pro Max for capturing the moon at night. Additionally, adjust the exposure and focus to achieve the desired results.
Q: How can I ensure that the moon appears clear and detailed in my iPhone 12 Pro Max photos?
A: To capture clear and detailed images of the moon with your iPhone 12 Pro Max, make sure to stabilize the device using a tripod, adjust the exposure and focus settings, and utilize Night mode for enhanced low-light photography.
Q: Can I edit the moon photos taken with my iPhone 12 Pro Max to enhance their quality?
A: Yes, you can use photo editing apps or the built-in editing features on your iPhone 12 Pro Max to enhance the quality of the moon photos, adjusting factors such as brightness, contrast, and sharpness to achieve the desired effect.