
Are you experiencing issues with your Apple mouse? Sometimes, a simple battery change can solve the problem and get your mouse back in working order. Knowing how to change the battery on your Apple mouse is essential for maintaining its functionality and maximizing your productivity. Whether you have a Magic Mouse, Magic Mouse 2, or any other model, this guide will provide you with step-by-step instructions to replace the battery seamlessly. By following these instructions, you can quickly and easily swap out the batteries and get your Apple mouse up and running again in no time. So, let’s dive into the details and learn how to change the battery on your Apple mouse.
Inside This Article
- How To Change Battery On Apple Mouse
- – Checking the Battery Status
- – Removing the Battery Cover
- – Replacing the Battery
- – Closing the Battery Cover
- Conclusion
- FAQs
How To Change Battery On Apple Mouse
Is your Apple mouse running low on battery? Don’t worry, changing the battery is a quick and simple process. In this guide, we will show you step-by-step instructions on how to change the battery on your Apple mouse.
Checking the Battery Status
Before changing the battery, it’s important to check the battery status of your Apple mouse. The battery status can be found in the Bluetooth settings on your Mac or in the Bluetooth section of the System Preferences. If the battery is low, it’s time to replace it.
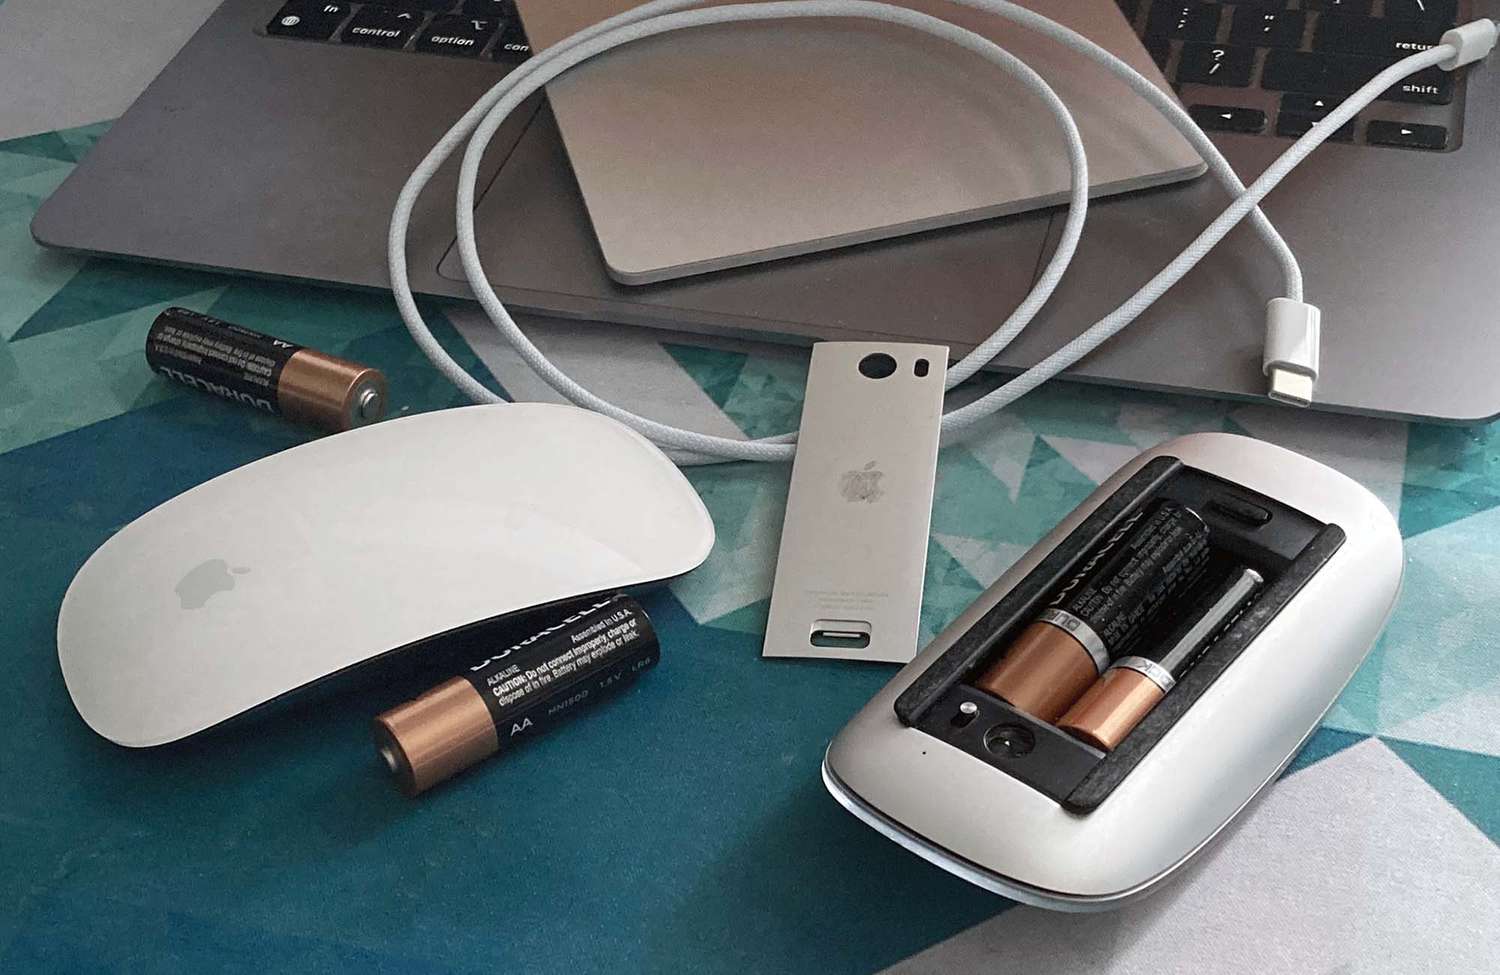
Removing the Battery Cover
The first step is to locate the battery cover on your Apple mouse. On most models, the battery cover is located on the bottom of the mouse. Look for a small indentation or a button that allows you to slide off the cover.
To remove the battery cover, press and hold the button or slide the cover in the direction indicated. Be gentle but firm in your movements to avoid damaging the cover or the mouse.
Replacing the Battery
Once you have successfully removed the battery cover, you will see the battery compartment. Take note of the battery type required for your mouse as different models may have different battery requirements.
Remove the old battery from the compartment by gently pushing it out or pulling on the tab, depending on the design. Dispose of the old battery in an environmentally friendly manner.
Now, it’s time to insert the new battery. Ensure that you are inserting it into the compartment correctly, following the polarity markings (+ and -) on the battery and in the compartment. Place the battery in and secure it in place.
Closing the Battery Cover
After replacing the battery, it’s time to close the battery cover. Align the cover with the grooves or tracks on the mouse and slide it back into place. You should feel a click or a snap when the cover is securely closed.
Once the battery cover is closed, turn your Apple mouse over and give it a quick test to make sure the new battery is working properly. If everything is functioning as expected, your Apple mouse is now ready to use.
Remember to hold onto the battery cover and keep it in a safe place in case you need to change the battery in the future.
Changing the battery on your Apple mouse is a simple task that will ensure your device continues to work smoothly. By following these step-by-step instructions, you can easily replace the battery and keep your Apple mouse powered up and ready for use.
– Checking the Battery Status
Before you start replacing the battery on your Apple Mouse, it’s essential to check the battery status. This will give you an idea of whether the battery is running low and needs to be replaced or if it still has some power left.
To check the battery status on your Apple Mouse, follow these steps:
- On your computer, go to the Apple menu and select System Preferences.
- Click on the Bluetooth icon to open the Bluetooth settings.
- Locate your Apple Mouse in the list of connected devices and click the “i” icon next to it.
- A window will open, displaying the battery level of your mouse. If the battery level is below 20%, it’s a good indication that you need to replace the battery soon.
By checking the battery status beforehand, you can ensure that you have a replacement battery ready and avoid any inconvenience caused by a dead mouse battery in the middle of an important task.
– Removing the Battery Cover
Once you’ve confirmed that the battery needs replacing, it’s time to remove the battery cover on your Apple Mouse. Here’s how:
- Flip the mouse upside down to expose the underside.
- Locate the battery cover, which is usually positioned at the top half of the mouse.
- Slide the battery cover in the direction indicated by the arrows. Some models may require you to push and hold a release button while sliding the cover.
- The battery cover should pop open, allowing you to access the battery compartment.
It’s important to be gentle while removing the battery cover to avoid causing any damage to the mouse or the cover itself.
– Replacing the Battery
With the battery cover off, you can now replace the old battery with a fresh one. Here’s what you need to do:
- Take out the old battery from the battery compartment.
- Make sure to match the orientation of the new battery with the markings inside the battery compartment. Most Apple Mouses use AA or AAA batteries.
- Insert the new battery into the compartment, making sure it fits snugly.
Ensure that you are inserting the battery correctly, following the correct polarity (+/-) indicated inside the battery compartment.
– Closing the Battery Cover
Once the new battery is securely in place, it’s time to close the battery cover and complete the battery replacement process. Here’s how:
- Align the battery cover back into its original position.
- Slide the cover in the opposite direction from the removal to lock it back into place. You may hear a click to confirm that the cover is securely closed.
Ensure that the battery cover is fully closed and secure to prevent any accidental opening during use.
With the battery replaced and the cover closed, your Apple Mouse is now ready for use with a fresh battery.
Changing the battery on an Apple Mouse is a straightforward process that can be done in just a few simple steps. By following the instructions provided and using the right tools, you can easily replace the battery and get your mouse up and running again in no time.
Remember to always use the appropriate battery type recommended by Apple for your specific mouse model. This will ensure optimal performance and prevent any potential damage to your device.
Regularly checking and replacing the batteries in your Apple Mouse is essential to maintain its functionality and ensure a smooth user experience. So, don’t wait until your mouse stops working – be proactive and keep your device powered up and ready for use at all times.
With the knowledge and guidance provided in this article, you can confidently change the battery on your Apple Mouse whenever the need arises, saving you time and frustration in the long run.
FAQs
Q: Can I change the battery on an Apple Mouse?
A: Yes, you can change the battery on an Apple Mouse. Apple Mice typically use either AA or AAA batteries, depending on the model. It is a straightforward process and can be done by following the steps outlined in the instruction manual or by referring to online resources for specific models.
Q: How often do I need to change the battery on an Apple Mouse?
A: The frequency of battery replacement for an Apple Mouse depends on the usage and the type of batteries being used. More frequent usage may require more frequent battery changes. However, on average, you can expect to need a battery replacement every few months to a year.
Q: What type of battery does an Apple Mouse use?
A: Apple Mice typically use either AA or AAA batteries. The exact battery type depends on the specific model of the mouse. It is essential to check the instruction manual or the manufacturer’s specifications for the recommended battery type for your specific Apple Mouse.
Q: How do I know when the battery on my Apple Mouse needs to be changed?
A: Most Apple Mice are equipped with a battery level indicator. This indicator can be accessed through the device’s settings or control panel on your computer. When the battery level is low, you will receive a notification on your computer, or the battery level indicator may turn red or flash to indicate that it is time to replace the battery.
Q: Are there any tips for extending the battery life of an Apple Mouse?
A: Yes, there are a few tips you can follow to extend the battery life of your Apple Mouse. Firstly, make sure to turn off the mouse when not in use. This will prevent unnecessary battery drain. Additionally, adjusting the tracking speed and disabling unnecessary features, such as the mouse’s backlight, can help conserve battery power. Finally, using high-quality, rechargeable batteries can be a more eco-friendly and cost-effective option in the long run.