
Are you tired of the default cursor on your Mac? Are you looking for a way to personalize your computer and make it truly your own? Look no further! In this comprehensive guide, we will show you step-by-step how to change the cursor on your Mac, giving it a fresh and unique look.
Your cursor is an essential part of your Mac experience, and customizing it can add a personal touch to your workflow. Whether you want to change it to a different shape, color, or style, we’ve got you covered. From the classic arrow to fun and creative options, you’ll find a wide range of cursor designs to suit your preferences.
So, if you’re ready to give your Mac a fresh new look, let’s dive into the world of cursor customization. Follow along with the easy-to-follow instructions in this article, and you’ll be navigating your Mac with a brand new cursor in no time!
Inside This Article
- Customizing the Cursor Appearance
- Changing the Cursor Size
- Modifying Cursor Color and Contrast
- Using Third-Party Cursor Tools
- Conclusion
- FAQs
Customizing the Cursor Appearance
One of the many ways to personalize your Mac experience is by customizing the appearance of the cursor. Whether you want to change the cursor shape, color, or animation, macOS offers several options to cater to your preferences. With a few simple steps, you can make your cursor stand out and reflect your unique style.
To begin customizing the cursor, follow these instructions:
- Click on the Apple menu in the top-left corner of your screen and select “System Preferences.”
- In the System Preferences window, click on “Accessibility.”
- Choose “Display” from the sidebar.
- Click on the “Cursor” tab.
- Here, you will find various customization options. Select the option that best suits your requirements.
Let’s explore some of the customization options available:
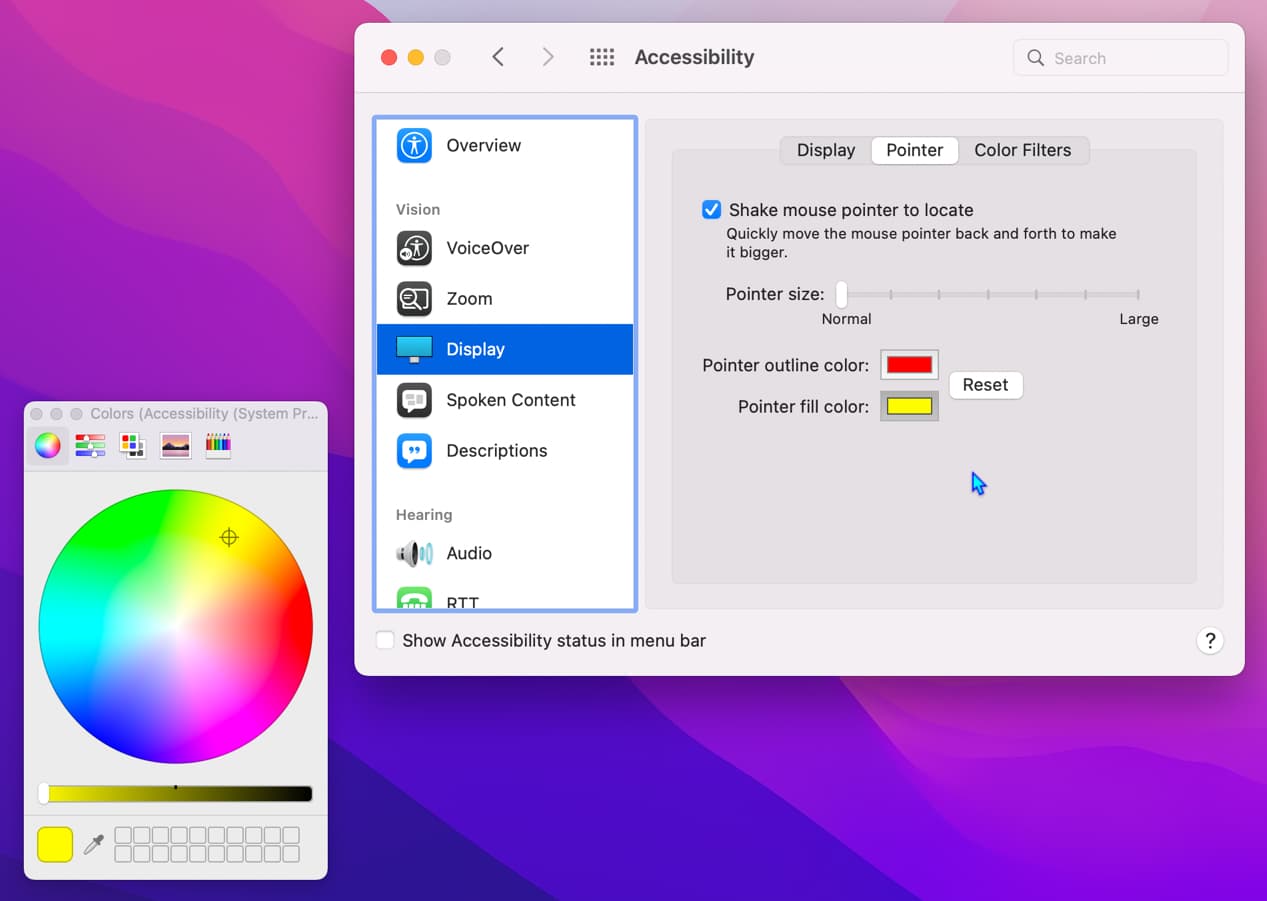
- Cursor Size: If you find the default cursor size too small or large, you can easily adjust it to your liking using the slider provided. Move it to the left to decrease the size or to the right to increase it.
- Cursor Shake: This feature adds a subtle animation or shake effect to the cursor. You can enable or disable this effect according to your preference.
- Cursor Color: macOS allows you to change the cursor color to any hue you desire. Simply click on the color picker and select the color that appeals to you.
- Invert Colors: By checking this option, you can invert the cursor colors to provide better contrast against different backgrounds.
- Cursor Accessibility: If you have any specific accessibility needs, you can enable additional cursor options here, such as increasing cursor contrast or enabling a cursor highlight.
Once you have made the desired changes, you will see an instant preview of your new cursor appearance. You can experiment with different options until you find the perfect look.
Customizing the cursor appearance on your Mac is a simple way to add a personal touch to your computer experience. Whether you prefer a larger cursor, a different color, or an animated effect, macOS offers the flexibility to match your style and improve your overall user experience. So go ahead and make your cursor truly yours!
Changing the Cursor Size
If you’re finding it difficult to see the cursor on your Mac or if you simply prefer a larger cursor size for better visibility, you can easily adjust the cursor size to suit your needs. Here’s how you can change the cursor size on your Mac:
- Click on the Apple menu in the top-left corner of your screen and select “System Preferences.”
- In the System Preferences window, click on “Accessibility.”
- From the left-side menu, select “Display.”
- Locate the “Cursor” section on the right-hand side of the window.
- Drag the “Cursor Size” slider to the right to increase the cursor size or to the left to decrease it.
- As you adjust the slider, you’ll see the changes in cursor size in the preview window.
- Once you’re satisfied with the cursor size, close the System Preferences window.
By following these steps, you can quickly customize the cursor size on your Mac to make it more prominent and easier to spot on the screen. This can be especially useful for users with visual impairments or those who simply find it challenging to locate the default cursor size.
It’s worth noting that changing the cursor size won’t affect the functionality of your Mac or any applications. It only modifies the visual appearance of the cursor to improve visibility.
Moreover, if you want to manage the cursor size even more precisely, you can enable the “Shake mouse pointer to locate” option in the Accessibility settings. This feature allows you to quickly locate the cursor by shaking the mouse or trackpad.
Overall, the ability to adjust the cursor size on your Mac provides a simple yet effective solution to enhance cursor visibility. Whether you have difficulty tracking the default cursor or simply want to make it more noticeable, changing the cursor size can significantly improve your user experience.
Modifying Cursor Color and Contrast
When it comes to customizing the cursor on your Mac, one of the key aspects you might want to tweak is its color and contrast. Luckily, macOS offers some options to modify the cursor’s appearance to suit your preferences.
To start, go to the Apple menu and select “System Preferences.” Then, click on “Accessibility.” This is where you’ll find settings to enhance the visibility of your cursor.
In the Accessibility preferences, navigate to the “Display” section and click on “Cursor.” Here, you’ll be presented with various options to modify the cursor’s color and contrast.
The first option you’ll see is the “Cursor Size” slider. Adjusting this slider will change the size of the cursor, making it more prominent and easier to locate on the screen.
In addition to adjusting the size, you can also modify the color of the cursor. To do this, click on the “Color” dropdown menu. macOS provides a range of color options to choose from, including white, black, yellow, red, green, blue, and purple.
If none of the default colors suit your preference, you can click on “Other” in the Color menu. Here, you’ll have the ability to select a custom color using the built-in color picker.
Furthermore, macOS allows you to adjust the cursor’s contrast. When you increase the contrast, the cursor will become more distinguishable from the background, making it easier to spot. To adjust the contrast, click on the “Contrast” checkbox and move the slider to your desired level.
Once you have adjusted the cursor’s color and contrast settings to your liking, you can close the Accessibility preferences. The changes you made will be applied instantly, and you can now enjoy a cursor that is more visible and personalized.
Modifying the cursor’s color and contrast is just one way to customize your Mac experience. With these options, you can make the cursor more prominent and accessible, ensuring a smoother and more enjoyable workflow on your Mac.
Using Third-Party Cursor Tools
While the default cursor options provided by your Mac may be sufficient for most users, there are times when you might want to explore third-party cursor tools that offer more customization options. These tools allow you to personalize your cursor and give your Mac a unique look and feel. Here are some popular third-party cursor tools that you can consider:
1. CursorSense: CursorSense is a highly regarded third-party cursor tool that provides advanced features for cursor customization. It allows you to adjust cursor speed, acceleration, and sensitivity according to your preference. Additionally, CursorSense offers various cursor styles and animations to choose from, giving you more control over your cursor’s appearance.
2. Mousecape: If you’re looking for a wide range of cursor options, Mousecape is a great choice. It offers an extensive library of cursor themes created by the community. You can select from a variety of fun and creative cursor designs that suit your taste. Mousecape also allows you to create and share your own custom cursor themes.
3. Capster: Capster is another popular third-party cursor tool that offers a wide range of customization options. It allows you to change the cursor size, shape, color, and transparency. Capster also offers different cursor styles and animations, enabling you to create a personalized cursor experience.
4. Unsanity Mighty Mouse: If you own an older Mac with a Mighty Mouse, Unsanity Mighty Mouse is a handy third-party tool that enhances the mouse functionality. It provides additional settings and customization options specifically designed for Mighty Mouse users, including cursor speed adjustments and scroll wheel enhancements.
5. Cursorcerer: Cursorcerer is a lightweight third-party tool that allows you to hide the cursor automatically when it’s not in use. This can be particularly useful when you want to minimize distractions while working or watching videos. Cursorcerer offers easy-to-use settings to control the cursor hide and show timings.
When using third-party cursor tools, it’s important to choose reputable and trusted sources to ensure the tools are reliable and compatible with your Mac operating system version. Always read user reviews and check for compatibility before installing any third-party software on your Mac.
By exploring these third-party cursor tools, you can customize your Mac’s cursor to suit your preferences and add a personal touch to your user experience. Whether you want a sleek and minimalistic cursor or a vibrant and animated one, these tools provide an array of options for you to choose from.
Conclusion
In conclusion, changing the cursor on a Mac is a simple process that allows users to personalize their experience and make their computer truly their own. Whether you prefer a sleek and minimalistic cursor or a fun and colorful one, Mac provides various options to cater to different tastes and preferences. By following the steps mentioned in this article, you can easily change the default cursor and enhance your computing experience. Don”t be afraid to get creative and experiment with different cursor styles to find the one that suits you best. So go ahead, give your Mac a personal touch and enjoy navigating your computer with a cursor that matches your unique personality and style.
FAQs
1. Can I change the cursor on my Mac?
Yes, you can change the cursor on your Mac. macOS provides options to customize the cursor and select from a range of different styles.
2. How do I change the cursor on my Mac?
To change the cursor on your Mac, follow these steps:
- Go to the Apple menu and select System Preferences.
- Click on Accessibility.
- Select Display in the left sidebar.
- Click on the Cursor tab.
- From here, you can adjust the cursor size, color, and even enable features like “Shake cursor to locate.”
3. Can I download custom cursors for my Mac?
Yes, you can download custom cursors for your Mac. There are several websites that offer a wide range of cursor styles and designs compatible with macOS. Once you’ve downloaded the custom cursor file, you can follow the steps mentioned earlier to change the cursor on your Mac.
4. Are there any accessibility options for the cursor on Mac?
Yes, macOS provides various accessibility options for the cursor on Mac. These options include cursor size adjustment, color inversion, and even enabling features like “Shake cursor to locate.” These accessibility options make it easier for individuals with visual impairments to navigate and use their Mac effectively.
5. Can I revert back to the default cursor on my Mac?
Yes, you can easily revert back to the default cursor on your Mac. Simply follow the steps mentioned earlier to access the Cursor settings in System Preferences, then select the default cursor style or make any desired adjustments to restore it to its original appearance.