
Are you struggling to figure out how to right-click on a wireless Mac mouse? Well, you’re not alone! Many Mac users find it confusing at first, especially if they have been accustomed to using a different type of mouse in the past.
Fortunately, learning how to right-click on a wireless Mac mouse is a simple process once you know the necessary steps. In this article, we will guide you through the process of right-clicking on a wireless Mac mouse, providing you with clear instructions, helpful tips, and troubleshooting advice, so you can effectively navigate your Mac system.
Whether you’re a new Mac user or just upgrading to a wireless mouse, understanding how to right-click is essential for maximizing your productivity and convenience. So let’s dive in and discover the various methods you can use to right-click on your wireless Mac mouse!
Inside This Article
- Pairing the Wireless Mac Mouse
- Understanding Mouse Settings
- Using Two Fingers for Right Clicking
- Adjusting Mouse Preferences
- Conclusion
- FAQs
Pairing the Wireless Mac Mouse
Pairing your Wireless Mac Mouse is a simple process that allows you to connect it to your Mac device and start using it wirelessly. Follow the step-by-step instructions below to pair your Wireless Mac Mouse:
1. First, ensure that your Wireless Mac Mouse has fresh batteries or is fully charged. This will ensure a smooth pairing process.
2. On your Mac device, go to the System Preferences by clicking on the Apple logo in the top-left corner of your screen and selecting “System Preferences” from the drop-down menu. Alternatively, you can search for “System Preferences” using the Spotlight search (press Command + Spacebar and type “System Preferences”).
3. In the System Preferences window, click on the “Bluetooth” icon. This will open the Bluetooth settings on your Mac.
4. Make sure that the Bluetooth on your Mac is turned on. If it’s not, toggle the Bluetooth switch to enable it.
5. On your Wireless Mac Mouse, press and hold the pairing button (usually located on the bottom of the mouse) for a few seconds until the LED indicator starts blinking. This indicates that the mouse is now in pairing mode.
6. On your Mac, under the Bluetooth settings, you should see the name of your Wireless Mac Mouse listed in the devices available for pairing. Click on the mouse’s name to initiate the pairing process.
7. Once the pairing is successful, the LED indicator on your Wireless Mac Mouse will stop blinking and remain solid. Your mouse is now paired with your Mac device.
8. Test the functionality of your Wireless Mac Mouse by moving it around and clicking the buttons. It should now work seamlessly with your Mac.
That’s it! You have successfully paired your Wireless Mac Mouse with your Mac device. Enjoy the freedom of using your mouse wirelessly and navigating your Mac with ease.
Understanding Mouse Settings
The mouse is an essential peripheral device that allows users to interact with their computers. Understanding the various mouse settings can greatly improve the user experience, making navigation and interaction tasks more efficient and personalized. In this article, we will explore the different aspects of mouse settings and how to customize them on your computer.
1. Pointer Speed: The pointer speed determines how quickly the mouse cursor moves across the screen. Adjusting the pointer speed to your liking is crucial for precision and comfort. You can find the pointer speed settings in the control panel or system preferences of your operating system.
2. Button Configuration: Most mice have at least two buttons – the left and right click. However, some mice have additional buttons that can be configured for specific functions. This allows you to assign shortcuts or macros to these buttons, enhancing your productivity. To configure button settings, you can typically use mouse software provided by the manufacturer.
3. Scrolling: Many mice have a scroll wheel located between the left and right buttons. The scrolling settings determine the behavior of the scroll wheel, such as the number of lines scrolled per notch or the smoothness of the scrolling motion. You can adjust these settings in the mouse control panel or system preferences.
4. Acceleration: Mouse acceleration is a feature that adjusts the sensitivity of cursor movement based on the speed at which the mouse is moved. It enables faster cursor movement with quicker mouse movements, allowing for more efficient navigation across the screen. However, some users prefer to disable mouse acceleration for more consistent cursor movement. This setting can usually be found in the control panel or system preferences.
5. Accessibility: Mouse settings may also include accessibility options to accommodate users with disabilities. These options can include features such as pointer size and color customization, dwell clicking (where a click is triggered by holding the cursor over an item), or cursor tracking enhancements. These settings can be found in the accessibility or ease of access settings of your operating system.
Understanding mouse settings and customizing them according to your preferences can significantly enhance your overall computer experience. By taking the time to explore and optimize these settings, you can make your interactions with the computer more efficient, comfortable, and tailored to your needs.
Using Two Fingers for Right Clicking
If you’re using a wireless Mac mouse and want to access the right-click functionality, one convenient method is to use two fingers on the mouse’s surface. This gesture, commonly known as a “two-finger tap,” is a quick and efficient way to perform a right-click action without the need for an additional physical button on the mouse.
To use two fingers for right-clicking on a wireless Mac mouse, follow these simple steps:
1. Enable Two-Finger Right Click: First, ensure that the two-finger right-click option is enabled in your Mac’s system preferences. To do this, open the Apple menu, click on “System Preferences,” and then select “Mouse” or “Trackpad,” depending on what your Mac is equipped with.
2. Access Trackpad Settings: Once in the Mouse or Trackpad settings, navigate to the “Point & Click” or “Trackpad” tab. Here, you should find an option labeled “Secondary Click” or “Two-Finger Click.” Click on this option to access the settings for two-finger right-click functionality.
3. Enable Two-Finger Right Click: In the secondary click settings, make sure that the “Two-Finger Click” option is selected or enabled. This will allow you to perform a right-click action by tapping the mouse surface with two fingers simultaneously.
4. Adjust Tracking Speed: While in the Trackpad or Mouse settings, you may also want to adjust the tracking speed to your preference. This can be done by moving the cursor speed slider towards the faster or slower side, depending on your preference and comfort level.
5. Test Two-Finger Right Click: Once you have enabled the two-finger right-click option and adjusted the tracking speed if necessary, it’s time to test your settings. Place two fingers on the surface of the wireless Mac mouse and perform a tap with both fingers simultaneously. If everything is working correctly, you should see the contextual menu or right-click menu appear on your screen.
Using two fingers for right-clicking on a wireless Mac mouse provides a hassle-free and intuitive way to access additional functionality without the need for physical buttons. It’s an excellent option for those who prefer a minimalist design or want to simplify their mouse usage experience.
Keep in mind that the availability and usability of the two-finger right-click feature may vary depending on your specific wireless Mac mouse model and macOS version. If you encounter any difficulties or the feature doesn’t work as expected, consult the user manual or Apple’s support resources for further assistance.
Adjusting Mouse Preferences
The mouse is an essential input device for navigating your computer, and adjusting its preferences can greatly enhance your user experience. Whether you’re using a wireless Mac mouse or any other mouse model, customizing its settings can make it more comfortable and efficient to use. In this guide, we’ll explore how to adjust mouse preferences on your Mac to suit your preferences.
To access mouse preferences, start by clicking on the Apple menu in the top left corner of your screen and selecting “System Preferences” from the drop-down menu. In the System Preferences window, click on the “Mouse” icon to open the mouse preferences pane.
Once you’re in the mouse preferences pane, you’ll find a range of settings that you can adjust to personalize your mouse experience. Here are a few key settings to consider:
- Tracking speed: This setting allows you to adjust the sensitivity of your mouse pointer. Moving the tracking speed slider to the left makes the pointer move slower, while moving it to the right makes it move faster. Experiment with different settings to find the one that feels most comfortable for you.
- Scroll direction: By default, Mac computers have “natural” scrolling, where swiping up on the mouse scrolls down and vice versa. If you prefer the traditional scrolling direction, you can uncheck the box next to “Scroll direction: natural.”
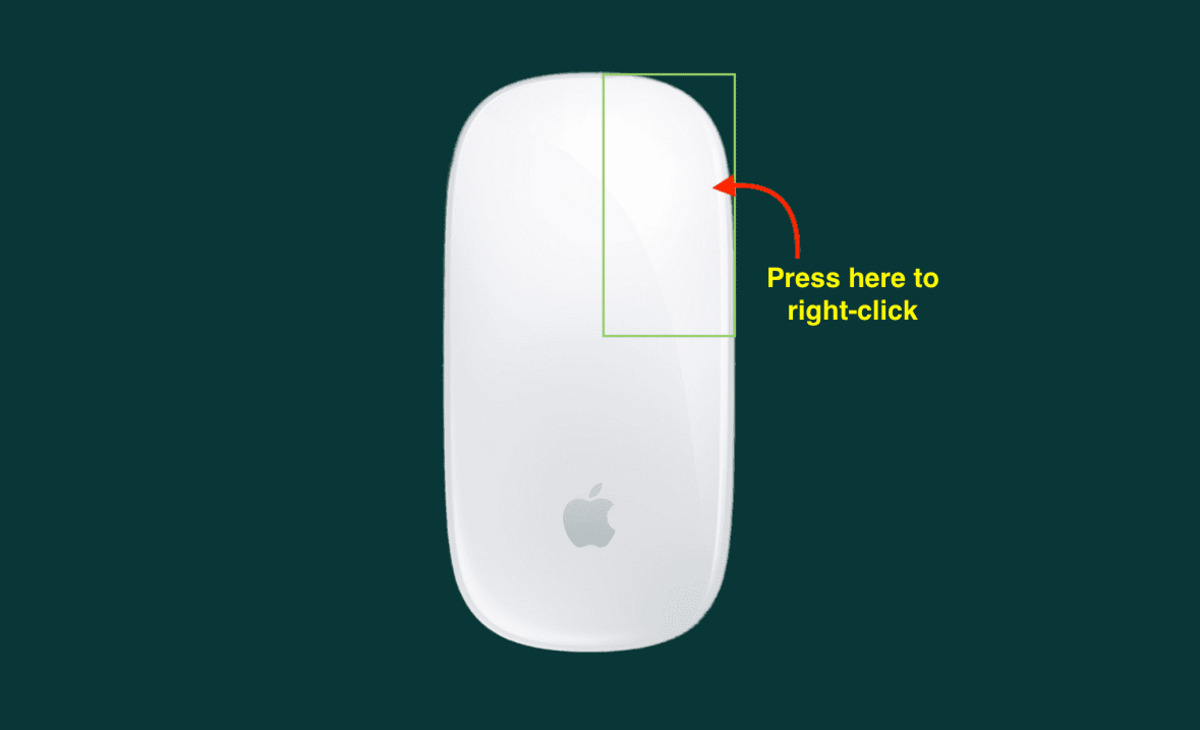
- Secondary click: This setting determines how you activate the right-click function on your mouse. You can choose between “Click on the right side” or “Click on the left side” depending on your preference. If you’re using a wireless Mac mouse, you may already have a dedicated right-click button.
Other options within mouse preferences include adjusting the double-click speed, enabling smart zoom for easy zooming in and out, and configuring mouse gestures if you have a supported mouse model. Take some time to explore these settings and customize them to your liking.
If you’re using a wireless Mac mouse with additional buttons or features, you may also have the option to customize those buttons within the mouse preferences pane. This can be useful for assigning specific functions or keyboard shortcuts to these buttons, further increasing your productivity and efficiency.
Once you’ve adjusted your mouse preferences to your satisfaction, you can close the mouse preferences pane, and the changes will be applied immediately. Feel free to revisit these settings anytime to fine-tune your mouse experience according to your evolving needs and preferences.
By customizing your mouse preferences on your wireless Mac mouse, you can optimize your workflow and make your computer usage more enjoyable. Experiment with different settings, find what works best for you, and take full advantage of the features provided by the mouse preferences pane.
Conclusion
In conclusion, learning how to right click on a wireless Mac mouse is essential for optimizing your productivity and convenience while using your Mac computer. By following the simple steps outlined in this guide, you can easily enable the right click function and enhance your overall user experience.
Remember, the ability to right click opens up a world of possibilities, allowing you to access context menus, shortcuts, and additional functionality. Whether you’re browsing the web, editing documents, or managing files, having the right click functionality on your wireless Mac mouse can make your tasks faster and more efficient.
So, don’t hesitate to make the most out of your wireless Mac mouse by enabling the right click feature. With a few clicks, you’ll unlock a whole new level of productivity and convenience. Happy right-clicking!
FAQs
Q: How do I right click on a wireless Mac mouse?
A: To right click on a wireless Mac mouse, you can follow these steps:
- Place your cursor where you want to right click.
- Press and hold the “Control” key on your keyboard.
- Click the mouse button with your index finger, while still holding the “Control” key.
This will simulate a right-click action on your Mac mouse. You can now access the right-click options or context menu just like you would with a traditional right-click on a two-button mouse.
Q: How do I know if my Mac mouse supports right-click?
A: Most wireless Mac mice, including the Apple Magic Mouse, support right-click functionality. However, if you are unsure whether your specific mouse model supports right-click, you can check the mouse settings on your Mac:
- Click on the Apple logo in the top-left corner of your screen.
- Select “System Preferences” from the drop-down menu.
- Choose “Mouse” or “Trackpad” from the System Preferences window.
- Look for a “Secondary Click” or “Right Click” option. If available, your mouse supports right-click.
If you do not see an option for right-click in the settings, it’s possible that your mouse does not support this feature.
Q: Is it possible to customize the right-click function on a wireless Mac mouse?
A: Yes, you can customize the right-click function on a wireless Mac mouse to suit your preferences. Follow these steps:
- Click on the Apple logo in the top-left corner of your screen.
- Select “System Preferences” from the drop-down menu.
- Choose “Mouse” or “Trackpad” from the System Preferences window.
- Click on the “Secondary Click” or “Right Click” option.
- Select your desired right-click function from the drop-down menu, such as “Click with two fingers” or “Click in bottom right corner.”
By customizing the right-click function, you can optimize your workflow and make the most out of your wireless Mac mouse.
Q: My wireless Mac mouse is not registering right-clicks. What should I do?
A: If your wireless Mac mouse is not registering right-clicks, you may try the following troubleshooting steps:
- Restart your Mac and try again.
- Ensure that you are pressing and holding the “Control” key on your keyboard while clicking the mouse button.
- Check the mouse settings in System Preferences to make sure the right-click function is properly enabled.
- Disconnect the mouse from your Mac and reconnect it to see if that resolves the issue.
- If none of these steps work, there may be an issue with the mouse itself. Try using a different mouse or contact the manufacturer for further assistance.
Q: Can I use a third-party mouse with my Mac to right-click?
A: Yes, you can use a third-party mouse with your Mac to right-click. Simply connect the mouse to your Mac using the appropriate method (such as USB or Bluetooth) and follow the same steps mentioned earlier to perform a right-click. Make sure to check the mouse settings in System Preferences to ensure proper functionality. Different mice may have slightly different ways to perform a right-click, so refer to the manufacturer’s instructions if needed.