
Connecting a joystick to an Arduino is a simple and effective way to add interactive and tactile inputs to your Arduino projects. Joysticks are commonly used in gaming consoles and remote-controlled devices, but they can also be integrated into Arduino-based projects to control motors, move robotic arms, or navigate menus on a display. In this article, we will walk you through the step-by-step process of connecting a joystick to an Arduino board, so you can start incorporating analog control into your projects. Whether you’re a beginner exploring the world of Arduino or an experienced maker looking to expand your project capabilities, this guide will provide you with the essential knowledge to connect a joystick to your Arduino and unleash its full potential.
Inside This Article
- Materials Needed
- Wiring the Joystick to Arduino
- Programming the Joystick with Arduino
- Testing the Joystick Connection
- Troubleshooting Tips
- Conclusion
- FAQs
Materials Needed
Before you begin connecting your joystick to Arduino, make sure you have the following materials:
- Arduino Board – You’ll need an Arduino board, like the Arduino Uno or Arduino Mega, to connect the joystick.
- Joystick Module – Get a joystick module that is compatible with Arduino. There are various models available, so choose one that suits your project requirements.
- Jumper Wires – You’ll need jumper wires to establish the electrical connections between the Arduino board and the joystick module. Make sure you have male-to-male jumper wires.
- Breadboard (optional) – Using a breadboard can help you create a neater and more organized circuit. It’s not mandatory, but it can make the wiring process easier.
Once you have gathered all these materials, you’re ready to move on to the next steps of connecting your joystick to Arduino.
Wiring the Joystick to Arduino
Connecting a joystick to an Arduino is a straightforward process that can bring your projects to life. The joystick serves as an input device that allows you to control the movement or direction of your project. Whether you are building a robotic arm, a remote-controlled car, or a gaming controller, wiring the joystick correctly is vital for proper functionality.
To wire the joystick to the Arduino, you will need a few essential materials. First and foremost, make sure you have an Arduino board. Any Arduino board will work for this project, such as the Arduino Uno or Arduino Nano.
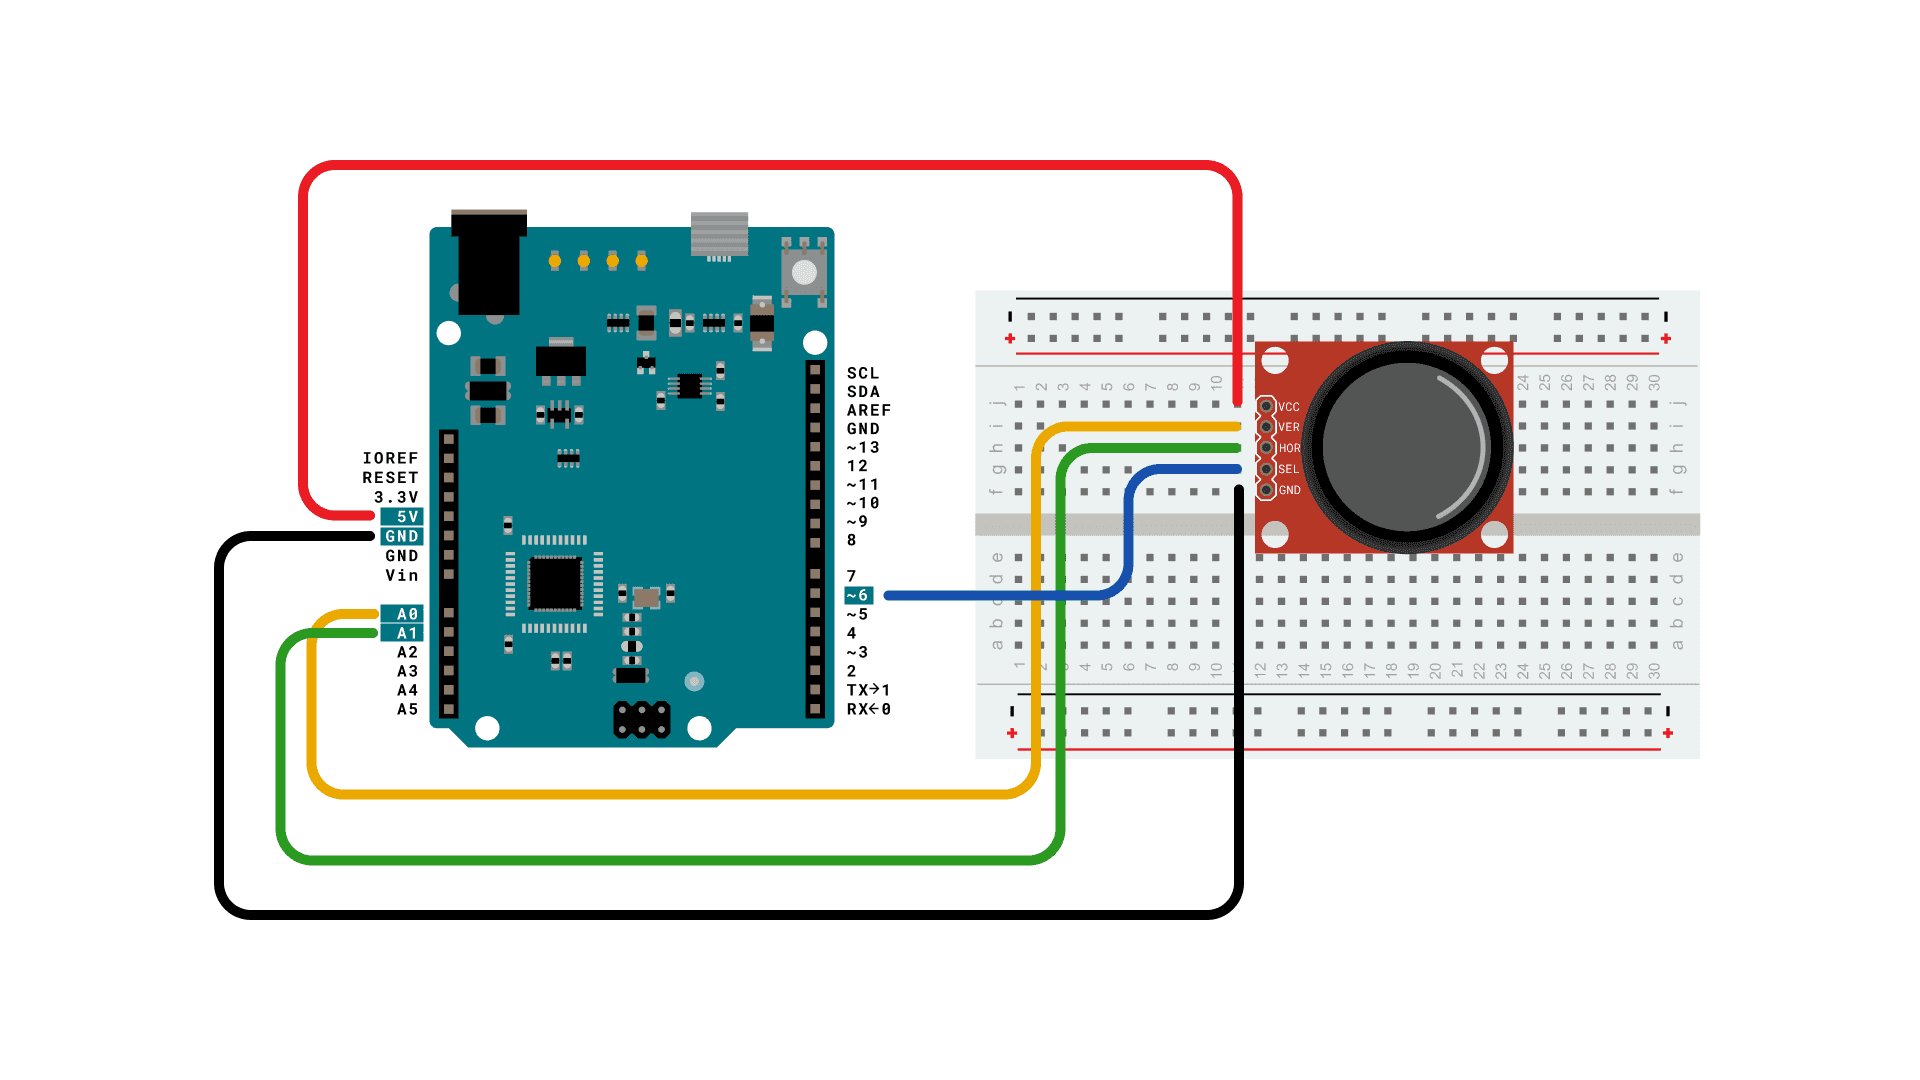
Next, you will need a joystick module. Joystick modules typically come in a small form factor, with two potentiometers that control the X and Y-axis movement. These modules usually have five pins: VCC, GND, VRx, VRy, and SW. VCC and GND should be connected to the 5V and GND pins on the Arduino, respectively.
The VRx and VRy pins on the joystick module correspond to the X and Y-axis outputs. You can connect these pins to any of the analog input pins on the Arduino, such as A0 and A1. Lastly, the SW pin, which stands for the switch, can be connected to any digital input pin on the Arduino, such as pin 2.
It is crucial to double-check the pinouts of your specific joystick module, as some modules may have different pin configurations. Always refer to the datasheet or manufacturer’s documentation for accurate pinout information.
Once you have gathered all the necessary materials and familiarized yourself with the pinout of your joystick module, it’s time to start wiring. Begin by connecting the VCC pin of the joystick module to the 5V pin on the Arduino. Next, connect the GND pin of the joystick module to the GND pin on the Arduino.
Now, take the VRx pin of the joystick module and connect it to any of the analog input pins on the Arduino, such as A0. Similarly, connect the VRy pin of the joystick module to another analog input pin on the Arduino, such as A1.
Finally, connect the SW pin of the joystick module to any digital input pin on the Arduino, such as pin 2. Once all the connections are made, double-check that the wiring is secure and free from any loose connections or short circuits.
With the joystick module successfully wired to the Arduino, you are one step closer to controlling your project with precision. The next step is to program the Arduino to read the input from the joystick module and respond accordingly. Stay tuned for the next section on programming the joystick with Arduino!
Programming the Joystick with Arduino
Now that you have successfully wired the joystick to your Arduino board, it’s time to program it to read and respond to the movement of the joystick. Programming the joystick with Arduino involves writing a code that will interpret the input from the joystick and execute the desired actions accordingly.
Here are the steps to program the joystick with Arduino:
- Open the Arduino IDE: First, make sure you have the Arduino IDE (Integrated Development Environment) installed on your computer. If not, you can download it from the official Arduino website and install it.
- Write the code: In the Arduino IDE, create a new sketch and start writing the code. Begin by including the necessary libraries for joystick input and output. You can find various joystick libraries available online, such as the “Joystick” library by Matthew Heironimus.
- Define the pin connections: Next, define the pin connections for the joystick. This involves specifying which pins on the Arduino board are connected to the X-axis and Y-axis of the joystick, as well as any additional buttons or switches.
- Initialize the joystick: Initialize the joystick by setting up the necessary parameters, such as the joystick sensitivity and any button debouncing requirements. This step ensures that the joystick is calibrated correctly and ready to be used.
- Read the joystick input: Use the appropriate function in the joystick library to read the input from the joystick. This will give you the position of the joystick along the X-axis and Y-axis, as well as the status of any buttons or switches.
- Perform actions based on the joystick input: Based on the readings from the joystick, you can now define the actions you want your Arduino board to perform. For example, you can make a servo motor move based on the movement of the joystick or control the speed of a motor based on the joystick position.
- Upload the code to the Arduino board: Once you have finished writing the code, verify it for any errors and then upload it to the Arduino board. Make sure the board is connected to your computer via USB.
- Test the joystick: Now that the code is uploaded, you can test the functionality of the joystick. Move the joystick in different directions and observe if the Arduino board responds accordingly.
- Iterate and refine: If you encounter any issues or want to add more functionalities, you can iterate on the code and make changes as needed. This step involves testing, debugging, and refining the code until you achieve the desired results.
Remember, programming the joystick with Arduino allows you to unleash the full potential of the joystick and control various aspects of your project. With a well-written code and careful testing, you can create interactive and dynamic projects that respond to the movement of the joystick.
Testing the Joystick Connection
Once you have wired and programmed your joystick with Arduino, it’s time to test the joystick connection. This is an essential step to ensure that everything is functioning correctly and that you can start using the joystick for your project.
Here is a step-by-step guide on how to test the joystick connection:
- First, make sure that your Arduino board is properly connected to your computer using a USB cable.
- Upload the joystick program to the Arduino board by clicking the “Upload” button in the Arduino IDE.
- Open the Serial Monitor in the Arduino IDE by clicking on the magnifying glass icon in the top-right corner or by going to “Tools” > “Serial Monitor”.
- Set the baud rate in the Serial Monitor to match the baud rate specified in your Arduino program. This is typically set to 9600 baud.
- Hold the joystick in your hand and move it in different directions. You should see the corresponding values being displayed in the Serial Monitor.
- Test each axis of the joystick by moving it up, down, left, and right. The values in the Serial Monitor should change accordingly.
- Press the buttons on the joystick and verify that the button press is registered and displayed in the Serial Monitor.
- If the values and button presses are not being displayed correctly, double-check your wiring and ensure that your Arduino code is correct.
- If everything is working as expected, congratulations! Your joystick is successfully connected to Arduino and ready to be used for your project.
It’s important to test the joystick connection to ensure that it is functioning properly before moving on to integrating it into your project. This will help you identify any potential issues early on and save you time troubleshooting later.
If you encounter any problems during the testing process, don’t worry. The next section will provide some troubleshooting tips to help you resolve common issues and get your joystick connection up and running smoothly.
Troubleshooting Tips
Connecting a joystick to Arduino may sometimes present challenges. If you encounter any issues, here are some troubleshooting tips to help you overcome them:
- Double-check the wiring: Ensure that all connections between the joystick and Arduino are secure. Check for loose or incorrectly placed wires, and verify that the pins are properly aligned.
- Verify the code: Review your Arduino code to ensure that it is correctly written. Double-check the pin assignments and any joystick-specific commands or functions you are using.
- Test individual components: Check the joystick and Arduino independently to identify any faulty components. You can test the joystick by connecting it to a different Arduino or use a different joystick with the same Arduino to pinpoint the issue.
- Ensure power supply: Make sure that both the joystick and Arduino are receiving enough power. Check the power source and ensure that it can adequately supply the required voltage and current for both devices.
- Consider noise interference: Joystick connections can be susceptible to noise interference. Keep the wiring away from sources of electrical noise, such as large motors, and use shielded cables if necessary.
- Verify the joystick’s compatibility: Confirm that the joystick you are using is compatible with Arduino. Some joysticks may require additional libraries or have specific pin configurations. Consult the joystick’s datasheet or product documentation for compatibility information.
- Update software and drivers: Ensure that you have the latest version of the Arduino IDE and any necessary drivers for your Arduino board. Outdated software or drivers can cause compatibility issues.
- Consult online forums and communities: If you are still facing difficulties, consider reaching out to the Arduino community. Online forums, discussion boards, and Arduino-related websites often have knowledgeable members who can provide troubleshooting advice or solutions.
- Keep experimenting: Troubleshooting is a part of the learning process. Don’t be discouraged if you encounter difficulties. Continue experimenting and exploring different solutions; you may discover a fix that works for your specific setup.
Remember, troubleshooting can be a trial-and-error process, and not all solutions may work for every situation. Be patient, be persistent, and keep exploring until you successfully connect your joystick to Arduino!
Conclusion
Connecting a joystick to an Arduino opens up a world of possibilities for creating interactive projects. Whether you are looking to build a gaming console, a remote control for a robot, or a custom input device for a computer, connecting a joystick to an Arduino is a straightforward process.
By following the steps outlined in this article, you can successfully wire a joystick to an Arduino and program it to send signals to your project. Remember to reference the datasheet for your specific joystick model to ensure you connect the pins correctly.
Once your joystick is connected, you can experiment with different projects and control systems, bringing your ideas to life. Whether you are a beginner or an experienced Arduino enthusiast, this guide provides the necessary knowledge to get started with joystick connectivity.
So, grab your Arduino, a joystick, and start exploring the endless possibilities of using a joystick with your Arduino projects!
FAQs
1. Can I connect a joystick to an Arduino?
Yes, you can connect a joystick to an Arduino board. The Arduino is a versatile microcontroller that can interface with various input devices, including joysticks. By using the appropriate libraries and following the necessary wiring connections, you can easily connect and communicate with a joystick using an Arduino.
2. What components do I need to connect a joystick to an Arduino?
To connect a joystick to an Arduino, you will need the following components:
– Arduino board (such as Arduino UNO or Arduino Nano)
– Joystick module (with X and Y axis analog outputs and button inputs)
– Jumper wires (male-to-male, male-to-female, or female-to-female) for connecting the Arduino and joystick module.
3. How do I wire a joystick to an Arduino?
Wiring a joystick to an Arduino involves connecting the X and Y axis outputs and button inputs of the joystick module to the appropriate pins on the Arduino board. Typically, the X and Y axis outputs are connected to analog input pins, while the button inputs are connected to digital input pins. You can refer to the datasheet or documentation of your specific joystick module for the pinout and the corresponding Arduino pins to make the connections.
4. Do I need any additional libraries for joystick communication with Arduino?
Yes, you will need to install the Arduino IDE and include the appropriate libraries to communicate with the joystick module. There are several joystick libraries available, such as the “Joystick” library or the “ArduinoJoystickLibrary”. These libraries provide functions and methods to read the joystick inputs and button states easily.
5. Can I use a joystick for controlling motors or servos with Arduino?
Certainly! The joystick’s analog outputs can be used to control motors or servos connected to the Arduino. By reading the analog values from the X and Y axis outputs, you can map them to the desired range and use them as input signals for controlling the speed and direction of motors or the position of servos. This enables you to create applications such as robotic arms or remote-controlled vehicles using a joystick and Arduino.