
In this digital age, personalization is the key to making your smartphone truly unique. Adding stickers to your Android device is an excellent way to express your individuality and add a touch of fun to your device. Whether you want to embellish your home screen, customize your favorite apps, or simply have some extra flair on your device, creating stickers on Android is easier than you might think. With a wide range of apps and tools available, you can unleash your creativity and design stickers that reflect your personality and style. In this article, we will guide you step by step on how to create stickers on Android, so you can bring your ideas to life and add a personal touch to your smartphone experience.
Inside This Article
- What are stickers?
- Android Apps for Creating Stickers
- Step-by-step guide to creating stickers on Android
- Choose a sticker creation app
- # 2. Select or create the sticker design
- # 3. Customize the size and shape of the sticker
- # 4. Add text or additional elements to the sticker
- # 5. Save and export the sticker for use
- Tips for creating high-quality stickers on Android
- Conclusion
- FAQs
What are stickers?
Stickers are visual elements that can be used to express emotions, add personality to conversations, or simply add a touch of fun to digital communication. In the context of mobile devices, stickers are often used in messaging apps and social media platforms to enhance conversations and make them more engaging. They can be static images or animated, and they cover a wide range of themes, from cute and playful to funny and sarcastic.
Stickers are essentially digital versions of traditional stickers that we used to put on physical objects like notebooks or laptops. The main difference is that digital stickers can be easily shared, customized, and used in various digital contexts.
Stickers offer a unique way to communicate and express ourselves, allowing us to convey emotions and thoughts visually instead of relying solely on text. They can add humor, emotion, and personalization to conversations, making them more dynamic and enjoyable.
Stickers have gained popularity over the years due to their versatility and the fact that they can be easily created and shared. Many messaging apps and social media platforms provide a built-in sticker store where users can browse and download various sticker packs created by designers and artists from around the world.
Additionally, users can create their own stickers, allowing for even more customization and personalization. This has led to a rise in popularity of sticker creation apps for Android, which provide users with easy-to-use tools for designing and sharing their own stickers.
Android Apps for Creating Stickers
If you’re a fan of personalizing messages with fun and expressive stickers, you’ll be glad to know that there are plenty of Android apps available for creating your own custom stickers. These apps provide a wide range of features and design tools, allowing you to unleash your creativity and design unique stickers to add some flair to your conversations. Whether you’re looking to create cute characters, funny memes, or stylish icons, these apps have got you covered.
Here are a few popular Android apps that are perfect for creating stickers:
- Sticker Maker – Sticker Maker is a versatile app that lets you turn any image or photo into a sticker. With its intuitive interface and powerful editing tools, you can easily crop, rotate, and adjust the colors of your images. The app also allows you to add text, emojis, and decorative elements to your stickers, giving you endless possibilities for customization.
- Personal Stickers for WhatsApp – As the name suggests, this app is specifically designed for creating stickers to use on WhatsApp. It offers a simple and user-friendly interface, making it easy to create and organize your sticker packs. You can import images from your gallery or use the app’s built-in editor to draw your own stickers. Once your sticker pack is ready, you can share it with your WhatsApp contacts.
- Sticker.ly – Sticker.ly is a popular app that allows you to create and share stickers on various messaging platforms, including WhatsApp, Telegram, and iMessage. The app provides a vast library of ready-made stickers, but you can also create your own custom stickers using your photos or hand-drawn designs. Sticker.ly also has a robust community of sticker creators, so you can discover and download stickers created by other users.
These are just a few examples of the many Android apps available for creating stickers. Just remember to explore the Play Store and read reviews to find the app that best suits your needs and preferences.
Step-by-step guide to creating stickers on Android
Creating stickers on Android is a fun and creative way to personalize your messaging experience. Whether you want to express your emotions, share a funny image, or promote a brand, stickers are an excellent option. Here is a step-by-step guide to help you create stickers on your Android device.
1. Choose a sticker creation app: Start by exploring the Google Play Store for sticker creation apps. Look for highly-rated apps with positive reviews and a wide range of features. Popular options include Sticker Maker, Sticker Studio, and StickIt! Make sure to read the app descriptions and check if they offer the creative tools and customization options you need.
2. Select or create the sticker design: Once you have your preferred app installed, you can choose to either select an existing image from your gallery or create a new design from scratch. If you have a pre-existing image or artwork you want to use, select it from your gallery. If not, unleash your creativity and design a sticker using the app’s drawing tools.
3. Customize the size and shape of the sticker: After selecting or creating the design, you can customize the size and shape of the sticker. Many sticker creation apps allow you to crop or resize the image to fit different messaging platforms. Experiment with different sizes to ensure your sticker looks visually appealing and stands out when used in conversations.
4. Add text or additional elements to the sticker: To add more personality and context to your sticker, consider adding text or additional elements. Sticker creation apps often provide built-in text tools that allow you to customize the font, size, and color of the text. You can also experiment with adding emojis, borders, or other decorative elements to enhance the sticker’s design.
5. Save and export the sticker for use: Once you are happy with your sticker design, save it within the sticker creation app. Some apps may save stickers directly to your device, while others may require you to export them to your gallery. Make sure to follow the app’s instructions for saving or exporting your stickers. After saving, you can access your stickers within the app or use them in supported messaging platforms like WhatsApp, Telegram, or Facebook Messenger.
Creating stickers on Android is an enjoyable process that allows you to unleash your creativity and personalize your messaging experience. Follow these step-by-step instructions, and in no time, you’ll have a collection of unique and customized stickers that you can use to express yourself in conversations with friends and family.
Choose a sticker creation app
When it comes to creating stickers on Android, the first step is to choose the right sticker creation app that suits your needs and preferences. With a wide range of options available on the Google Play Store, it can be challenging to find the perfect one. However, by considering a few key factors, you can make an informed decision to ensure a smooth and enjoyable sticker creation process.
One important factor to consider is the app’s user interface and ease of use. Look for apps that have a clean and intuitive interface, allowing you to navigate through the different features effortlessly. This will ensure that you can focus on creating stunning stickers without getting overwhelmed by complex settings or options.
Another important consideration is the range of editing tools and features offered by the app. Look for apps that provide a diverse range of options such as adding text, filters, effects, stickers, and more. This will allow you to unleash your creativity and create unique and personalized stickers that truly stand out.
It’s also essential to check the app’s compatibility with your Android device. Ensure that the app is compatible with your device’s operating system version to avoid any compatibility issues or performance glitches.
Lastly, take some time to read reviews and ratings of different apps to get an idea of their performance and user satisfaction. Look for apps that have positive reviews and high ratings, as these are indications of a reliable and well-designed app.
By considering these factors and researching different options, you can choose a sticker creation app that meets your requirements and allows you to create amazing stickers on your Android device.
# 2. Select or create the sticker design
Now that you have chosen a sticker creation app, it’s time to move on to the fun part: selecting or creating the design for your stickers. This step is where your creativity and personal touch come into play, as you have the freedom to make your stickers as unique as you want them to be.
Here are some options you can consider when selecting or creating the sticker design:
- Use pre-designed stickers: Many sticker creation apps offer a wide range of pre-designed stickers for you to choose from. These stickers can range from cute animals and emojis to stylish patterns and quotes. Simply browse through the available options and select the ones that best suit your taste and theme.
- Import images: If you have a specific image or artwork that you want to turn into a sticker, you can import it into the sticker creation app. This way, you can transform your favorite photos or illustrations into stickers that represent your personal style.
- Create your own artwork: For those who are artistically inclined, creating your own artwork for the stickers can be a rewarding experience. Whether it’s hand-drawn illustrations, digital designs, or mixed media creations, the possibilities are endless. Let your imagination run wild and let your artwork shine through your stickers.
Remember, your sticker design should align with the purpose and audience of the stickers. If you’re creating personal stickers for friends and family, you might want to incorporate inside jokes or personalized elements. On the other hand, if you’re designing stickers for a business or brand, ensure that the design reflects the brand identity and conveys the intended message.
Additionally, consider the size and shape of your stickers. Most sticker creation apps allow you to customize the dimensions, so you can create stickers that are suitable for various purposes, such as sticking them on notebooks, laptops, or even using them in digital messaging apps.
Once you have selected or created the sticker design, it’s time to move on to the next step: customizing the size and shape of the sticker. This step allows you to make your stickers stand out and fit your specific needs. Stay tuned!
# 3. Customize the size and shape of the sticker
After selecting or creating the base design of your sticker, the next step is to customize its size and shape. This allows you to make your sticker fit perfectly on your chosen surface or match your desired aesthetic. Here’s how you can easily customize the size and shape of your sticker on Android:
1. Adjust the dimensions: Most sticker creation apps provide options to resize your sticker. You can either specify the dimensions manually or use pre-defined sizes that are suitable for different purposes. Whether you want a small and cute sticker or a larger one that catches attention, you have the flexibility to adjust the dimensions as per your preference.
2. Crop or trim: In addition to resizing, some apps also allow you to crop or trim your sticker to remove any unwanted parts. This is particularly useful if you have a design element that extends beyond the borders or if you want to focus on a specific part of the image. Crop and trim tools make it easy to refine the shape of your sticker and create a more polished final product.
3. Shapes and borders: To further customize the shape of your sticker, some apps offer a variety of preset shapes such as circles, rectangles, squares, or even custom shapes like hearts or stars. These shapes can add a unique touch to your sticker and make it stand out. Additionally, you may have the option to add borders or frames to give your sticker a more defined look.
4. Transform and deform: For more advanced customization, certain apps provide options to transform and deform your sticker. You can manipulate the image by stretching, bending, twisting, or warping it, allowing for creative effects. This opens up a world of possibilities to give your sticker a truly unique and eye-catching appearance.
5. Preview and adjust: As you make changes to the size and shape of your sticker, it’s important to preview how it looks in real-time. This helps you fine-tune the adjustments and ensure that the sticker is aesthetically pleasing. Make sure to iterate and experiment until you achieve the desired result.
By customizing the size and shape of your sticker, you have full control over how it will appear. Whether you want a sleek and minimalistic design or a quirky and unconventional shape, Android apps provide you with the tools to bring your vision to life.
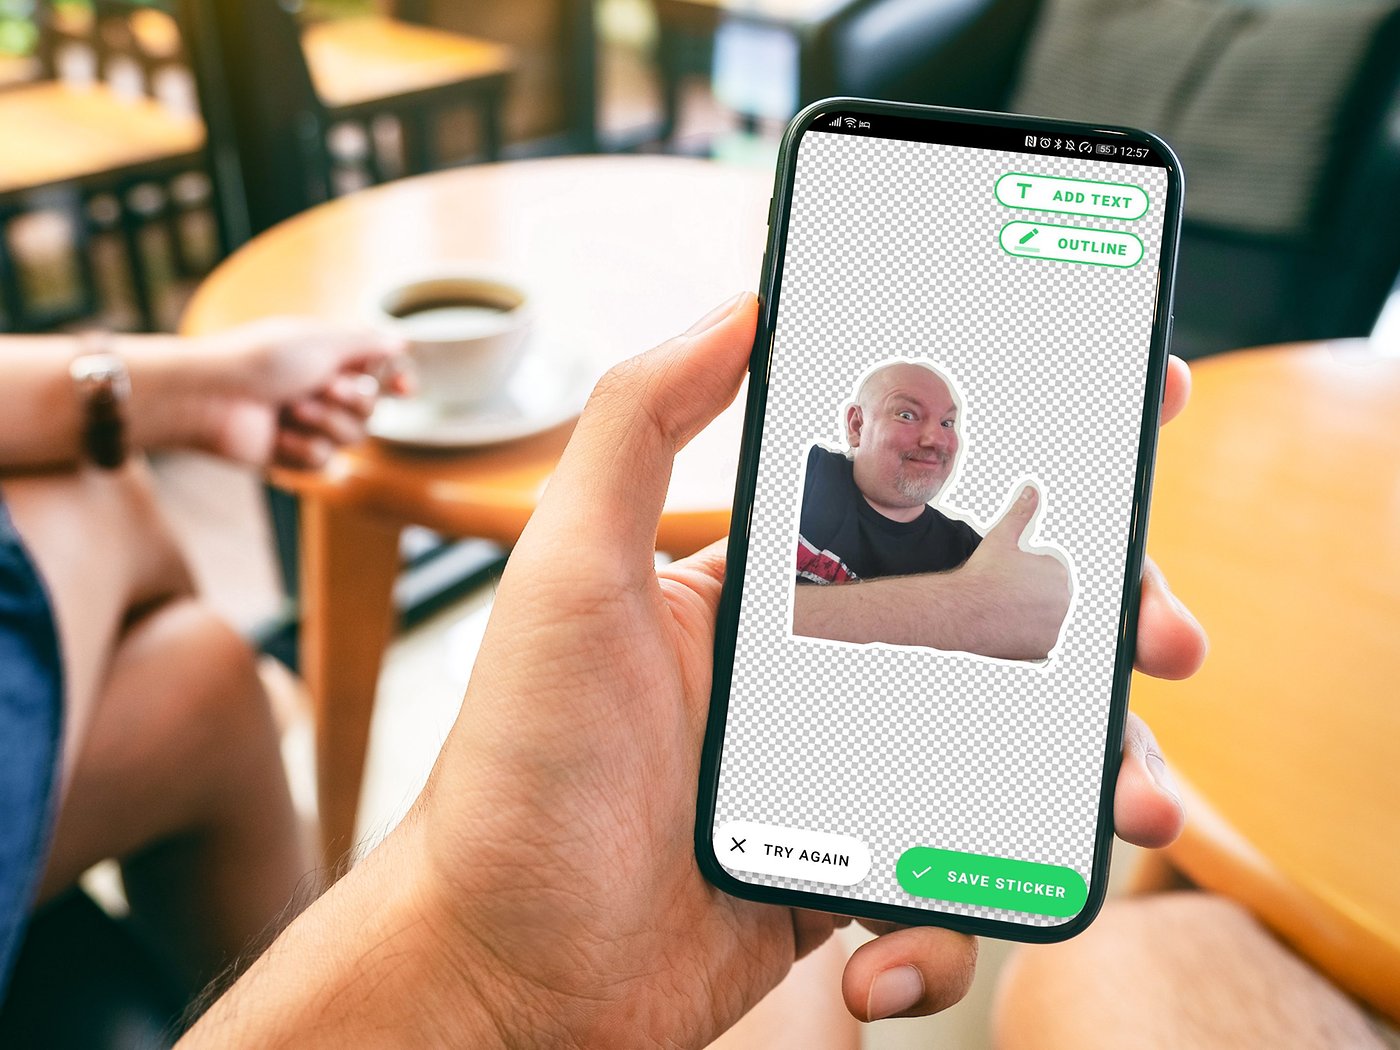
# 4. Add text or additional elements to the sticker
Once you have selected or created your sticker design and customized its size and shape, it’s time to add text or other elements to make your sticker truly unique and eye-catching. Adding text can help convey a message or add a personal touch to your stickers, while additional elements such as icons, shapes, or emojis can enhance the overall design. Here are some simple steps to follow:
1. Choose the right font and size: Select a font that matches the style and theme of your sticker. The font should be legible and easy to read, even in smaller sizes. Experiment with different font sizes to find the perfect balance between visibility and aesthetics.
2. Position the text: Decide where you want to place the text on your sticker. You can position it at the top, bottom, or center of the sticker, depending on your design and the message you want to convey. Consider the overall composition and make sure the text doesn’t overpower the other elements of the sticker.
3. Color and effects: Choose the color of the text that complements the sticker’s background and other design elements. Make sure the text stands out and is easily visible. You can also apply effects such as shadows or gradients to make the text more visually appealing and add depth to the overall sticker design.
4. Add additional elements: If you want to go beyond text, consider adding additional elements to your sticker. Icons, shapes, emojis, or even small illustrations can enhance the design and make your sticker more engaging. Make sure these elements are relevant to the message or theme of the sticker.
5. Experiment and iterate: Don’t be afraid to experiment and try different combinations of elements, fonts, sizes, and colors. Make adjustments as needed until you are satisfied with the overall look and feel of your sticker. Show your design to friends or colleagues for feedback and make necessary tweaks to improve its impact.
Remember, the goal is to create a sticker that is visually appealing, conveys the desired message, and grabs attention. Adding text and additional elements can help you achieve this and create stickers that stand out from the crowd.
# 5. Save and export the sticker for use
Once you have finished designing your sticker on your Android device, the final step is to save and export it for use. Here are a few options for saving and exporting your sticker:
1. Save to your device: Most sticker creation apps provide an option to save the sticker directly to your device’s storage. This allows you to access the sticker later and use it in any messaging or social media app.
2. Share directly: Some sticker creation apps have built-in sharing features that allow you to share your stickers directly with friends or to social media platforms. This can be a convenient way to showcase your creations and make them easily accessible to others.
3. Export as image: If the sticker creation app doesn’t have a specific save or share option, you can always export the sticker as an image. Simply tap on the export or save button and choose the image format (such as PNG or JPEG) to save it. You can then use the exported image like any other image file.
4. Import into messaging apps: Many messaging apps, such as WhatsApp or Telegram, allow you to import custom stickers. After saving or exporting your sticker, you can go to the sticker settings within the messaging app and import the sticker to use it in your conversations.
5. Use a sticker pack app: If you have multiple stickers, you can consider using a dedicated sticker pack app. These apps allow you to create collections of stickers that can be easily accessed and shared. Simply add your saved stickers to the sticker pack app, and then install the sticker pack on your device.
Remember to consider copyright and intellectual property rights when saving, sharing, or using stickers created by others. It’s always best to create your own stickers or use ones that are explicitly free for use.
With these options, you can now save and export your personalized stickers on your Android device. Whether you want to share them with friends or use them in your conversations, creating and using custom stickers adds a unique touch to your messaging experience.
Tips for creating high-quality stickers on Android
Creating high-quality stickers on Android is a fun and creative way to express yourself and personalize your messaging experience. Whether you’re designing stickers for personal use or planning to share them with friends and family, here are some tips to help you create stunning and eye-catching stickers:
1. Start with a clear concept: Before you begin designing your stickers, take some time to brainstorm and come up with a clear concept. Think about the emotions or messages you want your stickers to convey and develop a theme or style that aligns with your vision.
2. Keep it simple: While it’s tempting to add lots of details and elements to your stickers, remember that simplicity often works best. Clean lines and minimal designs can make your stickers stand out and be easily recognizable.
3. Use high-resolution images: To ensure that your stickers look sharp and professional, use high-resolution images. Images with a resolution of at least 300 DPI (dots per inch) are recommended to maintain clarity and prevent pixelation.
4. Pay attention to colors: Colors play a crucial role in the overall impact of your stickers. Choose a color palette that complements your design and evokes the desired emotions. Be mindful of color contrast to ensure that your stickers are visually appealing and easily distinguishable.
5. Experiment with different shapes and sizes: Don’t be afraid to think outside the box and try different sticker shapes and sizes. Round, square, or even custom shapes can add visual interest and make your stickers more unique and engaging.
6. Add a personal touch: Infusing your stickers with a personal touch can make them more special and meaningful. Consider incorporating hand-drawn elements or using your own photos to create personalized stickers that reflect your personality and style.
7. Test your stickers: Before finalizing your stickers, test them on different messaging platforms or devices to ensure they appear correctly and are easily usable. Pay attention to any resizing or formatting issues and make necessary adjustments.
8. Don’t be afraid to iterate: Designing stickers is an iterative process, so don’t be afraid to make changes and refine your designs. Seek feedback from others and be open to suggestions for improvement.
9. Keep the file sizes manageable: While high-resolution images are important, it’s also crucial to keep your sticker file sizes manageable. Large file sizes can lead to slow loading times or compatibility issues. Aim for a balance between quality and file size.
By following these tips, you’ll be well on your way to creating high-quality stickers that will enhance your messaging experience on Android. Let your creativity flow and have fun exploring different designs and ideas!
Conclusion
Creating stickers on Android is a fun and creative way to personalize your device and express yourself through custom designs. With the right tools and apps, you can easily bring your ideas to life and add a touch of uniqueness to your smartphone.
Whether you want to create stickers for messaging apps, social media, or simply to decorate your device, there are various options available. Apps like Sticker Maker and PicsArt provide a user-friendly interface and a wide range of features to help you design and customize your stickers effortlessly.
Remember, the key to creating captivating stickers is to tap into your creativity and let your imagination run wild. Experiment with different shapes, colors, and elements to make your stickers truly stand out.
So, grab your Android device and start creating your own stickers today. Let your personality shine through and share your unique designs with friends and family.
Show the world your creativity and enjoy the personalized touch that custom stickers bring to your device!
FAQs
1. Can I create stickers on Android?
Yes, you can create stickers on Android using various apps available on the Google Play Store. These apps provide a user-friendly interface and a wide range of tools and features to design and customize your own stickers.
2. What are some popular sticker maker apps for Android?
Some popular sticker maker apps for Android include “Sticker.ly,” “Stickify: Sticker Maker for WhatsApp,” “Bobble Indic Keyboard – Stickers, Fonts & Themes,” and “PicsArt Photo Editor: Pic, Video & Collage Maker.” These apps offer a plethora of templates, editing tools, and the ability to create personalized stickers from your own photos.
3. Do I need any artistic skills to create stickers on Android?
No, you don’t need any specific artistic skills to create stickers on Android. Sticker maker apps usually provide an intuitive interface with drag-and-drop functionality, making it easy to design stickers even for those without prior design experience. Additionally, these apps often come with pre-designed templates and stickers that you can use as a starting point.
4. Can I use my own images to create stickers on Android?
Yes, most sticker maker apps for Android allow you to use your own images to create stickers. You can simply import your preferred images from your device’s gallery or take a new photo using the app’s camera feature. This gives you the freedom to personalize your stickers with pictures of friends, family, or any subject you like.
5. How can I use the stickers I create on Android?
Once you have created your stickers using a sticker maker app on Android, you can easily use them in various messaging apps and social media platforms. Some sticker maker apps even offer integration with popular platforms like WhatsApp or Telegram, allowing you to directly import and use your custom stickers in those apps. You can also save the stickers to your device’s gallery and share them manually in other apps or with friends.
Remember to wrap the above FAQs content in a
tag to ensure proper formatting.