
Are you looking to remove a coaxial cable connector but unsure how to go about it? Whether you’re trying to replace a faulty connector, upgrade to a higher-quality one, or simply reconfigure your cable setup, removing a coaxial cable connector can seem like a daunting task. But fear not! In this article, we will guide you through the process step by step, ensuring that you can accomplish this task with ease and confidence. With a few simple tools and a little know-how, you’ll be able to remove the coaxial cable connector efficiently and safely in no time. So, let’s dive in and learn how to remove a coaxial cable connector like a pro!
Inside This Article
- Tools Required
- Step 1: Remove Outer Jacket
- Step 2: Expose the Inner Conductor
- Step 3: Remove the Coaxial Cable Connector
- Step 4: Trim the Inner Conductor
- Step 5: Attach a New Connector (Optional)
- Conclusion
- FAQs
Tools Required
Before you begin the process of removing a coaxial cable connector, make sure you have the following tools handy:
- Coaxial Cable Cutter: A coaxial cable cutter is a specialized tool designed to accurately cut through the thick outer jacket of the cable without damaging the inner conductor. These cutters provide clean and precise cuts, ensuring a proper removal of the connector.
- Coaxial Cable Stripper: A coaxial cable stripper is essential for removing the outer jacket of the cable. This tool assists in making a clean and precise cut, exposing the inner conductor without damaging it.
- Coaxial Cable Connector Removal Tool: Sometimes, coaxial cable connectors can be difficult to remove, especially if they are tightly secured. A coaxial cable connector removal tool can provide the necessary grip and leverage to loosen and remove the connector with ease.
- Needle-nose Pliers: Needle-nose pliers are versatile tools that can come in handy during the process of removing a coaxial cable connector. These pliers can be used to grip and manipulate small components, such as connector pins or wires, making it easier to remove and replace the connector.
- Electrical Tape: Electrical tape is useful for temporarily securing the exposed inner conductor before attaching a new connector. It provides insulation and protection against interference, ensuring the signal quality remains high.
Having these tools readily available will greatly assist you in removing a coaxial cable connector efficiently and effectively. Make sure to use them with care and follow the step-by-step instructions for a successful removal process.
Step 1: Remove Outer Jacket
Removing the outer jacket of a coaxial cable is the first step towards removing the cable connector. The outer jacket is the protective layer that covers the cable and provides insulation. To remove the outer jacket, you will need a few tools and follow a specific procedure. Here’s how you can do it:
1. Gather the necessary tools: To remove the outer jacket, you will need a cable stripper or a utility knife. These tools will allow you to make precise cuts without damaging the inner conductor.
2. Locate the end of the coaxial cable: Identify the end of the cable where the connector is attached. This is the portion you need to focus on to remove the outer jacket.
3. Measure and mark the length: Measure the length of the outer jacket that needs to be removed. Typically, this is about 1-2 inches from the end of the cable. Use a marker to make a clear mark on the cable at this point.
4. Cut the outer jacket: If you are using a cable stripper, adjust it to the appropriate setting for the diameter of your coaxial cable. Place the tool around the cable, aligning the marked point with the stripping blades. Close the tool and rotate it in a circular motion around the cable, applying gentle pressure. The blades will cut through the outer jacket, allowing you to remove it easily.
5. Strip away the excess jacket: Once you have made the circular cut, carefully pull away the excess outer jacket, exposing the underlying layers of the cable.
6. Inspect the cables: After removing the outer jacket, visually inspect the exposed layers of the cable. Ensure that the inner dielectric layer and the metallic foil shield are intact. If there are any damages or irregularities, consider replacing the cable or seeking professional assistance.
By following these steps, you can successfully remove the outer jacket of a coaxial cable. This is an important process when you need to replace or repair a cable connector.
Step 2: Expose the Inner Conductor
Once you have successfully removed the outer jacket of the coaxial cable, the next step is to expose the inner conductor. The inner conductor is the core wire that carries the electrical signals through the cable.
To expose the inner conductor, you will need to carefully strip away the insulation layer that surrounds it. This can be done using a wire stripper, which is a tool specifically designed for this purpose. Make sure to select the appropriate gauge setting on the wire stripper to match the size of the inner conductor.
Start by making a small incision in the insulation layer, about an inch away from the end of the cable. Gently insert the cable into the wire stripper, aligning the incision with the cutting blade of the tool. Apply slight pressure and rotate the stripper around the cable to remove the insulation.
Be cautious not to apply too much pressure or rotate the wire stripper too forcefully, as this may damage the inner conductor. Take your time and work carefully to ensure a clean and precise cut.
After removing the insulation layer, you should be left with the exposed inner conductor. Take a closer look to ensure that the inner conductor is intact and undamaged. Any nicks or cuts in the conductor may affect the performance of the cable.
It is important to note that the exposed inner conductor should not come into contact with any other metal surfaces or objects, as this can cause signal interference. Keep the conductor isolated and free from any potential obstructions.
With the inner conductor exposed, you are now ready to move on to the next step in removing the coaxial cable connector. Proceed to Step 3 to learn how to detach the connector from the inner conductor.
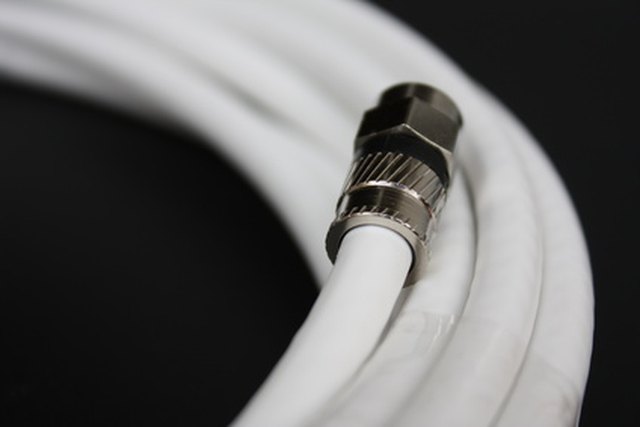
Step 3: Remove the Coaxial Cable Connector
Once you have exposed the inner conductor of the coaxial cable, the next step is to remove the coaxial cable connector. This connector is typically attached to the end of the cable and is responsible for securely connecting the cable to a device, such as a television or modem.
To remove the coaxial cable connector, you will need to locate the small metal collar or nut that surrounds the base of the connector. This collar is often referred to as the “ferrule”. It is important to note that different connectors may have varying designs, so the removal process may vary slightly depending on the type of connector you are working with.
If the coaxial cable connector has a threaded design, you will need to twist the collar counterclockwise to loosen and remove it. Use your fingers or a pair of adjustable pliers to grip the collar firmly. Slowly rotate it in a counterclockwise direction until it becomes loose enough to slide off the cable.
For connectors that do not have a threaded design, you may need to use a small flathead screwdriver or a coaxial cable connector removal tool. Insert the screwdriver or tool into the small slot or notch on the connector and gently pry it open. Be careful not to apply too much force, as this can damage the connector or the cable.
Once you have successfully removed the collar or opened the connector, you should be able to slide it off the end of the coaxial cable. Take care to support the cable with one hand while removing the connector with the other to prevent any stress or strain on the cable itself.
After the coaxial cable connector has been removed, inspect the end of the cable for any damage or frayed wires. Trim any excess or damaged parts of the inner conductor using wire cutters or a sharp knife. Make sure to leave a clean and smooth edge for proper reconnection or attachment of a new connector.
Removing a coaxial cable connector may seem like a daunting task, but with the right tools and careful attention, it can be done successfully. Take your time and follow the steps outlined in this guide to safely remove the connector from your coaxial cable.
Step 4: Trim the Inner Conductor
Now that you have successfully removed the coaxial cable connector, it’s time to trim the inner conductor. This step is crucial to ensure proper connectivity and signal transmission. Trimming the inner conductor helps eliminate any frayed or damaged parts, ensuring a clean and secure connection. Here’s how you can do it:
1. Locate the exposed inner conductor of the coaxial cable. This is the central wire that carries the signal.
2. Carefully examine the inner conductor for any signs of damage, such as frayed wires or uneven cuts. If you notice any damage, it’s essential to trim it off to maintain signal integrity.
3. Take a pair of sharp wire cutters or a coaxial cable stripping tool. Begin by placing the cable into the stripping tool, ensuring the set gauge matches the cable’s diameter. If you’re using wire cutters, make sure they are sharp and suitable for cutting through the cable.
4. Gently rotate the stripping tool or wire cutters around the exposed inner conductor. Apply slight pressure to ensure a clean cut.
5. Once you’ve made a full rotation, the excess inner conductor should be severed. Carefully remove the trimmed piece, ensuring no stray strands remain.
6. Inspect the trimmed end of the inner conductor to ensure it is clean and smooth. This will facilitate a better connection when reattaching the coaxial cable connector.
Remember, precision and attention to detail are essential during this step. Take your time to ensure a clean and accurate trim without damaging the inner conductor.
Trimming the inner conductor sets the stage for a successful reconnection of the coaxial cable. With a well-trimmed inner conductor, you can now proceed to the next step of attaching a new coaxial cable connector, if needed.
Step 5: Attach a New Connector (Optional)
If you have removed the coaxial cable connector and need to replace it with a new one, here’s how you can do it:
1. Choose the right type of connector: There are various types of coaxial cable connectors available in the market, such as F-type, BNC, RCA, and SMA connectors. Make sure to select the connector that matches the requirements of your cable and the device you are connecting it to.
2. Prepare the cable: Strip the outer jacket of the coaxial cable and expose the inner conductor, following the steps mentioned earlier. Ensure that you have enough length of exposed conductor to attach the new connector.
3. Insert the cable into the connector: Take the new coaxial cable connector and carefully insert the exposed end of the cable into it. Make sure that the inner conductor goes into the center pin of the connector, while the outer shield is properly aligned with the connector’s body.
4. Secure the connector: Once the cable is properly inserted into the connector, tighten any screws or nuts to secure it in place. Be cautious not to over-tighten, as it may damage the connector or the cable.
5. Test the connection: After attaching the new connector, it’s essential to test the connection to ensure it is functioning properly. Connect the cable to the appropriate device or equipment and check for a strong and stable signal.
6. Use appropriate tools: Depending on the type of connector you are working with, you may require specific tools like a coaxial cable crimping tool or a compression tool. Ensure that you have the necessary tools handy to properly secure the new connector.
Remember, attaching a new connector is an optional step and is only necessary if you need to replace a damaged or faulty connector. If you are not comfortable or confident in doing it yourself, it’s advisable to seek assistance from a professional.
That’s it! By following these steps, you can successfully attach a new coaxial cable connector to your cable.
Conclusion
Removing a coaxial cable connector may seem like a daunting task at first, but with the right tools and techniques, it can be easily accomplished. Whether you need to replace a faulty connector or simply want to reconfigure your setup, following the steps outlined in this article will ensure a smooth and successful removal process. Remember to gather the necessary tools, disconnect the cable properly, and use the appropriate technique to remove the connector. With a little patience and practice, you’ll be able to remove coaxial cable connectors with confidence and ease.
FAQs
1. What is a coaxial cable connector? – A coaxial cable connector is a device used to connect a coaxial cable to an electronic device, such as a television, modem, or antenna. It ensures a secure and reliable connection between the cable and the device, allowing for the transmission of audio or video signals.
2. Why would I need to remove a coaxial cable connector? – There can be various reasons why you would need to remove a coaxial cable connector. It could be that you need to replace a damaged connector, reposition the cable, or disconnect the cable from a device temporarily.
3. What tools do I need to remove a coaxial cable connector? – The tools required to remove a coaxial cable connector are relatively simple. You will need a coaxial cable stripping tool, which helps to remove the outer insulation and expose the inner conductors. Additionally, a small pair of pliers or a wrench may be helpful to unscrew the connector from the device.
4. How do I remove a coaxial cable connector? – To remove a coaxial cable connector, follow these steps:
a. Begin by turning off or unplugging the device to which the cable is connected.
b. Use the coaxial cable stripping tool to remove about 1 to 2 inches of the outer insulation, exposing the inner conductors.
c. Next, locate the connector where it is attached to the device and use the pliers or wrench to unscrew it in a counterclockwise direction.
d. Once the connector is unscrewed, gently pull it away from the device until it is completely disconnected.
5. Are there different types of coaxial cable connectors? – Yes, there are different types of coaxial cable connectors available, such as F-Type connectors, BNC connectors, and RCA connectors. Each type of connector is designed for specific applications, so it is important to ensure that you choose the right connector for your needs.