
Are you struggling to remove the band from your Fitbit Versa? Fret not, as we have got you covered! The Fitbit Versa is a popular and stylish smartwatch, but changing the band can sometimes be a bit tricky. Whether you want to swap out the original band for a new one or simply want to clean it, removing the Fitbit Versa band requires a certain technique to ensure you don’t damage your device. In this article, we will guide you step-by-step on how to successfully remove the band from your Fitbit Versa, making the process quick and easy. So, grab your Fitbit Versa, follow our instructions, and get ready to switch up your style!
Inside This Article
- Gather the necessary tools
- Unbuckle the clasp or release the pins
- Remove the old band
- Attach the new band
- Conclusion
- FAQs
Gather the necessary tools
Before you dive into removing the band from your Fitbit Versa, it’s important to gather all the necessary tools. Having the right tools on hand will make the process much easier and more efficient.
Here are the essential tools you’ll need:
- A small flathead screwdriver or a pin removal tool:
- A clean cloth or tissue:
- A replacement band:
These tools will help you unbuckle the clasp or remove the pins holding the band in place.
You’ll want to have a cloth or tissue nearby to wipe away any sweat, dirt, or debris that may have accumulated on your Fitbit Versa.
If you’re removing the old band because you want to replace it with a new one, make sure you have the replacement band ready and available.
Once you have these tools at your disposal, you’ll be well-prepared to embark on the journey of removing your Fitbit Versa band.
Unbuckle the clasp or release the pins
Once you have gathered the necessary tools to remove the Fitbit Versa band, it’s time to proceed to the next step: unbuckling the clasp or releasing the pins. The method you need to follow will depend on the type of band your Fitbit Versa comes with.
If your Fitbit Versa has a band with a clasp, follow these steps:
- Identify the clasp on your Fitbit Versa band. It is usually located on the underside of the band, where it attaches to the watch body.
- Hold the band firmly with one hand to stabilize it.
- With your other hand, use your fingers or a small tool to press on the release button or lever on the clasp.
- While keeping the release button or lever pressed, gently pull one end of the band away from the clasp. The clasp should easily open, allowing you to detach the band from the watch body.
If your Fitbit Versa has a band with pins, follow these steps:
- Look for small holes or grooves on the sides of the band where it attaches to the watch body. These are the pin release points.
- Locate the small metal pin on each side of the band.
- Using a pin removal tool or a small, pointed object like a paperclip, insert it into one of the pin release points.
- Apply gentle pressure to push the pin inward. You may need to wiggle the tool or object slightly to disengage the pin.
- Repeat the process for the pin on the other side of the band.
- Once both pins are released, you can easily slide the band out of the watch body.
Remember to handle the pins with care to avoid damaging them or the band. If you’re having trouble releasing the pins, you can also consult the user manual or check for video tutorials that provide visual guidance.
With the clasp unbuckled or the pins released, you have successfully completed the second step of removing the Fitbit Versa band. Now, let’s move on to the next step: removing the old band.
Remove the old band
Now that you have successfully unbuckled the clasp or released the pins, it’s time to remove the old band from your Fitbit Versa. Here are the steps to follow:
1. Hold the Fitbit Versa firmly in one hand to prevent it from slipping. You want to maintain a secure grip to ensure a smooth removal process.
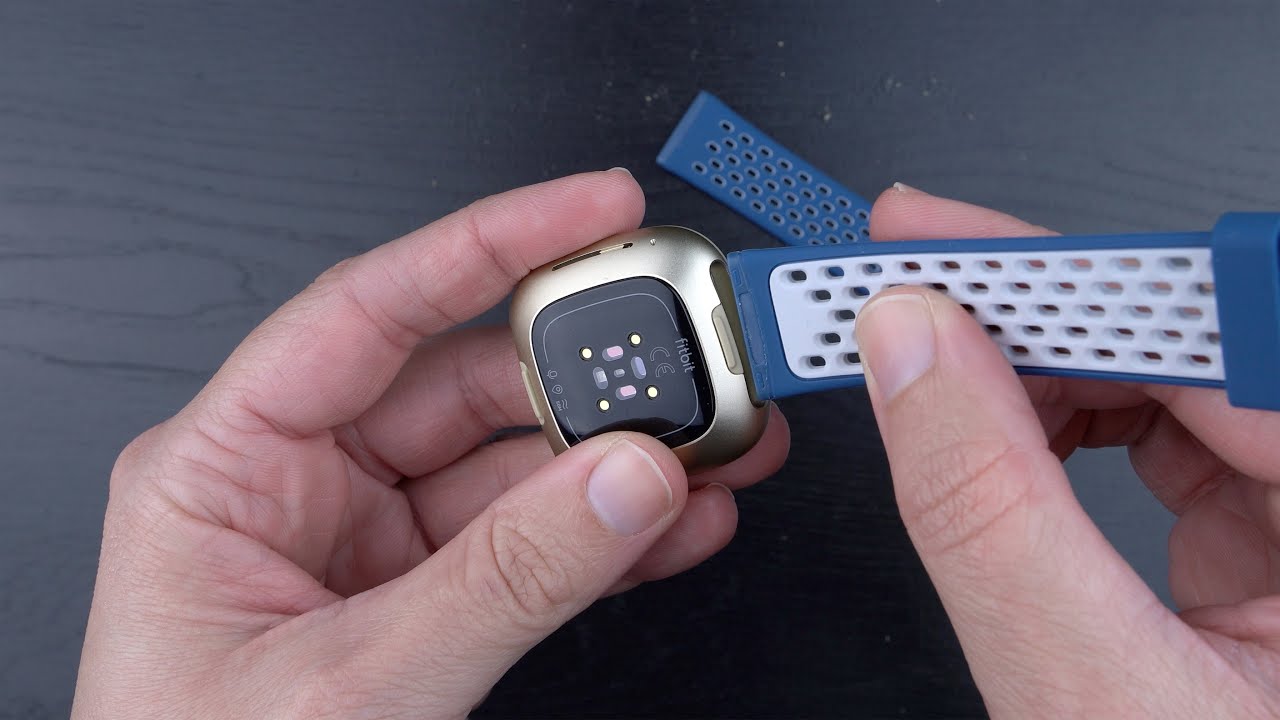
2. Locate the release buttons on the back of the Versa. These buttons are typically positioned near the connection points of the band and the tracker. Press the release buttons simultaneously with your fingers to release the band.
3. Gently pull the band away from the tracker. Take care not to pull too forcefully as this can damage the tracker or the band. Gradually and steadily remove the band from the Fitbit Versa.
4. If your Versa has pins securing the band, use a small tool, like a flathead screwdriver or a sim card ejector tool, to push the pins out from the side. Apply gentle pressure to release the pins and remove the band.
5. Once the band is detached, set it aside for cleaning or storage. You can now proceed with attaching the new band to your Fitbit Versa.
Remember, always handle your Fitbit Versa with care when removing or attaching bands to ensure that no damage occurs. With these steps, you’ll be able to remove the old band from your Fitbit Versa effortlessly.
Attach the new band
Once you have successfully removed the old band from your Fitbit Versa, it’s time to attach the new band. This process may vary slightly depending on the type of band you have, but the general steps remain the same. Here’s what you need to do:
1. Orient the new band: Take your new Fitbit Versa band and ensure that it is facing the correct way. Look for any labels or indicators to ensure you have the right orientation.
2. Align the pins: Look for the pin connectors on the inside of the band. Align these pins with the corresponding holes in the watch case. It’s important to make sure they line up properly for a secure connection.
3. Slide the band into place: Gently slide the new band into the slot on the watch case. Apply slight pressure as needed to ensure the pins slide into the holes fully. You may hear a satisfying click or feel a slight resistance when the band is properly attached.
4. Test the fit: Once the band is attached, check to make sure it is secure and properly aligned. Give the band a little tug to ensure it doesn’t come loose. Adjust the fit as needed by sliding the band slightly forward or backward on the watch case.
5. Fasten the clasp: If your new band has a clasp, buckle it securely to ensure a snug fit. Make sure the clasp aligns with the designated holes on the band for a comfortable fit on your wrist.
6. Check for comfort and functionality: Put the Fitbit Versa on your wrist and ensure that the new band feels comfortable. Move your wrist around to make sure the band doesn’t pinch or dig into your skin. Test the functionality of the device by navigating through the watch’s features.
Congratulations! You have successfully attached the new band to your Fitbit Versa. Enjoy your refreshed and personalized look as you continue to track your fitness and daily activities.
Conclusion
In conclusion, removing the Fitbit Versa band is a simple and straightforward process that allows you to customize your device and keep it comfortable on your wrist. Whether you want to change the band for style purposes or replace a damaged one, you can now confidently remove the band using the steps mentioned above.
Remember to handle the band and the device with care to avoid any potential damage. By following these steps and taking proper precautions, you can easily remove your Fitbit Versa band and enjoy the versatility and convenience of switching it out as needed.
So go ahead, upgrade your Fitbit Versa band and make a statement, or simply change it up to suit your mood. The process is quick, easy, and hassle-free, giving you the freedom to personalize your Fitbit Versa and make it truly your own.
FAQs
**Q: Can I remove the band on my Fitbit Versa?**
Yes, you can remove the band on your Fitbit Versa. The Fitbit Versa bands are interchangeable, allowing you to switch them out for different styles or colors to suit your preference.
**Q: How do I remove the band from my Fitbit Versa?**
To remove the band from your Fitbit Versa, follow these steps:
1. Flip your Fitbit Versa over and locate the quick-release pins on both sides of the device.
2. Using your finger or a tool, push down on the pins while simultaneously sliding the band away from the device.
3. Repeat the same steps for the other side of the device.
**Q: Do I need any special tools to remove the Fitbit Versa band?**
No, you do not need any special tools to remove the Fitbit Versa band. The quick-release pins can be easily pushed down with your finger, although using a small tool like a paperclip can provide extra leverage.
**Q: Are there any tips for removing the Fitbit Versa band without damaging it?**
To safely remove the Fitbit Versa band without causing damage, try the following tips:
– Use gentle pressure when pushing down on the quick-release pins to avoid bending or breaking them.
– Hold the device securely while removing the band to prevent it from accidentally falling and potentially getting damaged.
– If you encounter any resistance while sliding the band, check for any dirt or debris that may be obstructing the process and clean it before trying again.
**Q: Can I reuse the same band after removing it from my Fitbit Versa?**
Yes, you can reuse the same band after removing it from your Fitbit Versa, as long as it is still in good condition. Fitbit Versa bands are designed to be durable and withstand multiple band changes. Simply follow the reverse steps of the removal process to reattach the band.