
Are you tired of dealing with the hassle of removing a stubborn molex connector? Look no further! In this article, we will guide you through the step-by-step process of removing a molex connector effectively and safely. Whether you’re a tech enthusiast or a DIYer, a basic knowledge of removing molex connectors is essential. Molex connectors are widely used in electronics, such as computers, gaming consoles, and power supplies, to provide a secure and reliable connection. However, they can be notoriously difficult to remove without the proper technique. With our expert tips and tricks, you’ll be able to confidently remove molex connectors without damaging your devices. So, let’s dive in and learn how to conquer this common frustration!
Inside This Article
- Overview of Molex Connectors
- Tools and Materials Needed for Removal
- Step-by-Step Guide for Removing Molex Connector
- Safety Precautions to Consider
- Conclusion
- FAQs
Overview of Molex Connectors
Molex connectors are widely used in various electronic devices and applications. They are a type of electrical connector known for their reliability, versatility, and ease of use. These connectors consist of a male and female component that securely join together, providing a secure connection for power and signal transmission.
Molex connectors are typically found in computer systems, mobile devices, automotive applications, and industrial machinery. They are known for their compact size, which allows for space-saving designs in electronic devices. The connectors are designed to handle a wide range of voltages and currents, making them suitable for various electrical applications.
One of the key features of Molex connectors is their modular design. This means that you can easily connect and disconnect multiple connectors without the need for soldering or specialized tools. The connectors can be easily plugged and unplugged, making them convenient for both manufacturing and maintenance purposes.
Molex connectors also have a variety of contact configurations, including pins, sockets, and blends of both. This allows for different types of connection configurations, such as male-to-female, male-to-male, and female-to-female. The connectors also have a locking mechanism to ensure a secure and reliable connection, preventing accidental disconnection.
Furthermore, Molex connectors are known for their durability and resistance to various environmental factors. They are designed to withstand high temperatures, vibrations, and moisture, ensuring reliable performance in challenging conditions.
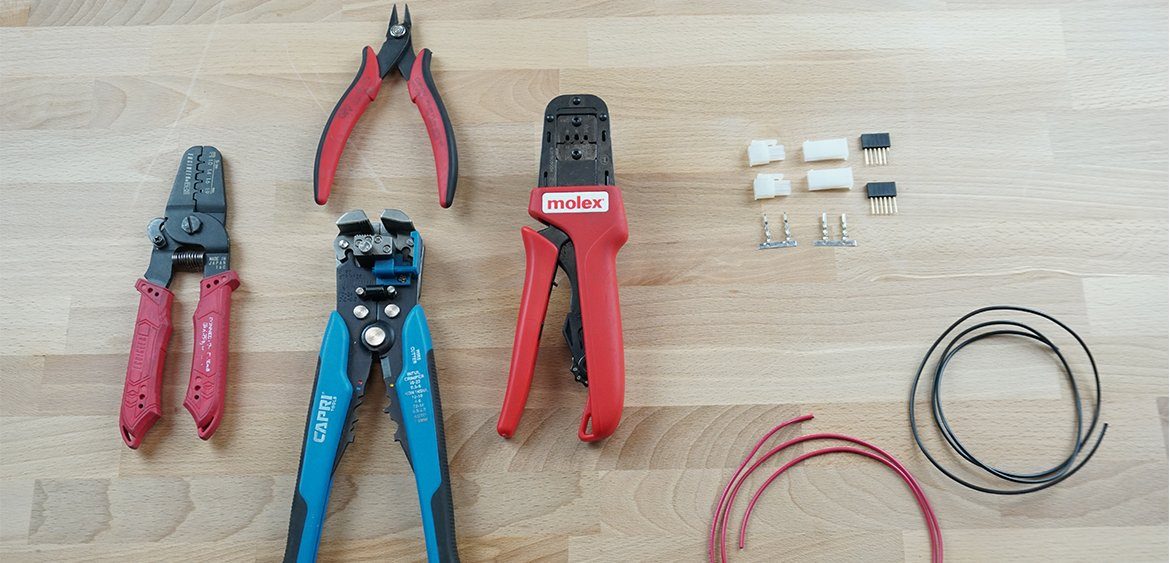
Tools and Materials Needed for Removal
When it comes to removing a Molex connector, having the right tools and materials on hand is crucial. Here’s a list of what you’ll need:
- Needle-nose pliers: These pliers have slender, tapered jaws that allow you to grip and manipulate small components with precision. They are essential for safely removing Molex connectors.
- Flat head screwdriver: A flat head screwdriver will come in handy for gently prying apart the Molex connector and its housing.
- Electrical tape: Electrical tape is useful for insulating and protecting exposed wires during the removal process. It helps prevent accidental short circuits or damage.
- Anti-static wrist strap: While not specifically required for removing Molex connectors, an anti-static wrist strap can provide an added layer of protection against static electricity, which can potentially damage sensitive electronic components.
Make sure to have these tools and materials ready before you proceed with removing the Molex connector. They will help you ensure a safe and smooth removal process, minimizing the risk of damage to your mobile accessory or other electronic devices.
Step-by-Step Guide for Removing Molex Connector
Removing a Molex connector may seem daunting at first, but with the right tools and a step-by-step approach, it can be a straightforward process. Follow the guide below to safely and effectively remove a Molex connector.
Step 1: Assess the Molex connector
Before starting the removal process, take a moment to examine the Molex connector and identify any locking mechanisms or clips. This will help you understand how it is attached and what actions are needed to safely detach it.
Step 2: Gather the necessary tools
To remove a Molex connector, you will need a few tools. Make sure you have a pair of needle-nose pliers or a Molex removal tool, which can be purchased from electronics stores. These tools are specifically designed to safely disconnect Molex connectors.
Step 3: Prepare the workspace
Ensure the area is well-lit and clean to avoid any accidents or damage to the connector or other components. Arrange the necessary tools within reach for easy access during the removal process.
Step 4: Disconnect the power source
Before removing a Molex connector, it is essential to disconnect the power source. This will prevent any electrical shock or damage to the connected device. If the Molex connector is connected to a computer or other electronic device, power it down and unplug it from the wall socket.
Step 5: Release any locking mechanisms
If the Molex connector has a locking mechanism, release it by gently pushing or sliding the locking tab in the indicated direction. Be careful not to use excessive force, as this may damage the connector or the device it is connected to.
Step 6: Grasp the connector firmly
With the locking mechanism released, use a pair of needle-nose pliers or the Molex removal tool to grip the connector firmly. Make sure you have a good grip on the connector to avoid any accidental slippage or damage.
Step 7: Wiggle and pull
Gently wiggle the connector from side to side while simultaneously pulling it straight out. This motion helps loosen the connector’s grip and allows for easier removal.
Step 8: Repeat if necessary
If the connector does not come out easily, repeat the wiggling and pulling motion. Be patient and avoid using excessive force, as this may cause damage to the connector or the device.
Step 9: Inspect for any damage
Once the Molex connector is removed, carefully inspect it for any signs of damage or wear. Check for bent pins, loose connections, or discoloration, and address any issues before reconnecting the connector.
Step 10: Store the removed connector safely
If you plan on reusing the Molex connector, make sure to store it in a safe and organized manner. Consider using an antistatic bag or a small container specifically designed for electronic components.
By following these step-by-step instructions, you can safely remove a Molex connector without causing any damage to the connector or the connected device. Remember to exercise caution and take your time to ensure a successful removal process.
Safety Precautions to Consider
When working with any type of electrical connector, including Molex connectors, it is important to prioritize safety. Taking the appropriate precautions not only ensures your well-being but also helps prevent any damage to the connectors or other components. Here are four safety precautions to consider:
1. Power Off: Before attempting to remove a Molex connector, always make sure to turn off the power to the device or system it is connected to. This will eliminate the risk of electric shock or damage to sensitive electronic components.
2. Ground Yourself: Static electricity can cause damage to electronic components, so it is important to ground yourself before working with Molex connectors. This can be done by using an anti-static wrist strap or by touching a grounded metal object before handling the connectors.
3. Use Proper Tools: It is essential to use the right tools when removing Molex connectors. Avoid using excessive force or sharp objects that could damage the connectors or surrounding components. Instead, use specialized tools such as a Molex connector removal tool or a small flathead screwdriver.
4. Take Your Time: Rushing through the process of removing a Molex connector can lead to mistakes and accidents. Take your time and carefully follow the step-by-step guide to ensure that you remove the connector without causing any damage. Patience and attention to detail are key.
By following these safety precautions, you can minimize the risk of injury and prevent any unintentional damage to your Molex connectors or the devices they are connected to. Remember, safety should always be your top priority when working with electrical components.
Conclusion
Removing a Molex connector may seem daunting at first, but with the right tools and techniques, it can be easily accomplished. Whether you’re replacing a faulty connector or upgrading your mobile accessories, knowing how to safely remove a Molex connector is essential.
Remember to disconnect any power sources and handle the connectors with care to avoid damage. Utilize a Molex removal tool or improvised alternatives, such as a paperclip or small screwdriver, to release the tabs and gently unplug the connector. Take note of any locking mechanisms or additional features that may be present.
By following these step-by-step instructions, you can confidently remove a Molex connector without causing harm to your device or accessories. Always refer to the manufacturer’s documentation and exercise caution during the process. With practice, you’ll become proficient in removing Molex connectors, allowing you to effortlessly customize your mobile setup.
FAQs
1. What is a Molex connector?
A Molex connector is a type of electrical connector widely used in computer hardware and other electronic devices. It is commonly used to provide power connections to components such as hard drives, optical drives, fans, and other peripherals. Molex connectors consist of a housing with multiple pins or sockets that securely connect to corresponding pins or sockets on the device.
2. Why would I need to remove a Molex connector?
There are various reasons why you might need to remove a Molex connector. It could be to replace a faulty component, perform maintenance or upgrades, reposition or reorganize your hardware setup, or simply to disconnect a device temporarily.
3. How do I remove a Molex connector?
To remove a Molex connector, you will need to gently pull it out from its socket or receptacle. It is important to be careful not to apply excessive force or pull on the wires, as this can damage the connector or the device it’s connected to. Make sure to hold the connector firmly near the base and apply steady, even pressure to remove it.
4. Are there any tools required to remove a Molex connector?
In most cases, you will not need any special tools to remove a Molex connector. However, if the connector feels particularly tight or difficult to remove, you can use a small flathead screwdriver or a similar tool to gently pry it out. Be cautious when using tools and take care not to damage the connector or the device.
5. Are there any precautions to take while removing a Molex connector?
Yes, there are a few precautions to keep in mind when removing a Molex connector. Firstly, make sure that the device is powered off and unplugged to avoid any electrical shock. Additionally, avoid pulling on the wires themselves, as this can damage them or the connector. Finally, if you encounter any resistance while trying to remove the connector, stop and double-check that you are applying pressure in the correct direction and not accidentally pulling on a latch or locking mechanism.