
Are you wondering how to take out the CMOS battery from your device? If so, you’ve come to the right place. The CMOS battery, also known as the motherboard battery, is a crucial component that stores important system information, such as the date, time, and hardware settings. Over time, the CMOS battery can lose its charge or become faulty, requiring you to replace it. However, removing the CMOS battery can be a bit tricky, especially if you’re not familiar with the process. But fret not! In this article, we will guide you through the step-by-step process of safely taking out the CMOS battery from your device, ensuring that you can complete the task with ease and confidence.
Inside This Article
- Overview
- Step 1: Power down the computer
- Step 2: Locate the CMOS battery
- Step 3: Remove the CMOS battery
- Step 4: Wait and reinsert the CMOS battery
- Step 5: Power on the computer
- Conclusion
- FAQs
Overview
Removing the CMOS (Complementary Metal-Oxide-Semiconductor) battery is a common troubleshooting method for dealing with various issues on a computer’s motherboard. The CMOS battery stores important configuration data for the computer’s BIOS (Basic Input/Output System) and by removing it, you can reset the BIOS to its default settings. This can be helpful in resolving issues such as forgotten BIOS passwords, incorrect system clock settings, or malfunctioning hardware detection. In this article, we will guide you through the process of taking out the CMOS battery.
Before proceeding with this procedure, it’s important to note that removing the CMOS battery should be done with caution. Make sure to follow the instructions carefully and ensure that you have a backup of any important data before making any changes to your computer’s BIOS.
Now, let’s dive into the steps involved in taking out the CMOS battery and resetting the BIOS.
Step 1: Power down the computer
Before you begin the process of removing the CMOS battery, it is crucial to properly power down the computer. This step ensures that you won’t encounter any electrical mishaps and enables you to work on the hardware safely and effectively.
To power down your computer, start by closing all the applications and saving your work. Once that is done, click on the Start menu or the Windows logo in the bottom left corner of your screen. From the drop-down menu, select the “Shut down” option.
Wait for a few moments until the computer completely shuts down. You can ensure this by checking if the fans and any visible lights on the computer have stopped running. It is important to be patient during this process as abruptly turning off the computer can lead to data loss or other issues.
Once the computer is fully powered down, you can move on to the next step of removing the CMOS battery. Remember, always prioritize safety and caution when working with computer hardware.
Step 2: Locate the CMOS battery
The CMOS battery is a small, round battery that is usually located on the motherboard of your computer. Its primary function is to provide power to the CMOS (Complementary Metal-Oxide-Semiconductor) chip, which stores crucial system information such as the date, time, and basic hardware settings.
To locate the CMOS battery, you will need to open your computer case. This may vary depending on the type of computer you have, but in most cases, you will need to remove the side panel of the computer tower. Some laptops may require you to remove the bottom cover to access the motherboard.
Once you have access to the motherboard, you will need to visually inspect it for the CMOS battery. The CMOS battery is typically a small, silver-colored circular battery, similar in appearance to a watch battery. It is usually located near the center of the motherboard, but its exact location may vary depending on the motherboard design.
If you are having trouble locating the CMOS battery, you can refer to your computer’s user manual or search online for the specific instructions for your computer model. Manufacturers often provide detailed diagrams and guides that can help you locate the CMOS battery more easily.
It’s important to note that the CMOS battery may be secured in place with a clip or holder. In some cases, you may need to gently push or release the clip to remove the battery. Be cautious when handling the battery and avoid touching the metal contacts on the battery to prevent any damage or interference with its functionality.
Once you have successfully located the CMOS battery, you can proceed to the next step of removing it from the motherboard. This will allow you to reset the CMOS settings and resolve any issues that may have occurred.
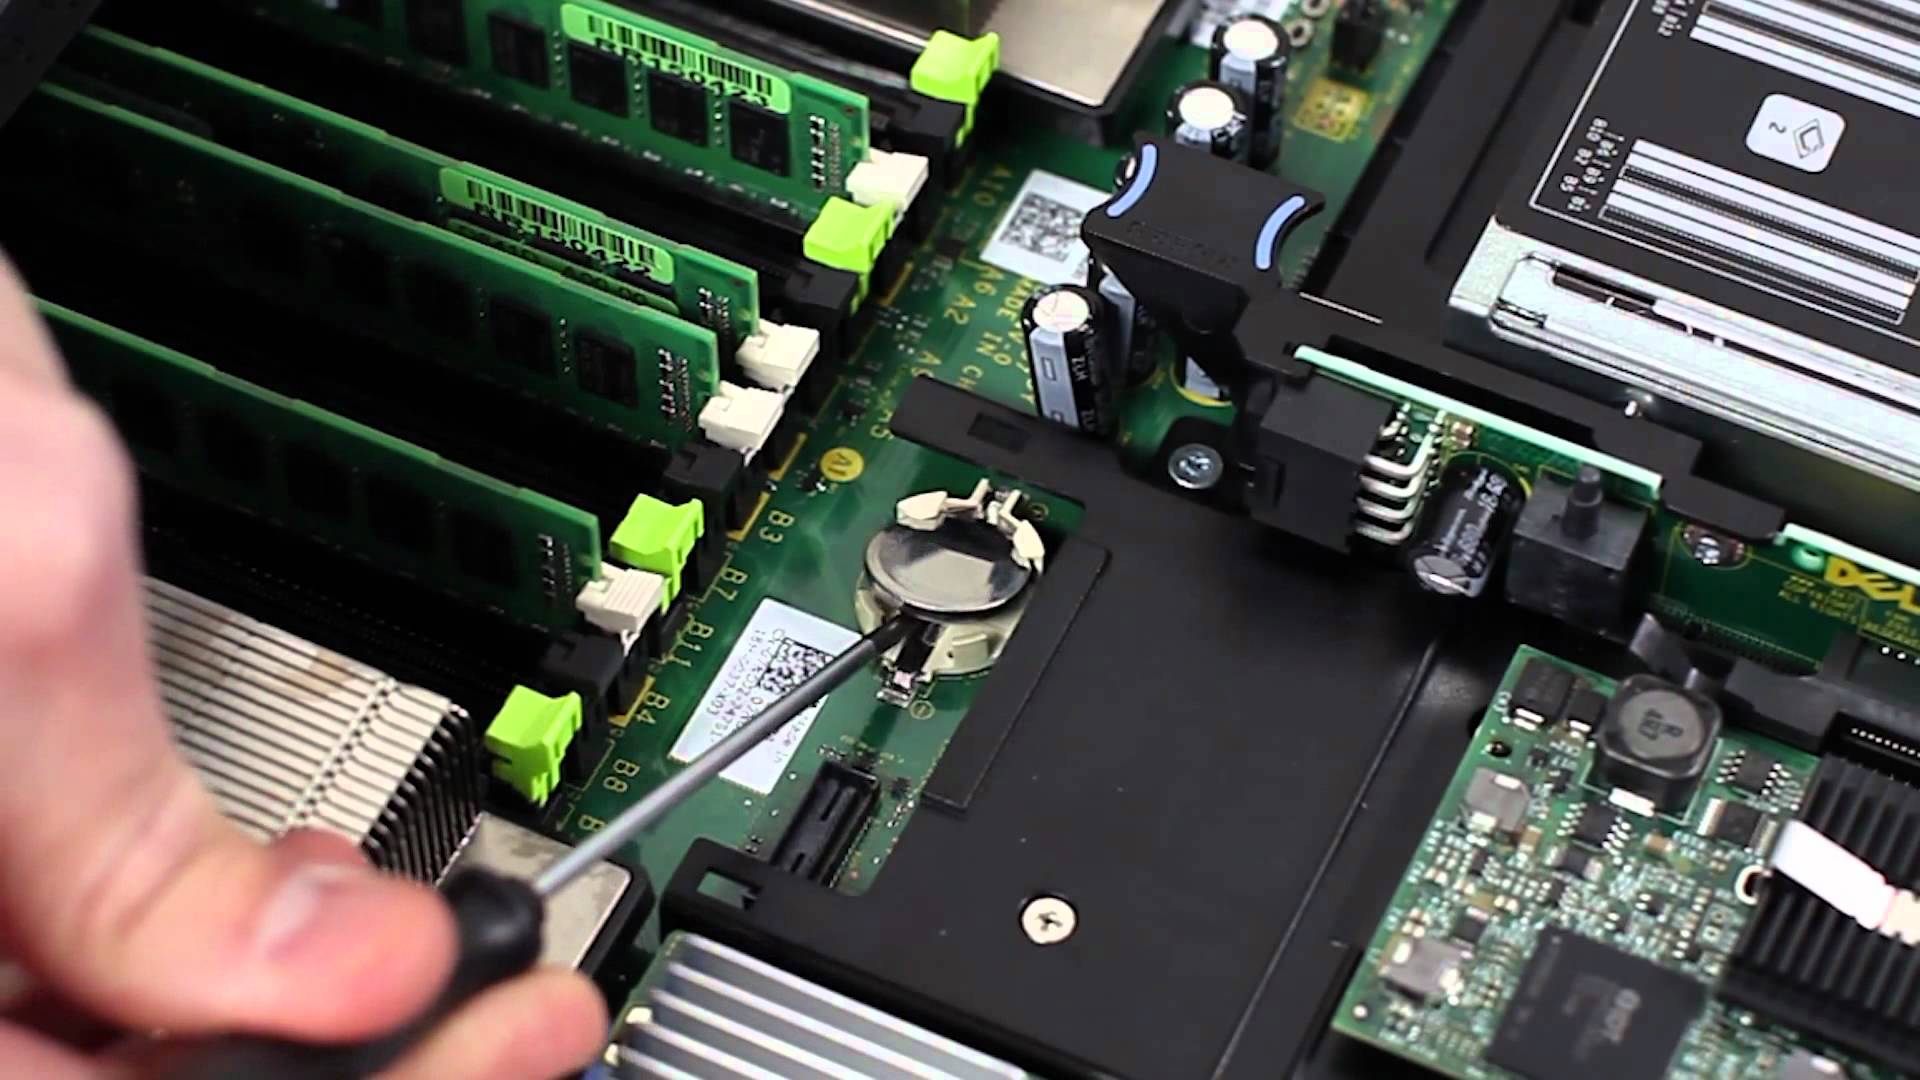
Step 3: Remove the CMOS battery
Now that you have identified the location of the CMOS battery, it’s time to remove it. Follow these steps carefully:
- Make sure the computer is still powered off and unplugged from the power source.
- Double-check the orientation of the CMOS battery. It usually has a small latch or clip holding it in place. Take note of how it is secured.
- Using a small flat-head screwdriver, gently push or lift the latch or clip to release the CMOS battery. Be careful not to apply too much force as you don’t want to damage any components.
- Once the latch or clip is released, carefully lift the CMOS battery out of its socket. If it feels stuck, gently wiggle it back and forth until it comes loose.
- Place the removed CMOS battery in a safe and clean location, away from static electricity or any other potential hazards.
It’s important to note that some computers may have a CMOS battery that is soldered to the motherboard. In this case, removing the battery may require advanced technical knowledge or professional assistance. If you are unsure or uncomfortable with the process, it is recommended to seek help from a qualified technician.
Remember to handle the CMOS battery with care. It contains a small amount of charge and should be properly disposed of according to your local regulations. Additionally, take note of any battery replacement information provided by the manufacturer.
Once the CMOS battery is safely removed, you can proceed to the next step of the process.
Step 4: Wait and reinsert the CMOS battery
After removing the CMOS battery from your computer, it’s important to wait for a few minutes before reinserting it. This waiting period allows any residual charge in the computer’s components to dissipate, ensuring a complete reset of the CMOS settings.
During this waiting time, it’s a good idea to take a few moments to inspect the CMOS battery. Check for any signs of damage, such as leakage or corrosion. If you notice any issues, it may be necessary to replace the battery before reinserting it.
Once the waiting period is over and you have inspected the CMOS battery, it’s time to reinsert it back into its original position. Carefully align the battery with the designated socket, making sure the positive and negative ends are correctly positioned.
Gently slide the CMOS battery back into place, applying slight pressure if needed. Take care not to force it, as this could damage the battery or the motherboard.
Make sure the battery is securely seated in the socket before proceeding. A loose connection can result in erratic behavior or failure to boot up properly.
Once the CMOS battery is back in place, you can reassemble any components that you may have removed earlier, such as the computer’s cover or access panel.
With the CMOS battery reinserted and the computer reassembled, it’s time to power on the system and see if the CMOS reset has been successful.
Turn on your computer and monitor the startup process. If everything went smoothly, you should see the BIOS screen or the operating system loading as usual.
However, in some cases, you may need to reconfigure certain settings in the CMOS setup utility. This is usually indicated by a prompt or message on the screen during startup.
If prompted, press the designated key or combination of keys to enter the CMOS setup. From there, navigate the menus and adjust any settings that may have been reset to default values.
Remember to save any changes you make before exiting the CMOS setup. This will ensure that the new settings are applied and preserved for future use.
Once you have completed the setup process, your computer should be back to its normal state, with the CMOS settings reset and the CMOS battery functioning properly.
Congratulations! You have successfully completed the process of waiting and reinserting the CMOS battery.
Step 5: Power on the computer
After successfully removing and reinserting the CMOS battery, it’s time to power on your computer. This step is crucial as it allows the system to boot up and start functioning again. Follow these instructions to ensure a smooth power-on process:
- Double-check the battery placement: Before turning on the computer, make sure that you have correctly reinserted the CMOS battery. It should fit snugly into its socket and be securely in place.
- Reconnect all cables and peripherals: Ensure that all necessary cables, such as power cables and display cables, are properly connected. Additionally, reconnect any peripherals, such as a keyboard or mouse, that were previously disconnected.
- Turn on the power supply: Locate the power switch on the back of your computer’s tower or the power button on your laptop. Flip the switch or press the button to provide power to your computer.
- Press the power button: Once the power supply is turned on, locate the power button on your computer’s front panel. Press the button and hold it for a few seconds until you see the system powering on.
- Observe the boot-up process: As your computer starts up, closely monitor the screen for any error messages or prompts. It may take a few moments for the system to complete the boot-up process.
- Login to your operating system: Once the boot-up process is complete, you will be prompted to log in to your operating system. Enter your username and password to gain access to your computer.
With the CMOS battery successfully reinserted and the computer powered on, you have completed the process of taking out and reinserting the CMOS battery. Your computer should now be ready to use. If you encounter any issues during the power-on process or notice any unusual behavior, it may be worthwhile to consult a professional or refer to your computer’s instruction manual for further troubleshooting steps.
Conclusion
Removing the CMOS battery is a straightforward process that can be done by anyone with a little bit of technical knowledge. Whether you need to reset the BIOS settings, replace a faulty battery, or perform other hardware maintenance on your computer, knowing how to take out the CMOS battery is a valuable skill.
By carefully following the steps outlined in this guide, you can confidently remove the CMOS battery from your computer without damaging any of the components. Just remember to exercise caution and handle the battery with care, as it contains a small amount of electrical charge.
With the CMOS battery removed, you have control over your computer’s BIOS settings and can proceed with any necessary troubleshooting or maintenance tasks. Remember to consult your computer’s manual or seek professional help if you encounter any difficulties during the process.
Now that you have learned how to take out the CMOS battery, you can confidently tackle the task whenever needed, ensuring the smooth operation of your computer system. Don’t be afraid to delve into the inner workings of your device – with the right knowledge, you can become an expert at hardware maintenance.
FAQs
1. How do I take out the CMOS battery from my device?
To remove the CMOS battery from your device, follow these steps:
- Turn off your device and disconnect the power source.
- Open the case of your device. The CMOS battery is usually located on the motherboard.
- Identify the CMOS battery, which is a small coin-shaped battery.
- Use a small screwdriver or your fingers to gently remove the CMOS battery from its socket. Be careful not to damage the socket or surrounding components.
- Wait for a few minutes to ensure that any residual charge is dissipated.
- Replace the CMOS battery with a new one.
- Close the case of your device and reconnect the power source.
- Power on your device and check if the CMOS settings have been reset.
2. Why would I need to remove the CMOS battery?
There are a few reasons why you might need to remove the CMOS battery:
- To reset the CMOS settings if your device is experiencing boot or hardware issues.
- To clear any BIOS passwords that may have been set and are now forgotten.
- To perform a hardware upgrade or modification that requires access to the motherboard.
- To troubleshoot certain hardware or software issues that may be related to the CMOS settings.
3. Can I remove the CMOS battery myself, or should I seek professional help?
Removing the CMOS battery can usually be done by yourself, as long as you take proper precautions and follow the necessary steps. However, if you are unsure or uncomfortable with working inside your device’s internal components, it is always a good idea to seek professional help to avoid any accidental damage.
4. Will removing the CMOS battery erase all my data?
No, removing the CMOS battery will not erase your data. The CMOS battery is responsible for powering the CMOS chip, which stores the system’s configuration settings. While removing the battery will reset these settings, it will not affect any data stored on your hard drive or other storage devices.
5. How often do I need to replace the CMOS battery?
The CMOS battery is designed to last for several years, but its lifespan can vary depending on factors such as usage and the quality of the battery. In general, it is recommended to replace the CMOS battery every 3 to 5 years to ensure proper functioning of your device’s BIOS settings. If you are experiencing frequent CMOS-related issues, it may be worth considering replacing the battery sooner.