
Are you facing issues with your Moto G Power and need to remove the battery? The Moto G Power is a popular smartphone that packs a long-lasting battery to keep you connected throughout the day. However, there may be situations where you need to remove the battery for troubleshooting or replacement purposes. In this article, we will guide you through the process of removing the battery from your Moto G Power, ensuring that you can carry out the task safely and effectively. Whether you are a novice or an experienced smartphone user, we’ve got you covered with step-by-step instructions. Let’s dive in and learn how to remove the battery from your Moto G Power!
Inside This Article
- Overview of the Moto G Power Battery Removal Process
- Step 1: Power off your Moto G Power
- Step 2: Locate and remove the SIM card tray
- Step 3: Remove the back cover of your Moto G Power
- Step 4: Disconnect the battery connector
- Step 5: Remove the battery from your Moto G Power
- Conclusion
- FAQs
Overview of the Moto G Power Battery Removal Process
The Moto G Power is known for its long-lasting battery life, but there may come a time when you need to remove the battery for troubleshooting, replacement, or other purposes. In this guide, we will walk you through the step-by-step process of removing the battery from your Moto G Power.
Please note that removing the battery should only be done if you have the necessary knowledge and experience. If you are uncomfortable performing this task yourself, it is recommended to seek assistance from a professional or contact the manufacturer for support.
Before we dive into the details, it’s important to mention that the Moto G Power has a non-removable battery. This means you won’t be able to simply pop out the battery like you would with some other smartphones. Instead, you’ll need to follow a specific process to access and disconnect the internal battery.
The battery removal process involves powering off the device, removing the SIM card tray, detaching the back cover, disconnecting the battery connector, and finally, removing the battery itself. By carefully following these steps, you’ll be able to safely remove the battery without causing any damage to your Moto G Power.
Please keep in mind that performing any modifications or repairs on your device may void the warranty. If you’re still covered under warranty and facing battery-related issues, it’s best to contact the manufacturer or authorized service center.
Now, let’s dive into the step-by-step instructions on how to remove the battery from your Moto G Power.
Step 1: Power off your Moto G Power
The first step in removing the battery from your Moto G Power is to power off the device. This is an important precautionary measure to ensure your safety and protect the internal components of the phone.
To power off your Moto G Power, simply press and hold the power button located on the right side of the device. A menu will appear on the screen, giving you the option to power off the phone. Tap on the “Power off” option to initiate the shut down process.
Give the device a few moments to completely power off. You can verify that the Moto G Power is turned off by ensuring that the screen is completely dark and unresponsive. This step is crucial as it eliminates the risk of electric shock or damage to the phone while handling the battery.
Once the Moto G Power is powered off, you can proceed to the next step of the battery removal process. Remember to exercise caution and follow the instructions carefully to avoid any accidental damage to your device.
Step 2: Locate and remove the SIM card tray
Removing the SIM card tray is an essential step in the process of removing the battery from your Moto G Power. The SIM card tray houses your SIM card, which allows you to connect to your cellular network and make calls or access your data.
To locate the SIM card tray, you need to turn your Moto G Power over and locate the small hole or notch on the side of the device. This hole or notch is usually located near the volume buttons or the power button.
Once you have located the hole or notch, you will need to insert a SIM card removal tool or a small paperclip into it. Gently push the tool into the hole until you feel some resistance. Then, apply a small amount of pressure to eject the SIM card tray out of the device.
When the SIM card tray is partially ejected, you can use your fingers to pull it out completely. Be careful not to apply too much force or twist the tray, as this can damage the tray or the SIM card slot.
Once the SIM card tray is removed, you can take out your SIM card from the tray. If you have a dual SIM model, you may have two SIM card slots in the tray. Make sure to keep your SIM card in a safe place, as it is an important component for accessing your cellular network.
After removing the SIM card, you can proceed with the next steps to remove the back cover and disconnect the battery from your Moto G Power.
Step 3: Remove the back cover of your Moto G Power
Removing the back cover of your Moto G Power is a crucial step in accessing the battery. Here’s a detailed guide to help you through the process:
1. Start by ensuring that your Moto G Power is powered off. This is important to avoid any potential damage to the device or harm to yourself.
2. Locate the small notch or groove on the side or bottom edge of the device. This is where you will begin the process of removing the back cover.
3. With your fingers or a safe tool like a plastic opening tool, gently insert it into the notch or groove. Apply a small amount of pressure and slide the tool along the edge to pry open the back cover.
4. As you move along the edge, you may hear slight clicks or snaps. This is a normal part of the process and indicates that the clips holding the back cover in place are disengaging.
5. Continue to carefully work your way around the edges of the device, applying gentle pressure and using the tool to separate the back cover from the main body of the Moto G Power. Take your time and be patient to avoid any accidental damage.
6. Once you have successfully loosened all the clips, you should be able to easily remove the back cover from the device. Gently lift it off and set it aside.
7. Take a moment to inspect the back cover for any signs of damage or wear. If necessary, you can clean it using a soft cloth or an alcohol wipe before reattaching it.
With the back cover removed, you now have access to the internal components of your Moto G Power, including the battery. Proceed to the next step to disconnect the battery connector and remove the battery. Remember to handle all components with care and follow proper safety precautions throughout the process.
Step 4: Disconnect the battery connector
Disconnecting the battery connector is a crucial step in safely removing the battery from your Moto G Power. The battery connector is the link between the battery and the phone’s circuitry. By disconnecting it, you ensure that no power is flowing through the device, minimizing the risk of electrical accidents.
To disconnect the battery connector, you will need a small Philips head screwdriver and a pair of tweezers or a plastic opening tool. Here’s a step-by-step guide on how to do it:
- Power off your Moto G Power: Before you begin, make sure your phone is powered off completely. This will prevent any potential damage to the phone or injury to yourself.
- Locate the battery connector: Once the back cover is removed, you will see the battery connector near the bottom left corner of the phone. It is a small rectangular connector with multiple pins.
- Detach the battery connector: Gently insert your plastic opening tool or tweezers under the connector and carefully lift it up. Be cautious not to apply too much force as you don’t want to damage the connector or the circuitry.
- Verify the disconnection: Once the battery connector is detached, ensure that the pins inside the connector are no longer touching the corresponding pins on the phone’s board. This confirms that the battery is truly disconnected.
Remember, when working with electronic devices, it is crucial to handle them with care and precision. Always follow the manufacturer’s instructions and take necessary precautions to avoid any mishaps.
Now that you have successfully disconnected the battery connector, you’re one step closer to removing the battery from your Moto G Power.
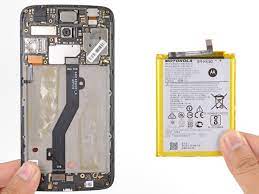
Step 5: Remove the battery from your Moto G Power
Now that you have successfully disconnected the battery connector, it’s time to remove the battery from your Moto G Power. Follow these steps to complete the process:
-
Start by locating the battery, which is located near the bottom of your device.
-
Using a pry tool or a plastic opening tool, gently lift one side of the battery. Be cautious and apply even pressure to avoid damaging any internal components.
-
Slowly and carefully lift the battery up, making sure not to bend or twist it excessively.
-
If you encounter any resistance, check to ensure there are no adhesive strips holding the battery in place. If necessary, gently lift these strips to release the battery.
-
Once the battery is free from any connections or adhesive strips, you can safely remove it from your Moto G Power.
Congratulations! You have successfully removed the battery from your Moto G Power. Remember to handle the battery with care and dispose of it according to local regulations. If you need to replace the battery, make sure to purchase a compatible one from a reliable source.
Removing the battery from the Moto G Power is a straightforward process that can be done by following a few simple steps. While the Moto G Power is known for its long-lasting battery life, there may come a time when you need to replace or remove the battery. By carefully following the instructions provided by the manufacturer, you can safely and easily remove the battery to either replace it or perform any necessary maintenance.
Always remember to exercise caution and be gentle when handling the battery. It is important to follow the manufacturer’s instructions and guidelines to avoid any damage to the device or potential harm to yourself. With the right knowledge and a little bit of patience, you can successfully remove the battery from your Moto G Power whenever the need arises.
FAQs
Q: How do I remove the battery from Moto G Power?
To remove the battery from your Moto G Power, follow these steps:
1. Power off your phone by pressing and holding the power button until the power menu appears, then select “Power off.”
2. Locate the SIM card tray on the side of your phone and use the SIM card removal tool or a small paperclip to eject it.
3. Once the SIM card tray is removed, you will see a small notch at the bottom of the battery compartment.
4. Insert a fingernail or a plastic pry tool into the notch and gently lift the battery up.
5. Carefully disconnect the battery connector from the motherboard by lifting it up with your fingers or using a plastic pry tool.
6. With the battery connector disconnected, you can now safely remove the battery from your Moto G Power.
Q: Is it safe to remove the battery from Moto G Power?
Yes, it is safe to remove the battery from your Moto G Power. However, it is important to ensure that your phone is powered off before attempting to remove the battery. Additionally, handle the battery with care and avoid puncturing, bending, or exposing it to extreme temperatures.
Q: Why would I need to remove the battery from Moto G Power?
There are several reasons why you may need to remove the battery from your Moto G Power. Some common reasons include replacing a worn-out battery, troubleshooting power-related issues, or performing a hard reset on your device. Removing the battery allows for easier access to the internals of the phone and can be necessary for certain repairs or maintenance.
Q: Can I replace the battery in Moto G Power myself?
While it is technically possible to replace the battery in your Moto G Power yourself, it is recommended to have it done by a professional or authorized repair technician. Replacing the battery requires disassembling the phone and can be tricky, especially if you are not familiar with the internals of the device. Improper battery replacement can potentially damage your phone or void your warranty.
Q: How long does the battery last in Moto G Power?
The Moto G Power is known for its impressive battery life. It is equipped with a large capacity 5000mAh battery that can last up to three days on a single charge, depending on your usage. The device also features efficient power management software that helps optimize battery performance and extend its lifespan.