
Are you tired of your iPhone or iPad mispronouncing certain words? Do you wish you could add your own pronunciations to ensure that your device speaks the way you do? Well, the good news is that you can! Apple provides a built-in feature that allows you to add custom pronunciations to its devices, making it easier for them to understand and pronounce words correctly.
Whether you’re dealing with unique names, regional accents, or foreign words, the ability to add your own pronunciations can greatly improve your device’s speech capabilities and enhance your overall user experience. In this article, we will guide you through the simple steps of adding custom pronunciations on your iPhone or iPad, ensuring that your device speaks in a way that feels more natural and familiar to you.
Inside This Article
- Overview
- Step 1: Update to the Latest iOS Version
- Step 2: Open the Settings App
- Step 3: Go to the Accessibility Settings
- Step 4: Select the “Spoken Content” Option
- Step 5: Tap on “Voices”
- Step 6: Customize Pronunciations
- Step 7: Add New Pronunciations
- Step 8: Verify the Pronunciation
- Step 9: Use the Custom Pronunciations
- Conclusion
- FAQs
Overview
In today’s fast-paced world, communication has become more important than ever. With the increasing use of smartphones, mobile apps have become the go-to solution for many tasks, including making phone calls, sending messages, and accessing various services. However, there may be times when the pronunciation of certain words or names in the apps doesn’t match your expectations.
Thankfully, iPhone and iPad users have the option to add their own pronunciations to ensure accurate and personalized audio output. This feature allows you to customize the pronunciation of specific words or names, making it easier for you to communicate and understand information from your mobile apps.
In this article, we will guide you through the process of adding your own pronunciations on iPhone and iPad. Whether you want to tweak the pronunciation of a frequently used contact’s name, a specific word in a foreign language, or any other term that is important to you, this functionality will prove to be a valuable tool.
Step 1: Update to the Latest iOS Version
In order to add your own pronunciations on your iPhone and iPad, it is important to make sure that your device is running on the latest version of iOS. Apple regularly releases updates that include feature enhancements, bug fixes, and security improvements. Updating your iOS version ensures that you have access to the latest features and functionalities, including the ability to add your own pronunciations.
To update to the latest iOS version, follow these steps:
- Connect your iPhone or iPad to a Wi-Fi network.
- Go to the “Settings” app on your device.
- Scroll down and tap on “General”.
- Tap on “Software Update”.
- If an update is available, tap on “Download and Install”.
- Follow the on-screen instructions to complete the update.
It is recommended to have a stable internet connection and sufficient battery life before initiating the update process. Once the update is complete, you can proceed to the next step of adding your own pronunciations.
Step 2: Open the Settings App
Once you have unlocked your iPhone or iPad, go to the home screen and locate the Settings app. It is represented by a gray icon with gears. Tap on it to open the Settings menu.
The Settings app is where you can customize various aspects of your device, including network settings, display preferences, privacy settings, and more. It is a powerful tool that allows you to personalize your device to suit your needs.
Upon opening the Settings app, you will be presented with a list of different options. The options are arranged in sections, such as “General,” “Privacy,” “Display & Brightness,” and so on. Scroll through the list to find the desired option or use the search bar at the top of the screen to quickly locate a specific setting.
Additionally, you can customize the layout of the Settings app by rearranging the options or adding shortcuts to frequently accessed settings. To do this, simply tap on “Edit” in the top-right corner of the screen.
By accessing the Settings app, you gain control over your device’s functionality and appearance. It is a crucial step in adding your own pronunciations on your iPhone or iPad.
Step 3: Go to the Accessibility Settings
Once you have enabled the Pronunciation Mode on your iPhone or iPad, the next step is to navigate to the Accessibility Settings. Here is how you can do it:
1. Launch the Settings app on your device, which can be found on the home screen.
2. Scroll down and tap on “Accessibility.” This section contains various options to personalize your device’s accessibility features.
3. In the Accessibility menu, you will find a wide range of settings. Scroll down until you see the “Spoken Content” option and tap on it.
4. Under the Spoken Content menu, you will see the “Voices” option. Tap on it to access the voice settings.
5. Once you are in the Voices menu, scroll down to find the “Pronunciations” option. This is where you can add custom pronunciations to your device.
By following these steps, you will be able to access the Accessibility Settings on your iPhone or iPad and begin customizing the pronunciations of specific words or phrases.
Step 4: Select the “Spoken Content” Option
Once you have accessed the Accessibility settings on your iPhone or iPad, it’s time to move on to the next step: selecting the “Spoken Content” option. This feature allows you to customize the pronunciation of specific words or phrases according to your preferences.
To select the “Spoken Content” option, follow these simple steps:
- From the Accessibility settings menu, scroll down until you find the “Spoken Content” option.
- Tap on “Spoken Content” to enter the settings for this feature.
- Here, you will find various options related to spoken content, including “Voices” and “Pronunciations”.
- Tap on “Pronunciations” to access the settings specifically related to customizing pronunciations.
By selecting the “Spoken Content” option, you are taking the necessary step to fine-tune the pronunciation of words and phrases on your iPhone or iPad. This feature is incredibly useful for individuals who have unique pronunciations or need certain words to be pronounced correctly.
Now that you have selected the “Spoken Content” option, you are ready to move on to the next steps: recording and editing custom pronunciations.
Step 5: Tap on “Voices”
Once you have accessed the “Accessibility” settings on your iPhone or iPad, the next step in adding your own pronunciations is to tap on “Voices”. This option allows you to explore the different voices and speech settings available on your device.
By tapping on “Voices”, you will be presented with a list of available voices in different languages and dialects. Scroll through the list to find the voice that best suits your preferences.
It’s worth noting that the voices listed may vary depending on your device model and software version. If you can’t find the specific voice you’re looking for, make sure to check for any available updates for your device to access the latest voice options.
Within the “Voices” section, you’ll also find additional settings related to speech, such as the option to download enhanced quality voices or adjust the speaking rate. Feel free to explore these options if you want to further customize the pronunciation experience.
Once you have selected a voice and made any desired adjustments to the speech settings, you can move on to the next step in the process: recording your own custom pronunciations.
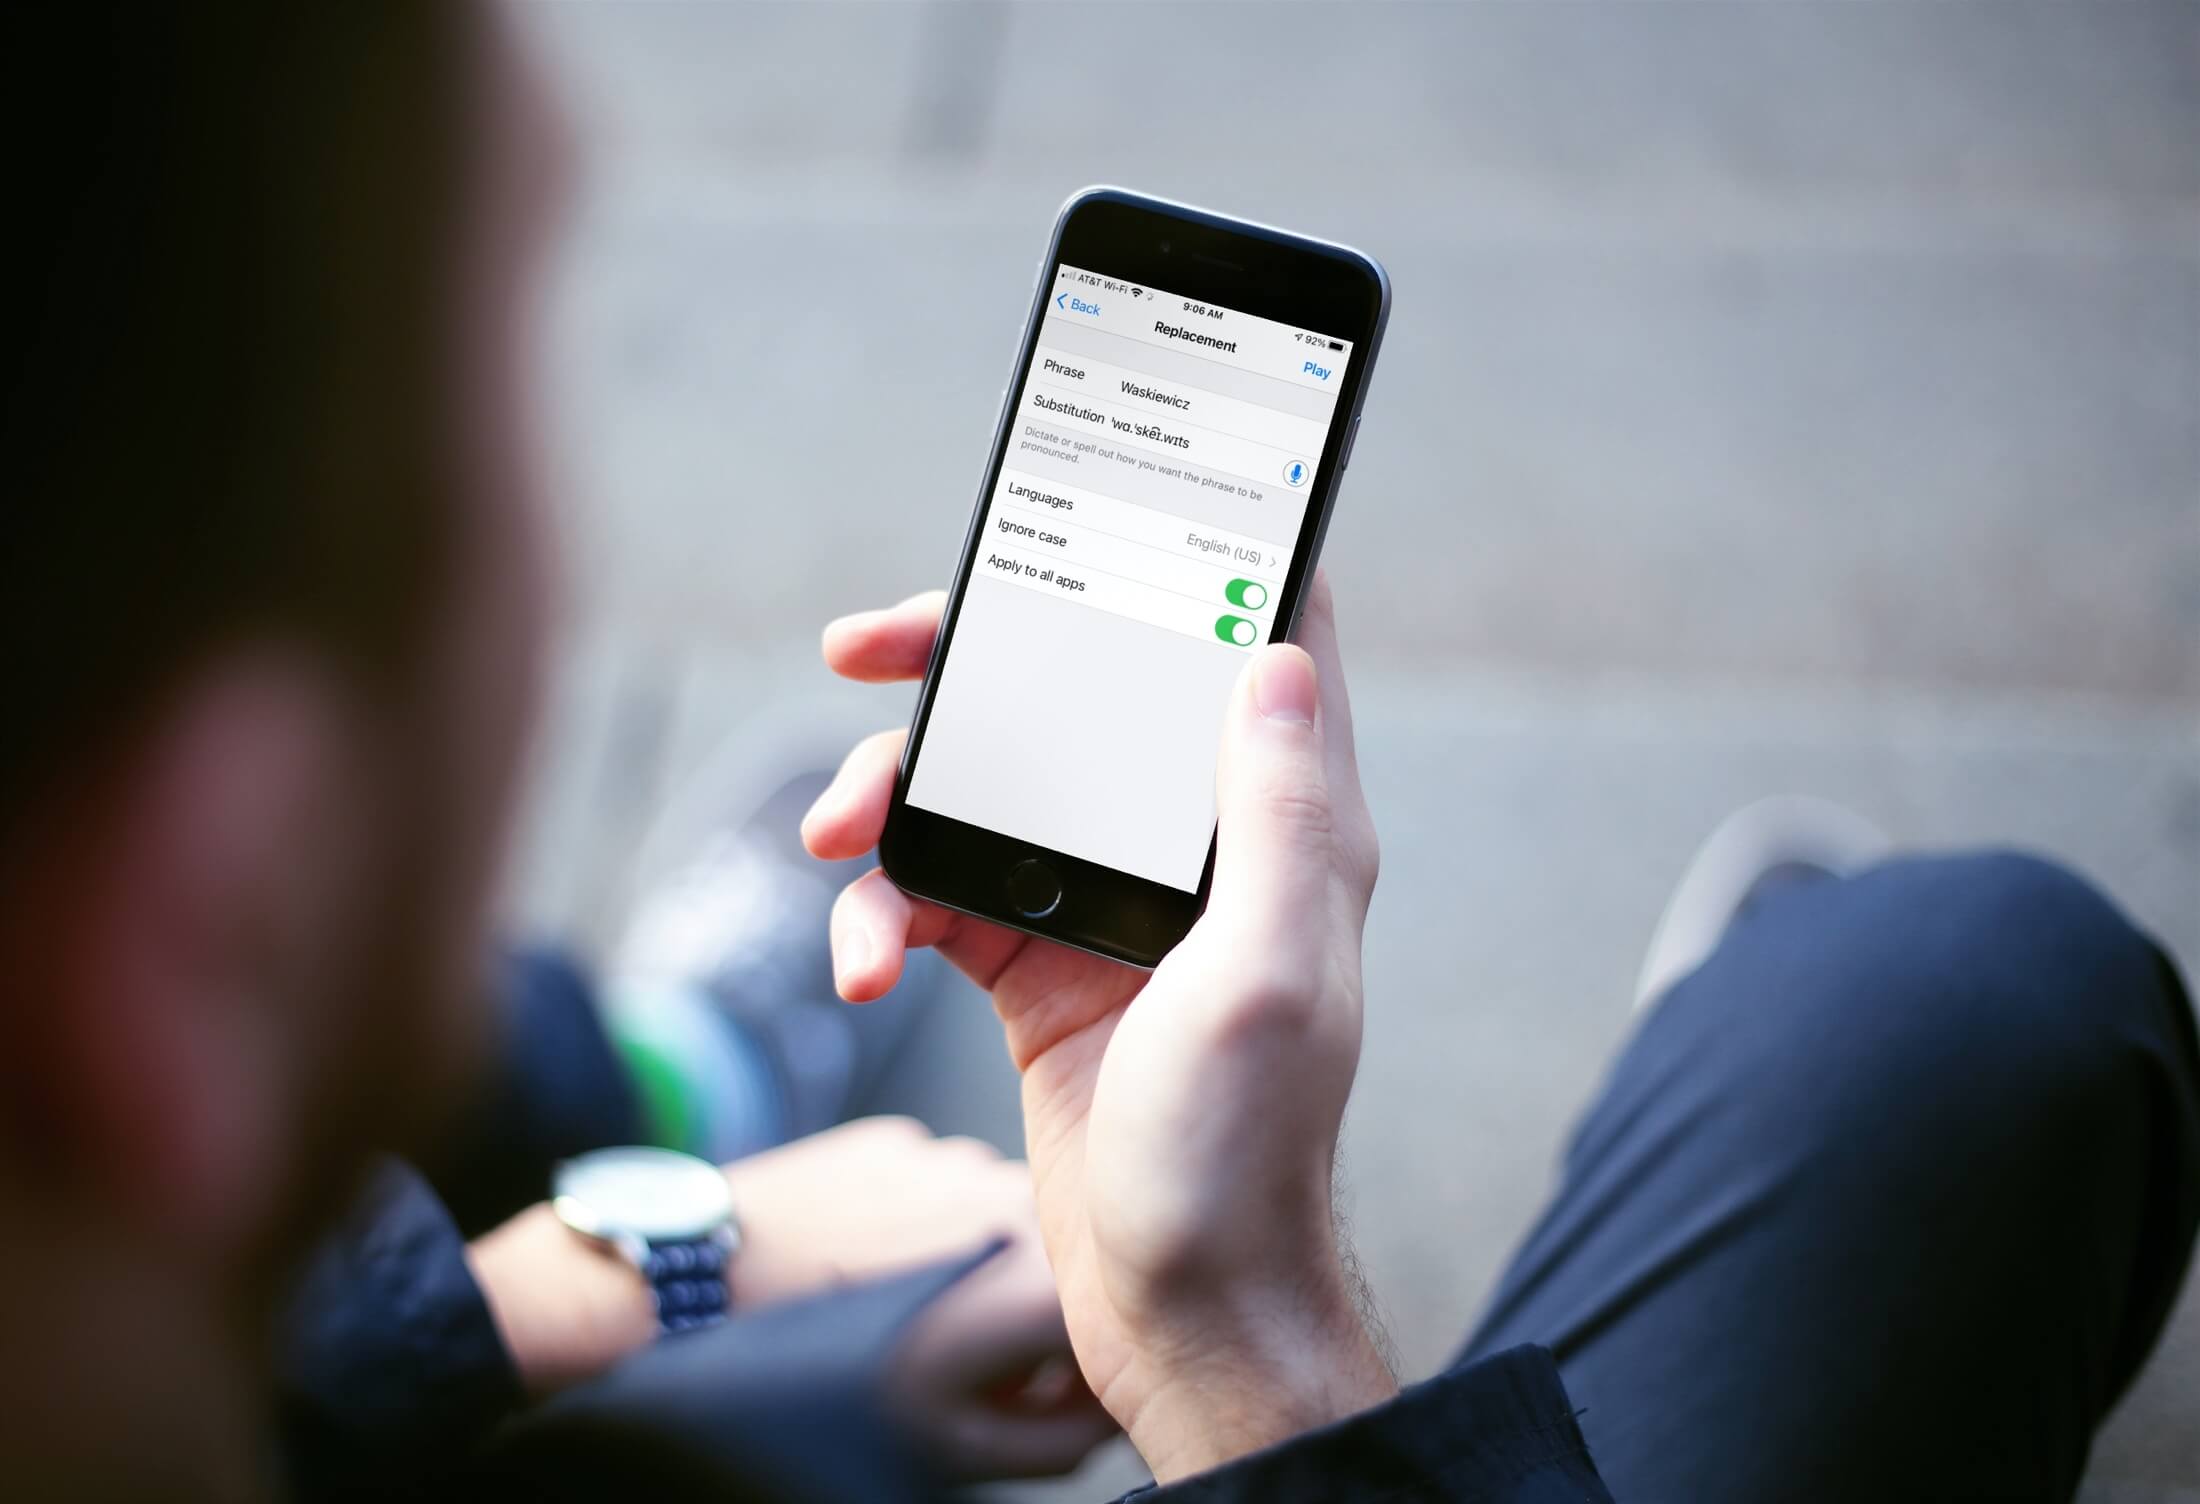
Step 6: Customize Pronunciations
After recording your own pronunciations, iOS offers the option to customize and fine-tune pronunciations according to your preference. This allows you to have complete control over how certain words and phrases are pronounced on your iPhone or iPad.
Here’s how you can customize pronunciations on your iOS device:
1. Open the Settings app on your iPhone or iPad.
2. Scroll down and tap on Accessibility.
3. Select Spoken Content.
4. Next, tap on Voices and then choose the Voice you want to customize pronunciations for. You can select either the default Siri voice or any other alternative voice that you have installed on your device.
5. Now, tap on Customize Pronunciations. You will see a list of words and phrases that can be customized.
6. To edit the pronunciation of a specific word or phrase, tap on it.
7. On the next screen, you will find options to adjust the pronunciation, including adding additional syllables, emphasizing certain sounds, or modifying the phonetic spelling.
8. Make the necessary changes to the pronunciation and tap on OK to save your modifications.
9. Repeat step 6 and 7 for each word or phrase you want to customize.
10. Once you are satisfied with the customized pronunciations, simply exit the Settings app. Your changes will be applied across your device, ensuring that your iPhone or iPad speaks words and phrases exactly the way you want.
This customization feature is especially useful for individuals who prefer a certain accent or have unique pronunciations for specific names or terms.
With the ability to customize pronunciations, iOS aims to deliver a personalized and tailored experience for users, ensuring that their device accurately reflects their unique linguistic preferences.
Step 7: Add New Pronunciations
If you’re not satisfied with the built-in pronunciation options on your iPhone or iPad, you have the ability to add your own pronunciations. This feature can come in handy when you encounter names or words that the device struggles to pronounce accurately. Follow these steps to add new pronunciations:
1. Open the “Settings” app on your device.
2. Scroll down and tap on “Accessibility.”
3. In the accessibility menu, select “Spoken Content.”
4. Next, choose “Voices.”
5. Under the “Voices” section, tap on “Siri.”
6. Now, select “American” or “British” depending on your preferred voice.
7. Tap on “Add New Siri Pronunciation.”
8. A text box will appear where you can enter the word or phrase you want to add a custom pronunciation for.
9. Type the word or phrase exactly as you want Siri to pronounce it and tap on “OK.”
10. You will be presented with a list of suggested pronunciations. Tap on the one that closely matches what you intended.
11. If none of the suggestions are correct, you can tap on “Create New Pronunciation” and input the phonetic spelling of the word or phrase manually.
12. After selecting the correct pronunciation, tap on “OK.”
13. The new pronunciation will now be saved, and Siri will use it whenever encountering the specific word or phrase.
By following these steps, you have the ability to customize the pronunciation of specific words or phrases on your iPhone or iPad. This feature can greatly improve the accuracy and clarity of Siri’s speech, making it easier for you to interact with your device.
Step 8: Verify the Pronunciation
Once you have recorded or edited the custom pronunciation, it’s important to verify that it sounds correct. The pronunciation on your iPhone or iPad should accurately match the word or phrase you have entered.
To verify the pronunciation, you can follow these simple steps:
- Open the app or document where you want to use the pronunciation.
- Locate the word or phrase you have added the custom pronunciation for.
- Tap on the word or phrase to select it.
- Tap on the Speak button or use the Voice Assistant feature to hear the pronunciation.
- Listen carefully to ensure that the pronunciation matches your intended pronunciation.
- If the pronunciation sounds accurate, congratulations! You have successfully added and verified your custom pronunciation.
If you find any issues with the pronunciation, you can go back to the pronunciation settings and make necessary edits. Repeat the recording or editing process until you are satisfied with the pronunciation.
Verifying the pronunciation is crucial, especially if you plan to use the custom pronunciation in professional or academic settings. Accurate pronunciation enhances communication and ensures that you are conveying your intended meaning correctly.
Remember, your custom pronunciations are unique to your device and won’t affect how words are pronounced on other devices or by other users.
Step 9: Use the Custom Pronunciations
Once you have added your own pronunciations on your iPhone or iPad, you can now start using them in your day-to-day interactions. Here is how you can leverage the custom pronunciations you have created:
1. Open any app or feature that utilizes voice input or text-to-speech functionality, such as Siri, Messages, or Notes.
2. Begin typing or speaking the words that you want to use your custom pronunciations for.
3. As you enter the words, your device will automatically parse the text and identify any custom pronunciations that match your input.
4. Once a custom pronunciation is detected, your device will use the recorded pronunciation you have set instead of the default pronunciation.
5. Listen to the output and enjoy hearing your custom pronunciations in action!
Keep in mind that not all apps or features may support custom pronunciations, so the use of your custom pronunciations may vary depending on the specific use case. However, many popular apps and system features do support custom pronunciations, giving you the flexibility to personalize your device’s voice interactions.
It’s worth noting that the pronunciation changes you make are specific to your device and do not affect how words are pronounced on other devices or platforms. This means that if you share messages or files containing custom pronunciations with others, they may not hear the same pronunciation unless they have made the same customizations on their own devices.
So go ahead and have fun adding your own unique touch to the way your iPhone or iPad speaks. Whether it’s a name, a specific term, or a regional accent, custom pronunciations allow you to truly make your device your own.
Conclusion
Adding your own pronunciations on iPhone and iPad is a simple and useful feature that can greatly enhance your experience with these devices. Whether you rely on specific terms or have trouble pronouncing certain words, having the ability to customize the pronunciation is a valuable tool.
With the help of the built-in pronunciation editor and third-party apps like Speak4Me, you can easily add and modify pronunciations to match your preferences. This allows you to communicate effectively, especially when it comes to unfamiliar or specialized vocabulary in different languages.
By following the step-by-step instructions covered in this article, you can take control of your device’s speech recognition capabilities and ensure accurate pronunciations across various apps and features.
So, go ahead and start customizing your pronunciations with confidence. Enjoy the seamless communication and improved user experience that comes with mastering the pronunciation of any word or phrase on your iPhone or iPad!
FAQs
Q: Can I add my own pronunciations on my iPhone and iPad?
Yes, you can! The iOS operating system allows you to customize the pronunciation of words on your iPhone and iPad.
Q: How can I add my own pronunciations?
To add your own pronunciations, go to the Settings app on your iPhone or iPad, then tap on “General,” followed by “Accessibility.” Under the “Vision” section, tap on “Spoken Content.” Here, you will find the option to add and customize pronunciations.
Q: Why would I want to add my own pronunciations?
Adding your own pronunciations can be beneficial if there are certain words or names that Siri or other voice assistants on your device frequently mispronounce. By customizing the pronunciation, you can ensure that the device understands and pronounces them correctly.
Q: Can I add pronunciations for multiple languages?
Yes, you can! The feature to add your own pronunciations is available for multiple languages supported by the iOS operating system. You can customize pronunciations for words in different languages as per your preferences.
Q: Will adding my own pronunciations impact the device’s overall functionality?
No, adding your own pronunciations will not impact the overall functionality of your iPhone or iPad. It is a simple customization option that allows you to enhance the accuracy of voice assistants on your device. Your device will continue to work as usual, providing you with all its usual features and capabilities.