
Are you tired of forgetting important tasks or appointments? With the advanced technology of your iPhone or iPad, you can easily set reminders to keep you on track. Whether it’s a meeting, a deadline, or simply picking up groceries, setting a reminder on your iPhone or iPad can help you stay organized and never miss a beat. In this article, we will guide you through the process of setting a reminder on your iOS device. From accessing the built-in Reminders app to utilizing Siri, we will explore various methods and provide step-by-step instructions to ensure you never forget another task again. So let’s dive in and discover how to set a reminder on your iPhone or iPad!
Inside This Article
- Setting a Reminder on your iPhone or iPad
- Using the built-in Reminders app
- Using Siri to create a reminder
- Adding reminders from other apps
- Conclusion
- FAQs
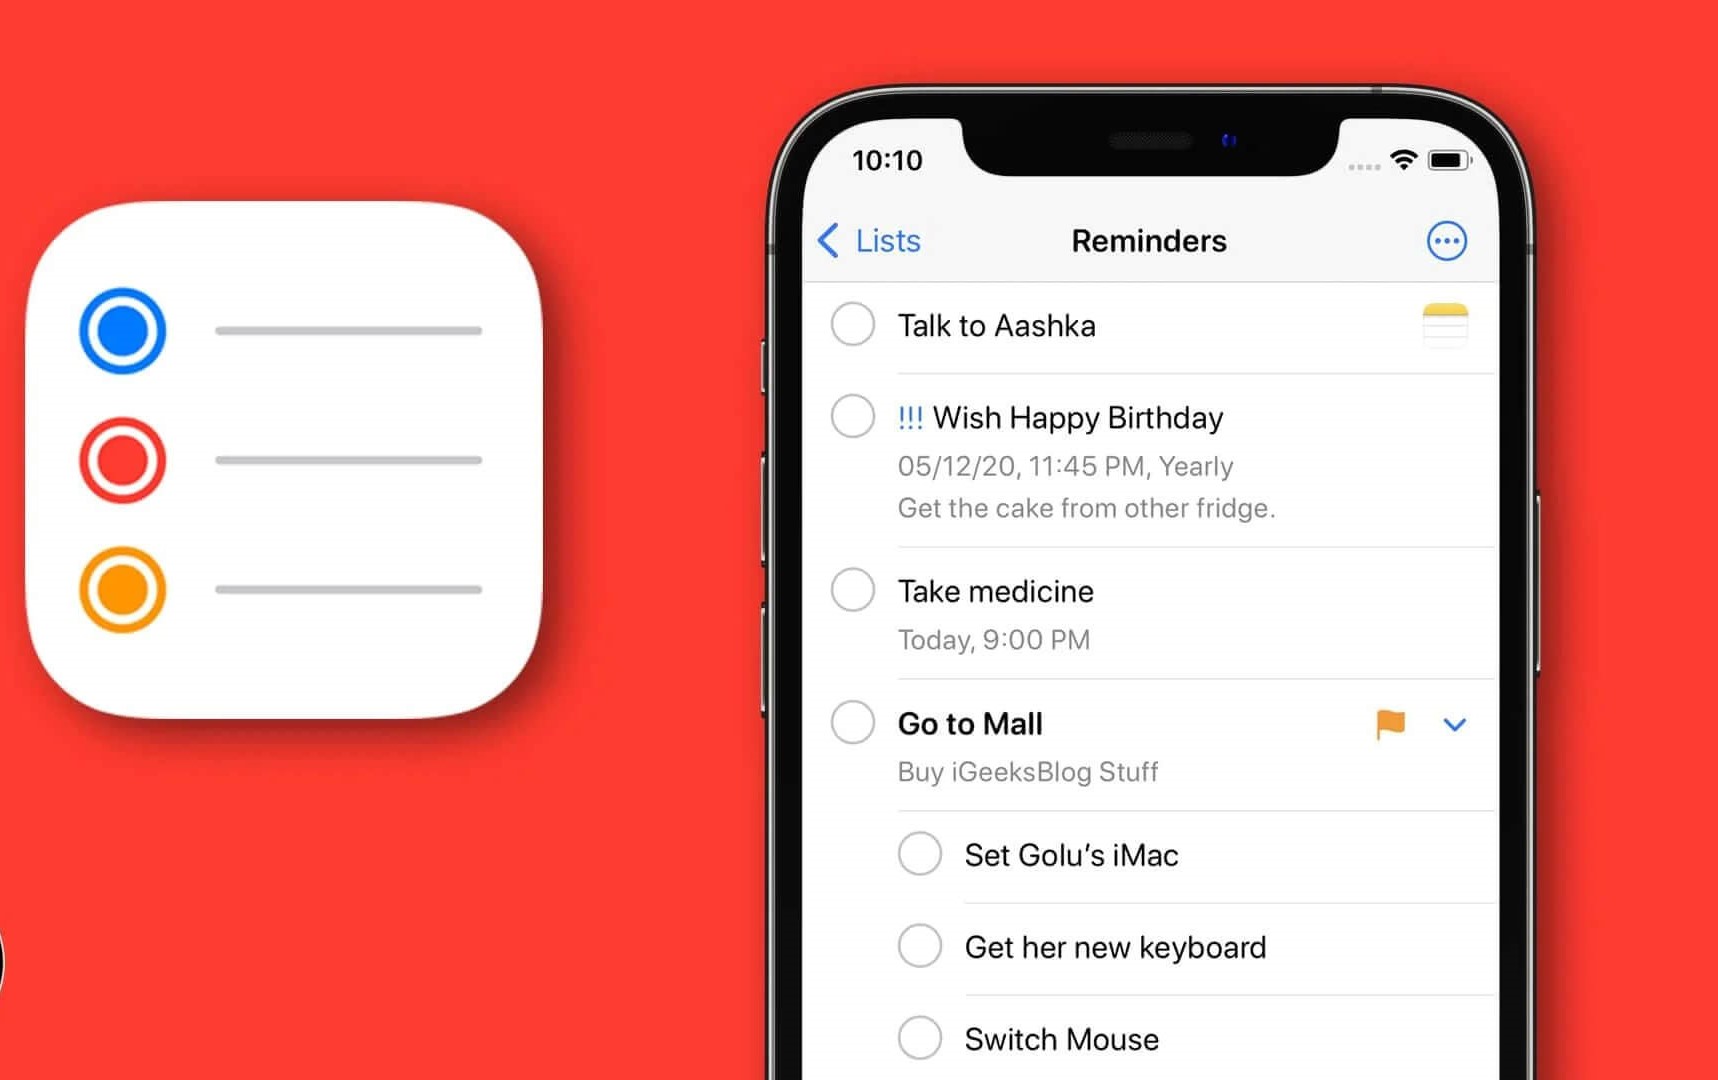
Setting a Reminder on your iPhone or iPad
In today’s fast-paced world, it’s easy to forget important tasks and appointments. Luckily, your iPhone or iPad comes with a built-in Reminders app that allows you to easily set reminders and stay organized. Whether you need to remember a meeting, pick up groceries, or simply want to set a daily reminder, your iPhone or iPad has got you covered. Here’s how you can set a reminder on your device:
1. Using the built-in Reminders app
The Reminders app is a handy tool that comes pre-installed on your iPhone or iPad. To set a reminder using this app, follow these steps:
- Launch the Reminders app on your iPhone or iPad.
- Tap on the “+” button located in the top right corner of the screen to create a new reminder.
- Enter the details of your reminder, such as the title, date, and time. You can also set a priority or add additional notes if needed.
- Once you’re satisfied with the reminder details, tap on “Done” to save it. The reminder will now be added to your list of reminders.
2. Using Siri to create a reminder
If you prefer a hands-free approach, you can use Siri, Apple’s virtual assistant, to set a reminder on your iPhone or iPad. Simply follow these steps:
- Activate Siri by holding down the home button or saying “Hey Siri” if it’s enabled on your device.
- Say something like “Set a reminder for [task] on [date] at [time].” Be sure to provide specific details like the task, date, and time.
- Siri will confirm the details of the reminder and create it for you. It will then be added to your list of reminders in the Reminders app.
3. Adding reminders from other apps
Your iPhone or iPad allows you to easily convert information from other apps into reminders. Here’s how:
- Open the app where you want to create the reminder. This could be Notes, Messages, Safari, or any other app that supports the “Share” functionality.
- Highlight the text or item you want to turn into a reminder.
- Tap on the “Share” button, usually represented by a box with an arrow pointing upwards.
- From the list of share options, select “Reminders.”
- Edit the reminder details as needed, then tap on “Save” or “Done” to create the reminder.
4. Using third-party reminder apps
If you prefer more advanced features and customization options, you can explore third-party reminder apps available on the App Store. Some popular options include Todoist, Any.do, and Microsoft To Do. To use these apps:
- Search for and download the preferred reminder app from the App Store.
- Install the app on your iPhone or iPad.
- Follow the app’s instructions to set up and create reminders according to their interface and features.
With the ability to set reminders directly from your iPhone or iPad, you can ensure you never miss an important task or appointment again. Whether you choose to use the built-in Reminders app or explore third-party options, staying organized and on top of your schedule has never been easier.
Using the built-in Reminders app
Launching the Reminders app on your iPhone or iPad is a straightforward process.
Simply locate the Reminders app on your device’s home screen or use the built-in search feature to find it. Once you’ve located the app, tap on it to open it.
Once you have opened the Reminders app, you can start creating a new reminder by tapping on the “+” button.
After tapping on the “+” button, a new screen will appear where you can enter the details of your reminder.
First, enter a title for your reminder. Make it concise and descriptive so that you can easily identify the task or event you are setting a reminder for.
Next, specify the date and time for your reminder. You can choose a specific date and time by tapping on the respective fields and selecting the desired values from the pop-up menu.
Once you have entered all the necessary details, tap on the “Done” button to save the reminder. The reminder will now appear in your list of reminders.
Using the built-in Reminders app on your iPhone or iPad is a convenient and efficient way to stay organized and keep track of tasks and events. With just a few simple steps, you can create reminders for important events, appointments, or tasks, ensuring that you never miss a deadline or forget an important task again.
Using Siri to create a reminder
One of the easiest ways to set a reminder on your iPhone or iPad is by using Siri, Apple’s virtual assistant. Siri can quickly create reminders for you with just a few voice commands. Here’s how you can do it:
1. Activate Siri: To activate Siri, you can either hold the home button on your device or simply say “Hey Siri” if you have the feature enabled. Siri will respond with a chime and a prompt to listen to your command.
2. Give the command: Once Siri is activated, you can simply say something like “Set a reminder for [task] on [date] at [time].” For example, you could say “Set a reminder to pick up groceries on Sunday at 4 pm.” Remember to speak clearly and concisely to ensure Siri understands your command accurately.
3. Confirmation and creation: After you give Siri the command, it will process the information and present you with a confirmation screen. Siri will display the details of the reminder it understood, including the task, date, and time. If everything looks correct, you can confirm the reminder creation. If there are any mistakes or you want to make changes, you can tap on the edit button and modify the details accordingly.
4. Enjoy your reminder: Once you confirm the details, Siri will create the reminder for you and add it to the built-in Reminders app on your iPhone or iPad. You can also access your reminders through other devices that are connected to your iCloud account, such as your Mac or Apple Watch.
Setting reminders with Siri is not only a convenient way to keep track of your tasks, but it also allows for hands-free usage, which is particularly helpful when you’re busy or on the go. Whether you need to remember an important meeting, an upcoming event, or even a simple errand, Siri has got you covered.
Adding reminders from other apps
If you are using an iPhone or iPad, you can easily add reminders from other apps such as Notes, Messages, or Safari. Here’s how:
1. Open the app where you want to create the reminder, like Notes, Messages, or Safari.
2. Highlight the text or item you want to turn into a reminder. It could be a specific message, a paragraph in a note, or even a webpage in Safari.
3. Tap on the “Share” button, which is usually represented by a square with an arrow pointing upwards.
4. From the share options that appear, select “Reminders”. This option may be located in the bottom row of the share menu or under the “More” option.
5. A new window will appear, allowing you to edit the reminder details. You can change the title, select a due date, set a priority, or even add a note to the reminder.
6. Once you have edited the reminder details, tap on “Save” or a similar button to save the reminder.
By using this method, you can seamlessly transform important information from other apps into reminders without the need to switch back and forth between multiple applications. It’s a convenient way to stay organized and ensure that important tasks or ideas don’t slip your mind.
Conclusion
Setting reminders on your iPhone or iPad is a convenient and efficient way to stay organized and never miss an important task or appointment. Whether you need a reminder to pick up groceries, pay your bills, or attend a meeting, the Reminders app has got you covered.
With its user-friendly interface and intuitive features, setting reminders has never been easier. From setting specific dates and times to creating recurring reminders, you can customize the reminders to suit your needs.
By utilizing the various options and settings available in the Reminders app, you can ensure that you never forget an important task again. Utilize this function to streamline your life and increase your productivity.
So, take advantage of this powerful feature on your iOS device and start setting reminders today. Stay organized, stay on top of your tasks, and enjoy the ease and convenience that the Reminders app brings to your iPhone or iPad.
FAQs
1. How do I set a reminder on my iPhone or iPad?
To set a reminder on your iPhone or iPad, follow these steps:
- Open the “Reminders” app on your device.
- Tap the “+” button at the top right corner to create a new reminder.
- Type in the name of your reminder.
- Tap on the “i” icon next to the reminder to access additional options.
- Set the specific date and time for your reminder.
- Choose whether you want a notification for the reminder.
- Tap “Done” to save your reminder.
2. Can I set recurring reminders on my iPhone or iPad?
Yes, you can set recurring reminders on your iPhone or iPad. After creating a new reminder, tap on the “i” icon next to the reminder and select the “Repeat” option. From there, you can choose the frequency of the recurring reminder, such as daily, weekly, monthly, or custom options. This feature is great for tasks or events that occur regularly.
3. How can I prioritize my reminders?
You can prioritize your reminders on your iPhone or iPad by assigning them different levels of importance. When creating a new reminder or editing an existing one, tap on the “Priority” option and choose from three levels: High, Medium, or Low. This helps you stay organized and ensures that you focus on the most important tasks first.
4. Is it possible to organize my reminders into different lists?
Yes, you can organize your reminders into different lists on your iPhone or iPad. Open the “Reminders” app and tap on the “Lists” option at the bottom. Tap on the “+” button to create a new list and give it a name. To add reminders to a specific list, tap on the list name and then tap on the “+” button to create new reminders. This allows you to categorize your tasks and events for better organization.
5. Can I share my reminders with others?
Yes, you can share your reminders with others on your iPhone or iPad. Open the “Reminders” app and select the list you want to share. Tap on the “Edit” button at the top right corner and then tap on “Add People”. Enter the name or email address of the person you want to share the reminders with and choose their access level (view only or edit). This is a useful feature for collaborating on tasks or sharing important reminders with family or colleagues.