
Are you struggling to keep your iPhone and iPad in sync? Look no further, as we’ve got you covered! In this article, we will walk you through the step-by-step process of syncing your iPhone with your iPad, ensuring that all your data, apps, and settings are seamlessly transferred between your devices. Whether you want to keep your contacts, calendars, photos, or even app preferences in sync, we’ll provide you with the tips and tricks you need to make it happen. So, buckle up and get ready to unlock the full potential of your Apple devices by mastering the art of syncing your iPhone with your iPad.
Inside This Article
- Point 1: Setting up iCloud on both devices
- Point 2: Syncing your contacts, calendars, and reminders
- Point 3: Transferring photos and videos between your iPhone and iPad
- Point 4: Syncing your apps and app data
- Conclusion
- FAQs
Point 1: Setting up iCloud on both devices
When it comes to syncing your iPhone with your iPad, iCloud is an essential tool that allows you to seamlessly transfer data between your devices. To get started, you’ll need to set up iCloud on both your iPhone and iPad. Follow these simple steps to ensure a smooth synchronization process:
1. Update both devices to the latest version of iOS: Before setting up iCloud, make sure that both your iPhone and iPad are running on the latest version of iOS. This ensures compatibility and access to all the features offered by iCloud.
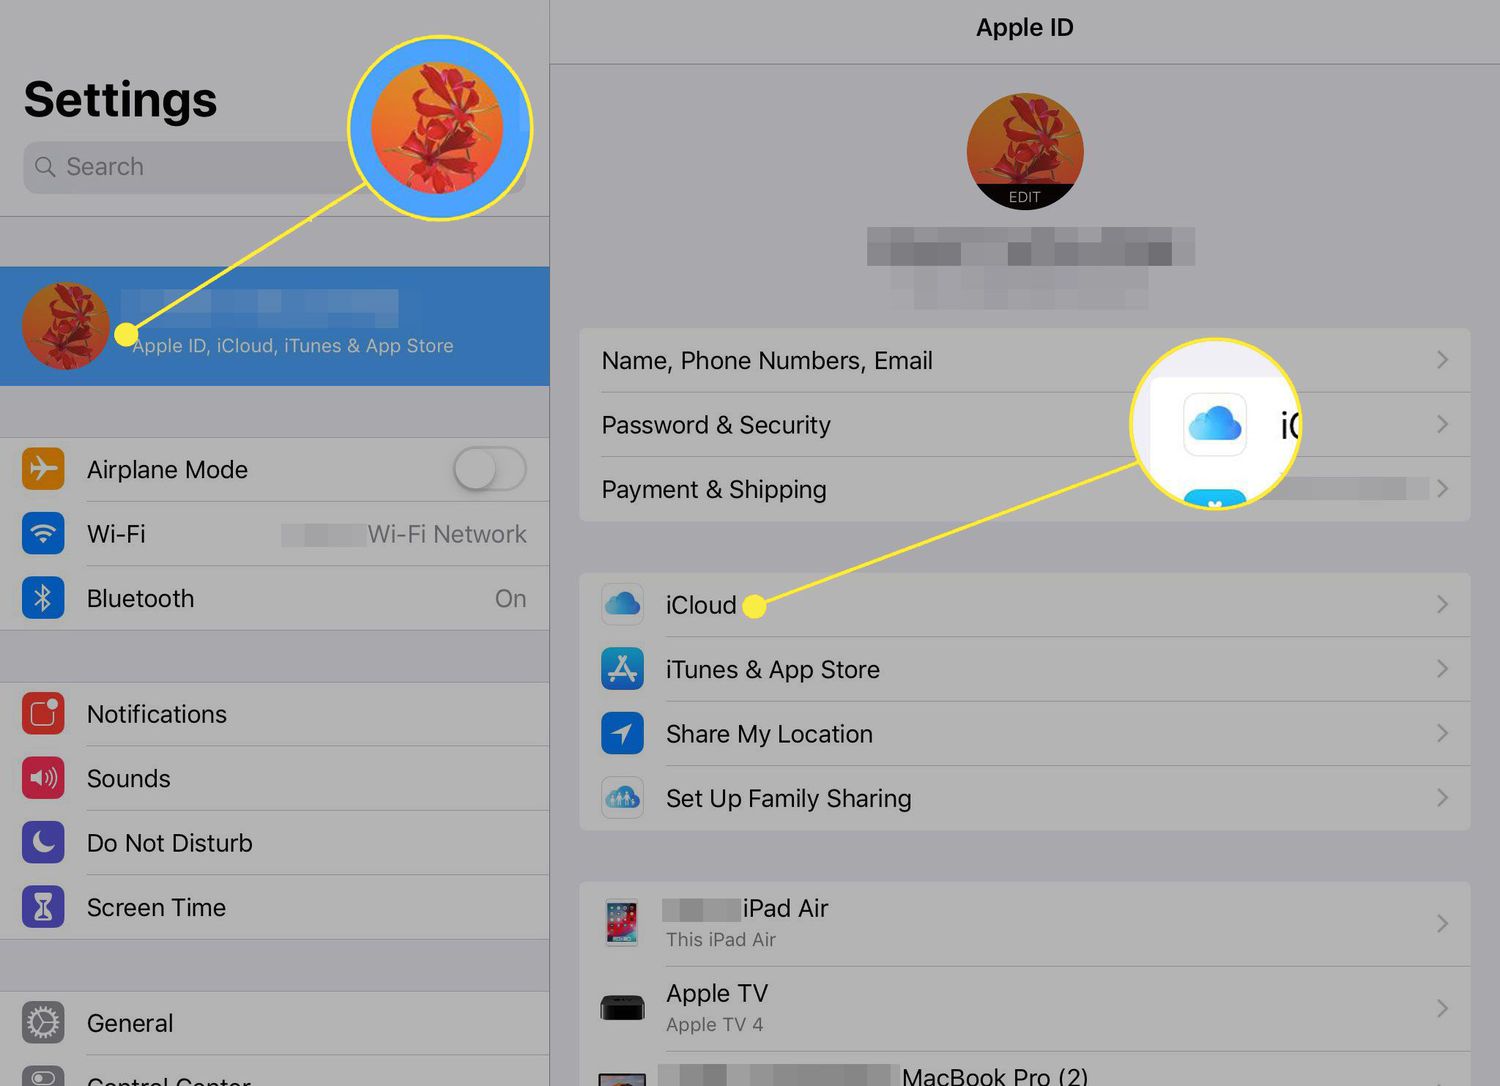
2. Enable iCloud on your iPhone and iPad: On both devices, go to the “Settings” app and tap on your Apple ID at the top of the screen. Then, select “iCloud” and sign in with your Apple ID and password. Once you’re signed in, enable the iCloud services you want to sync between your devices.
3. Choose the data to be synced: Within the iCloud settings on both devices, you can select which types of data you want to sync. For example, you can choose to sync your contacts, calendars, reminders, photos, and more. Ensure that the desired data is enabled for syncing on both your iPhone and iPad.
4. Allow time for initial sync: Once you’ve enabled iCloud on both devices, it may take some time for the initial sync to complete. During this process, your data will be uploaded to iCloud and made available for syncing between your iPhone and iPad. Make sure both devices have a stable internet connection and allow sufficient time for the sync to occur.
5. Verify sync settings: Double-check your sync settings to ensure that everything is configured correctly. On both devices, navigate to the relevant settings for each type of data you want to sync, such as contacts or calendars. Verify that the sync options are enabled and that any specific settings, such as merge or replace, are set according to your preferences.
By following these steps and setting up iCloud on both your iPhone and iPad, you’ll establish a seamless connection that allows for effortless synchronization of data between the two devices. Whether it’s contacts, calendars, photos, or more, you’ll be able to access and update your information on either device, ensuring a streamlined user experience.
Point 2: Syncing your contacts, calendars, and reminders
Keeping your contacts, calendars, and reminders synchronized between your iPhone and iPad is essential for staying organized and ensuring that you have all your important information readily available on both devices. Fortunately, with the help of iCloud, syncing these data can be a seamless process. Let’s explore how to do it.
To begin, make sure that both your iPhone and iPad are signed in to the same iCloud account. This will ensure that the syncing process can take place smoothly. You can check this by going to the “Settings” app on both devices and selecting your Apple ID at the top of the screen.
Once you have confirmed that both devices are using the same iCloud account, you can proceed to sync your contacts. Open the “Settings” app on your iPhone and navigate to “Mail,” then “Contacts,” and finally “Calendars.” Toggle on the “Contacts” option under the “iCloud” section. Your contacts will now be synced with iCloud and will be available on your iPad as well.
To sync your calendars, go back to the “Mail, Contacts, Calendars” section in the “Settings” app on your iPhone. Toggle on the “Calendars” option under the “iCloud” section. This will ensure that any events or appointments you add or modify on your iPhone will also appear on your iPad’s calendar.
Similarly, you can sync your reminders by toggling on the “Reminders” option under the “iCloud” section in the “Settings” app on your iPhone. This will enable you to access and manage your reminders seamlessly across both devices.
It’s worth noting that for these sync settings to work effectively, you must have an active internet connection on both your iPhone and iPad. This will ensure that changes made on either device are reflected in real-time on the other device.
So, whether you add a new contact on your iPhone or create a reminder on your iPad, the changes will be automatically synced and updated on both devices. This level of synchronization ensures that you can access and manage your essential data seamlessly, no matter which device you are using at any given time.
By following these steps, you can effortlessly sync your contacts, calendars, and reminders between your iPhone and iPad. This synchronization not only keeps your information up to date but also ensures that you can access it on both devices without any hassle.
Point 3: Transferring photos and videos between your iPhone and iPad
One of the great features of owning both an iPhone and an iPad is the ability to seamlessly transfer photos and videos between the two devices. Whether you want to share your favorite moments captured on your iPhone with a larger screen on your iPad or simply backup your precious memories, transferring media files is a straightforward process.
The easiest way to transfer photos and videos between your iPhone and iPad is by using Apple’s iCloud Photo Library. Make sure you have enabled iCloud Photo Library on both devices. This will automatically sync your photos and videos across all your Apple devices, including iPhone and iPad.
To enable iCloud Photo Library, open the Settings app on your iPhone and go to “[Your Name] > iCloud > Photos”. Toggle on the “iCloud Photo Library” option. Repeat the same steps on your iPad to ensure both devices are connected to the same iCloud account and have iCloud Photo Library enabled.
Once iCloud Photo Library is enabled, any new photos or videos that you take on your iPhone will automatically be available on your iPad. Additionally, you can access your entire photo and video library from both devices, regardless of where they were taken.
If you prefer not to use iCloud Photo Library or want to transfer specific photos and videos manually, you have a couple of alternative options. One option is to use AirDrop, which allows you to wirelessly transfer files between Apple devices.
To use AirDrop, ensure that both your iPhone and iPad have Bluetooth and Wi-Fi enabled. On your iPhone, open the Photos app and select the photos or videos you want to transfer. Tap the Share button, and then choose the device you want to send the files to from the AirDrop options. Accept the transfer on your iPad, and the files will be transferred successfully.
Another method for transferring photos and videos between your iPhone and iPad is by using a third-party app like Google Photos or Dropbox. These apps allow you to upload your media files to the cloud and access them from any device with the respective app installed.
To transfer photos and videos using Google Photos or Dropbox, install the app on both your iPhone and iPad. Open the app, sign in to your account, and allow access to your photo library. Upload the desired photos and videos from your iPhone, and they will be available for download on your iPad.
Remember to consider the available storage space on your devices and choose the method that best suits your needs. Whether you opt for iCloud Photo Library, AirDrop, or a third-party app, transferring photos and videos between your iPhone and iPad is a breeze.
Point 4: Syncing your apps and app data
When it comes to syncing your apps and app data between your iPhone and iPad, there are a few different methods you can use. Whether you’re looking to transfer your favorite games, productivity apps, or any other app, we’ve got you covered. Let’s take a look at some of the ways you can sync your apps and app data.
1. iCloud Sync: One of the easiest and most convenient methods to sync your apps and app data is by utilizing iCloud. When you enable iCloud on both your iPhone and iPad, it will automatically sync your app data, including settings, preferences, and even in-app purchases, to both devices. This ensures that you have a seamless experience across all your Apple devices. To enable iCloud sync, go to Settings on your iPhone and iPad, tap on your Apple ID at the top, select iCloud, and toggle on the apps you want to sync.
2. App Store Purchases: If you have purchased apps on your iPhone and want to sync them to your iPad, you can simply go to the App Store on your iPad, tap on the “Purchased” tab, and download the apps you want. Since you’re using the same Apple ID on both devices, you won’t be charged again for the apps you’ve already purchased. This method is particularly useful if you have a large library of apps and only want to sync specific ones to your iPad.
3. iTunes File Sharing: For apps that support iTunes file sharing, you can connect your iPhone to your computer and use iTunes to sync the app data to your iPad. First, connect your iPhone to the computer using a USB cable and launch iTunes. Select your iPhone from the device list, go to the “File Sharing” section, and choose the app you want to transfer data from. You can then click “Save to…” to save the app data to your computer. Next, connect your iPad to the computer, select your iPad in iTunes, go to the “File Sharing” section again, and choose the same app. Finally, click “Add…” to transfer the saved app data from your computer to your iPad.
4. Third-Party Apps: There are also third-party apps available that can assist you in syncing your apps and app data between your iPhone and iPad. These apps provide additional features and flexibility, allowing you to selectively sync certain apps or even schedule automatic syncing. Some popular third-party apps for app syncing include iMazing, AnyTrans, and Syncios. Simply download the app on both devices, follow the instructions provided, and start syncing your apps and app data.
By exploring these different methods, you can easily sync your apps and app data between your iPhone and iPad, ensuring that you have access to your favorite apps and personalized settings on both devices. Whether you choose to use iCloud sync, App Store purchases, iTunes file sharing, or third-party apps, syncing your apps has never been easier.
Conclusion
Syncing your iPhone with your iPad is a convenient way to ensure that your devices stay updated and in sync. Whether you want to transfer files, photos, or apps, the process is straightforward and can be done effortlessly.
By following the steps outlined in this article, you can successfully sync your iPhone with your iPad and enjoy a seamless experience across your Apple devices. Keep in mind that you should always make sure that both devices are connected to the same Wi-Fi network and have the latest software updates installed to ensure optimal performance.
Now that you know how to sync your iPhone with your iPad, take advantage of this powerful feature to streamline your digital life. Say goodbye to manual transfers and enjoy the convenience of having your data and content automatically synced between your devices.
FAQs
1. How do I sync my iPhone with my iPad?
2. Can I sync my iPhone and iPad wirelessly?
3. What data can be synced between my iPhone and iPad?
4. Is there a limit to the number of devices I can sync with my iPhone?
5. Can I sync my iPhone and iPad if they are running different software versions?