
Voicemails might be a thing of the past but one can’t deny how helpful it is, especially if you are running a business. These days, it’s hard to keep track of the people who call you and even harder to call them all back individually when you miss calls. That’s why Voicemails are still being used today. AT&T is a network that provides its users with voicemail options that range from basic to visual voicemail. It’s a service that is available to all of their patrons as long as it is allowed by their device and mobile plan. If you don’t know how you can start using your voicemail, don’t fret, the AT&T Voicemail setup is quick and easy.
If you’re one of the users who can use the service but can’t set it up, we’ll help you get started in this AT&T Voicemail setup guide.
Also read: What Is Call Forwarding and How to Use It? (Complete Guide)
What is AT&T Voicemail?

AT&T Voicemail is a service by the network provider that allows their users to record messages from callers when they’re not available to take the call. All AT&T phones come with free basic voicemail that you will have to set up before using. The carrier offers three different voicemail services that are available to their patrons. These types are as follows:
- Basic voicemail
- Enhanced Voicemail
- Visual Voicemail
Basic Voicemail is a service available to all AT&T users as long as they are not committed to a data plan or a Wireless Home Phone. This can be upgraded to the Enhanced Voicemail to get more time and memory capacity.
Visual Voicemail, on the other hand, allows you to view your messages directly from your phone without having to dial anything. It also allows better management and an interface where you can read the transcriptions of your messages instead of listening to them.
Take note that this is different from the Android and iOS voicemail services as this is exclusive to AT&T users only.
AT&T Voicemail: Options to Consider
For AT&T, the available type of voicemail for you will depend on your service and phone. Those with wireless and AT&T data plans with compatible smartphones can get Visual Voicemail at no additional cost. However, those who don’t have a data plan or Wireless Home Phone will only have the Basic Voicemail available to them. They can opt to upgrade to Enhanced Voicemail for a small fee to be paid per month to get more storage time and message capacity.
If you have an AT&T Prepaid account, you won’t be able to avail yourself of the Enhanced Voicemail option.
Here’s a quick rundown of the AT&T Voicemail services that you can consider:
| Voicemail Option | Visual Voicemail | Basic Voicemail | Enhanced Voicemail |
| Supported Devices | Only for compatible smartphones | All wireless OR prepaid phones WITHOUT a Wireless Home Phone and a data plan | Wireless phones that don’t have a data plan or a Wireless Home Phone plan; not available for AT&T PREPAID |
| Plan Requirements | Data and voice plans with Visual Voicemail | Voice plan | Voice Plans with Basic Voicemail can get this for $1.99/month |
| Maximum Message Capacity | 40 | 20 | 40 |
| Message Storage Time | 30 days | 14 days | 30 days |
| Maximum Message Length | 4 minutes | 2 minutes | 4 minutes |
| Group Distribution | Not Applicable | 15 groups with 25 members | 15 groups with 25 members |
AT&T Voicemail Setup: Regular Voice Mailbox
Now that you have an idea of the options that are available to you, it’s time to take a look at the process of an AT&T Voicemail setup. This section of the article will tackle how you can set up the regular voice mailbox. This option is more available to users as long as their phones don’t have a data plan or a Wireless Home Phone.
On Mobile Phone
To set up your AT&T Voicemail through your mobile phone, simply follow the steps below:
- On your AT&T phone, dial your number with the area code.
- Press the (*) key. You’ll hear a recording that will state your phone number. It will also tell you to leave a message.
- Create a password for your mailbox. You can create any password but remember that you can only use numbers and they must not exceed 10 digits. Choose one that will be easy for you to remember as you will need to enter this password whenever you want to listen to your messages.
- You will be prompted to record your name on the phone and a greeting. You’ll also be asked to record a busy greeting in the process.
That should do the trick. Don’t forget to test it out with a friend or relative to confirm if it is working.
Using Another Phone
Alternatively, you can also do an AT&T voicemail setup on another phone. The steps for that are as follows:
- From any phone, dial your AT&T Voicemail access number.
- Press the (*) key to reach your mailbox. After that, key in the phone number from your service. This will be your mailbox number.
- The next prompt will instruct you to press the (#) key to be the setup.
- Setup your password. Remember that it has to be at least four digits long but must not exceed 10.
- Record your name, greeting message, and a busy greeting.
With that, you’re all set to use your AT&T voicemail. Don’t forget to take note of your password as you won’t be able to access your messages without it.
On Online Account
Setting up your voicemail online is a bit faster than setting it up on your phone. To set up your AT&T voicemail online, just follow the steps below:
- Log in to your myAT&T account. If you don’t have an account yet, you can simply register on the site.
- Go to the Voicemail Setup Wizard after logging in.
- Once you’re on the Setup Wizard page, click Next.
- You’ll be taken to the Voice Mailbox Type page. Simply select Generic Voice Mailbox > Next.
- Go to the Phone Line Names screen. Once there, just assign a name to your phone number. If you have multiple numbers, you’ll have to assign a name to each of them.
- Locate the “Assign Members to Phone Numbers” section and select your Member ID.
- Head to the “Create Mailbox PIN” section and input a 6 to 10-digit PIN. Once done, press save.
That should do the trick. Don’t forget to give your voicemail a try to see if it works properly.
AT&T Voicemail Setup: Visual Voicemail
AT&T Visual Voicemail is a service that allows you to access the transcript of your voice messages directly from your phone. Compared to the network’s Basic and Enhanced voicemail, this service is only available to compatible smartphones.
Contrary to the Basic Voicemail, you don’t need to dial numbers for this one. Everything can be done through the AT&T Visual Voicemail app.
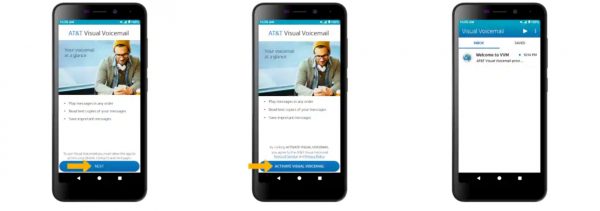
To set up your Visual Voicemail, simply follow the steps below:
- Open the AT&T Visual Voicemail app.
- Once you’re on the app, tap Next.
- Tap on Activate Visual Voicemail.
And that’s it! It’s easier to set up than the basic voicemail and it won’t take you a lot of effort to do it. However, you will have to remember that AT&T’s Visual Voicemail is only available for select smartphones that are compatible with it. Also, it is not a perfect system and you might sometimes find visual voicemails not working.
Download for Android (Play Store)
AT&T Voicemail Setup: Adding Multiple Mailboxes
For those who have multiple telephone numbers or if you want multiple persons to have a voicemail mailbox, you have two options:
- Create a unique telephone number or voicemail box per person
- All voicemail messages will be left in a single voicemail box
If you want to create additional voicemail boxes, there are a couple of steps and procedures that you’ll need to go through before you can add them.
Creating a subaccount
The first step to creating additional voicemail boxes is to create subaccounts for each person. Simply follow the steps below to get started:
- Go to the “Account Overview page” and then to the “My Digital Phone” section. Tap on the (+) button.
- Locate and select Manage my Plan.
- You’ll be transferred to the “My Phone Service” page. From there, locate “My Voicemail” and select “Create or Manage Voicemail Accounts.”
- Tap on Manage Subaccounts.
- Locate Add a Subaccount.
- Fill in the information required on the profile and save.
- Review the information and click on Continue.
Once you’re done creating all your subaccounts, head back to the “Account Overview” page. From there, select your voicemail box type, and go to “Advanced Voicemail.” From there, add a name and assign the numbers that will be used.
Adding Subaccount Users
- Put a check next to the name of each user who needs a unique voicemail box.
- Assign a PIN to teach the user.
- Indicate specific keypad numbers to help route calls to the subaccount user’s voicemail box. You can also configure your settings to give a user a private number option.
Configuring Phone Numbers
- Select the subaccount user for the private phone number or select “Shared voicemail” to sync the number to your primary number.
- Tap on Save.
- A confirmation will appear to show that changes have been made to your voice mailbox.
From there, all you have to do is to test your voicemail to make sure that it works properly.
Wrap-Up
In all, the AT&T Voicemail setup is generally easy to do. Of course, it’s much easier if you have a phone that is compatible with their Visual Voicemail so that you don’t have to go through the long process of having to tinker with your phone. Regardless, once you set up your voicemail, you don’t have to do much after that. Just make sure to check your mailbox from time to time to clear messages so you won’t reach the maximum capacity. Also, don’t forget to take note of your mailbox PIN so that you won’t have trouble accessing your mailbox in the future.