
Is your Android phone feeling sluggish and bogged down? It might be time for a good cleaning. Just like any other electronic device, Android phones can accumulate junk files, cache data, and unnecessary apps over time, which can result in decreased performance and limited storage space. But don’t worry, cleaning your Android phone is a simple and effective way to optimize its performance and reclaim precious storage. In this article, we will walk you through the step-by-step process of cleaning your Android phone, from clearing cache and deleting unused apps to organizing files and optimizing settings. So, if you’re ready to give your Android phone a fresh start and make it run smoothly again, let’s dive into the world of phone cleaning!
Inside This Article
- Reasons for Cleaning an Android Phone
- Necessary Precautions before Cleaning
- Tools and Materials Required
- Step-by-Step Guide to Clean an Android Phone
- Cleaning the Screen
- Cleaning the Case
- Cleaning the Ports and Buttons
- Cleaning the Camera Lens
- Cleaning the Microphone and Speaker
- Cleaning the Charging Port
- Cleaning the Headphone Jack
- Cleaning the SIM Card Slot
- Cleaning the Battery
- Cleaning the Back Cover
- Cleaning the Internals
- Tips to Maintain a Clean Android Phone
- Conclusion
- FAQs
Reasons for Cleaning an Android Phone
Keeping your Android phone clean is not just about aesthetics, but it also has several important reasons. Here are some key reasons why you should make cleaning your Android phone a regular part of your maintenance routine:
1. Hygiene: Our phones are constantly exposed to germs, bacteria, and other debris. Regularly cleaning your Android phone helps to remove these contaminants and promotes good hygiene.
2. Performance Optimization: Over time, dust and dirt can accumulate on your phone’s components, such as the charging port, speaker, and microphone. Cleaning these areas can improve performance and prevent issues like audio problems or charging difficulties.
3. Extend Lifespan: By keeping your Android phone clean, you can help extend its lifespan. Dust and debris can cause damage or blockage in essential components, leading to malfunctions or reduced performance.
4. Image and Screen Clarity: A clean phone enhances your overall experience. Removing fingerprints, smudges, and dust from the screen improves visibility and clarity, allowing you to fully enjoy the vibrant colors and sharpness of your Android phone’s display.
5. Resale Value: If you plan to sell or trade-in your Android phone in the future, having a clean and well-maintained device can significantly increase its resale value. Potential buyers are more likely to be attracted to a device that looks clean and well-cared for.
6. Psychological Satisfaction: Cleaning your Android phone can provide a sense of psychological satisfaction. A clean and well-maintained phone not only looks good but also feels good to use, giving you a sense of pride and ownership over your device.
These reasons show the importance of regular cleaning for your Android phone. By implementing a cleaning routine, you can reap the benefits of improved hygiene, better performance, enhanced longevity, and a visually pleasing device.
Necessary Precautions before Cleaning
Before diving into the process of cleaning your Android phone, it is crucial to take some necessary precautions to prevent any damage. Here are a few important steps to consider before getting started:
- Power off your phone: This is the first and foremost precaution you should take before cleaning your Android phone. Switch off the device and make sure it is completely powered down to avoid any electrical mishaps during the cleaning process.
- Remove the battery (if possible): If you have a phone with a removable battery, it is recommended to take it out before cleaning. This ensures that no liquid accidentally enters the battery compartment and avoids any potential damage.
- Disconnect from power sources: Unplug your phone from any charging cables or power sources before cleaning. This eliminates the risk of electrical shock and safeguards both you and your device.
- Gather necessary tools and materials: Before you start cleaning, gather all the tools and materials you will need for the process. This includes a microfiber cloth, cotton swabs, a soft-bristled brush, a mild cleaning solution, and isopropyl alcohol (if recommended by the manufacturer). Having everything ready beforehand saves time and ensures a smooth cleaning experience.
- Refer to the manufacturer’s instructions: Different phone models may have specific instructions or guidelines for cleaning. It is always wise to consult the user manual or visit the manufacturer’s website for any specific precautions or recommendations tailored to your device.
- Avoid excessive moisture: Although it is important to clean your Android phone, excessive moisture can be harmful. Make sure to only use a slightly dampened cloth or cotton swab for cleaning the phone’s surface, avoiding any water dripping into the openings or ports.
- Do not use harsh chemicals: It is crucial to use mild cleaning solutions specifically designed for electronic devices. Avoid using harsh chemicals, such as ammonia-based cleaners or abrasive substances, as they can damage the phone’s screen, case, and internal components.
- Be gentle and cautious: When cleaning your Android phone, handle it with care. Avoid applying excessive pressure or using sharp objects that could scratch the screen or damage the delicate components. Take your time and work methodically to ensure a thorough yet gentle cleaning process.
By following these necessary precautions, you can ensure a safe and effective cleaning process for your Android phone, promoting its longevity and keeping it in top-notch condition.
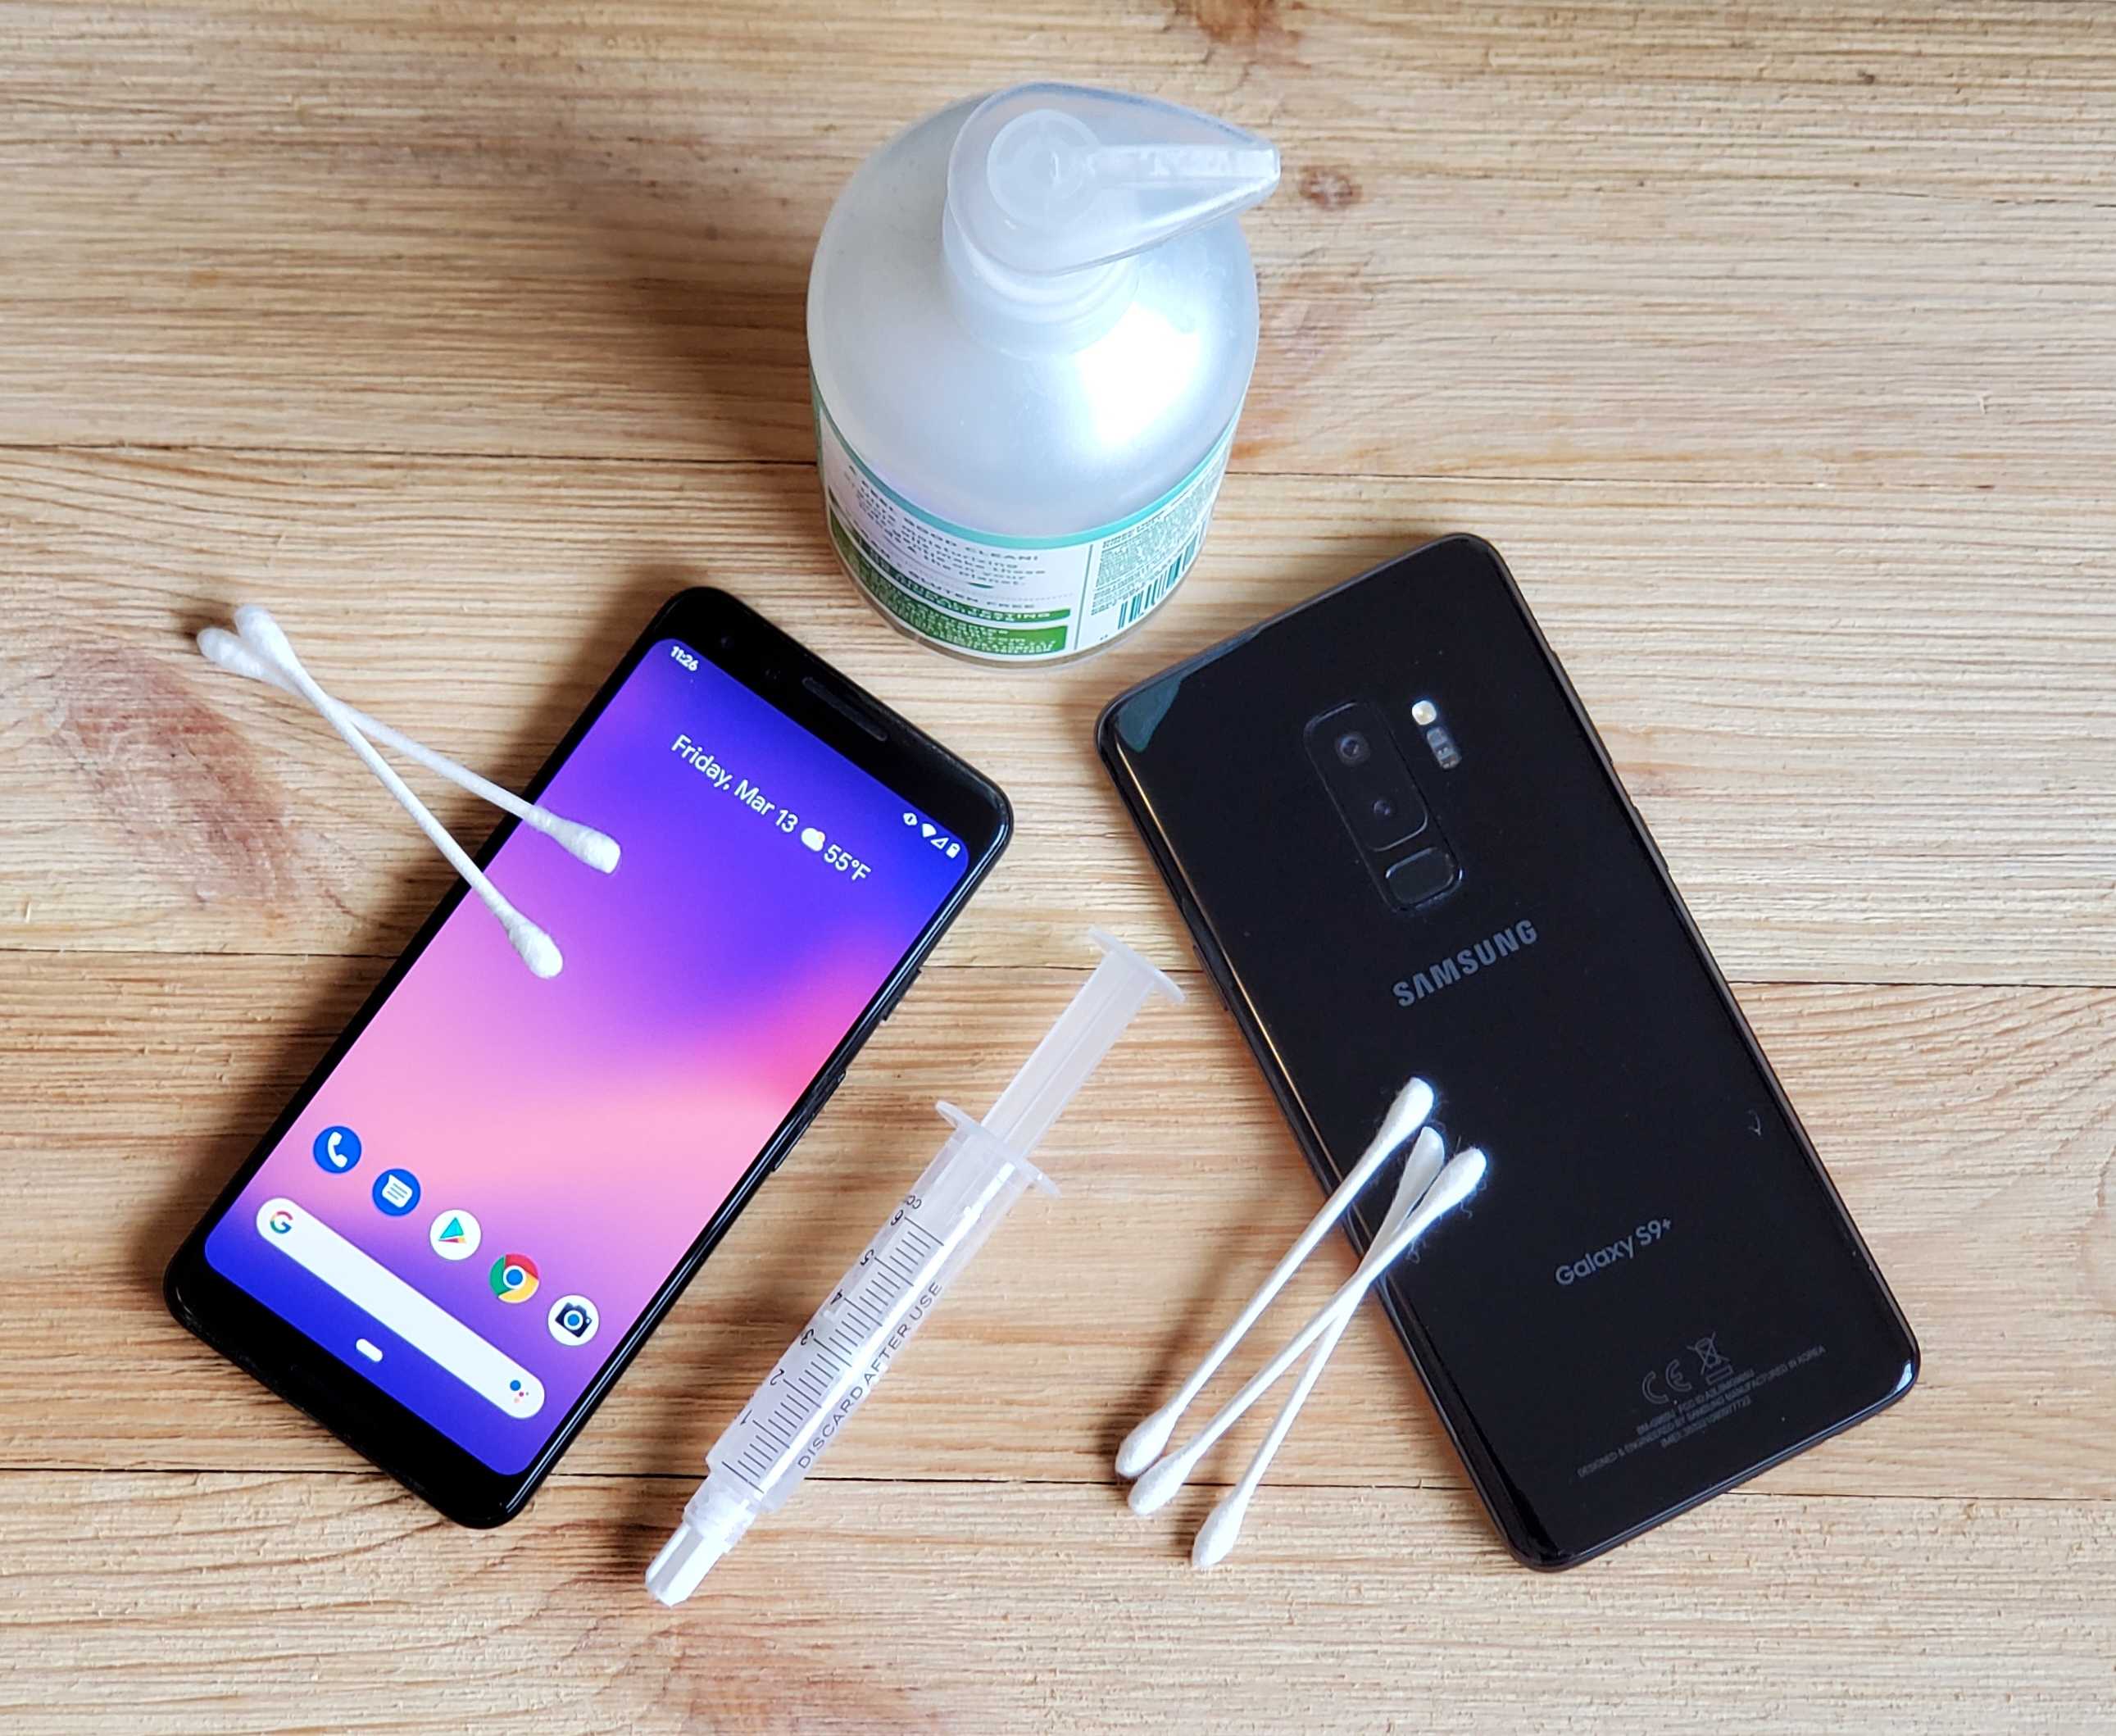
Tools and Materials Required
When it comes to cleaning your Android phone, having the right tools and materials on hand is essential. These items will ensure that you can effectively remove dirt, grime, and fingerprints from your device without causing any damage. Here are the tools and materials that you will need:
- Cleaning Solution: It’s important to use a cleaning solution specifically designed for electronic devices. Avoid using harsh chemicals or abrasive cleaners, as they can damage the screen and other components of your Android phone. Look for a screen cleaner solution or a mixture of gentle soap and water.
- Microfiber Cloth: A microfiber cloth is the best tool for cleaning your Android phone’s screen. These soft and lint-free cloths are designed to effectively remove smudges and fingerprints without scratching the surface. Avoid using paper towels, tissues, or regular cloth, as they can leave behind lint or small scratches.
- Cotton Swabs: Cotton swabs are useful for reaching tight spots and cleaning hard-to-reach areas such as the ports and buttons. They allow you to apply the cleaning solution precisely and remove any dirt or debris that may have accumulated.
- Soft-bristled Brush: A soft-bristled brush, such as a clean makeup brush or a small paintbrush, can be used to gently remove dust and dirt from the crevices and corners of your Android phone. Make sure to choose a brush with soft bristles to prevent scratching the surface.
- Compressed Air: Compressed air in a can is an effective tool for blowing away dust particles from the ports, buttons, and other hard-to-reach areas of your Android phone. It helps to dislodge debris and keep your device clean. Remember to use the air canister in short bursts to prevent moisture buildup.
- Isopropyl Alcohol: Isopropyl alcohol can be used as a cleaning agent for stubborn stains or sticky residue on your Android phone’s case or back cover. However, use it sparingly and ensure that you apply it to a cloth first before wiping the surface.
Having these tools and materials ready before you start the cleaning process will ensure that you can efficiently and effectively remove dirt and grime from your Android phone without damaging its components. Remember to exercise caution and follow the cleaning instructions provided by your phone’s manufacturer.
Step-by-Step Guide to Clean an Android Phone
Keeping your Android phone clean is essential to maintain its functionality and extend its lifespan. Regularly cleaning your phone can prevent grime, dirt, and bacteria buildup, ensuring optimal performance and a hygienic user experience. Follow this step-by-step guide to clean your Android phone effectively:
1. Power off your phone: Before you start cleaning, it’s important to turn off your Android phone to avoid any accidental damage or interference.
2. Remove the case: If your phone has a protective case, take it off carefully. This will allow you to clean both the case and the phone separately.
3. Prepare cleaning solution: Mix a few drops of mild liquid soap or a phone-safe cleaner with water in a small bowl. Alternatively, you can use pre-moistened electronic wipes formulated for cleaning devices.
4. Clean the screen: Dip a microfiber cloth or a lint-free, non-abrasive cloth in the cleaning solution. Gently wipe the screen in a circular motion, removing fingerprints, smudges, and dirt. Be mindful not to press too hard, as excessive pressure can damage the screen.
5. Clean the case: For plastic or rubber cases, wash them with mild soap and water using a soft-bristle brush. For fabric or leather cases, use a slightly damp cloth to wipe away stains and dirt. Let the case dry completely before putting it back on the phone.
6. Clean the ports and buttons: Use a clean, dry toothbrush or a soft-bristle brush to gently clean the charging port, headphone jack, and any other ports or buttons. This will help remove dust and debris that might affect the phone’s connectivity.
7. Clean the camera lens: Use a microfiber cloth or a lens cleaning cloth to gently wipe the camera lens. Avoid using abrasive materials or excessive force to prevent scratches.
8. Clean the microphone and speaker: Use a soft-bristle brush or a cotton swab dipped in the cleaning solution to clean the microphone and speaker areas. Be gentle and ensure not to push any dirt further into the openings.
9. Clean the charging port: Use a clean toothbrush or a toothpick to remove any dirt or lint from the charging port. Be careful not to damage the port while cleaning.
10. Clean the headphone jack: Use a toothpick or a cotton swab dipped in the cleaning solution to clean the headphone jack. Remove any debris or lint carefully to maintain optimal audio quality.
11. Clean the SIM card slot: If your Android phone has a removable SIM card, remove it and clean both the SIM card and the slot using a clean cloth or a cotton swab lightly dampened with the cleaning solution.
12. Clean the battery: If the battery is removable, remove it and clean the battery contacts with a dry cloth or a cotton swab. If the battery is non-removable, skip this step.
13. Clean the back cover: Use a clean, damp cloth or a cotton swab dipped in the cleaning solution to wipe the back cover of your phone. Dry it thoroughly before reattaching it.
14. Clean the internals: While you can’t clean the internal components of your phone directly, you can use compressed air to remove dust or debris from the openings like the speaker grills or the microphone area. Hold the can in an upright position and follow the can’s instructions to safely blow the air.
After completing these steps, allow your phone to air dry or use a soft, lint-free cloth to dry it completely. Once dry, you can reattach the case and power on your Android phone. Remember to regularly clean your phone to maintain its cleanliness and performance.
Cleaning the Screen
The screen of your Android phone is one of the most important and frequently used components. It is important to keep it clean to ensure optimal visibility and touch sensitivity. Here’s how you can effectively clean the screen of your Android phone:
1. Start by turning off your phone and unplugging any cables connected to it. This will prevent any accidental actions or damage while cleaning.
2. Use a microfiber cloth to gently wipe the screen. Microfiber is a soft material that won’t scratch or damage the screen. Avoid using harsh materials such as tissue paper or paper towels, as they can leave scratches.
3. If there are stubborn smudges or fingerprints on the screen, slightly dampen the microfiber cloth with water. Be careful not to use excessive water, as moisture can damage the phone. Wring out any excess water before cleaning.
4. For tougher stains or smudges, you can use a small amount of screen-cleaning solution, specifically designed for electronic devices. Apply the solution to the microfiber cloth, not directly onto the screen, and gently wipe the affected area.
5. Pay extra attention to the corners and edges of the screen, as dirt and debris tend to accumulate in those areas. Gently clean these areas using the microfiber cloth, making sure not to apply too much pressure.
6. Once you’re done cleaning, allow the screen to air dry before turning on your phone. This will ensure that there is no moisture left on the screen, which could potentially cause damage.
Remember, regular cleaning of the screen is essential to maintain its clarity and responsiveness. Avoid using abrasive cleaners or rough materials that could potentially scratch or damage the screen. By following these steps, you can keep your Android phone’s screen looking clean and vibrant.
Cleaning the Case
Your Android phone’s case, or cover, is an important part of its overall appearance. Over time, it can accumulate dirt, dust, fingerprints, and even makeup residue. Keeping your phone case clean not only enhances its visual appeal but also helps to maintain its longevity. Here’s a step-by-step guide to cleaning your Android phone case:
1. Remove the case: Start by removing the case from your Android phone. This will give you better access to clean it thoroughly.
2. Check the material: Identify the material of your phone case. Different materials require different cleaning methods. Common materials include plastic, silicone, leather, and metal.
3. Prepare a cleaning solution: Depending on the material of your case, prepare a suitable cleaning solution. For plastic or silicone cases, a mild soap and water solution will suffice. For leather cases, use a leather cleaner or a mixture of vinegar and water. For metal cases, use a metal cleaner or a mixture of baking soda and water.
4. Dampen a cloth or sponge: Dip a soft cloth or sponge in the cleaning solution. Make sure it is damp and not soaking wet to avoid any liquid entering the phone or damaging the case.
5. Clean the case: Gently wipe down the entire surface of the case with the damp cloth or sponge. Pay attention to any visible stains or spots and give them a bit of extra cleaning. Be careful not to scrub too hard, especially if your case is made of fragile material.
6. Scrub stubborn stains: If there are stubborn stains or marks on your case that won’t come off with just a cloth or sponge, use a soft-bristled toothbrush dipped in the cleaning solution. Gently scrub the affected areas in a circular motion until the stains are removed.
7. Rinse and dry: Once you have cleaned the case, rinse it thoroughly with clean water to remove any soap residue. Then, use a dry cloth or towel to dry the case completely. Ensure it is dry before putting it back on your Android phone to prevent any moisture from causing damage.
8. Reattach the case: Finally, carefully reattach the clean and dry case to your Android phone. Make sure it fits properly and securely before handling your phone.
Cleaning your Android phone case regularly will help keep it looking fresh and new. Remember to follow the manufacturer’s instructions for cleaning if provided. By taking care of your phone case, you can extend its lifespan and maintain a clean and appealing device.
Cleaning the Ports and Buttons
Keeping the ports and buttons of your Android phone clean is essential to ensure optimal performance and longevity. Dust, dirt, and debris can build up in these areas, causing connectivity issues, reduced functionality, and even damage to your device. Here’s a step-by-step guide to help you clean the ports and buttons on your Android phone:
1. Power off your Android phone and remove any cables or accessories connected to it. This ensures your safety and prevents any accidental damage to your device.
2. Use a soft-bristled brush or a toothbrush to gently brush out any visible dirt or debris from the ports and buttons. Be sure to brush in a controlled and gentle manner to avoid causing any damage to the sensitive components.
3. If there is stubborn dirt or grime that cannot be removed with a brush, you can use a cotton swab dipped in isopropyl alcohol or electronic cleaning solution. Gently swab the ports and buttons, making sure not to apply too much pressure. Allow the alcohol to evaporate completely before using your phone again.
4. For ports like the charging port or headphone jack, you can also use a can of compressed air to blow away any dust or debris. Hold the can of compressed air upright and use short bursts to avoid any excessive pressure that may damage the port.
5. After cleaning, inspect the ports and buttons to ensure they are clean and free from visible dirt or residue. If necessary, repeat the cleaning process until you are satisfied with the results.
6. Once the ports and buttons are clean, allow them to dry completely before reconnecting any cables or accessories and powering on your Android phone.
It’s important to note that while cleaning, you should avoid using excessive force or harsh cleaning agents as they can potentially damage the ports and buttons of your Android phone. Additionally, make sure to follow any specific cleaning instructions provided by the manufacturer to avoid voiding the warranty.
By regularly cleaning the ports and buttons of your Android phone, you can prevent any potential issues and ensure that your device continues to function smoothly. Take the time to incorporate this cleaning routine into your maintenance routine for a clean and reliable Android phone.
Cleaning the Camera Lens
The camera lens on your Android phone is responsible for capturing clear and sharp images. Over time, dust, fingerprints, and smudges can accumulate on the lens, affecting the quality of your photos. To ensure that your camera lens stays clean and your pictures come out crisp, follow these simple steps:
- Gather the necessary tools: Before you begin cleaning the camera lens, gather the required tools. You will need a microfiber cloth, lens cleaning solution or isopropyl alcohol, and a cleaning brush or blower to remove any loose particles.
- Power off your phone: Turn off your Android phone to prevent any accidental button presses while cleaning the camera lens.
- Remove any visible dirt or debris: Use a cleaning brush or blower to gently remove any visible dirt or debris from the camera lens. This will help avoid scratching the lens surface during the cleaning process.
- Dampen the microfiber cloth: Moisten a corner of the microfiber cloth with lens cleaning solution or a small amount of isopropyl alcohol. Be careful not to spray the solution directly onto the lens, as it may seep into other parts of the phone.
- Gently wipe the lens: Using the dampened corner of the microfiber cloth, gently wipe the camera lens in a circular motion. This will help remove any stubborn fingerprints or smudges. Avoid applying too much pressure to prevent scratching the lens.
- Dry the lens: Once you have finished cleaning the lens, use the dry part of the microfiber cloth to gently dry any remaining moisture. Ensure that the lens is completely dry before turning on your phone to prevent water damage.
- Repeat if necessary: If there are still visible smudges or marks on the lens, repeat the cleaning process using a fresh corner of the microfiber cloth. Do not use excessive force or harsh chemicals that could damage the lens.
By regularly cleaning the camera lens on your Android phone, you can ensure that your photos turn out clear and vibrant. Remember to be gentle and avoid using abrasive materials or solutions, as they can cause permanent damage to the lens. Now you’re ready to capture stunning photos with a clean camera lens!
Cleaning the Microphone and Speaker
The microphone and speaker on your Android phone are crucial components for making calls and enjoying media. Over time, they can accumulate dirt, dust, and debris, affecting their performance and audio quality. Cleaning them regularly is essential to ensure clear sound transmission and reception. Here’s how you can clean the microphone and speaker on your Android phone:
1. Begin by powering off your Android phone to avoid any accidental damage or interference during the cleaning process.
2. Take a clean, soft-bristled brush or a small toothbrush and gently brush the microphone and speaker areas. Be careful not to press too hard to avoid causing any damage to the delicate components.
3. If there is visible dirt or debris, you can use a can of compressed air to blow away any particles from the microphone and speaker. Hold the can upright and use short bursts to avoid excessive pressure.
4. For stubborn or hard-to-reach dirt, you can use a cotton swab lightly dampened with isopropyl alcohol. Gently swipe the cotton swab over the microphone and speaker areas, being careful not to leave any excess moisture behind.
5. Allow the microphone and speaker to air dry completely before powering on your Android phone. This will ensure that no moisture remains, which can damage the components or affect the audio quality.
6. Once the microphone and speaker area is dry, carefully inspect it for any remaining dirt or debris. If needed, repeat the cleaning process until they are completely clean.
7. Finally, power on your Android phone and test the microphone and speaker by making a call or playing media. If you notice any issues with the sound quality, repeat the cleaning process or consult a professional technician.
By regularly cleaning the microphone and speaker on your Android phone, you can maintain optimal audio performance and enjoy clear communication and media playback. Remember to follow these steps carefully and exercise caution to prevent any damage to the delicate components.
Cleaning the Charging Port
The charging port of your Android phone is a vital component that can easily accumulate dust, lint, or debris over time. If left uncleaned, it can hinder your phone’s charging performance and cause connectivity issues. Here’s a step-by-step guide on how to properly clean the charging port:
- Gather the necessary tools: To clean the charging port, you’ll need a soft bristle toothbrush, a clean toothpick or a SIM card ejector tool, and a can of compressed air.
- Power off your phone: Before you begin cleaning, it’s important to turn off your Android phone and disconnect it from any power source. This ensures safety during the cleaning process.
- Inspect the charging port: Take a close look at the charging port to identify any visible dirt, lint, or debris. Use a flashlight if needed to get a better view.
- Gently remove visible debris: Carefully insert the clean toothpick or SIM card ejector tool into the charging port and gently scrape away any visible dirt or debris. Be cautious not to apply too much pressure or damage the port.
- Use compressed air: Holding the can of compressed air upright, give short bursts of air into the charging port to dislodge any remaining debris. Make sure to maintain a safe distance to avoid causing any damage to the port or internal components.
- Brush away stubborn particles: Take the soft bristle toothbrush and gently scrub the charging port in circular motions. This helps to loosen any stubborn particles that may have been overlooked.
- Repeat if necessary: If you still notice any debris or dust in the charging port, repeat the process of using compressed air and brushing until the port is clean.
- Allow the charging port to dry: Once you’re satisfied with the cleanliness of the charging port, give it some time to air dry completely. Avoid using your phone or connecting any charging cables until the port is dry to prevent any potential damage.
Cleaning the charging port of your Android phone on a regular basis not only improves its charging efficiency but also reduces the risk of any long-term damage. It’s a simple yet crucial maintenance task that ensures the longevity of your device.
Cleaning the Headphone Jack
The headphone jack is a vital component of your Android phone that allows you to enjoy music, podcasts, and videos with the use of headphones. However, over time, it can accumulate dust, lint, and debris, leading to poor audio quality or even a malfunctioning jack. To ensure optimal performance, it’s important to clean the headphone jack regularly. Here’s a step-by-step guide to help you through the process.
1. Gather the necessary tools: Before you begin, make sure you have the right tools at hand. You’ll need a small, soft-bristled brush, a can of compressed air, and a cotton swab. These tools will help you remove any dirt or debris stuck in the headphone jack.
2. Power off your phone: Before cleaning the headphone jack, it’s crucial to power off your Android phone. This will prevent any accidental damage and also reduce the risk of electrical shocks.
3. Inspect the headphone jack: Take a closer look at the headphone jack to identify any visible dirt, lint, or debris. Use a flashlight if needed. If you notice any large particles, gently remove them with a small brush or compressed air. Be careful not to push them further into the jack.
4. Cleaning with a cotton swab: Take a cotton swab and, if necessary, dampen it slightly with isopropyl alcohol or distilled water. Gently insert the cotton swab into the headphone jack and rotate it in a circular motion. This will help dislodge and remove any stubborn dirt or residue. Avoid using excessive force to prevent damaging the internal components.
5. Compressed air for deeper cleaning: If the cotton swab didn’t completely clean the headphone jack, you can use a can of compressed air. Hold the can upright and carefully insert the nozzle into the jack. Give it a few short bursts to blow out any remaining debris.
6. Repeat cleaning if necessary: After using the cotton swab and compressed air, inspect the headphone jack again. If you notice any residual dirt or debris, repeat the cleaning process until the jack is completely clean.
7. Allow it to dry: After cleaning, give the headphone jack some time to dry completely. Once it’s dry, you can power on your Android phone and test the headphone jack with a pair of headphones to ensure everything is working properly.
Cleaning the headphone jack is a simple yet effective way to maintain the audio quality and functionality of your Android phone. By regularly cleaning this small but important component, you can enjoy an uninterrupted audio experience with your favorite headphones.
Cleaning the SIM Card Slot
The SIM card slot is a delicate component of your Android phone that requires proper maintenance. Over time, dust, lint, or debris can accumulate in this slot, affecting the performance of your SIM card. Cleaning the SIM card slot is essential to ensure a reliable connection and prevent any potential issues.
Follow these steps to clean the SIM card slot of your Android phone:
- Gather the necessary tools: To clean the SIM card slot, you will need a SIM card ejector tool or a small paperclip, a soft microfiber cloth, and a can of compressed air (optional).
- Power off your Android phone: Before cleaning the SIM card slot, it is important to turn off your Android phone to avoid any accidental damage or short-circuiting.
- Locate the SIM card slot: The location of the SIM card slot may vary depending on the model of your Android phone. Typically, it is found on the side of the phone or underneath the battery.
- Eject the SIM card: Insert the SIM card ejector tool or the unfolded paperclip into the small hole next to the SIM card slot. Apply gentle pressure until the SIM card tray pops out.
- Inspect the SIM card slot: Take a close look at the SIM card slot for any visible dirt, dust, or debris. Use a soft microfiber cloth to gently wipe away any particles.
- Use compressed air (optional): If there is stubborn dirt or debris inside the SIM card slot, you can use a can of compressed air to blow it away. Make sure to hold the can upright and use short bursts of air to avoid damaging the internal components.
- Reinsert the SIM card: Once the SIM card slot is clean, carefully insert the SIM card back into the tray, aligning it with the designated area. Push the tray back into the phone until it clicks into place.
- Power on your Android phone: After cleaning and reinserting the SIM card, power on your Android phone to ensure that it recognizes the SIM card and establishes a proper connection.
Regularly cleaning the SIM card slot of your Android phone helps maintain a strong and stable connection. It is recommended to perform this cleaning routine every few months or whenever you notice any issues with your SIM card. Keeping the SIM card slot free from dirt and debris will not only improve the performance of your phone but also extend the lifespan of your SIM card.
Cleaning the Battery
The battery is one of the most critical components of an Android phone, and it is essential to keep it clean to maintain its optimal performance. Over time, dust, grime, and other particles can accumulate on the battery, affecting its efficiency and potentially causing overheating issues.
To clean the battery, follow these steps:
- Power off the phone: Before starting the cleaning process, make sure to turn off your Android phone and remove the battery if it is removable. This is a safety precaution to avoid any damage or electrical risks.
- Use a soft cloth: Take a soft, lint-free cloth and gently wipe the exterior of the battery. This will help remove any surface dust or dirt.
- Avoid harsh chemicals: Do not use any harsh chemicals or cleaning solvents, as they can damage the battery. Stick to using a mild detergent or isopropyl alcohol if necessary.
- Cleaning the contacts: The battery contacts, which connect the battery to the phone, can sometimes become dirty or corroded. Use a cotton swab lightly dampened with isopropyl alcohol to clean the contacts. Be careful not to apply too much pressure or get any liquid inside the phone.
- Allow it to dry: After cleaning the battery and contacts, make sure to let them dry completely before reinserting the battery back into the phone.
It is important to note that not all smartphones have removable batteries. If your Android phone has a non-removable battery, it is advised to refer to the manufacturer’s guidelines or seek professional assistance for cleaning.
Cleaning the battery regularly not only helps in maintaining its performance but also prolongs its lifespan. A clean battery can provide better battery life and prevent any potential issues that may arise due to dirt or corrosion.
Remember, taking care of your Android phone’s battery is crucial for its overall performance and longevity. By following these simple steps, you can keep your battery clean and ensure your phone functions optimally.
Cleaning the Back Cover
The back cover of your Android phone is prone to accumulating dust, dirt, and fingerprints over time. Cleaning it regularly is essential to maintain the overall cleanliness and aesthetics of your device. Here are the steps to effectively clean the back cover:
1. Remove the back cover: Start by safely removing the back cover of your Android phone. Check the user manual or consult the manufacturer’s website for specific instructions on how to remove the back cover for your particular model.
2. Wipe off visible dirt and debris: Use a soft, lint-free microfiber cloth to gently wipe off any visible dirt, dust, or debris from the back cover. Begin by using a dry cloth to remove loose particles.
3. Prepare a cleaning solution: Fill a small bowl or container with warm water. Add a few drops of mild liquid soap or dishwashing detergent to create a gentle cleaning solution. Avoid using harsh chemicals or abrasive cleaners as they can damage the back cover.
4. Dampen the cloth: Dip the microfiber cloth into the cleaning solution and wring out any excess liquid. The cloth should be slightly damp, but not dripping wet.
5. Wipe down the back cover: Gently wipe the damp cloth over the entire surface of the back cover, paying extra attention to areas with visible stains or grime. Use circular motions and apply light pressure to remove stubborn dirt.
6. Dry the back cover: After cleaning, use a dry microfiber cloth to thoroughly dry the back cover. Ensure that no moisture is left behind, as it can cause damage to the phone’s internals if it seeps through any openings or ports.
7. Reattach the back cover: Once the back cover is completely dry, carefully reattach it to your Android phone. Make sure it is securely fastened before turning on the device.
8. Optional: Use a phone case: To protect your phone from future dirt and damage, consider using a phone case or cover. This will provide an additional layer of protection for the back cover.
Cleaning the back cover of your Android phone is a simple yet crucial part of device maintenance. By following these steps on a regular basis, you can keep your phone looking clean and fresh, ensuring optimal performance and longevity.
Cleaning the Internals
While cleaning the external parts of your Android phone is important, it’s equally essential to pay attention to the internals to ensure optimal performance and longevity. Here are some steps to clean the internals of your Android phone:
1. Power off the device: Before you begin cleaning the internals, make sure to power off your Android phone. This will prevent any accidental damage or short-circuiting during the cleaning process.
2. Remove the back cover: Depending on the model of your Android phone, you may be able to remove the back cover. If it’s removable, gently take it off to gain access to the internals.
3. Use compressed air: Dust and debris can accumulate inside your phone, affecting its performance. Utilize compressed air to blow away the dust from the internals. Ensure you hold the can of compressed air at a safe distance to prevent any damage to delicate components.
4. Clean the circuit board and connectors: The circuit board and connectors are prone to dirt and grime buildup. Use a soft brush or cotton swab dipped in isopropyl alcohol to gently clean these areas. Be careful not to apply too much pressure or use excessive alcohol, as it may damage the components.
5. Remove stubborn debris: If there are stubborn debris or particles stuck on the internals, carefully remove them using a clean toothbrush or an anti-static brush. Take your time and ensure you’re gentle to avoid any damage.
6. Let it dry completely: After cleaning the internals, allow them to dry completely before reassembling the phone. This will ensure that no moisture is left behind, preventing any potential damage when you power on the device.
7. Reassemble the phone: Once the internals are clean and dry, reassemble the phone by placing the back cover back in its position. Make sure it snaps into place securely.
8. Power on your phone: Now that your Android phone is clean both externally and internally, power it on and enjoy using a device that performs optimally.
It’s important to note that cleaning the internals of your Android phone requires caution and precision. If you’re not confident in doing it yourself, it’s best to consult a professional or reach out to the manufacturer for guidance.
Tips to Maintain a Clean Android Phone
Keeping your Android phone clean not only enhances its appearance but also contributes to its overall performance and longevity. Here are some tips to help you maintain a clean and fresh Android phone:
- Regularly clean the screen of your phone using a microfiber cloth. Gently wipe away any smudges, fingerprints, or dirt to ensure a clear and vibrant display.
- Avoid eating or drinking near your phone to prevent accidental spills and crumbs from getting inside the device. This will help prevent sticky residue and potential damage to the internal components.
- Use a protective case or cover to shield your phone from dust, scratches, and accidental drops. Choose a case that is easy to clean and provides adequate protection for your specific phone model.
- Keep your phone away from extreme temperatures and humidity, as they can damage the internal components and cause issues with the phone’s performance. Avoid leaving your phone in direct sunlight or in locations prone to moisture.
- Regularly clean the charging port and headphone jack using a soft brush or cotton swab. Dust, lint, and debris can accumulate in these areas, hindering proper connectivity and charging. Be gentle and careful while cleaning these sensitive parts.
- Ensure your hands are clean before using your phone. Oils, dirt, and grime from your hands can transfer to the phone’s surface, potentially causing buildup and affecting its overall cleanliness. Consider using a hand sanitizer or wipes before handling your phone.
- Remove unnecessary apps and files from your phone regularly. This not only frees up storage space but also helps keep your phone running smoothly. Unwanted apps can sometimes contain adware or malware, which can compromise your phone’s security and performance.
- Regularly update your Android operating system and applications. These updates often include bug fixes and security enhancements, ensuring the smooth functioning and protection of your phone.
- Avoid placing your phone on dirty or dusty surfaces. Use a clean and flat surface to keep your phone when you’re not using it. This reduces the chances of dirt and debris entering the phone through its ports or getting stuck in the case.
- Consider using a screen protector to add an extra layer of protection against scratches and smudges. Screen protectors are easy to clean and can be replaced if they become worn or damaged.
- If your phone gets wet, avoid using it immediately. Instead, power it off and let it dry completely before turning it back on. Moisture can damage the internal components, so it’s essential to take the necessary steps to dry your phone thoroughly.
- Regularly back up your phone’s data to prevent the loss of important files and information. This ensures that even if your phone encounters any issues, you can restore your data to a new device without any hassle.
- Consider using a cleaning app to optimize your phone’s performance. These apps can help remove unwanted files, clear cache, and improve battery life, keeping your Android phone running smoothly.
By following these tips, you can maintain a clean and well-functioning Android phone. Remember, a clean phone not only looks better but also performs better, ensuring a seamless and enjoyable user experience.
Conclusion
Keeping your Android phone clean is essential for its performance, longevity, and user experience. By implementing a regular cleaning routine, you can prevent sluggishness, improve battery life, and maintain optimal storage capacity.
Remember to start with a physical cleaning, gently wiping the screen and body with a soft cloth to remove dirt and smudges. Pay attention to the charging port and headphone jack, using a toothpick or can of compressed air for deeper cleaning.
Next, address the digital clutter by uninstalling unnecessary apps, clearing cache and junk files, and organizing your home screen. Regular software updates and security scans are also crucial for maintaining a clean and secure Android device.
By following these simple steps, you can enjoy a clean and well-functioning Android phone that is ready to meet your daily needs and keep you connected to the digital world.
FAQs
Q: How often should I clean my Android phone?
A: It’s a good idea to clean your Android phone regularly to maintain its performance and hygiene. Aim for cleaning it at least once a month or more frequently if you tend to use your phone in dirty or dusty environments.
Q: Can I use water to clean my Android phone?
A: While it’s best to avoid water directly on your Android phone, you can use a slightly damp, soft cloth to gently wipe the screen and body. Do not apply water directly or use any cleaning agents containing water that may seep into the phone’s ports or components.
Q: Should I turn off my Android phone before cleaning it?
A: Yes, it’s highly recommended to turn off your Android phone before cleaning it. This will prevent any accidental inputs or damage to the device while you’re cleaning its screen and body. Always disconnect and remove the battery (if possible) before cleaning.
Q: Can I use disinfectant wipes on my Android phone?
A: It’s not advisable to use disinfectant wipes directly on your Android phone, as these wipes often contain harsh chemicals that can damage the screen or remove the oleophobic coating. Instead, opt for screen-safe wipes or a solution of isopropyl alcohol (70% or less) on a soft, lint-free cloth.
Q: How can I clean the charging port of my Android phone?
A: The charging port of your Android phone can accumulate dust or lint over time, affecting its charging efficiency. To clean it, you can use a small, dry, soft-bristled brush (like a toothbrush) to gently remove any debris. Be careful not to damage the port or push any debris further inside.