
Welcome to our comprehensive guide on how to format an SD card on an Android device. If you’re experiencing storage issues, need to remove unwanted files, or simply want to start fresh with a blank SD card, formatting is the way to go. Android devices offer a simple and straightforward process to format an SD card, ensuring it is ready to use for storing photos, videos, apps, and more. In this article, we will walk you through the step-by-step process of formatting an SD card on your Android device. Whether you’re a tech-savvy individual or a novice Android user, our guide will provide you with the necessary information to accomplish this task with ease. So, let’s dive in and learn how to format an SD card on Android!
Inside This Article
- What is an SD Card?
- Formatting an SD Card on Android
- Method 1: Formatting SD Card using Device Settings
- Method 2: Formatting SD Card using Third-Party Apps
- Conclusion
- FAQs
What is an SD Card?
An SD card, short for Secure Digital card, is a portable memory card commonly used in smartphones, tablets, digital cameras, and other electronic devices. It provides additional storage space for files, such as photos, videos, music, and documents, which can be accessed and transferred between devices.
SD cards come in different storage capacities, ranging from a few gigabytes (GB) to several terabytes (TB). They are known for their small size, durability, and ease of use.
The SD card technology was introduced in 1999 by the SD Association, a consortium of electronics manufacturers, aiming to establish a standardized format for memory cards. Since then, SD cards have become a popular storage solution for many devices.
SD cards are particularly useful for devices with limited internal storage capacity, allowing users to expand their device’s storage and increase the number of files they can store. They are widely used in Android smartphones, as they provide a convenient way to store media and apps without relying solely on internal memory.
Formatting an SD Card on Android
An SD card is a removable storage device commonly used in smartphones and other electronic devices to expand their storage capacity. Over time, you may need to format your SD card on your Android device to fix issues, optimize performance, or erase all the data. In this article, we will discuss two methods to format an SD card on Android.
Method 1: Formatting SD Card using Device Settings
The easiest way to format an SD card on Android is through the device settings. Follow these steps:
- Open the “Settings” app on your Android device.
- Scroll down and tap on “Storage” or “Storage & USB” depending on your device.
- Find the SD card section and tap on it.
- Tap on the three-dot menu icon on the top-right corner of the screen.
- Select “Format” from the menu options.
- Confirm the formatting process by tapping on “Format SD card.
- Wait for the device to complete the formatting process.
After the formatting is complete, your SD card will be reset to its factory settings, and all the data on it will be erased. It is advisable to backup any important files before formatting the SD card.
Method 2: Formatting SD Card using Third-Party Apps
If you prefer a more advanced formatting option or encounter any issues with the built-in formatting method, you can use third-party apps available on the Google Play Store. These apps offer more customization options and may be helpful in solving certain problems with the SD card.
To format the SD card using a third-party app:
- Open the Google Play Store on your Android device.
- Search for “SD card formatter” or a similar keyword.
- Select a reliable and well-rated app from the search results.
- Install the app on your device.
- Launch the app and follow the on-screen instructions to format the SD card.
Remember that formatting an SD card will erase all the data on it, so be sure to back up any important files before proceeding.
Formatting an SD card on Android is a straightforward process that can help resolve various issues or improve the overall performance of your device. Whether you choose to use the built-in formatting option or opt for a third-party app, make sure to backup your data to avoid any loss.
Method 1: Formatting SD Card using Device Settings
Formatting an SD card using the device settings on your Android phone is a straightforward process. Follow the steps below to format your SD card:
Step 1: Start by inserting the SD card into the SD card slot on your Android device. It is usually located either on the side or at the back of the phone, but the exact location may vary depending on the model and manufacturer.
Step 2: Once the SD card is inserted, go to the “Settings” app on your Android device. You can usually find it in the app drawer or by swiping down from the top of the screen and tapping the gear-shaped icon.
Step 3: In the settings menu, scroll down and look for the “Storage” or “Storage & USB” option. Tap on it to open the storage settings.
Step 4: Within the storage settings, you should see a list of storage options, including your SD card. Tap on the SD card option to access the SD card settings.
Step 5: In the SD card settings, you will find an option to format the SD card. The wording may vary depending on your device, but it is usually something like “Format SD Card” or “Erase SD Card.” Tap on this option to begin the formatting process.
Step 6: A warning message will usually appear, informing you that formatting the SD card will erase all data on it. Make sure to back up any important files or data before proceeding. If you are certain you want to continue, tap on “Format” or “Erase” to confirm.
Step 7: The formatting process will then begin, and it may take a few minutes to complete, depending on the size of the SD card. Once the formatting is finished, you will see a notification indicating that the SD card has been successfully formatted.
Step 8: You can now safely remove the SD card from your Android device. To do this, power off your device, remove the back cover (if applicable), and gently push on the SD card to release it from the slot. Be careful not to force it out or damage the card.
Step 9: Your SD card is now formatted and ready to use. It is recommended to restart your Android device before using the newly formatted SD card to ensure that all settings and changes are properly applied.
Remember, formatting an SD card will erase all data on it, so it’s crucial to back up any important files or data before proceeding with the formatting process.
Method 2: Formatting SD Card using Third-Party Apps
Formatting an SD card using third-party apps is another convenient method for Android users. There are several applications available on the Google Play Store that can help you format your SD card quickly and efficiently.
Here are a few popular third-party apps that you can use for formatting your SD card:
- SD Card Formatter: This app is specifically designed to format SD cards. It provides a user-friendly interface with easy-to-follow steps. Simply download the app, open it, select your SD card, and follow the on-screen instructions to format your card.
- File Manager: Many file manager apps offer the option to format an SD card. These apps not only allow you to format your card but also provide additional features like file management, backup, and restore. Simply navigate to the SD card section in the file manager app, select the formatting option, and follow the prompts to format your card.
- Partition Master: This app not only allows you to format your SD card but also gives you the option to partition it. Partitioning your SD card can be useful if you want to allocate specific space for different purposes, such as creating separate partitions for photos, videos, and documents. With Partition Master, you can easily format and partition your SD card according to your preferences.
Before selecting a third-party app for formatting your SD card, make sure to read user reviews and check the app’s ratings. It is also recommended to choose a reliable and well-known app to ensure the safety of your data.
Remember, when using third-party apps for formatting, always take precautions. Backup your important data before formatting to prevent any accidental loss. Once you have successfully formatted your SD card, you can transfer your files back onto it without any issues.
Conclusion
Formatting an SD card on Android is a straightforward process that can help resolve storage issues and optimize device performance. Whether you want to erase all the data on your SD card or simply need to fix some formatting errors, Android provides easy-to-use options to accomplish these tasks.
By following the steps outlined in this article, you can format your SD card and ensure its compatibility with your Android device. Remember to back up any important data before formatting, as the process will erase all the contents on the card.
Formatting an SD card is a useful tool for managing storage space, resolving errors, and optimizing the performance of your Android phone. With this knowledge, you can confidently take control of your device’s storage and improve its overall functionality.
FAQs
1. How do I format an SD card on Android?
To format an SD card on Android, follow these steps:
- Go to the “Settings” menu on your Android device.
- Scroll down and tap on “Storage” or “Storage & USB” option.
- Tap on “SD card” or “External Storage”.
- Tap on the three-dot menu icon at the top-right corner of the screen.
- Select “Format” or “Format SD card”.
- Confirm the action by tapping on “Format SD card” again.
- Wait for the formatting process to complete.
- Your SD card will now be formatted, erasing all data on it.
2. Will formatting an SD card delete all the data on it?
Yes, formatting an SD card will erase all the data on it. Make sure to backup any important files before formatting.
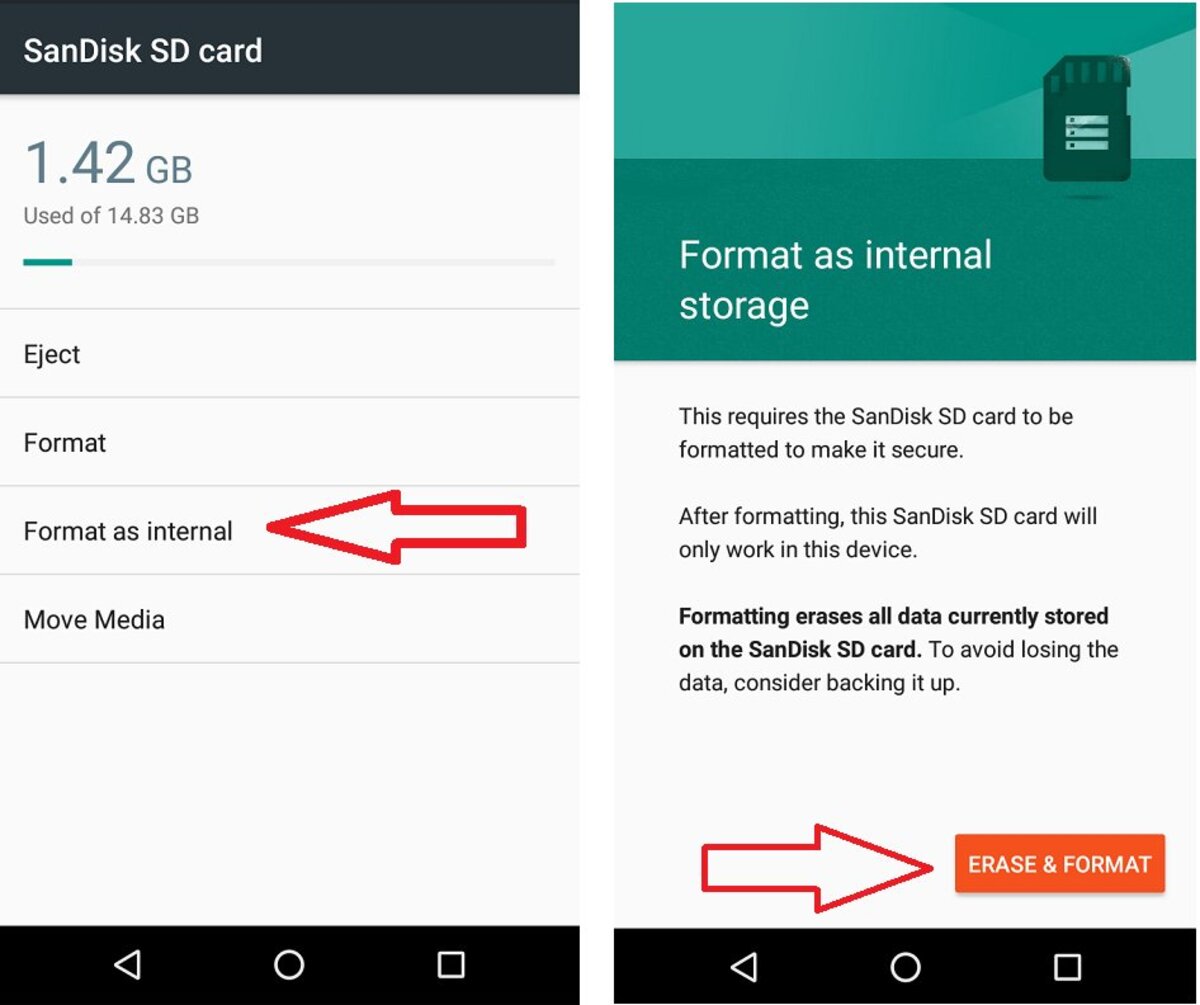
3. Can I format my SD card as internal storage?
Some Android devices allow you to format an SD card as internal storage, effectively merging it with the device’s internal storage. However, this feature may not be available on all devices or Android versions. To check if your device supports this feature, go to “Settings” > “Storage” and look for the option to format the SD card as internal storage.
4. Are there any risks associated with formatting an SD card?
While formatting an SD card is generally safe, there are a few risks to be aware of. Firstly, as mentioned earlier, all data on the SD card will be permanently deleted, so it’s important to backup any important files. Additionally, if the formatting process is interrupted or not completed correctly, it can lead to data corruption or make the SD card unusable. Therefore, it’s recommended to ensure a stable power source and follow the instructions carefully.
5. Can I format an SD card on a computer instead of an Android device?
Yes, you can format an SD card on a computer as well. If you have a card reader or an adapter that allows you to connect your SD card to your computer, you can use the built-in disk management tools on Windows or Disk Utility on Mac to format the SD card. However, be cautious when formatting on a computer, as selecting the wrong drive or partition can result in accidental data loss.