
In the fast-paced digital world, where smartphones have become an extension of our lives, losing important files can be a panic-inducing situation. Whether it’s accidentally deleting a crucial document, a cherished photo, or a favorite video, we’ve all experienced the sinking feeling that accompanies such an incident. Luckily, Android devices offer a safety net in the form of the Trash feature. Much like the recycling bin on a computer, the Trash on Android allows you to restore deleted files and breathe a sigh of relief. In this article, we will explore how to restore files from the Trash on your Android device, ensuring that you can recover your precious data with ease. So, let’s dive into the step-by-step process and get your deleted files back where they belong.
Inside This Article
- Step 1: Accessing the Trash Folder
- Step 2: Selecting the File to Restore
- Step 3: Restoring the File from Trash
- Conclusion
- FAQs
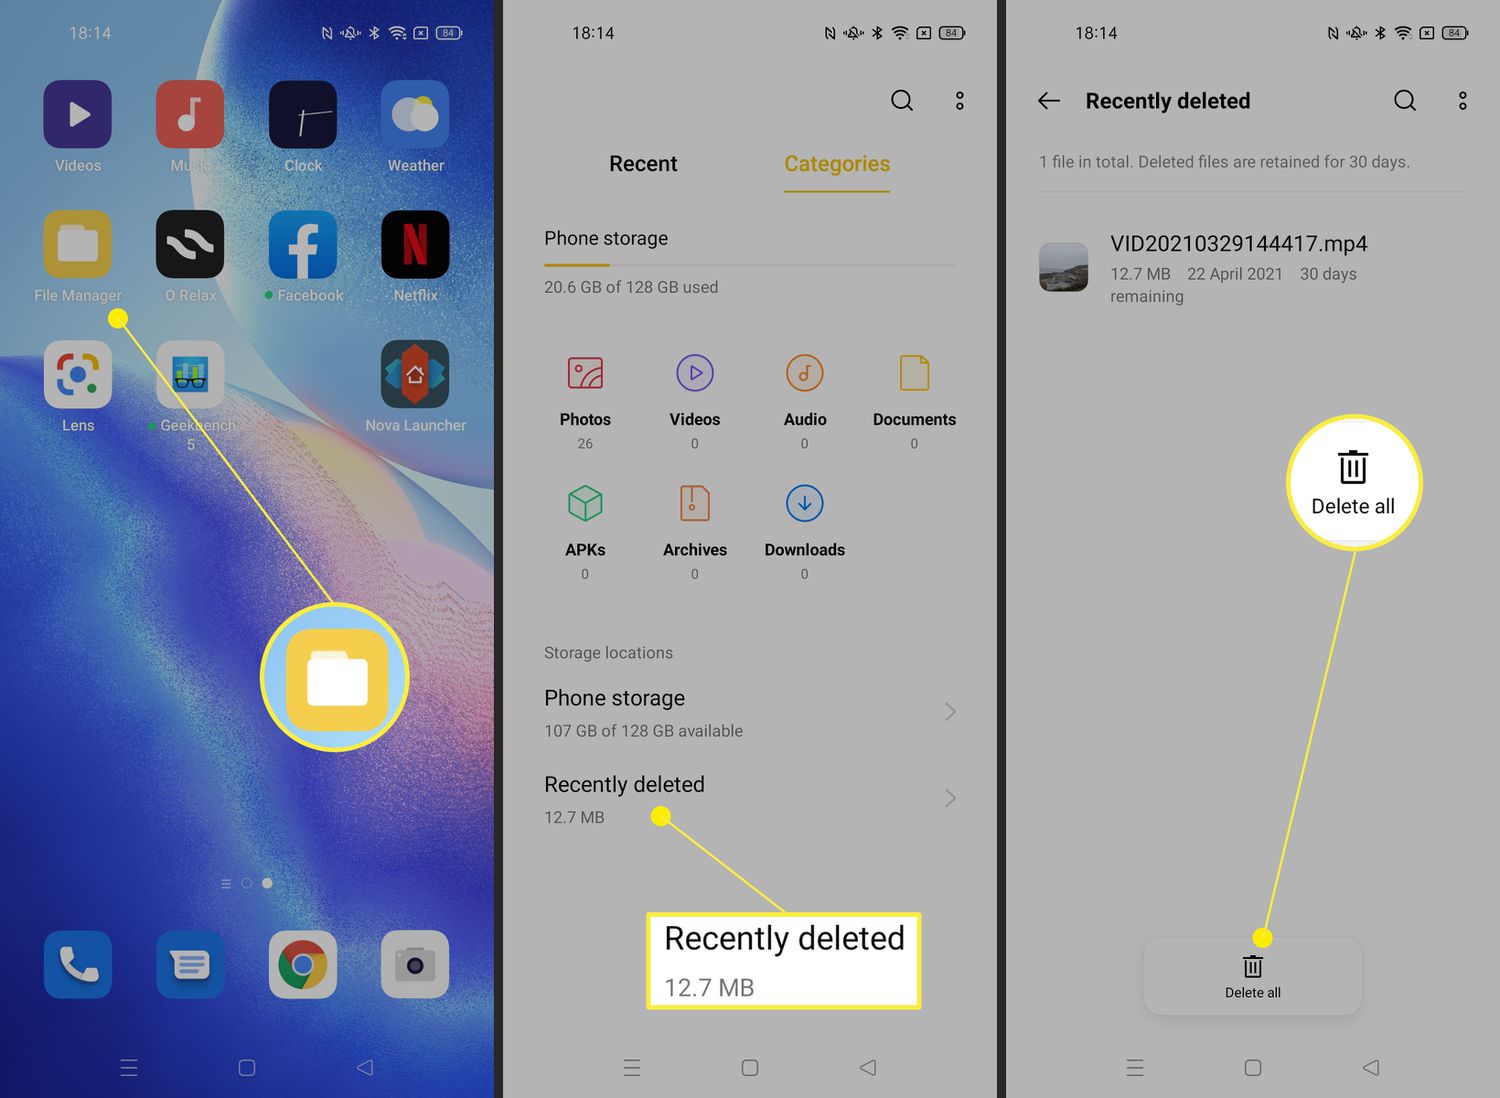
Step 1: Accessing the Trash Folder
Accidentally deleting files on your Android device can be a frustrating experience. Fortunately, most Android devices have a built-in feature called the Trash or Recycle Bin that stores deleted files temporarily. To retrieve a deleted file, you’ll need to access the Trash folder. Here’s how you can do it:
1. Open the Files or File Manager app on your Android device. This app is usually pre-installed on most devices, but if you can’t find it, you may need to download a file manager app from the Google Play Store.
2. Once you have the Files app open, look for the “Trash” or “Recycle Bin” option. It may be located in the sidebar menu or under a “More” option, depending on your device and the version of Android you’re running.
3. Tap on the “Trash” or “Recycle Bin” option to access the folder. Inside the Trash folder, you’ll find all the files that you’ve recently deleted from your device.
4. From here, you can browse through the Trash folder to locate the file you want to restore. The files in the Trash folder are usually listed in a similar file hierarchy as the main storage, making it easy to navigate and find the desired file.
5. Once you’ve found the file you want to restore, tap on it to select it. You may also have the option to select multiple files if needed.
6. After selecting the file(s), look for the “Restore” or “Recover” option. It is usually located either at the top or bottom of the screen, or in the overflow menu (three-dot icon) depending on the app and Android version.
7. Tap on the “Restore” or “Recover” option, and the selected file(s) will be restored to their original location on your device.
That’s it! You have successfully accessed the Trash folder on your Android device and restored your deleted file(s). It’s important to note that the availability and functionality of the Trash or Recycle Bin feature may vary depending on the device manufacturer and the version of Android you’re using. If you can’t find the Trash option or it doesn’t work as expected, you may need to explore alternative solutions or consider using third-party file recovery apps.
Step 2: Selecting the File to Restore
Once you have accessed the trash folder on your Android device, the next step is to select the file that you want to restore. The trash folder typically contains all the files that have been deleted within a specific time frame, usually 30 days. To find the file you want to restore, follow these steps:
1. Scroll through the trash folder to locate the file you wish to restore. You can browse through the files by swiping up or down on the screen. Alternatively, you can use the search bar at the top of the screen to search for a specific file by name.
2. Once you have found the file you want to restore, tap on it to select it. You can confirm that the file is selected by a checkmark or highlight that appears next to it.
3. If you want to select multiple files to restore, simply tap on each file to add the checkmark or highlight. You can select as many files as you want to restore at once.
4. If you want to restore all the files in the trash folder, look for the option to “Select All” or a similar command. Tapping on this option will automatically select all the files in the folder for restoration.
5. Once you have selected the file or files you want to restore, look for the option to “Restore” or “Recover”. You may find this option at the top or bottom of the screen, or it may appear as an icon or button. Tap on it to initiate the restoration process.
By following these steps, you will be able to easily select the file or files you want to restore from the trash folder on your Android device. It’s important to note that once you restore a file, it will be moved back to its original location before it was deleted, so make sure you have selected the correct file before proceeding with the restoration.
Step 3: Restoring the File from Trash
Now that you have accessed the Trash folder on your Android device and have selected the file you want to restore, it’s time to proceed to the final step – restoring the file from Trash.
1. Tap on the selected file to open the file options menu. This menu will provide you with various actions that you can perform on the file.
2. Look for the “Restore” or “Recover” option in the file options menu. This option is typically represented by an icon that resembles an arrow pointing upwards or a recycle bin. Tap on the “Restore” or “Recover” option to initiate the file restoration process.
3. Once you have selected the “Restore” or “Recover” option, the Android system will start restoring the file to its original location. This process may take a few moments, depending on the size of the file and the device’s performance.
4. After the file has been successfully restored, you will receive a notification indicating the completion of the process. The file will now be back in its original location, and you can access it as you normally would.
5. It’s important to note that not all Android devices have a built-in Trash folder or a dedicated option to restore files. If your device doesn’t have these features, you may need to use a third-party file recovery app from the Play Store. These apps can help you recover deleted files from your device’s storage.
And there you have it! You have successfully restored the file from the Trash folder on your Android device. Make sure to double-check the file’s integrity and ensure that it is functioning as expected.
Remember to regularly check your Trash folder to prevent accidentally deleting important files. It’s always better to be safe than sorry!
Now that you have learned how to restore files from the Trash on your Android device, you can easily recover any accidentally deleted data with just a few simple steps.
Conclusion
In conclusion, restoring a file from the Trash in Android is a relatively simple process that can help you recover important data that you may have accidentally deleted. By following the steps outlined above, you can easily locate and retrieve your deleted files.
Remember to regularly check your Trash folder to ensure that you do not permanently delete any files that you may still need. Additionally, it is always a good idea to back up your important data regularly to prevent any data loss incidents.
By making use of the built-in Trash feature in Android, you can feel more confident in managing your files and ensuring that you have a safety net in case of accidental deletions. So, don’t panic if you accidentally delete a file – simply head to the Trash folder and restore it in a few easy steps.
So, next time you find yourself in need of retrieving a deleted file on your Android device, remember to visit the Trash and utilize the simple process of restoring your important data.
FAQs
Q: Can I restore a file from the trash on my Android phone?
Yes, you can restore a file from the trash on your Android phone. Android devices have a built-in trash or recycle bin feature that allows you to recover deleted files. Keep in mind that the availability of this feature may vary depending on your device model and the file storage method (internal storage or SD card).
Q: How do I access the trash or recycle bin on my Android phone?
To access the trash or recycle bin on your Android phone, you can follow these steps:
- Open the file manager or file explorer app on your phone.
- Look for a folder named “Trash” or “Recycle Bin”.
- Tap on the folder to open it.
- Inside the folder, you should find your deleted files.
If you can’t find a specific trash or recycle bin folder, you can try checking the “Deleted” or “Trash” section within the app itself, as some apps may have their own designated trash folder.
Q: How long do files stay in the trash on an Android phone?
The duration for which files stay in the trash on an Android phone can vary. It generally depends on the file manager or the app you are using to manage your files. Some file managers automatically empty the trash after a certain period, while others allow you to manually empty it or set a specific time frame. The default duration is often a few days, but it can be adjusted based on your preferences.
Q: Can I restore files from the trash after emptying it on my Android phone?
Unfortunately, once you empty the trash on your Android phone, the files within it are permanently deleted and cannot be recovered using the built-in trash or recycle bin feature. Therefore, it is crucial to double-check the contents of the trash before emptying it to avoid losing any important files.
Q: Is there any other way to recover deleted files on an Android phone?
Yes, even if you have emptied the trash on your Android phone, there are still ways to potentially recover deleted files. You can use third-party data recovery apps or software specifically designed for Android devices. These tools can help scan your phone’s storage and attempt to recover deleted files. However, the success rate may vary depending on various factors, such as how long ago the files were deleted and the extent of overwritten data on your device.