
Are you having trouble finding the Trash folder on your Android device? If so, you’ve come to the right place. The Trash folder, sometimes referred to as the Recycle Bin, is a crucial feature that allows you to recover deleted files and folders. Many Android users struggle to locate this essential feature, leading to frustration and confusion. However, fear not! In this article, we will guide you through the steps to access the Trash on your Android device. Whether you accidentally deleted an important document or need to restore a deleted photo, we have you covered. So, let’s dive in and discover how to access the Trash on Android!
Inside This Article
- Method 1: Using the App Drawer
- Method 2: Accessing Trash through Settings
- Method 3: Using a File Manager App
- Method 4: Accessing Trash in Google Photos
- Conclusion
- FAQs
Method 1: Using the App Drawer
One of the easiest ways to access the trash on your Android device is by using the app drawer. The app drawer is a centralized location on your device where all the installed apps are listed for easy access. Here’s how you can access the trash using this method:
1. Open the app drawer on your Android device by tapping on the app drawer icon, which is usually represented by a grid of dots or a circular icon with six smaller dots inside.
2. Scroll through the list of apps until you find the specific app you want to access the trash for. This could be an app like Google Photos, Gmail, or even your device’s default file manager.
3. Once you locate the app, tap on it to open it. This will take you directly to the app’s interface.
4. Look for the “Trash” or “Recycle Bin” option within the app’s interface. Different apps may use different names, but the concept is the same – it’s where all the deleted items are stored temporarily before being permanently deleted.
5. Tap on the “Trash” or “Recycle Bin” option to access the contents of the trash. Here, you will be able to view any deleted files, photos, emails, or other items that have not yet been permanently deleted.
6. To recover a deleted item, simply tap on it and select the “Restore” or “Undelete” option if available. The item will be restored to its original location within the app.
Remember that the availability and location of the trash within an app may vary, so always explore the app’s interface and menu options to find the trash feature. Using the app drawer method, you can easily access the trash for various apps on your Android device and retrieve any accidentally deleted items.
Method 2: Accessing Trash through Settings
If you’re looking for a way to access the trash on your Android device, another method involves accessing the settings of your device. While this method may vary slightly based on the make and model of your device, the following steps should give you a general idea of how to access the trash through settings.
1. Open the “Settings” app on your Android device. You can usually find this app in your app drawer or by swiping down on your notification panel and tapping the gear icon.
2. Scroll down the settings menu and look for the section labeled “Storage” or “Storage & USB.” Tap on this option to continue.
3. Within the storage settings, you may see an option called “Trash” or “Trash bin.” Tap on this option to access the trash folder.
4. Once you’re in the trash folder, you can browse through the deleted items and choose to restore them if necessary. Remember, the available options and features may vary depending on your device’s manufacturer and Android version.
It’s important to note that not all Android devices have a built-in trash feature in their settings. Some devices, especially older models or budget-friendly options, may not provide this option. In such cases, you may need to explore alternative methods to access the trash, such as using specific apps or file managers.
Now that you know how to access the trash through settings, you can easily retrieve deleted items and restore them to their original location on your Android device.
Method 3: Using a File Manager App
If you are looking to recover deleted files on your Android device, using a file manager app can be an effective method. A file manager app allows you to browse through the different files and folders on your device, giving you access to the trash or recycle bin.
To begin, you will need to download and install a file manager app from the Google Play Store. There are several options available, such as ES File Explorer, Solid Explorer, or Astro File Manager. Choose the one that suits your preferences and install it on your device.
Once the file manager app is installed, open it and navigate to the storage location where your deleted files might be. This could be your internal storage or an external SD card, depending on where you deleted the files from.
Look for a folder named “Trash” or “Recycle Bin” within the file manager app. This folder serves as a temporary storage for deleted files. If you find such a folder, open it to access your deleted files.
If you don’t see a dedicated “Trash” or “Recycle Bin” folder, don’t worry. Some file manager apps, like ES File Explorer, utilize a feature called “Recycle Bin” that saves deleted files for a certain period of time. To access this feature, open the file manager app and look for a menu or settings option. From there, navigate to the “Recycle Bin” or “Deleted Files” section to see if your deleted files are stored there.
Once you locate the deleted files in the trash or recycle bin folder, you can select the desired files and choose to restore or recover them to their original location. Keep in mind that the steps to restore files may vary depending on the file manager app you are using.
It’s important to note that the availability of a trash or recycle bin folder and the specific steps to access it can depend on the file manager app you choose and the Android device you are using. Some devices and file manager apps may not have a built-in trash feature.
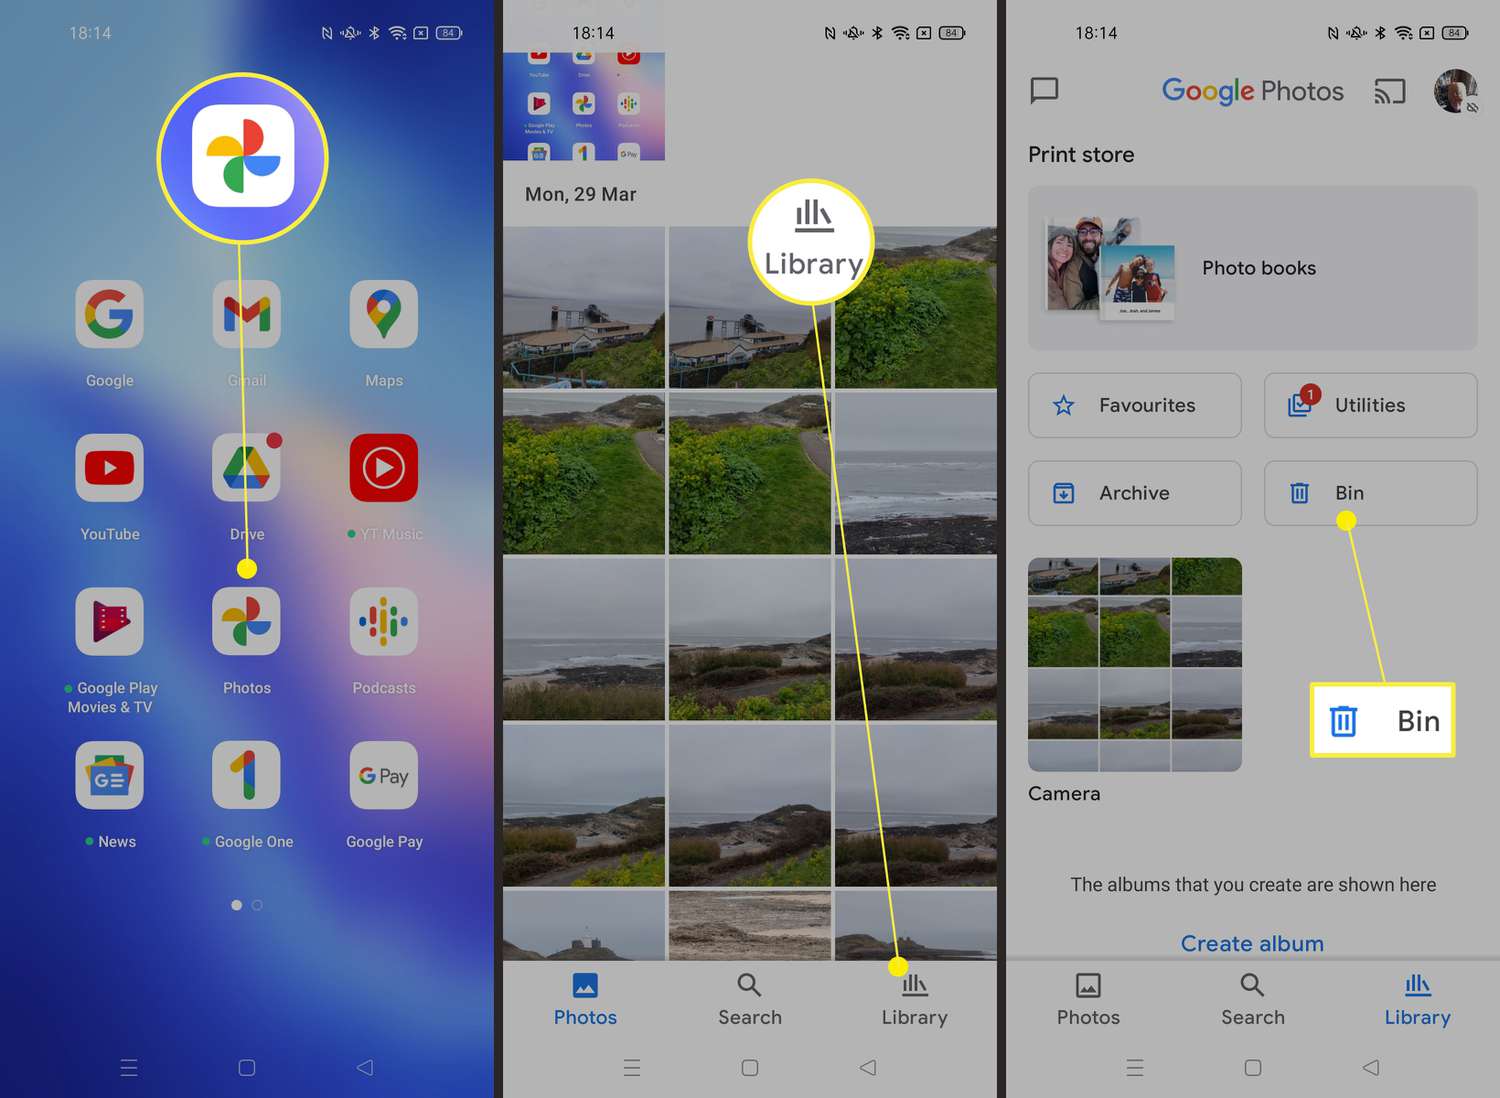
Method 4: Accessing Trash in Google Photos
Google Photos is a popular app for storing and managing your photos and videos on Android devices. It also has a trash feature that allows you to restore recently deleted media files. Let’s take a look at how you can access the trash in Google Photos and retrieve your deleted items.
To start, open the Google Photos app on your Android device. If you don’t have the app installed, you can download it from the Google Play Store.
Once you’re in the app, tap on the three-line menu icon at the top left corner of the screen. This will open the menu sidebar.
In the sidebar, scroll down and tap on “Trash.” This will take you to the trash folder where all your recently deleted photos and videos are stored.
Once you’re in the trash folder, you can browse through the deleted items. Google Photos keeps the deleted files in the trash for 30 days, after which they will be automatically deleted permanently.
If you want to restore a deleted item, simply tap and hold on the photo or video that you want to recover. This will select the file, and you will see a checkmark appear on it.
After selecting the items you want to restore, tap on the “Restore” button at the bottom of the screen. This will move the selected files back to their original location in your Google Photos library.
It’s important to note that the trash feature in Google Photos is different from the trash or recycle bin on your device’s file manager. The trash in Google Photos only stores deleted photos and videos from within the app.
If you accidentally delete media files outside of the Google Photos app, they may still be recoverable through your device’s file manager or other backup solutions.
By accessing the trash in Google Photos, you can easily recover recently deleted photos and videos. This feature is especially useful if you accidentally delete important files or change your mind about deleting something. Make sure to check the trash folder regularly to avoid permanent loss of your precious memories.
Conclusion
Accessing the trash on your Android device is a simple and convenient process that allows you to manage and restore deleted items. Whether you’re looking for a deleted file, an accidentally deleted photo, or trying to free up storage space, knowing how to access the trash can be a valuable skill.
By following the steps outlined in this article, you can easily locate and retrieve deleted items from various apps and settings on your Android device. Remember to regularly empty the trash to optimize storage and keep your device running smoothly. Additionally, consider implementing backup solutions and cloud services to safeguard your important data.
Now that you have a thorough understanding of how to access the trash on Android, you can confidently manage your deleted files and enjoy a clutter-free and organized device.
FAQs
Q: How do I access trash on Android?
A: Accessing the trash on Android can vary depending on the device and operating system version. However, most Android devices have a built-in recycle bin or trash feature in their file manager or gallery app. You can usually find it by opening your file manager or gallery app and looking for a “Trash” or “Recycle Bin” option.
Q: Where is the trash folder on my Android phone?
A: The location of the trash folder on your Android phone can differ depending on the device and manufacturer. In general, you can find the trash folder in your file manager app, gallery app, or even in individual apps like Gmail or Google Photos. If you’re unable to locate it, you can check the settings of your specific app or device to find the exact location of the trash folder.
Q: How long do deleted files stay in the trash on Android?
A: The duration for which deleted files stay in the trash on Android can vary. Some devices or apps may have a limited retention period, such as 30 days, while others may keep deleted files indefinitely until you manually empty the trash. It’s important to note that the storage capacity of your device or app can also impact the amount of time deleted files are retained in the trash.
Q: Can I recover files from the trash on Android?
A: Yes, in most cases, you can recover files from the trash on Android. If you haven’t emptied the trash, you can simply restore the files by selecting them and choosing the “Restore” or “Move out of Trash” option. However, if you have already emptied the trash or if the retention period has expired, it may be more challenging to recover the files. In such cases, you can try using specialized data recovery apps or contacting a professional data recovery service.
Q: How do I empty the trash on Android?
A: To empty the trash on Android, open your file manager app, gallery app, or the specific app that has a trash or recycle bin feature. Look for the option to “Empty Trash” or “Delete All” and confirm your action. Keep in mind that once you empty the trash, the deleted files will be permanently removed and cannot be recovered unless you have a backup.