
Have you ever found yourself struggling to find the “Trash” folder on your mobile phone? Don’t worry; you’re not alone in this tech conundrum. Navigating through the various folders and settings on our phones can be a bit confusing at times, especially when it comes to locating the trash bin or recycle bin.
In this article, we will guide you through the process of finding the trash folder on your phone. Whether you use an Android device or an iPhone, we have got you covered. So, let’s dive into the world of phone trash folders and discover how to access them with ease.
Inside This Article
- Enabling Access to Trash
- Accessing the Trash on Android
- Accessing the Trash on iPhone
- Emptying the Trash
- Conclusion
- FAQs
Enabling Access to Trash
Accessing the trash on your mobile phone can be a useful feature, allowing you to easily recover deleted items or free up storage space. However, in order to access the trash, you need to enable this feature on your device. The steps to enable access to the trash may vary depending on the operating system of your phone, whether it’s Android or iOS.
In most cases, accessing the trash requires enabling a specific setting or feature in your phone’s settings. Here’s a general guide on how to enable access to trash on both Android and iPhone:
Android:
- Open the settings app on your Android phone.
- Scroll down and find the “Storage” or “Storage and backup” option. Tap on it.
- Look for the “Trash” or “Recycle Bin” option. If you don’t see it, tap on “Advanced” or “More” to expand the options.
- Toggle the switch to enable the trash feature.
iPhone:
- Open the settings app on your iPhone.
- Scroll down and find the “Photos” option. Tap on it.
- Look for the “Recently Deleted” album and tap on it.
- Toggle the switch to enable the feature to keep photos in the recently deleted album for a specific duration.
Enabling access to the trash on your mobile phone is a straightforward process. By following these steps, you can ensure that deleted items are moved to the trash folder instead of being permanently deleted, giving you the option to recover them if needed.
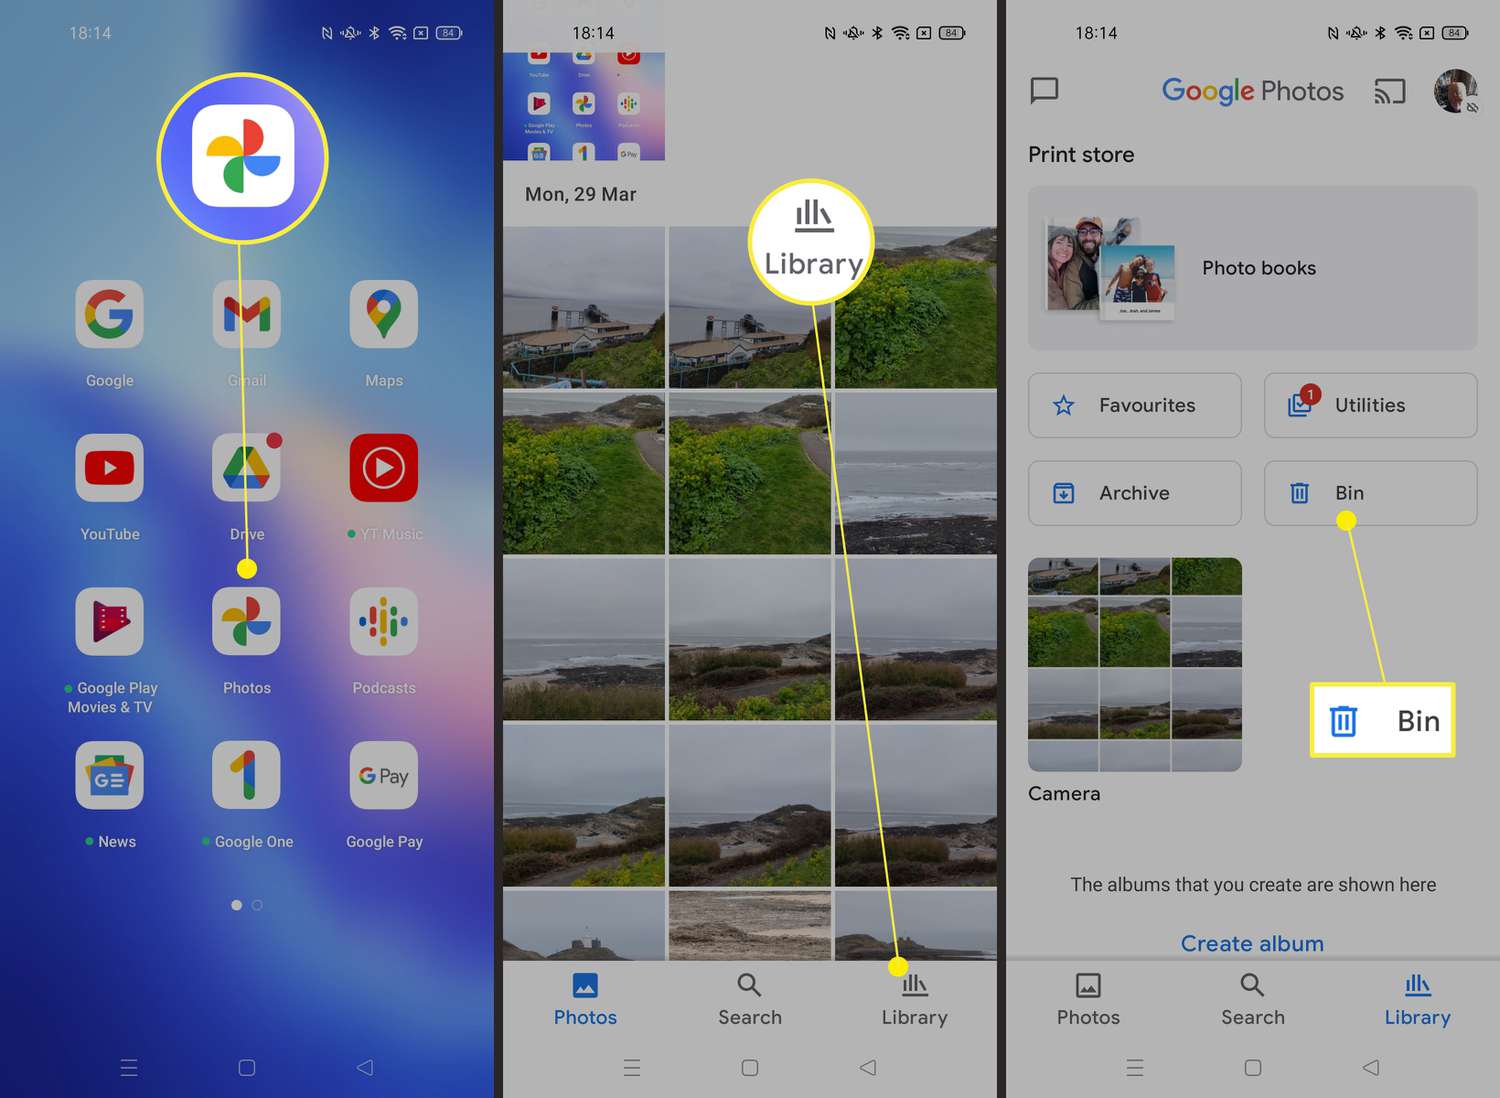
Accessing the Trash on Android
Android devices have different ways of accessing the trash depending on the phone’s manufacturer and the version of Android OS. However, there are a few common methods to help you locate and access the trash on your Android device. Here are a few options to consider:
1. Look for the “Trash” or “Recycle Bin” App: Some Android devices have a dedicated trash app that allows you to access and manage deleted files. Check your app list or app drawer to see if there is a trash or recycle bin app pre-installed on your device. If you find one, simply tap on it to open and browse through your deleted files.
2. Check the File Manager: Most Android devices come with a built-in file manager that allows you to navigate through the files and folders on your device. Open the file manager app and look for a folder named “Trash” or “Deleted Items.” This folder may hold all your recently deleted files. If you find it, you can explore the contents and restore any files you wish to recover.
3. Use a Third-Party File Recovery App: If you can’t find a built-in trash or recycle bin app or folder, you can consider using a third-party file recovery app from the Google Play Store. There are several options available that can help you recover deleted files and provide a trash-like functionality. Simply search for “file recovery” or “trash app” in the Play Store, read reviews, and choose a reliable app that suits your needs.
4. Check the Gallery App: In some cases, deleted photos and videos may end up in the trash or recycle bin of the gallery app on your Android device. Open your gallery app, look for a “Trash” or “Recently Deleted” folder, and check if your deleted media files are stored there. If you find them, you can restore them to their original location.
Remember, the process of accessing the trash on your Android device may vary depending on the device model and software version. If none of the above methods work for you, consider referring to your device’s user manual or contacting the manufacturer’s support for specific instructions.
Accessing the Trash on iPhone
On an iPhone, the concept of a “trash” or “recycle bin” might seem a bit different compared to other devices. In fact, iOS does not have a dedicated trash folder like Android, where deleted items are stored. However, there are still ways to access and recover recently deleted items on your iPhone.
The first method is to utilize the “Recently Deleted” folder in the Photos app. When you delete a photo or video from your iPhone, it is moved to this folder instead of being permanently erased. To access the “Recently Deleted” folder, open the Photos app and tap on the “Albums” tab at the bottom. Then, scroll down and select the “Recently Deleted” album. Here, you will find all the photos and videos that have been deleted in the past 30 days. Simply tap on the item you want to recover and tap “Recover” to restore it back to your photo library.
Pro tip: To permanently delete items from the “Recently Deleted” folder and free up storage on your iPhone, tap on “Select” at the top-right corner, then select the items you want to delete and tap “Delete”. Keep in mind that once you delete them from the “Recently Deleted” folder, they cannot be recovered.
Another way to access the trash on your iPhone is through the Files app. The Files app acts as a centralized location for all your files, including those stored locally on your iPhone and in cloud storage services like iCloud Drive or Dropbox. If you have accidentally deleted a file, document, or attachment, you can use the Files app to search for it in your iCloud Drive trash or other connected cloud storage providers. Simply open the Files app, tap on “Browse” at the bottom, and then select the desired cloud storage service or “On My iPhone” if the item was stored locally.
Once in the appropriate location, look for a “Trash” or “Deleted Items” folder. Open the folder, locate the deleted item you want to recover, and tap on it to preview. To restore the item, tap the share icon (usually represented by a square with an arrow pointing upwards) and select “Move” or “Copy” to place it back in its original location.
It’s important to note that the availability of a trash folder and the process of accessing and recovering deleted items may vary depending on the iOS version and device model you are using. Therefore, it’s always a good idea to refer to the official Apple support documentation or reach out to their support team for specific instructions related to your device.
Emptying the Trash
Now that you know how to access the trash on your phone, it’s important to understand how to properly empty it. Emptying the trash helps to free up storage space on your device and ensure that deleted files are permanently removed. Let’s explore how to do this on both Android and iPhone devices.
On Android:
1. Open the Gallery or Files app on your Android device.
2. Look for the “Trash” or “Bin” icon and tap on it. This will open the trash folder.
3. Once in the trash folder, you will see a list of deleted files. Tap on the options menu (usually represented by three dots or a cog icon) located at the top right corner of the screen.
4. From the options menu, select “Empty Trash” or a similar option. A confirmation prompt might appear, asking if you are sure you want to permanently delete the files. Confirm your decision.
5. The trash folder will be emptied, and the deleted files will be permanently removed from your device’s storage.
On iPhone:
1. Open the Photos app on your iPhone.
2. Tap on the “Albums” tab located at the bottom of the screen.
3. Scroll down and look for the “Recently Deleted” album. Tap on it to access the deleted photos and videos.
4. Once inside the “Recently Deleted” album, tap on the “Select” button located at the top right corner of the screen.
5. Select the files you want to permanently delete by tapping on them. You can also tap on “Select All” to choose all the files.
6. After selecting the files, tap on the “Delete” button at the bottom right corner of the screen.
7. A prompt will appear, asking if you want to delete the selected items. Confirm your decision by tapping on “Delete Photos” or a similar option.
8. The selected files will be permanently deleted, freeing up storage space on your iPhone.
Remember, once you empty the trash, the files cannot be recovered. Ensure that you have backed up any important data before proceeding with the deletion process.
By regularly emptying the trash on your phone, you can keep your device running smoothly and make the most of its storage capacity.
Conclusion
In conclusion, accessing the trash on your phone is a simple and essential task for managing your device’s storage effectively. Whether you are using an Android or iOS device, you can easily access the trash folder and restore or permanently delete files as per your needs.
Remember to regularly empty the trash to free up storage space and maintain the optimal performance of your device. Additionally, consider utilizing cloud storage services or external storage options to further expand your device’s storage capacity.
With the knowledge and skills gained from this article, you are now equipped to navigate and manage the trash on your phone like a pro. Keep your device clutter-free and organized, ensuring a seamless and efficient user experience.
So, next time you need to find that deleted photo or free up some space, don’t forget to locate and explore the trash folder on your mobile phone. Happy managing!
FAQs
1. How do I access the trash on my phone?
To access the trash on your phone, you can follow these steps:
- Go to the app drawer or home screen of your phone.
- Look for the “Gallery” or “Photos” app.
- Open the app and navigate to the “Trash” or “Bin” folder. It might be located in the sidebar or in the settings menu.
- Tap on the “Trash” or “Bin” folder to view the deleted items.
- You can select and restore any files you want to keep by tapping on them and choosing the “Restore” option.
2. What happens when I empty the trash on my phone?
When you empty the trash on your phone, any files or items that were previously deleted from your device will be permanently erased. Once you empty the trash, it is usually not possible to retrieve these items unless you have a backup saved somewhere else, such as cloud storage or a computer.
3. How long do deleted items stay in the trash on my phone?
The length of time deleted items stay in the trash on your phone can vary depending on the device and the app you are using. In some cases, deleted items may only stay in the trash for a few days, while in other cases, they may remain there for a longer period of time, such as 30 days. It is always a good idea to check the settings of the app or device to see how long deleted items are retained in the trash before they are permanently deleted.
4. Can I recover a file that I accidentally deleted from my phone’s trash?
In some cases, it is possible to recover a file that you accidentally deleted from your phone’s trash. However, the ability to recover a deleted file depends on several factors, such as the device you are using, the app you are using, and whether or not you have a backup of the file. If you have a backup, you can restore the file from there. Alternatively, there are also data recovery apps available that can help you retrieve deleted files, but the success of recovery may vary.
5. Can I disable the trash feature on my phone?
The ability to disable the trash feature on your phone will depend on the device and app you are using. In some cases, you may have the option to disable the trash feature by going into the app or device settings and adjusting the trash settings. However, it is important to note that disabling the trash feature means that deleted items will be permanently removed from your device without the possibility of recovery. Before disabling the trash feature, ensure that you have a backup of any files or items that you may want to recover in the future.