
If you’re an Android phone user, you’re likely familiar with the convenient feature of having a trash bin where deleted files go before they are permanently removed. However, you may be wondering how to empty that trash bin and free up storage space on your device. In this article, we will guide you through the process of emptying the trash bin on your Android phone, step by step. Whether you’re looking to delete photos, videos, documents, or any other type of file, we’ve got you covered. By the end of this article, you’ll have the knowledge and tools to keep your Android phone tidy and maximize its storage capacity. So let’s dive in and clear out that trash bin together!
Inside This Article
- Emptying the Trash Bin on Android Phone
- Accessing the Trash Bin
- Selecting and Managing Deleted Files
- Permanently Deleting Files from the Trash Bin
- Customizing Trash Bin Settings
- Conclusion
- FAQs
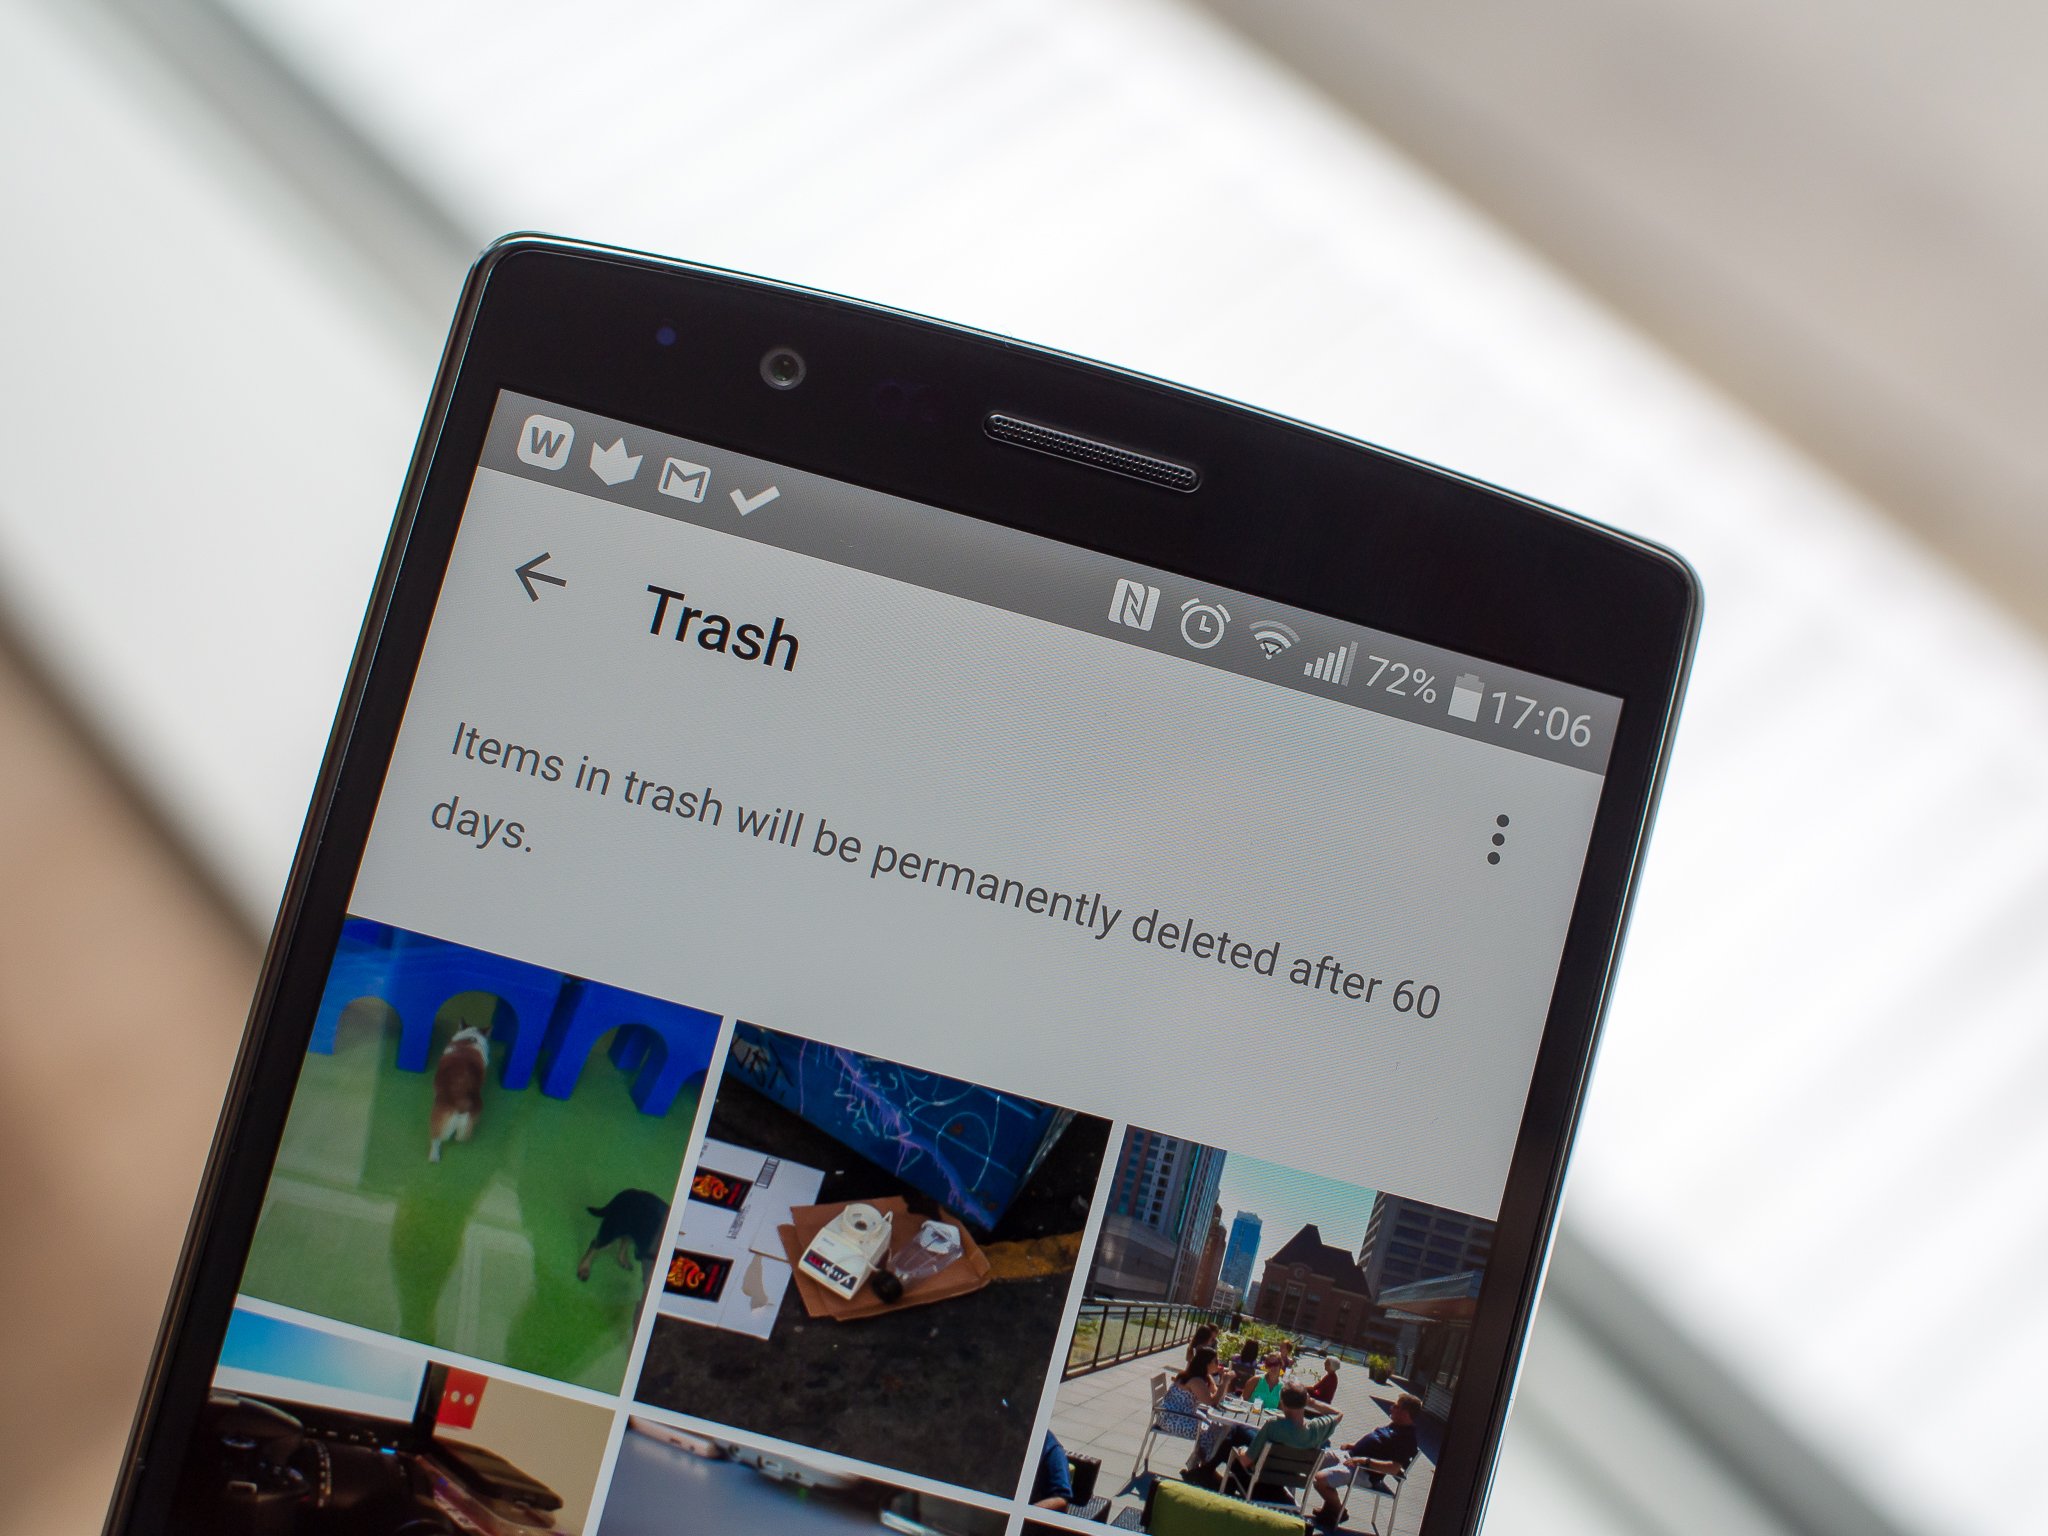
Emptying the Trash Bin on Android Phone
Most Android phones have a Trash Bin feature that works similarly to the Recycle Bin on a computer. When files are deleted from your phone, they are moved to the Trash Bin instead of being permanently deleted. This allows users to recover accidentally deleted files or items that were deleted by mistake. In this article, we will guide you on how to empty the Trash Bin on your Android phone.
To access the Trash Bin on your Android phone, you will need to follow these steps:
- Open the File Manager app on your Android phone. The name of the app may vary depending on the manufacturer, but it is commonly named “Files,” “File Manager,” or similar.
- Navigate to the “Trash” or “Recycle Bin” folder. This folder is usually located in the internal storage or SD card storage.
- Tap on the Trash Bin folder to open it. Here, you will find all the deleted files that are currently in the Trash Bin.
Once you have accessed the Trash Bin, you can select and manage the deleted files. Here’s how:
- To select a file for deletion, long-press on it to highlight it. You can select multiple files by tapping on each one.
- Once you have selected the files, tap on the “Delete” or “Empty” option. Alternatively, you can look for a trash bin icon or a delete button within the app interface.
After deleting the files from the Trash Bin, they are permanently removed from your Android phone. However, it’s important to note that once files are deleted from the Trash Bin, they cannot be recovered. Be sure to double-check which files you are deleting to avoid losing important data.
Now that you know how to empty the Trash Bin on your Android phone, it’s worth mentioning that you can customize the Trash Bin settings on some devices. This allows you to set preferences such as the duration of time a file stays in the Trash Bin before being automatically deleted. To customize the Trash Bin settings, follow these steps:
- In the File Manager app, go to the settings or options menu. Look for a gear icon or three dots in the top-right corner of the app interface.
- Navigate to the Trash Bin settings or preferences.
- Adjust the settings according to your preference. Some common options include setting the duration of time before files are permanently deleted or enabling/disabling the Trash Bin feature altogether.
By customizing the Trash Bin settings, you can optimize the storage space on your Android phone and control the retention period of deleted files.
Accessing the Trash Bin
Accidentally deleting files on your Android phone can be frustrating, but luckily, many Android devices come equipped with a Trash Bin feature that allows you to recover deleted files. To access the Trash Bin on your Android phone, follow these steps:
- Open the File Manager app on your Android phone. This app is pre-installed on most Android devices, but if you can’t find it, you can download a third-party file manager app from the Google Play Store.
- Once you have opened the File Manager app, you will see a list of folders and files on your device. Look for the “Trash” or “Recycle Bin” folder. Note that the name may vary depending on the manufacturer of your Android phone.
- Tap on the “Trash” or “Recycle Bin” folder to access it.
After following these steps, you should now be in the Trash Bin folder on your Android phone. Here, you can view and manage the files that you have recently deleted.
Selecting and Managing Deleted Files
Once you have successfully accessed the Trash Bin on your Android phone, the next step is to select and manage the deleted files. Here’s how to do it:
1. Browse through the list of deleted files: In the Trash Bin, you will find a list of all the files that you have recently deleted. Take your time to scroll through the list and locate the files that you want to manage.
2. Select files individually or in bulk: On your Android phone, you have the option to select files individually or in bulk. To select multiple files at once, tap and hold on the first file, then select the other files by tapping on them. Alternatively, you can choose the “Select all” option to mark all the files in the Trash Bin.
3. Restore or permanently delete files: After selecting the desired files, you have two options – restore or permanently delete. If you want to restore the files and bring them back to their original location, tap on the “Restore” or “Recover” button. However, if you want to permanently delete the selected files without any chance of recovery, tap on the “Delete” or “Empty” button.
4. Use file management apps for advanced options: If you require more advanced options for managing deleted files, you can consider using third-party file management apps. These apps often provide additional features such as file preview, selective recovery, and secure deletion.
5. Regularly empty the trash bin: To keep your Android phone optimized and free up storage space, it’s important to regularly empty the trash bin. Set a reminder for yourself to check the Trash Bin periodically and delete any unnecessary files that are taking up valuable storage space.
By following these steps, you can easily select and manage deleted files in the Trash Bin on your Android phone. Whether you want to restore important files or permanently delete unwanted ones, the process is straightforward and can be done in just a few taps.
Permanently Deleting Files from the Trash Bin
Once you have accessed the Trash Bin on your Android phone and selected the files you want to delete, it’s time to permanently remove them from your device. Follow the steps below to ensure that the files are permanently deleted:
1. Open the Trash Bin on your Android phone. This can usually be done by navigating to the file manager app or the storage settings on your device.
2. Select the files that you want to permanently delete from the Trash Bin. You can do this by tapping on the files and holding down to select multiple items, or by using the options menu to select all.
3. Once you have selected the files, look for the option to permanently delete or empty the Trash Bin. This option may be labeled differently depending on your device and file manager app, but it is usually located at the top or bottom of the screen.
4. Tap on the option to permanently delete or empty the Trash Bin. A confirmation message may appear asking if you are sure you want to delete the files. Confirm the action by tapping on “Yes” or “OK”.
5. Depending on the size and number of files you are deleting, it may take a few moments for the process to complete. Once the files have been permanently deleted, you will no longer be able to recover them.
6. After the files have been permanently deleted from the Trash Bin, it is a good practice to empty the device’s cache or temporary files. This will free up additional storage space on your Android phone.
7. Congratulations! You have successfully permanently deleted files from the Trash Bin on your Android phone. Make sure to regularly empty the Trash Bin to keep your device clutter-free and optimize its performance.
Customizing Trash Bin Settings
Customizing the settings of your trash bin on your Android phone can give you more control over how deleted files are managed. Here are some options you can explore:
1. Changing the retention period: By default, Android devices keep deleted files in the trash bin for a certain duration before permanently deleting them. You can adjust the retention period according to your preference. This is useful if you want to give yourself more time to restore accidentally deleted files or if you want to free up storage space more quickly.
2. Setting storage limits: Some Android phones allow you to specify a maximum size for the trash bin. This can be helpful if you have limited storage capacity on your device and want to prevent the trash bin from consuming too much space. When the limit is reached, the oldest deleted files will be automatically removed to make room for new ones.
3. Enabling or disabling automatic deletion: Depending on the settings on your Android phone, the trash bin may automatically delete files once they reach a certain age. If you want to retain deleted files for as long as possible, you can disable this feature. On the other hand, if you prefer to have a more streamlined and clutter-free trash bin, enabling automatic deletion can be beneficial.
4. Choosing file types to exclude: Some Android phones allow you to specify certain file types that should be excluded from the trash bin. This can be useful if you frequently delete files of a specific type and do not want them to take up space in the trash bin. For example, you can choose to exclude temporary files or system files from being stored in the trash bin.
5. Restoring default settings: If you have made several changes to the trash bin settings and want to revert back to the original configurations, most Android phones provide an option to restore the default settings. This allows you to start fresh and have the default retention period, storage limits, automatic deletion, and file type exclusions.
By customizing the trash bin settings on your Android phone, you can have better control over your deleted files and optimize your storage space. Explore the settings menu on your device to access these options and tailor them to your preferences.
Concluding Thoughts
Emptying the trash bin on your Android phone is a simple yet important task to keep your device running smoothly and free up valuable storage space. By following the steps outlined in this article, you can easily locate and empty the trash bin on your Android phone.
Remember to regularly check and empty your trash bin to avoid unnecessary clutter and to optimize your device’s performance. By doing so, you can ensure that your Android phone continues to operate at its best and has enough storage for all your important files and applications.
Now that you know how to empty the trash bin on your Android phone, go ahead and give it a try. Enjoy the benefits of a clutter-free device and enjoy the extra space to store your cherished memories and important data. Happy cleaning!
FAQs
1. How do I empty the trash bin on my Android phone?
To empty the trash bin on your Android phone, follow these steps:
- Open the “Gallery” or “Photos” app on your Android phone.
- Tap on the menu icon (usually represented by three dots) located in the top-right corner of the screen.
- Scroll down and look for the “Trash” or “Bin” option.
- Tap on “Trash” or “Bin” to open it.
- Select the items you want to permanently delete from the trash bin.
- Finally, tap on the “Delete” or “Empty Trash” button to remove the selected items permanently from your Android phone’s trash bin.
2. Will emptying the trash bin delete my files permanently?
Yes, emptying the trash bin on your Android phone will permanently delete the files. Once the files are removed from the trash bin, they cannot be recovered unless you have a backup stored elsewhere. It is important to double-check the items in the trash bin before emptying it to avoid any accidental deletion of important files.
3. Can I recover files that have been emptied from the trash bin on my Android phone?
No, once the files have been emptied from the trash bin on your Android phone, they cannot be recovered directly from the device. However, if you have a backup of your files stored on external storage or cloud services, you may be able to restore them from there. It’s always a good practice to regularly back up your important files to avoid permanent data loss.
4. Are there any third-party apps available to manage the trash bin on Android phones?
Yes, there are various third-party apps available on the Google Play Store that can help you manage the trash bin on your Android phone. These apps provide additional features, such as restoring deleted files, setting up automatic cleanup, and organizing deleted items. Some popular apps in this category include Dumpster, Recycle Master, and Files by Google.
5. Is it necessary to empty the trash bin regularly on my Android phone?
Emptying the trash bin regularly on your Android phone is not absolutely necessary, as the system usually manages the storage and deletes the oldest items when it needs more space. However, it is a good practice to review the items in the trash bin periodically and delete any files that you no longer need. This can help free up storage space on your device and keep it clutter-free.