
Emergencies can happen unexpectedly, and having a reliable way to reach out for help is crucial. Fortunately, Android devices offer a feature that allows you to set emergency contacts directly on your phone. By specifying emergency contacts, you can ensure that your loved ones or trusted individuals are easily reachable during times of need.
In this article, we will explore how to set emergency contacts on your Android device. Whether you’re using the latest version of Android or an older one, we’ve got you covered. We’ll walk you through the steps to add, edit, and remove emergency contacts, providing you with the knowledge to make the most of this essential feature.
So, let’s dive in and discover how to set up emergency contacts on your Android device, ensuring peace of mind and a reliable support system at your fingertips.
Inside This Article
- How to Set Emergency Contacts on Android
- Accessing the Emergency Contacts Setting
- Adding Contacts to Emergency Contacts List
- Editing and Deleting Emergency Contacts
- Setting Up Emergency Contact Information on Lock Screen
- Conclusion
- FAQs
How to Set Emergency Contacts on Android
Having emergency contact information readily available on your Android device is crucial for your safety and well-being. In case of an emergency, it allows others to quickly reach out to your designated contacts for help. Fortunately, setting emergency contacts on Android is a simple and straightforward process. In this article, we will guide you through the steps to set up emergency contacts on your Android device.
1. Accessing the Emergency Contacts Setting
The first step is to access the emergency contacts setting on your Android device. Follow these steps:
- Open the “Settings” app on your Android device.
- Scroll down and select the “About phone” or “About device” option.
- Look for the “Emergency information” or “Emergency” section and tap on it.
- On some devices, you may need to tap on “Emergency calls” or a similar option to access the emergency contacts setting.
2. Adding Contacts to Emergency Contacts List
Once you have accessed the emergency contacts setting, you can start adding contacts to the emergency contacts list. Here’s how:
- Tap on the “Edit” or “Add” button to begin adding contacts.
- Choose a contact from your phone’s existing contacts list or add a new one by tapping on the “Create contact” option.
- Enter the necessary information for the contact, including name, phone number, and any additional details you deem relevant.
- Save the contact and repeat the process to add more emergency contacts if desired.
3. Editing and Deleting Emergency Contacts
If you need to edit or delete a contact from your emergency contacts list, follow these steps:
- Go back to the emergency contacts setting in the “Settings” app.
- Tap on the contact you wish to edit or delete.
- Choose the appropriate option, such as “Edit contact” or “Delete contact.”
- Follow the on-screen prompts to make the necessary changes or remove the contact from your list.
4. Setting Up Emergency Contact Information on Lock Screen
In addition to adding emergency contacts to your device’s settings, you can also set up emergency contact information on your lock screen. This way, even if your phone is locked, emergency responders or Good Samaritans can access your emergency contacts.
Follow these steps to set up emergency contact information on your lock screen:
- Go to the “Settings” app on your Android device.
- Select the “Security” or “Lock screen” option.
- Look for an option called “Emergency info” or “Owner info” and tap on it.
- Enter the necessary contact information, such as emergency contacts, allergies, medical conditions, and any other relevant details.
- Save the changes, and the emergency contact information will now be displayed on your lock screen.
By following these steps, you can easily set up emergency contacts on your Android device and ensure that vital information is readily accessible during emergencies. It’s important to periodically review and update your emergency contacts list to ensure its accuracy in times of need.
Remember to provide accurate and up-to-date emergency contact information to ensure the safety and well-being of yourself and others around you.
Accessing the Emergency Contacts Setting
Setting up emergency contacts on your Android device is an important step to ensure that your loved ones can be easily reached in case of an emergency situation. To access the emergency contacts setting, follow these simple steps:
- Unlock your Android device and go to the home screen.
- Swipe down from the top of the screen to open the notification shade.
- Tap on the gear icon in the upper right corner to open the settings menu.
- Scroll down the settings menu and locate the “Users & accounts” option.
- Tap on ‘Users & accounts’ to open the submenu.
- From the submenu, find and tap on the “Emergency Information” or “Emergency Contacts” option.
- You may be prompted to enter your device’s password or use biometric authentication to proceed.
- Once you’re in the Emergency Contacts settings, you’re ready to add your emergency contacts.
Now that you know how to access the Emergency Contacts setting on your Android device, let’s move on to the next step of adding contacts to your emergency contacts list.
Adding Contacts to Emergency Contacts List
Adding emergency contacts to your Android device is a simple process that can provide vital information to first responders or helpful individuals in case of an emergency. Follow these steps to add contacts to your emergency contacts list:
1. Open the Contacts app on your Android device. This app is often represented by an icon resembling a person or a silhouette.
2. Find the contact you want to add to your emergency contacts list. You can either search for the contact by typing their name in the search bar or browse through your existing contacts list.
3. Once you have found the contact, tap on their name to open their contact details.
4. Tap on the three-dot menu icon located at the top-right corner of the screen. This will open a drop-down menu with various options.
5. From the drop-down menu, select the option that says “Add to emergency contacts” or a similar option related to emergency contacts. The exact wording may vary depending on the manufacturer and version of your Android device.
6. After selecting the appropriate option, you may be prompted to confirm your choice. Follow any additional prompts or instructions provided by the system.
7. Repeat these steps for each contact you wish to add to your emergency contacts list.
Once you have added the contacts to your emergency contacts list, they will be easily accessible in case of an emergency. It’s important to note that these contacts can be accessed even if your device is locked, allowing others to quickly help you in times of need.
Remember to update your emergency contacts list periodically, especially if there are any changes in contact information or if you wish to include additional contacts.
Adding emergency contacts to your Android device is a proactive step that ensures your safety and provides peace of mind. Take a few moments to set up your emergency contacts list today, and be prepared for any unforeseen circumstances that may arise.
Editing and Deleting Emergency Contacts
Once you have added emergency contacts to your Android device, there may come a time when you need to edit or delete them. Thankfully, the process is simple and straightforward. Here’s how you can do it:
1. Open the Contacts app on your Android device. This can usually be found on your home screen or in the app drawer.
2. Scroll through your contacts until you find the entry for the emergency contact you want to edit or delete.
3. Tap on the contact’s name to open their contact details.
4. To edit the contact’s information, tap on the “Edit” button or the pencil icon. This will allow you to make changes to the contact’s name, phone number, and other details.
5. To delete the contact from the emergency contacts list, tap on the “Delete” button or the trash can icon. You will usually be asked to confirm the deletion before it is finalized.
6. After editing or deleting the contact, make sure to save the changes by tapping on the “Save” button or the check mark icon.
7. Repeat these steps for any other emergency contacts you want to edit or delete.
By following these steps, you can easily manage your emergency contacts on your Android device. Whether you need to update their information or remove them from the list, you have the flexibility to make necessary changes as needed.
Setting Up Emergency Contact Information on Lock Screen
In case of an emergency, it’s crucial to have your emergency contact information readily accessible even if your phone is locked. Android devices allow you to display this information directly on your lock screen, making it easier for someone to reach out to your designated contacts when you need help the most.
To set up your emergency contact information on the lock screen, follow these steps:
- Go to the “Settings” menu on your Android device.
- Scroll down and select the “Security” or “Lock Screen” option.
- Look for the “Emergency Information” or “Emergency Contacts” section.
- Tap on it to access the emergency contact settings.
- Here, you’ll find options to add the necessary information such as your name, blood type, allergies, and medical conditions.
- Scroll further to find the “Emergency Contacts” section.
- Tap on the “Add Contact” button to select a contact from your phone’s contact list.
- You can add multiple emergency contacts by tapping on the “Add Contact” button again.
- For each contact, you can designate their relationship to you, such as “Spouse,” “Parent,” or “Friend.”
- Make sure to include their phone numbers as well.
Once you have entered all the necessary information and added your emergency contacts, it’s time to test how it appears on your lock screen.
- Lock your phone screen by pressing the power button.
- Wake up your device by pressing the power button or the home button, depending on your phone model and settings.
- You should see an “Emergency” or “Emergency Call” button on the lock screen.
- Tap on this button to reveal the emergency information and contacts you have set up.
- Anyone who finds your phone or needs to assist you in an emergency can now easily access this information without unlocking your device.
Remember, it’s important to update your emergency contact information regularly to ensure its accuracy. Always notify your chosen emergency contacts that they are listed and provide them with any necessary details they may need to assist you in an emergency.
By setting up your emergency contact information on your Android lock screen, you can have peace of mind knowing that help is just a glance away when you need it most.
The ability to set emergency contacts on your Android device is a valuable feature that can provide an added layer of security and peace of mind. By following the steps outlined in this guide, you can ensure that your emergency contacts are easily accessible in case of an emergency.
Having the option to set emergency contacts allows first responders or anyone who finds your phone to quickly reach out to your designated contacts and inform them of the situation. This can be especially helpful if you are in a medical emergency or in a situation where you might not be able to communicate for yourself.
Remember, taking the time to set up emergency contacts on your Android device is a simple yet significant step towards ensuring your safety. No one wants to think about emergencies, but being prepared can make all the difference. Stay safe!
FAQs
1. How do I set an emergency contact on my Android device?
To set an emergency contact on your Android device, follow these steps:
- Open the “Settings” app on your Android device.
- Scroll down and tap on “Users & accounts.”
- Select your user profile from the list.
- Scroll down to find the “Emergency information” section and tap on it.
- Tap on “Add contact” under the “Emergency contacts” section.
- Select a contact from your phonebook or add a new contact by tapping on the “+” button.
- Once you’ve selected the contact, you can add their relationship with you and any additional information like allergies or medical conditions.
- Save the contact, and it will be set as your emergency contact on your Android device.
2. Can I have multiple emergency contacts on my Android device?
Yes, you can add multiple emergency contacts on your Android device. When following the steps mentioned in the previous question, instead of tapping on “Add contact” under the “Emergency contacts” section, tap on the “+” button again to add another contact. You can repeat this process to add as many emergency contacts as you need.
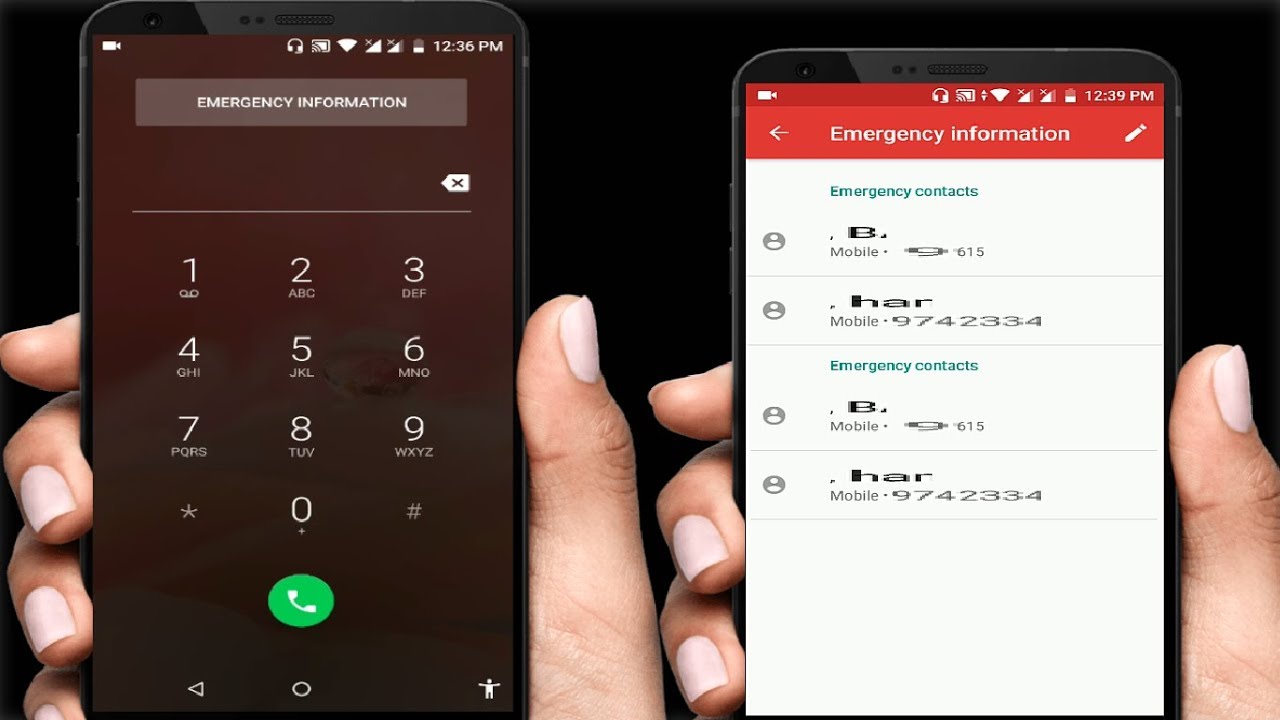
3. How can I access emergency contact information on my locked Android device?
In case of an emergency, you can access emergency contact information on your locked Android device by following these steps:
- On the lock screen, swipe up or press the power button to wake your device.
- On the lock screen, tap on the “Emergency” or “Emergency call” button.
- Tap on “Emergency information” or a similar option based on your device.
- You will find the emergency contact(s) you have set, along with any additional information like allergies or medical conditions.
4. Can emergency contacts be accessed from any Android device?
No, emergency contacts can only be accessed from the Android device on which you have set them. The emergency contacts and information are linked to your specific device and are not synced or accessible from other Android devices.
5. Can I set emergency contacts on my Android device without a lock screen?
Yes, you can set emergency contacts on your Android device even if you do not have a lock screen set up. Simply follow the steps mentioned in the first question, and the emergency contact information will still be accessible from the lock screen if you choose to set up a lock screen later on.