
Have you ever found yourself in a situation where the subject of your photo is perfectly framed, but the exposure just doesn’t seem right? Or maybe you want to lock the focus on a specific area of the image while adjusting the exposure separately? With the latest iOS 14 update, Apple has introduced a powerful feature that allows users to lock focus and exposure separately with just a few taps. This article will guide you through the steps to use this feature effectively and capture stunning photos with your iOS device. So, whether you’re an amateur photographer or a seasoned pro, let’s dive in and learn how to take full control of your focus and exposure settings in iOS 14.
Inside This Article
- How to Lock Focus and Exposure Separately in iOS 14
- # 1. Enabling Separate Controls for Focus and Exposure
- Locking Focus in iOS 14
- # 3. Locking Exposure in iOS 14
- # 4. Unlocking Focus and Exposure in iOS 14
- Conclusion
- FAQs
How to Lock Focus and Exposure Separately in iOS 14
One of the great features introduced in iOS 14 is the ability to lock focus and exposure separately in the native Camera app. This allows users to precisely control the focus and exposure settings when capturing photos or recording videos. In this article, we will explore how to take advantage of this feature and capture stunning shots with your iPhone.
1. Enabling Separate Controls for Focus and Exposure
The first step to lock focus and exposure separately is to enable the feature in your iPhone settings. To do this, follow these steps:
- Open the Settings app on your iPhone.
- Scroll down and tap on “Camera”.
- Toggle on the “Separate Focus and Exposure” option.
Once you have enabled this feature, you will be able to lock focus and exposure independently when using the Camera app.
2. Locking Focus in iOS 14
To lock the focus on a specific subject, follow these steps:
- Open the Camera app on your iPhone.
- Tap on the area of the screen where you want to set the focus.
- Hold your finger on the screen until you see the yellow square appear, indicating that the focus is locked.
Once the focus is locked, you can recompose your shot without worrying about losing focus on your subject. This is particularly useful for capturing photos of moving subjects or when shooting in low-light conditions.
3. Locking Exposure in iOS 14
Locking exposure allows you to preserve the brightness level in a specific area of the frame, which is especially handy when dealing with situations where the lighting conditions change constantly. To lock the exposure, follow these steps:
- Open the Camera app and frame your shot.
- Tap on the area of the screen that you want to set the exposure.
- Hold your finger on the screen until the sun icon appears, indicating that the exposure is locked.
Locking the exposure helps ensure that your photos or videos are consistent in terms of brightness, even if the lighting conditions change during the capture.
4. Unlocking Focus and Exposure in iOS 14
If you want to revert back to automatic focus and exposure, it’s easy to unlock them. Simply tap anywhere on the screen to reset both the focus and exposure settings to their automatic mode.
By unlocking focus and exposure separately, you have better control over the outcome of your shots, allowing you to capture more professional looking photos and videos with your iPhone in iOS 14.
# 1. Enabling Separate Controls for Focus and Exposure
With the release of iOS 14, Apple has introduced a new feature that allows users to lock focus and exposure separately when taking photos or videos. This feature gives photographers and videographers greater control over their shots, ensuring that both focus and exposure remain constant, even if the lighting conditions change.
Enabling separate controls for focus and exposure in iOS 14 is a simple process. Here’s how you can do it:
- Open the Camera app on your iOS device.
- Tap on the screen to focus on your subject.
- A yellow square will appear to indicate the focus point. You can also drag the yellow square to a different area if needed.
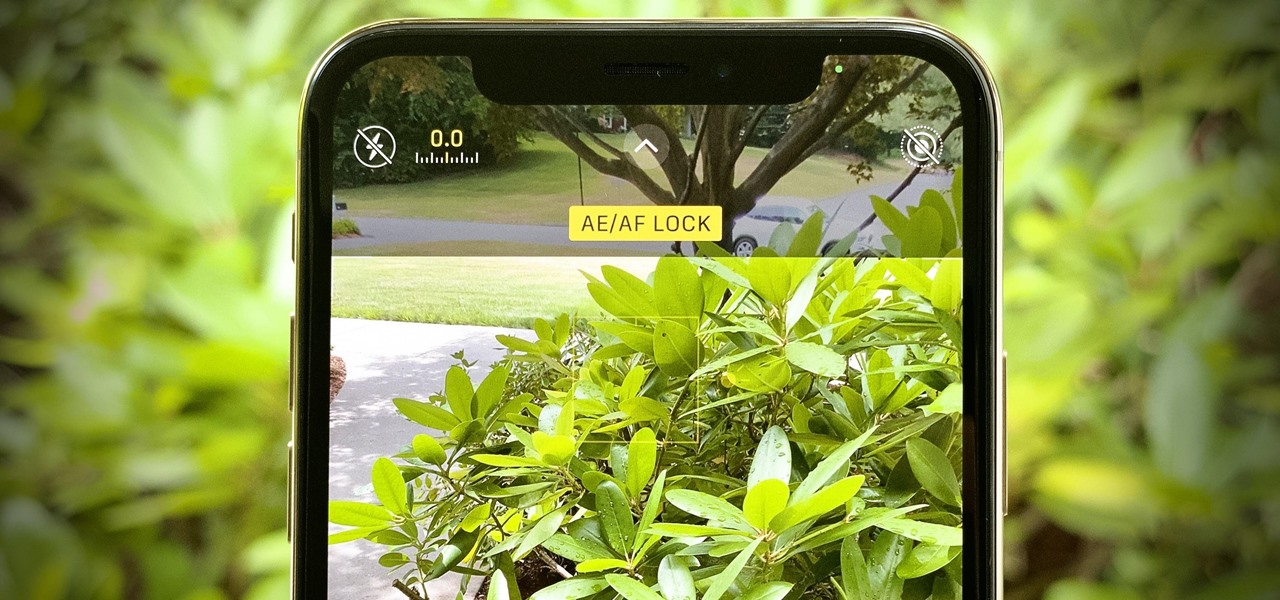
- Next, tap and hold on the screen until you see the “AE/AF Lock” banner appear at the top of the screen.
- When the banner appears, you’ll notice two separate sliders: one for focus and one for exposure.
- Now, you can adjust the focus and exposure independently by dragging the respective sliders left or right.
Once you have locked the focus and exposure settings, you can be confident that they will remain constant, even if you change the composition or lighting conditions. This is particularly useful in situations where you want to capture a specific subject or scene with consistent focus and exposure.
Please note that the separate controls for focus and exposure are available on iPhones and iPads running iOS 14 or later. Older iOS versions may not have this feature.
Now that you know how to enable separate controls for focus and exposure in iOS 14, you can take your photography and videography skills to the next level. Experiment with different compositions, lighting conditions, and subjects, knowing that you have the control and flexibility to capture your vision with precision.
Locking Focus in iOS 14
One of the features introduced in iOS 14 is the ability to lock focus and exposure separately. This allows users to have more control over their photography and ensures that the desired elements remain in focus, even if there are changes in lighting conditions.
To lock focus in iOS 14, follow these simple steps:
- Launch the Camera app on your iPhone running iOS 14.
- Frame your shot and tap on the screen to set the focus point.
- Once the focus is set, you’ll notice a yellow box or square indicating the focus area.
- Now, to lock the focus, press and hold on the screen until you see the text “AE/AF Lock” or “Lock” appear at the top of the screen.
- The focus is now locked, and you can reposition the camera without losing the focus point.
By locking focus, you can ensure that your subject remains sharp and in focus, even if you move the camera or if there are changes in the distance between the camera and the subject. This is particularly useful in situations where you want to maintain focus on a specific subject, such as capturing a portrait or shooting macro photography.
It’s important to note that locking focus in iOS 14 can be overridden by tapping on a different area of the screen or if significant changes occur within the frame. However, for most scenarios, locking focus provides a simple and effective way to ensure sharp and well-focused images.
Now that you know how to lock focus in iOS 14, let’s move on to learning how to lock exposure separately.
# 3. Locking Exposure in iOS 14
One of the camera features in iOS 14 that users often find helpful is the ability to lock exposure separately from focus. This feature allows you to maintain a consistent exposure setting even when you move the camera or your subject moves. Locking exposure ensures that your photos and videos have the desired brightness level, regardless of lighting changes in the scene.
To lock exposure in iOS 14, follow these simple steps:
- Open the Camera app on your iPhone or iPad running on iOS 14.
- Tap on the screen to set the focus point.
- Once the focus is set, you will see a yellow square indicating the focus point.
- Next, swipe up or down on the screen to adjust the exposure manually.
- When you have achieved the desired exposure, tap and hold on the screen for a moment until you see “AE/AF Lock” at the top of the screen.
Now, the exposure is locked, and you can recompose your shot or even move the camera around while maintaining the same exposure level. This is especially useful in situations where the lighting conditions are changing or when you want to capture consistent exposure for a series of shots.
If you need to adjust the exposure again while it’s locked, simply tap on the screen to release the lock, and then repeat the above steps to lock it again with the desired exposure settings.
It’s worth noting that locking the exposure also locks the white balance, which means that the color temperature of your photos or videos will remain consistent as well. This ensures that your shots have uniform color representation, even in varying lighting conditions.
Unlocking the exposure in iOS 14 is as easy as tapping anywhere on the screen. This will release the lock, and the camera will revert to its automatic exposure mode, adjusting the exposure based on the current f
# 4. Unlocking Focus and Exposure in iOS 14
Unlocking the focus and exposure in iOS 14 is as simple as tapping on the screen. When you are ready to unlock the focus and exposure settings and allow them to adjust automatically, you just need to tap anywhere on the screen. This will release the lock and let the camera recalibrate the focus and exposure based on the new subject or lighting conditions.
If you have previously locked the focus and exposure separately, tapping on the screen will unlock both settings simultaneously. The camera will then use its default automatic focus and exposure settings to ensure optimal results for your photos and videos.
Keep in mind that when unlocking the focus and exposure, the camera will prioritize the subject’s focus and adjust the exposure accordingly. It will analyze the scene and make adjustments based on factors like brightness levels, contrast, and the overall composition of the image.
If you want to have full control over the focus and exposure again, you can repeat the steps mentioned earlier to lock them separately. Simply tap and hold on the screen until you see the yellow square for focus lock, and the sun icon for exposure lock. This will allow you to manually adjust and lock the focus and exposure settings based on your specific preferences.
By understanding how to unlock the focus and exposure in iOS 14, you can take advantage of the camera’s smart capabilities while still having the option to fine-tune your photography or videography skills. Experiment with different settings and techniques to capture remarkable shots that truly reflect your creative vision.
Conclusion
In conclusion, the ability to lock focus and exposure separately in iOS 14 is a game-changer for iPhone photographers. Being able to control these two aspects independently allows for more creative freedom and better control over the image quality. Whether you’re capturing a stunning landscape or a fast-moving subject, this feature empowers you to capture the perfect shot with ease.
iOS 14 has introduced enhancements not only in terms of user experience but also in providing professional-level tools for photography enthusiasts. The separate focus and exposure lock feature is just one example of how Apple is constantly improving its camera capabilities.
So if you’re an iPhone user who loves photography, make sure to update your device to iOS 14 and take advantage of this fantastic feature. Unlock your creative potential and capture stunning images like never before.
FAQs
1. Can I lock focus and exposure separately on my iPhone with iOS 14?
Yes, with iOS 14, you can now lock focus and exposure separately on your iPhone. This allows you to have more control over your photos and videos, ensuring the perfect balance of light and clarity.
2. How do I lock focus and exposure separately on my iPhone?
To lock focus and exposure separately on your iPhone, follow these steps:
– Open the Camera app.
– Tap on the area of the viewfinder where you want to lock the focus.
– Then, press and hold on the screen until you see AE/AF Lock appear at the top of the screen. This indicates that both focus and exposure are locked.
– If you want to adjust the exposure separately, swipe up or down on the screen to increase or decrease the exposure level.
3. Can I adjust the locked focus and exposure settings?
Yes, you can readjust the locked focus and exposure settings. Simply tap on the area of the viewfinder where you want to change the focus or exposure, and the camera will readjust accordingly. You can also swipe up or down on the screen to adjust the exposure level after locking focus.
4. Why would I want to lock focus and exposure separately?
Locking focus and exposure separately can be particularly useful in situations with challenging lighting conditions or when you want to focus on a specific subject in the frame. It gives you more control over the technical aspects of the photo, resulting in better composition and overall image quality.
5. Does locking focus and exposure separately impact video recording?
Yes, you can also lock focus and exposure separately when recording videos on your iPhone. By doing so, you ensure that the focus and exposure remain consistent throughout the recording, providing a more professional and polished look to your videos.